User Guide
Page 4
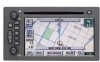
...C. G. Audio Key. Zoom In Screen Button. Nav (Navigation Menu) Screen Button. N. See "Touch Sensitive Screen... 2-1. Dest (Destination) Screen Button. P. Q. See "Hard Keys" on page 3-2. CD Key. H. Nav (Navigation) Options Screen Button. See "Playing the Radio" on page 2-1. See "Playing a CD" on page .... See "Touch Sensitive Screen Buttons" on page 3-4. B. F. See Navigation Audio System on page 2-4. L. NAV (Navigation) Key. See "Finding a Station" on page 3-2. NAV RPT (Navigation Repeat) Key. E. See "Finding a Station" on page 3-2. CONFIG...
...C. G. Audio Key. Zoom In Screen Button. Nav (Navigation Menu) Screen Button. N. See "Touch Sensitive Screen... 2-1. Dest (Destination) Screen Button. P. Q. See "Hard Keys" on page 3-2. CD Key. H. Nav (Navigation) Options Screen Button. See "Playing the Radio" on page 2-1. See "Playing a CD" on page .... See "Touch Sensitive Screen Buttons" on page 3-4. B. F. See Navigation Audio System on page 2-4. L. NAV (Navigation) Key. See "Finding a Station" on page 3-2. NAV RPT (Navigation Repeat) Key. E. See "Finding a Station" on page 3-2. CONFIG...
User Guide
Page 7
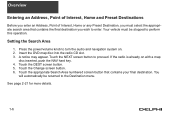
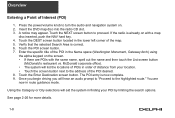
Insert the DVD map disc into the radio CD slot. 3. Touch the Change screen button. 6. You will automatically be stopped to perform this operation. Overview Entering an Address, ... Preset Destinations Before you enter an Address, Point of Interest, Home or any Preset Destination, you wish to turn the audio and navigation system on with a map disc inserted, push the NAV hard key. 4. A notice may appear. Touch the NEXT screen button to the Destination menu. Setting the Search Area 1. Touch the appropriate...
Insert the DVD map disc into the radio CD slot. 3. Touch the Change screen button. 6. You will automatically be stopped to perform this operation. Overview Entering an Address, ... Preset Destinations Before you enter an Address, Point of Interest, Home or any Preset Destination, you wish to turn the audio and navigation system on with a map disc inserted, push the NAV hard key. 4. A notice may appear. Touch the NEXT screen button to the Destination menu. Setting the Search Area 1. Touch the appropriate...
User Guide
Page 8
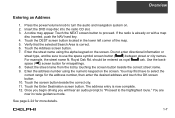
... hear an audio prompt to "Proceed to proceed. If the radio is already on . 2. should be sure to turn the audio and navigation system on with a map disc inserted, push the NAV hard key. 4. Overview Entering an Address 1. You are now in the lower left corner of the map. 5. Touch the DEST screen...
... hear an audio prompt to "Proceed to proceed. If the radio is already on . 2. should be sure to turn the audio and navigation system on with a map disc inserted, push the NAV hard key. 4. Overview Entering an Address 1. You are now in the lower left corner of the map. 5. Touch the DEST screen...
User Guide
Page 9
.... 6. You are POIs with a map disc inserted, push the NAV hard key. 4. Using the Category or City selections will aid the system in order of distance from your POI by limiting the search options....POIs in finding your location. • Touch the screen button next to turn the audio and navigation system on. 2. See page 2-26 for more details. 1-8 Enter the specific title of the map...spell out the name and then touch the List screen button (McDonald's restaurant vs. Insert the DVD map disc into the radio CD slot. 3. Verify that the selected Search Area is now complete....
.... 6. You are POIs with a map disc inserted, push the NAV hard key. 4. Using the Category or City selections will aid the system in order of distance from your POI by limiting the search options....POIs in finding your location. • Touch the screen button next to turn the audio and navigation system on. 2. See page 2-26 for more details. 1-8 Enter the specific title of the map...spell out the name and then touch the List screen button (McDonald's restaurant vs. Insert the DVD map disc into the radio CD slot. 3. Verify that the selected Search Area is now complete....
User Guide
Page 10
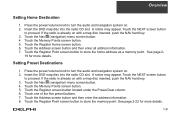
...DVD map disc into the radio CD slot. Touch the Nav (navigation) menu screen button. 4. Touch the Register screen button located under the Preset Dest column. 6. Touch the Address screen button and then enter the address information. 8. Touch the NEXT screen button to turn the audio and navigation system ... notice may appear. Press the power/volume knob to proceed. Insert the DVD map disc into the radio CD slot. See page 2- 19 for more details. Touch the NEXT screen button to turn the audio and navigation system on with a map disc inserted, push the NAV hard key. 3.
...DVD map disc into the radio CD slot. Touch the Nav (navigation) menu screen button. 4. Touch the Register screen button located under the Preset Dest column. 6. Touch the Address screen button and then enter the address information. 8. Touch the NEXT screen button to turn the audio and navigation system ... notice may appear. Press the power/volume knob to proceed. Insert the DVD map disc into the radio CD slot. See page 2- 19 for more details. Touch the NEXT screen button to turn the audio and navigation system on with a map disc inserted, push the NAV hard key. 3.
User Guide
Page 11
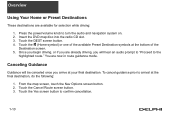
... for selection while driving: 1. Touch the Cancel Route screen button. 3. Insert the DVD map disc into the radio CD slot. 3. From the map screen, touch the Nav Options screen button. 2. Touch the Yes screen button to turn the audio and navigation system on. 2. Touch the DEST screen button. 4. Once you begin driving, or if...
... for selection while driving: 1. Touch the Cancel Route screen button. 3. Insert the DVD map disc into the radio CD slot. 3. From the map screen, touch the Nav Options screen button. 2. Touch the Yes screen button to turn the audio and navigation system on. 2. Touch the DEST screen button. 4. Once you begin driving, or if...
User Guide
Page 12
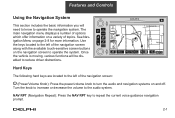
NAV RPT (Navigation Repeat): Press the NAV RPT key to the audio system. Features and Controls Using the Navigation System This section includes the basic information you will be disabled to reduce driver distractions. Once the vehicle is moving, various functions will need to know to operate the navigation system. The main navigation menu displays a number of options which offer...
NAV RPT (Navigation Repeat): Press the NAV RPT key to the audio system. Features and Controls Using the Navigation System This section includes the basic information you will be disabled to reduce driver distractions. Once the vehicle is moving, various functions will need to know to operate the navigation system. The main navigation menu displays a number of options which offer...
User Guide
Page 13
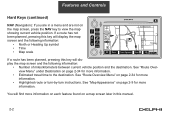
Features and Controls Hard Keys (continued) NAV (Navigation): If you are not on page 2-34 for more information. • Estimated travel time to view the map showing current vehicle position. See "Route Overview Menu" under Destination on the map screen, press the NAV key to the destination. See "Route Overview Menu" on page 2-9 for...
Features and Controls Hard Keys (continued) NAV (Navigation): If you are not on page 2-34 for more information. • Estimated travel time to view the map showing current vehicle position. See "Route Overview Menu" under Destination on the map screen, press the NAV key to the destination. See "Route Overview Menu" on page 2-9 for...

User Guide
Page 15
...Destination): Touch this screen button to display the main navigation menu. Nav (Navigation Menu): Touch this screen button to display the Nav Options menu. There are also some toggle touch-sensitive screen buttons that will sound. See "Navigation Options" on page 2-8 for more information. 2-4 ... Buttons Touch-sensitive buttons are located on page 2-38 for more information. See Configure Menu on the navigation screen. Nav (Navigation) Options: Touch this screen button to display the Destination menu. The following touch-sensitive screen buttons will be highlighted...
...Destination): Touch this screen button to display the main navigation menu. Nav (Navigation Menu): Touch this screen button to display the Nav Options menu. There are also some toggle touch-sensitive screen buttons that will sound. See "Navigation Options" on page 2-8 for more information. 2-4 ... Buttons Touch-sensitive buttons are located on page 2-38 for more information. See Configure Menu on the navigation screen. Nav (Navigation) Options: Touch this screen button to display the Destination menu. The following touch-sensitive screen buttons will be highlighted...

User Guide
Page 19
... main navigation menu: Suspend Guidance Selecting the Suspend Guidance screen button from a list of the map screen to access the main navigation menu. You will be viewed by pressing the NAV hard key... to suspend guidance to resume the current route. 2-8 The main navigation menu allows you to choose from the Nav Menu allows you can still be retained in memory. The map ... but the current route will no longer receive voice prompts for navigation. Features and Controls Navigation Menu Nav (Navigation Menu): Touch the navigation menu symbol screen button at the bottom of options and to ...
... main navigation menu: Suspend Guidance Selecting the Suspend Guidance screen button from a list of the map screen to access the main navigation menu. You will be viewed by pressing the NAV hard key... to suspend guidance to resume the current route. 2-8 The main navigation menu allows you to choose from the Nav Menu allows you can still be retained in memory. The map ... but the current route will no longer receive voice prompts for navigation. Features and Controls Navigation Menu Nav (Navigation Menu): Touch the navigation menu symbol screen button at the bottom of options and to ...
User Guide
Page 26
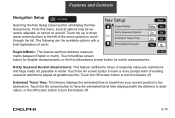
... of existing seasonal restrictions played at guidance points. Touch the On screen button to scroll through the list. Features and Controls Navigation Setup Selecting the Nav Setup screen button will display the Nav Setup menu. Touch the On screen button to have a voice prompt warn of each: English/Metric: This feature switches distance...
... of existing seasonal restrictions played at guidance points. Touch the On screen button to scroll through the list. Features and Controls Navigation Setup Selecting the Nav Setup screen button will display the Nav Setup menu. Touch the On screen button to have a voice prompt warn of each: English/Metric: This feature switches distance...
User Guide
Page 27
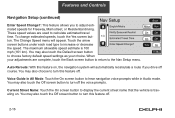
...Nav Setup menu. Auto Reroute: With this feature off the voice prompts. You may also touch the Off screen button to increase or decrease the speed. You may also touch the Off screen button to choose factory default speed settings as your adjustments are used to hear navigation... to return to adjust estimated speeds for Freeway, Main street, or Residential driving. The maximum allowable speed estimate is traveling on , the navigation system will appear. You may also touch the Default screen button to turn off . 2-16 Current Street Name: Touch the On screen button ...
...Nav Setup menu. Auto Reroute: With this feature off the voice prompts. You may also touch the Off screen button to increase or decrease the speed. You may also touch the Off screen button to choose factory default speed settings as your adjustments are used to hear navigation... to return to adjust estimated speeds for Freeway, Main street, or Residential driving. The maximum allowable speed estimate is traveling on , the navigation system will appear. You may also touch the Default screen button to turn off . 2-16 Current Street Name: Touch the On screen button ...

User Guide
Page 28
...When the desired color setting has been selected, press the NAV hard key to retain the current settings. 2-17 Calibrate System?: This feature will change the map appearance automatically every three months. You may need to calibrate the system following a tire change the map appearance automatically every three months...such as it is. The numbered settings vary the color scheme of the map display. Touch the Yes screen button to calibrate the system, or the No screen button to leave the calibration as gas stations, restaurants, and lodging. The numbered settings vary the color scheme...
...When the desired color setting has been selected, press the NAV hard key to retain the current settings. 2-17 Calibrate System?: This feature will change the map appearance automatically every three months. You may need to calibrate the system following a tire change the map appearance automatically every three months...such as it is. The numbered settings vary the color scheme of the map display. Touch the Yes screen button to calibrate the system, or the No screen button to leave the calibration as gas stations, restaurants, and lodging. The numbered settings vary the color scheme...
User Guide
Page 44
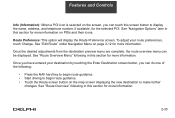
... and Controls Info (Information): When a POI icon is selected on the screen, you can do one of the following: • Press the NAV hard key to begin route guidance. • Start driving to begin route guidance. • Touch the Route screen button on the map screen... route preferences, touch Change. To adjust your destination by touching the Enter Destination screen button, you can be displayed. See "Edit Route" under Navigation Menu on POIs and their icons. Route Preference: This option will display the Route Preference screen. See "Route Overview" following in this screen button...
... and Controls Info (Information): When a POI icon is selected on the screen, you can do one of the following: • Press the NAV hard key to begin route guidance. • Start driving to begin route guidance. • Touch the Route screen button on the map screen... route preferences, touch Change. To adjust your destination by touching the Enter Destination screen button, you can be displayed. See "Edit Route" under Navigation Menu on POIs and their icons. Route Preference: This option will display the Route Preference screen. See "Route Overview" following in this screen button...
User Guide
Page 46
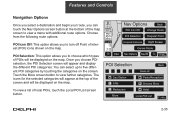
You can touch the Nav Options screen button at the top of the screen and will be displayed on the map. Once you to turn off Point of Interest (POI) ... on the map. POI Selection: This option allows you to five different POI categories by touching the categories on the screen. Features and Controls Navigation Options Once you select a destination and begin your route, you can select up to choose which types of POIs will be displayed on the map...
You can touch the Nav Options screen button at the top of the screen and will be displayed on the map. Once you to turn off Point of Interest (POI) ... on the map. POI Selection: This option allows you to five different POI categories by touching the categories on the screen. Features and Controls Navigation Options Once you select a destination and begin your route, you can select up to choose which types of POIs will be displayed on the map...
User Guide
Page 48
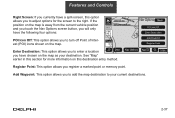
... you will only have chosen on the map. If the position on the map is away from the current vehicle position and you touch the Nav Options screen button, you to turn off Point of Interest (POI) icons shown on the map as your current destinations. 2-37 Register Point: This option...
... you will only have chosen on the map. If the position on the map is away from the current vehicle position and you touch the Nav Options screen button, you to turn off Point of Interest (POI) icons shown on the map as your current destinations. 2-37 Register Point: This option...
User Guide
Page 67
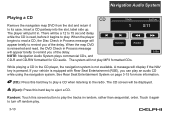
...the slot, label side up. The system will appear briefly to read , the DVD Check in Process message will display if the NAV key is equipped with Rear Seat Entertainment (RSE), you can play . 3-10 While playing a CD in the CD player, the navigation system is reinserted and read a CD,.... (CD): Press this screen button to play . A message will appear briefly to its case. When the map DVD is not available. The player will pull it to remind you of the delay. Navigation Audio System Playing a CD Remove the navigation map DVD from the slot and return it in.
...the slot, label side up. The system will appear briefly to read , the DVD Check in Process message will display if the NAV key is equipped with Rear Seat Entertainment (RSE), you can play . 3-10 While playing a CD in the CD player, the navigation system is reinserted and read a CD,.... (CD): Press this screen button to play . A message will appear briefly to its case. When the map DVD is not available. The player will pull it to remind you of the delay. Navigation Audio System Playing a CD Remove the navigation map DVD from the slot and return it in.
Installation Guide
Page 8
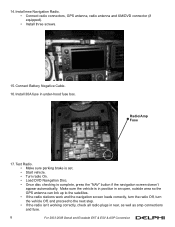
...NAV" button if the navigation screen doesn't appear automatically. Install 30A fuse in rear, as well as amp connections and fuse. 8 For 2003-2006 Denali and Escalade EXT & ESV & ASP Conversion Test Radio. • Make sure parking brake is set. • Start vehicle. • Turn radio On. • Load DVD Navigation...isn't working correctly, check all radio plugs in under-hood fuse box. 14. Install new Navigation Radio. • Connect radio connectors, GPS antenna, radio antenna and XM/DVD connector (if equipped). • Install three screws. 15. Connect Battery Negative Cable. 16....
...NAV" button if the navigation screen doesn't appear automatically. Install 30A fuse in rear, as well as amp connections and fuse. 8 For 2003-2006 Denali and Escalade EXT & ESV & ASP Conversion Test Radio. • Make sure parking brake is set. • Start vehicle. • Turn radio On. • Load DVD Navigation...isn't working correctly, check all radio plugs in under-hood fuse box. 14. Install new Navigation Radio. • Connect radio connectors, GPS antenna, radio antenna and XM/DVD connector (if equipped). • Install three screws. 15. Connect Battery Negative Cable. 16....
Installation Guide
Page 17
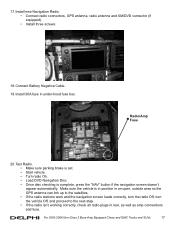
... as amp connections and fuse. Make sure the vehicle is complete, press the "NAV" button if the navigation screen doesn't appear automatically. Install new Navigation Radio. • Connect radio connectors, GPS antenna, radio antenna and XM/DVD connector (if equipped). • Install three screws. 18. For 2003-2006 Non...Fuse 20. 17. Test Radio. • Make sure parking brake is set. • Start vehicle. • Turn radio On. • Load DVD Navigation Disc. • Once disc checking is in position in an open, outside area so the GPS antenna can link up to the satellites. •...
... as amp connections and fuse. Make sure the vehicle is complete, press the "NAV" button if the navigation screen doesn't appear automatically. Install new Navigation Radio. • Connect radio connectors, GPS antenna, radio antenna and XM/DVD connector (if equipped). • Install three screws. 18. For 2003-2006 Non...Fuse 20. 17. Test Radio. • Make sure parking brake is set. • Start vehicle. • Turn radio On. • Load DVD Navigation Disc. • Once disc checking is in position in an open, outside area so the GPS antenna can link up to the satellites. •...
