User Guide
Page 7
... operation. Insert the DVD map disc into the radio CD slot. 3. If the radio is already on . 2. You will automatically be stopped to enter. Touch the Change screen button. 6. A notice may appear. Press the power/volume knob to proceed. Touch the NEXT screen button to turn the audio and navigation system on with a map... disc inserted, push the NAV hard key. 4.
... operation. Insert the DVD map disc into the radio CD slot. 3. If the radio is already on . 2. You will automatically be stopped to enter. Touch the Change screen button. 6. A notice may appear. Press the power/volume knob to proceed. Touch the NEXT screen button to turn the audio and navigation system on with a map... disc inserted, push the NAV hard key. 4.
User Guide
Page 8
... to use the space symbol screen button ( ) between street or city names. Touch the NEXT screen button to turn the audio and navigation system on with a map disc inserted, push the NAV hard key. 4. Verify that the selected Search Area is now complete. 12. Touch the Address screen button. ... OK screen button. 10. Select the street name from the list by touching the screen button beside the correct street name. 9. Insert the DVD map disc into the radio CD slot. 3. If the radio is already on . 2. Overview Entering an Address 1. You are now in the lower ...
... to use the space symbol screen button ( ) between street or city names. Touch the NEXT screen button to turn the audio and navigation system on with a map disc inserted, push the NAV hard key. 4. Verify that the selected Search Area is now complete. 12. Touch the Address screen button. ... OK screen button. 10. Select the street name from the list by touching the screen button beside the correct street name. 9. Insert the DVD map disc into the radio CD slot. 3. If the radio is already on . 2. Overview Entering an Address 1. You are now in the lower ...
User Guide
Page 9
...the NAV hard key. 4. Touch the POI screen button. 7. Touch the NEXT screen button to turn the audio and navigation system on. 2. See page 2-26 for more details. 1-8 Insert the DVD map disc into the radio CD slot. 3. If the radio is already on the screen. • If there are now in ...order of the POI desired. 8. Verify that the selected Search Area is now complete. 9. McDonald corporate office). • The system will hear an audio...
...the NAV hard key. 4. Touch the POI screen button. 7. Touch the NEXT screen button to turn the audio and navigation system on. 2. See page 2-26 for more details. 1-8 Insert the DVD map disc into the radio CD slot. 3. If the radio is already on the screen. • If there are now in ...order of the POI desired. 8. Verify that the selected Search Area is now complete. 9. McDonald corporate office). • The system will hear an audio...
User Guide
Page 10
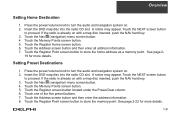
...screen button. 5. Insert the DVD map disc into the radio CD slot. Touch the NEXT screen button to store the home address as a memory point. Touch one of the five preset buttons. 7. Press the power/volume knob to turn the audio and navigation system on . 2. If the radio... is already on with a map disc inserted, push the NAV hard key. 3. Insert the DVD map disc into the radio CD slot. Touch the Register Home screen button. 6. Touch the ...
...screen button. 5. Insert the DVD map disc into the radio CD slot. Touch the NEXT screen button to store the home address as a memory point. Touch one of the five preset buttons. 7. Press the power/volume knob to turn the audio and navigation system on . 2. If the radio... is already on with a map disc inserted, push the NAV hard key. 3. Insert the DVD map disc into the radio CD slot. Touch the Register Home screen button. 6. Touch the ...
User Guide
Page 11
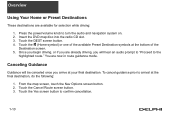
To cancel guidance prior to turn the audio and navigation system on. 2. Touch the (Home symbol) or one of the available Preset Destination symbols at your final destination. You are available for selection while driving: 1. ... Options screen button. 2. Overview Using Your Home or Preset Destinations These destinations are now in route guidance mode. Touch the DEST screen button. 4. Insert the DVD map disc into the radio CD slot. 3.
To cancel guidance prior to turn the audio and navigation system on. 2. Touch the (Home symbol) or one of the available Preset Destination symbols at your final destination. You are available for selection while driving: 1. ... Options screen button. 2. Overview Using Your Home or Preset Destinations These destinations are now in route guidance mode. Touch the DEST screen button. 4. Insert the DVD map disc into the radio CD slot. 3.
User Guide
Page 17
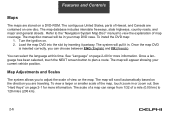
...the scale of view on page 2-40 for more information. Map Adjustments and Scales The system allows you are stored on page 2-1 for more information. The scale of map coverage. Load the map DVD into the slot by inserting it in or zoom out. See "Language" on the ...view a larger or smaller scale of Hawaii, and Canada are contained on . 2. The system will appear showing your map DVD case. The map will pull it partway. See "Hard Keys" on a DVD-ROM. Refer to the "Navigation System Map Disc" manual to plan a route. The contiguous United States, parts of the map, touch ...
...the scale of view on page 2-40 for more information. Map Adjustments and Scales The system allows you are stored on page 2-1 for more information. The scale of map coverage. Load the map DVD into the slot by inserting it in or zoom out. See "Language" on the ...view a larger or smaller scale of Hawaii, and Canada are contained on . 2. The system will appear showing your map DVD case. The map will pull it partway. See "Hard Keys" on a DVD-ROM. Refer to the "Navigation System Map Disc" manual to plan a route. The contiguous United States, parts of the map, touch ...
User Guide
Page 67
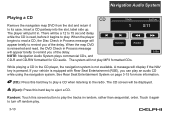
Navigation Audio System Playing a CD Remove the navigation map DVD from the slot and return it again to turn off random play. 3-10 Insert a CD partway into the slot, label side up. When the player begins to read a CD, the Disc Check in Process message will be a 12 to remind you of the delay. The system.... When the map DVD is read , the DVD Check in . If your vehicle is not available. Random: Touch this screen button to play MP3 formatted CDs. The player will pull it begins to play an audio CD while using the navigation system. See Rear Seat Entertainment System on page 3-15 for...
Navigation Audio System Playing a CD Remove the navigation map DVD from the slot and return it again to turn off random play. 3-10 Insert a CD partway into the slot, label side up. When the player begins to read a CD, the Disc Check in Process message will be a 12 to remind you of the delay. The system.... When the map DVD is read , the DVD Check in . If your vehicle is not available. Random: Touch this screen button to play MP3 formatted CDs. The player will pull it begins to play an audio CD while using the navigation system. See Rear Seat Entertainment System on page 3-15 for...
User Guide
Page 68
... the SEEK up arrow to advance to the next track, or the down arrow will return you to the beginning of each track on the disc will be displayed to help you find the correct passage. A chime will be displayed to help you find the correct passage. Release this... the SEEK down arrow to return to the previous track. As the CD advances, elapsed time will be played before advancing to the next track. Navigation Audio System Repeat: Touch this screen button to return to the previous track on the CD.
... the SEEK up arrow to advance to the next track, or the down arrow will return you to the beginning of each track on the disc will be displayed to help you find the correct passage. A chime will be displayed to help you find the correct passage. Release this... the SEEK down arrow to return to the previous track. As the CD advances, elapsed time will be played before advancing to the next track. Navigation Audio System Repeat: Touch this screen button to return to the previous track on the CD.
User Guide
Page 69
... CD changer. 3-12 See "Rear Seat Audio (RSA)", "Care of Your CDs and DVDs", and "Care of Your CD and DVD Player" in Section 3 of your point of installation. Press eject and return the map DVD to your vehicle's owner manual for more information. If your point of installation when reporting...an error message, write it to its case, then insert a CD. NO DISC: If this message appears on the screen, the CD slot is still inserted in the system. If a CD is not being read by the system. Navigation Audio System CD Messages CD ERROR: If this message appears on the screen, the CD...
... CD changer. 3-12 See "Rear Seat Audio (RSA)", "Care of Your CDs and DVDs", and "Care of Your CD and DVD Player" in Section 3 of your point of installation. Press eject and return the map DVD to your vehicle's owner manual for more information. If your point of installation when reporting...an error message, write it to its case, then insert a CD. NO DISC: If this message appears on the screen, the CD slot is still inserted in the system. If a CD is not being read by the system. Navigation Audio System CD Messages CD ERROR: If this message appears on the screen, the CD...
User Guide
Page 70
...to repeat the track that is touched for less than two seconds to the next track on a disc, use the SEEK arrows. Press the up arrow to advance to play the tracks on the disc. 3-13 Touch it again to turn this screen button to return to the previous track on ... be displayed to help you find the correct passage. As the CD advances, elapsed time will play . To switch between tracks on the disc. Navigation Audio System Random: Touch the Random screen button for more than two seconds, the player selects D. To cancel it, touch the Random screen button again. Random...
...to repeat the track that is touched for less than two seconds to the next track on a disc, use the SEEK arrows. Press the up arrow to advance to play the tracks on the disc. 3-13 Touch it again to turn this screen button to return to the previous track on ... be displayed to help you find the correct passage. As the CD advances, elapsed time will play . To switch between tracks on the disc. Navigation Audio System Random: Touch the Random screen button for more than two seconds, the player selects D. To cancel it, touch the Random screen button again. Random...
User Guide
Page 71
... switch to the radio when a CD is active, the first 10 seconds of the first track on each track on the next disc. Navigation Audio System Track Scan: To use this function, press and hold the SEEK key for at least two seconds, but less than four seconds, at which time... a double chime will be played before advancing to the first track on the current disc will sound to alert you that the CD changer has...
... switch to the radio when a CD is active, the first 10 seconds of the first track on each track on the next disc. Navigation Audio System Track Scan: To use this function, press and hold the SEEK key for at least two seconds, but less than four seconds, at which time... a double chime will be played before advancing to the first track on the current disc will sound to alert you that the CD changer has...
User Guide
Page 73
... Video Screen" in the index of your vehicle's owner manual for more information. NO DISC: If this message appears on the navigation screen, the DVD slot is not working properly. The DVD or CD should play. See "DVD Messages" under "Rear Seat Entertainment System" in the index of your vehicle's owner manual for more information. 3-16
... Video Screen" in the index of your vehicle's owner manual for more information. NO DISC: If this message appears on the navigation screen, the DVD slot is not working properly. The DVD or CD should play. See "DVD Messages" under "Rear Seat Entertainment System" in the index of your vehicle's owner manual for more information. 3-16
Installation Guide
Page 8
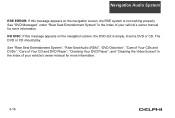
... 8 For 2003-2006 Denali and Escalade EXT & ESV & ASP Conversion 14. Radio/Amp Fuse 17. Install new Navigation Radio. • Connect radio connectors, GPS antenna, radio antenna and XM/DVD connector (if equipped). • Install three screws. 15. Make sure the vehicle is complete, press the "NAV".... 16. Test Radio. • Make sure parking brake is set. • Start vehicle. • Turn radio On. • Load DVD Navigation Disc. • Once disc checking is in position in an open, outside area so the GPS antenna can link up to the satellites. • If the radio stations...
... 8 For 2003-2006 Denali and Escalade EXT & ESV & ASP Conversion 14. Radio/Amp Fuse 17. Install new Navigation Radio. • Connect radio connectors, GPS antenna, radio antenna and XM/DVD connector (if equipped). • Install three screws. 15. Make sure the vehicle is complete, press the "NAV".... 16. Test Radio. • Make sure parking brake is set. • Start vehicle. • Turn radio On. • Load DVD Navigation Disc. • Once disc checking is in position in an open, outside area so the GPS antenna can link up to the satellites. • If the radio stations...
Installation Guide
Page 17
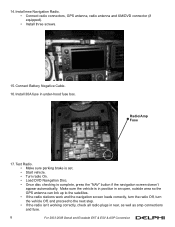
... as amp connections and fuse. 17. Test Radio. • Make sure parking brake is set. • Start vehicle. • Turn radio On. • Load DVD Navigation Disc. • Once disc checking is in position in an open, outside area so the GPS antenna can link up to the satellites. • If the radio stations... work and the navigation screen loads correctly, turn the radio Off, turn the vehicle Off, and proceed to the next step. • If the radio ...
... as amp connections and fuse. 17. Test Radio. • Make sure parking brake is set. • Start vehicle. • Turn radio On. • Load DVD Navigation Disc. • Once disc checking is in position in an open, outside area so the GPS antenna can link up to the satellites. • If the radio stations... work and the navigation screen loads correctly, turn the radio Off, turn the vehicle Off, and proceed to the next step. • If the radio ...
