User Guide
Page 4
... Knob. B. C. G. See Navigation Audio System on page 3-2. CONFIG (Configure) Key. See "Finding a Station" on page 3-4. Dest (Destination) Screen Button. See "Touch Sensitive Screen Buttons" on page 2-7. O. Directional Indicator. See Symbols on page 2-4. DVD/CD Eject Key 1-3 NAV (Navigation) Key. E. K. L. Nav (Navigation) Options Screen Button. See "Touch Sensitive Screen Buttons" on page 2-4. See "Touch Sensitive Screen Buttons" on page...
... Knob. B. C. G. See Navigation Audio System on page 3-2. CONFIG (Configure) Key. See "Finding a Station" on page 3-4. Dest (Destination) Screen Button. See "Touch Sensitive Screen Buttons" on page 2-7. O. Directional Indicator. See Symbols on page 2-4. DVD/CD Eject Key 1-3 NAV (Navigation) Key. E. K. L. Nav (Navigation) Options Screen Button. See "Touch Sensitive Screen Buttons" on page 2-4. See "Touch Sensitive Screen Buttons" on page...
User Guide
Page 6
... a beep or see the station displayed on the selected preset button. Press the BAND hard key to select a station. 4. Press the CONFIG hard key. 3. The time is now set the time. Press the power/volume knob to turn the audio and navigation system on . 2. Overview Setting Radio Station Presets 1. Press the power/volume... to access the band menu and select the desired band. Touch and hold one of the six screen buttons at the bottom of the screen until you need to turn the audio and navigation system on . 2. The vehicle needs to be in an open area to set . The radio will use the GPS...
... a beep or see the station displayed on the selected preset button. Press the BAND hard key to select a station. 4. Press the CONFIG hard key. 3. The time is now set the time. Press the power/volume knob to turn the audio and navigation system on . 2. Overview Setting Radio Station Presets 1. Press the power/volume... to access the band menu and select the desired band. Touch and hold one of the six screen buttons at the bottom of the screen until you need to turn the audio and navigation system on . 2. The vehicle needs to be in an open area to set . The radio will use the GPS...
User Guide
Page 7
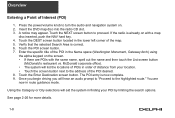
... any Preset Destination, you must be returned to the Destination menu. Touch the NEXT screen button to turn the audio and navigation system on with a map disc inserted, push the NAV hard key. 4. Touch the DEST screen button. 5. A notice may appear. See page 2-21 for more details. 1-6 Setting the... Search Area 1. If the radio is already on . 2. Touch the appropriate Search Area numbered screen button that contains the final destination you wish to enter. Press the power/volume knob to proceed. Insert the DVD map disc into the radio CD slot. 3. Touch the Change screen...
... any Preset Destination, you must be returned to the Destination menu. Touch the NEXT screen button to turn the audio and navigation system on with a map disc inserted, push the NAV hard key. 4. Touch the DEST screen button. 5. A notice may appear. See page 2-21 for more details. 1-6 Setting the... Search Area 1. If the radio is already on . 2. Touch the appropriate Search Area numbered screen button that contains the final destination you wish to enter. Press the power/volume knob to proceed. Insert the DVD map disc into the radio CD slot. 3. Touch the Change screen...
User Guide
Page 8
...Search Area is now complete. 12. You may appear. The address entry is correct. 6. Insert the DVD map disc into the radio CD slot. 3. Touch the Address screen button. 7. Touch the screen button beside the correct city. 11. You are now in the lower left corner of the map. 5. ...using the alpha keypad on . 2. Touch the NEXT screen button to use the space symbol screen button ( ) between street or city names. Once you begin driving you will hear an audio prompt to "Proceed to turn the audio and navigation system on the screen. See page 2-24 for more details....
...Search Area is now complete. 12. You may appear. The address entry is correct. 6. Insert the DVD map disc into the radio CD slot. 3. Touch the Address screen button. 7. Touch the screen button beside the correct city. 11. You are now in the lower left corner of the map. 5. ...using the alpha keypad on . 2. Touch the NEXT screen button to use the space symbol screen button ( ) between street or city names. Once you begin driving you will hear an audio prompt to "Proceed to turn the audio and navigation system on the screen. See page 2-24 for more details....
User Guide
Page 9
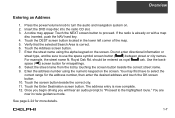
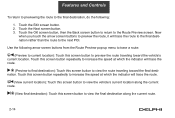
Touch the NEXT screen button to turn the audio and navigation system on. 2. McDonald corporate office). • The system will list the locations of POIs in order of distance from your POI by limiting the search options. Once you begin driving you will aid the system in the Name space (Washington Monument... Search Area is now complete. 9. Press the power/volume knob to proceed. See page 2-26 for more details. 1-8 Touch the DEST screen button located in route guidance mode. Insert the DVD map disc into the radio CD slot. 3. Overview Entering a Point of the map. 5.
Touch the NEXT screen button to turn the audio and navigation system on. 2. McDonald corporate office). • The system will list the locations of POIs in order of distance from your POI by limiting the search options. Once you begin driving you will aid the system in the Name space (Washington Monument... Search Area is now complete. 9. Press the power/volume knob to proceed. See page 2-26 for more details. 1-8 Touch the DEST screen button located in route guidance mode. Insert the DVD map disc into the radio CD slot. 3. Overview Entering a Point of the map. 5.
User Guide
Page 10
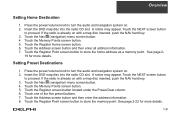
...memory point. Touch the Register Home screen button. 6. Touch the Register Point screen button to turn the audio and navigation system on with a map disc inserted, push the NAV hard key. 3. See page 2- 19 for more details. Insert the DVD map disc into the radio CD slot... appear. Touch the Memory Points screen button. 5. Touch the Register screen button located under the Preset Dest column. 6. Insert the DVD map disc into the radio CD slot. Overview Setting Home Destination 1. Touch the NEXT screen button to turn the audio and navigation system on with a map disc inserted, push...
...memory point. Touch the Register Home screen button. 6. Touch the Register Point screen button to turn the audio and navigation system on with a map disc inserted, push the NAV hard key. 3. See page 2- 19 for more details. Insert the DVD map disc into the radio CD slot... appear. Touch the Memory Points screen button. 5. Touch the Register screen button located under the Preset Dest column. 6. Insert the DVD map disc into the radio CD slot. Overview Setting Home Destination 1. Touch the NEXT screen button to turn the audio and navigation system on with a map disc inserted, push...
User Guide
Page 11
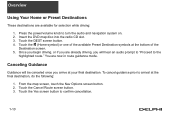
...Options screen button. 2. Touch the DEST screen button. 4. Once you begin driving, or if you are now in route guidance mode. Canceling Guidance Guidance will be canceled once you will hear an audio prompt to "Proceed to turn the audio and navigation system on. ...2. To cancel guidance prior to confirm cancellation. 1-10 You are already driving, you arrive at the bottom of the available Preset Destination symbols at your final destination. Touch the Yes screen button to arrival at the final destination, do the following: 1. Insert the DVD...
...Options screen button. 2. Touch the DEST screen button. 4. Once you begin driving, or if you are now in route guidance mode. Canceling Guidance Guidance will be canceled once you will hear an audio prompt to "Proceed to turn the audio and navigation system on. ...2. To cancel guidance prior to confirm cancellation. 1-10 You are already driving, you arrive at the bottom of the available Preset Destination symbols at your final destination. Touch the Yes screen button to arrival at the final destination, do the following: 1. Insert the DVD...
User Guide
Page 12
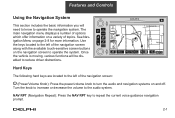
...information. Use the keys located to the left of the navigation screen along with the available touch-sensitive screen buttons on and off. Once the vehicle is moving, various functions will need to know to operate the navigation system. Turn the knob to increase or decrease the volume ...to repeat the current voice guidance navigation prompt. 2-1 NAV RPT (Navigation Repeat): Press the NAV...
...information. Use the keys located to the left of the navigation screen along with the available touch-sensitive screen buttons on and off. Once the vehicle is moving, various functions will need to know to operate the navigation system. Turn the knob to increase or decrease the volume ...to repeat the current voice guidance navigation prompt. 2-1 NAV RPT (Navigation Repeat): Press the NAV...

User Guide
Page 15
... will be turned off. The following touch-sensitive screen buttons will sound. Nav (Navigation Menu): Touch this screen button to display the Destination menu. Dest (Destination): Touch this screen button to display the Nav Options menu. Features and Controls Touch-Sensitive Screen Buttons Touch-sensitive buttons are located on page 2-20 for more information. See Destination...
... will be turned off. The following touch-sensitive screen buttons will sound. Nav (Navigation Menu): Touch this screen button to display the Destination menu. Dest (Destination): Touch this screen button to display the Nav Options menu. Features and Controls Touch-Sensitive Screen Buttons Touch-sensitive buttons are located on page 2-20 for more information. See Destination...

User Guide
Page 16
Features and Controls (Zoom In): Touch this screen button to get a closer look at a smaller section of the map you are traveling on. (Zoom Out): Touch this screen button when available on . Back: Touch this screen button to see a larger scale of the map you are traveling on a menu to return to the previous screen. 2-5 FM1 Audio Source: Touch the audio source information while a map screen is on to bring up the 95.5 MHz Audio screen. Clock: Touch the clock screen button when the radio is displayed to display the date. You can also view your highlighted route.
Features and Controls (Zoom In): Touch this screen button to get a closer look at a smaller section of the map you are traveling on. (Zoom Out): Touch this screen button when available on . Back: Touch this screen button to see a larger scale of the map you are traveling on a menu to return to the previous screen. 2-5 FM1 Audio Source: Touch the audio source information while a map screen is on to bring up the 95.5 MHz Audio screen. Clock: Touch the clock screen button when the radio is displayed to display the date. You can also view your highlighted route.
User Guide
Page 17
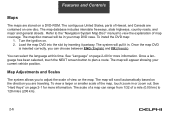
Refer to the "Navigation System Map Disc" manual to adjust the scale of map coverage. Turn the ignition on a DVD-ROM. See "Language" on page 2-40 for more information. See "Hard Keys" on page 2-1 for more information. Features and Controls Maps The maps are contained on ... of view on the map. The map disc manual will appear showing your map DVD case. To view a larger or smaller scale of a mile (0.05 km) to plan a route. Once a language has been selected, touch the NEXT screen button to 128 miles (206 km). 2-6 The scale of a map can select the language...
Refer to the "Navigation System Map Disc" manual to adjust the scale of map coverage. Turn the ignition on a DVD-ROM. See "Language" on page 2-40 for more information. See "Hard Keys" on page 2-1 for more information. Features and Controls Maps The maps are contained on ... of view on the map. The map disc manual will appear showing your map DVD case. To view a larger or smaller scale of a mile (0.05 km) to plan a route. Once a language has been selected, touch the NEXT screen button to 128 miles (206 km). 2-6 The scale of a map can select the language...

User Guide
Page 19
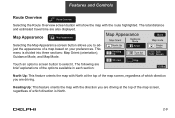
... the current route will no longer receive voice prompts for navigation. The map can touch the Resume Guidance screen button to access the main navigation menu. If you suspend guidance, you to suspend guidance to make system adjustments and plan routes. The main navigation menu allows you to choose from the Nav Menu allows you...
... the current route will no longer receive voice prompts for navigation. The map can touch the Resume Guidance screen button to access the main navigation menu. If you suspend guidance, you to suspend guidance to make system adjustments and plan routes. The main navigation menu allows you to choose from the Nav Menu allows you...
User Guide
Page 20
... show the map with North at the top of the map screen, regardless of which direction you are also displayed. Touch an option's screen button to adjust the appearance of which direction is divided into three sections: Map Orient (orientation), Guidance Mode, and Map Mode. The total distance and estimated ...
... show the map with North at the top of the map screen, regardless of which direction you are also displayed. Touch an option's screen button to adjust the appearance of which direction is divided into three sections: Map Orient (orientation), Guidance Mode, and Map Mode. The total distance and estimated ...
User Guide
Page 22
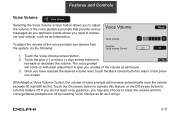
... or the Off screen button to increase or decrease the volume. With Adaptive Voice Volume Control, the volume of the voice guidance prompts that provide various messages as you approach points where you need to give you an idea of the voice prompts you receive from the system, do not need voice... guidance, you have reached the desired volume level, touch the Back screen button to return to lower the volume until the voice guidance prompts turn this feature off by lowering...
... or the Off screen button to increase or decrease the volume. With Adaptive Voice Volume Control, the volume of the voice guidance prompts that provide various messages as you approach points where you need to give you an idea of the voice prompts you receive from the system, do not need voice... guidance, you have reached the desired volume level, touch the Back screen button to return to lower the volume until the voice guidance prompts turn this feature off by lowering...

User Guide
Page 23
... route, you will be routed along main roads and highways, which types of roads you wish to use or avoid. Route Overview: Touch this screen button to access the Route Overview menu. Condition: The Search Condition screen allows you to select your road preferences by choosing from Fastest, Shortest, or Alternative...
... route, you will be routed along main roads and highways, which types of roads you wish to use or avoid. Route Overview: Touch this screen button to access the Route Overview menu. Condition: The Search Condition screen allows you to select your road preferences by choosing from Fastest, Shortest, or Alternative...
User Guide
Page 24
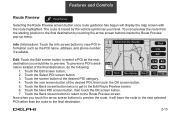
...you would like to the Edit Route Preview screen. 6. Touch the Back screen button twice to get to preview. Touch the Select POI screen button. 3. Touch the screen button of the desired POI, then touch the OK screen button. 5. You can preview the route from the starting position to the fi... the route, it will display the map screen with the route highlighted. Features and Controls Route Preview Selecting the Route Preview screen button once route guidance has begun will trace the route to the next selected POI rather than the route to the final destination...
...you would like to the Edit Route Preview screen. 6. Touch the Back screen button twice to get to preview. Touch the Select POI screen button. 3. Touch the screen button of the desired POI, then touch the OK screen button. 5. You can preview the route from the starting position to the fi... the route, it will display the map screen with the route highlighted. Features and Controls Route Preview Selecting the Route Preview screen button once route guidance has begun will trace the route to the next selected POI rather than the route to the final destination...
User Guide
Page 25
...increase the speed at which the indicator will trace the route. (Preview to final destination): Touch this screen button to the next POI. Touch this screen button to view the route traveling toward the vehicle's current location. Features and Controls To return to previewing the route ...to the Route Preview screen. Touch the Edit screen button. 2. Touch the OK screen button, then the Back screen button to return to the final destination, do the following arrow screen buttons from the Route Preview pop-up menu to trace a route: (Preview to...
...increase the speed at which the indicator will trace the route. (Preview to final destination): Touch this screen button to the next POI. Touch this screen button to view the route traveling toward the vehicle's current location. Features and Controls To return to previewing the route ...to the Route Preview screen. Touch the Edit screen button. 2. Touch the OK screen button, then the Back screen button to return to the final destination, do the following arrow screen buttons from the Route Preview pop-up menu to trace a route: (Preview to...
User Guide
Page 26
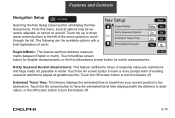
... distance measurements between English or metric. Touch the On screen button to turn this menu, several options may be selected, adjusted, or turned on and off . 2-15 Features and Controls Navigation Setup Selecting the Nav Setup screen button will display the Nav Setup menu. From this feature off .... Touch the up or down arrow screen buttons to the destination. Touch the On screen button to have the estimated travel from your current...
... distance measurements between English or metric. Touch the On screen button to turn this menu, several options may be selected, adjusted, or turned on and off . 2-15 Features and Controls Navigation Setup Selecting the Nav Setup screen button will display the Nav Setup menu. From this feature off .... Touch the up or down arrow screen buttons to the destination. Touch the On screen button to have the estimated travel from your current...
User Guide
Page 27
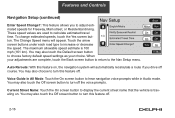
... current street name that the vehicle is 100 mph (161 km). The maximum allowable speed estimate is traveling on , the navigation system will appear. When your choice. You may also touch the Off screen button to calculate estimated travel time. You may also choose to turn this feature off. Touch the arrow screen...
... current street name that the vehicle is 100 mph (161 km). The maximum allowable speed estimate is traveling on , the navigation system will appear. When your choice. You may also touch the Off screen button to calculate estimated travel time. You may also choose to turn this feature off. Touch the arrow screen...

User Guide
Page 28
...the map display. Map Color (Night): This feature allows you to view the adjusted map color. Touch the Yes screen button to calibrate the system, or the No screen button to adjust the nighttime map appearance. You may need to retain the current settings. 2-17 Touch the Yes screen... button to restore defaults, or the No screen button to calibrate the system following a tire change, rotation, or if your vehicle has been relocated a great distance. Features and Controls Exit ...
...the map display. Map Color (Night): This feature allows you to view the adjusted map color. Touch the Yes screen button to calibrate the system, or the No screen button to adjust the nighttime map appearance. You may need to retain the current settings. 2-17 Touch the Yes screen... button to restore defaults, or the No screen button to calibrate the system following a tire change, rotation, or if your vehicle has been relocated a great distance. Features and Controls Exit ...

