Installation Guide
Page 4
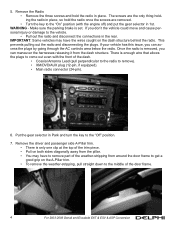
Remove the Radio • Remove the three screws and hold the radio once the screws are removed. • Turn the key to remove). • XM/DVD/AUX plug (12-pin, if equipped). • Main radio connector (24-pin). 6. This prevents pulling out the radio and disconnecting the plugs. If ... access the plugs by going through the AC controls area below the radio. Put the gear selector in place. IMPORTANT: Some vehicles may have the wires caught on the A-Pillar trim. • To remove the weather-stripping, pull straight down to the middle of the dash. • Coaxial Antenna Lead...
Remove the Radio • Remove the three screws and hold the radio once the screws are removed. • Turn the key to remove). • XM/DVD/AUX plug (12-pin, if equipped). • Main radio connector (24-pin). 6. This prevents pulling out the radio and disconnecting the plugs. If ... access the plugs by going through the AC controls area below the radio. Put the gear selector in place. IMPORTANT: Some vehicles may have the wires caught on the A-Pillar trim. • To remove the weather-stripping, pull straight down to the middle of the dash. • Coaxial Antenna Lead...
Installation Guide
Page 6
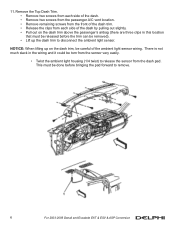
..., be done before the trim can be removed). • Lift up on the dash trim above the passenger's airbag (there are three clips in the wiring and it could be torn from the sensor very easily. • Twist the ambient light housing (1/4 twist) to release the sensor from each side of...
..., be done before the trim can be removed). • Lift up on the dash trim above the passenger's airbag (there are three clips in the wiring and it could be torn from the sensor very easily. • Twist the ambient light housing (1/4 twist) to release the sensor from each side of...
Installation Guide
Page 7
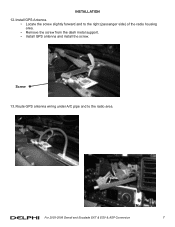
Install GPS Antenna. • Locate the screw slightly forward and to the radio area. For 2003-2006 Denali and Escalade EXT & ESV & ASP Conversion 7 Route GPS antenna wiring under A/C pipe and to the right (passenger side) of the radio housing area. • Remove the screw from the dash metal support. • Install GPS antenna and install the screw. Screw 13. INSTALLATION 12.
Install GPS Antenna. • Locate the screw slightly forward and to the radio area. For 2003-2006 Denali and Escalade EXT & ESV & ASP Conversion 7 Route GPS antenna wiring under A/C pipe and to the right (passenger side) of the radio housing area. • Remove the screw from the dash metal support. • Install GPS antenna and install the screw. Screw 13. INSTALLATION 12.

Installation Guide
Page 14
... careful of the dash by pulling out slightly. • Pull out on the dash trim above the passenger's airbag (there are three clips in the wiring and it could be released before bringing the pad forward to release the sensor from the dash pad. 12. This must be torn from each... side of the ambient light sensor wiring. Remove the Top Dash Trim. • Remove two screws from each side of the dash. • Remove two screws from the passenger A/C vent location. •...
... careful of the dash by pulling out slightly. • Pull out on the dash trim above the passenger's airbag (there are three clips in the wiring and it could be released before bringing the pad forward to release the sensor from the dash pad. 12. This must be torn from each... side of the ambient light sensor wiring. Remove the Top Dash Trim. • Remove two screws from each side of the dash. • Remove two screws from the passenger A/C vent location. •...

Installation Guide
Page 15
Route GPS antenna wiring under A/C pipe and to the right (passenger side) of the radio housing area. • Remove the screw from the dash metal support. • Install GPS antenna and install the screw. Screw 14. For 2003-2006 Non-Class 2 Bose Amp Equipped Chevy and GMC Trucks and SUVs 15 INSTALLATION 13. Install GPS Antenna. • Locate the screw slightly forward and to the radio area.
Route GPS antenna wiring under A/C pipe and to the right (passenger side) of the radio housing area. • Remove the screw from the dash metal support. • Install GPS antenna and install the screw. Screw 14. For 2003-2006 Non-Class 2 Bose Amp Equipped Chevy and GMC Trucks and SUVs 15 INSTALLATION 13. Install GPS Antenna. • Locate the screw slightly forward and to the radio area.
Installation Guide
Page 16
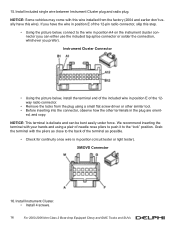
...picture below , connect to the wire in position A4 on the instrument cluster connector (you can be...under force. ed, and copy. Install included single wire between Instrument Cluster plug and radio plug. Install ...the pliers as possible. • Check for continuity once wire is delicate and can either use the included tap splice ...included wire in position E of the terminal as close to the "lock" position. We recommend inserting the terminal with this wire installed... (2004 and earlier don't usally have the wire in position (circuit tester or light tester). 15. NOTICE:...
...picture below , connect to the wire in position A4 on the instrument cluster connector (you can be...under force. ed, and copy. Install included single wire between Instrument Cluster plug and radio plug. Install ...the pliers as possible. • Check for continuity once wire is delicate and can either use the included tap splice ...included wire in position E of the terminal as close to the "lock" position. We recommend inserting the terminal with this wire installed... (2004 and earlier don't usally have the wire in position (circuit tester or light tester). 15. NOTICE:...
