

Owners Manual
Page 1
z Be sure to read the precautions in the separate User's Guide (Basic Operation). E DATA PROJECTOR XJ-SC210/XJ-SC215* XJ-S32/XJ-S37* XJ-S42/XJ-S47* XJ-S52/XJ-S57* * USB Port Equipped Models User's Guide z Be sure to keep all user documentation handy for future reference. For details about setting up the projector and lamp replacement, see the User's Guide (Basic Operation).
z Be sure to read the precautions in the separate User's Guide (Basic Operation). E DATA PROJECTOR XJ-SC210/XJ-SC215* XJ-S32/XJ-S37* XJ-S42/XJ-S47* XJ-S52/XJ-S57* * USB Port Equipped Models User's Guide z Be sure to keep all user documentation handy for future reference. For details about setting up the projector and lamp replacement, see the User's Guide (Basic Operation).
Owners Manual
Page 10
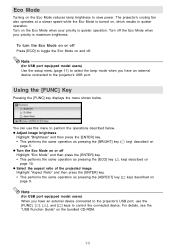
... [ECO] to save power. Note (for USB port equipped model users) When you have an external device connected to the projector's USB port, use this menu to the projector's USB port. Using the [FUNC] Key Pressing the [FUNC] key displays the menu shown below . For details, see the...key) described on , which results in quieter operation. Note (for USB port equipped model users) Use the setup menu (page 11) to select the lamp mode when you have an external device connected to perform the operations described below . z Adjust image brightness Highlight "Brightness" and then press the [ENTER...
... [ECO] to save power. Note (for USB port equipped model users) When you have an external device connected to the projector's USB port, use this menu to the projector's USB port. Using the [FUNC] Key Pressing the [FUNC] key displays the menu shown below . For details, see the...key) described on , which results in quieter operation. Note (for USB port equipped model users) Use the setup menu (page 11) to select the lamp mode when you have an external device connected to perform the operations described below . z Adjust image brightness Highlight "Brightness" and then press the [ENTER...
Owners Manual
Page 14
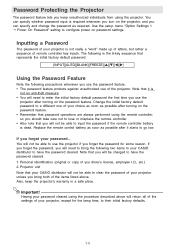
...Also note that you will need to enter the initial factory default password the first time you use the projector if you forget the password for the lamp time, to your projector is dead. Important! Replace the remote control battery as soon as possible after turning on the password ... from using the procedure described above . Note that your CASIO distributor will not be charged to bring both of the items listed above will be able to a different one of the projector. If you forget your projector unless you bring the following precautions whenever you use the password...
...Also note that you will need to enter the initial factory default password the first time you use the projector if you forget the password for the lamp time, to your projector is dead. Important! Replace the remote control battery as soon as possible after turning on the password ... from using the procedure described above . Note that your CASIO distributor will not be charged to bring both of the items listed above will be able to a different one of the projector. If you forget your projector unless you bring the following precautions whenever you use the password...
Owners Manual
Page 18
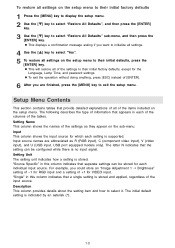
... source. The letter N indicates that a single setting is no input signal. "Single" in this column indicates that separate settings can be stored for the Language, Lamp Time, and password settings. To restore all settings on the setup menu to their initial factory defaults, except for each individual input source. The initial...
... source. The letter N indicates that a single setting is no input signal. "Single" in this column indicates that separate settings can be stored for the Language, Lamp Time, and password settings. To restore all settings on the setup menu to their initial factory defaults, except for each individual input source. The initial...
Owners Manual
Page 25
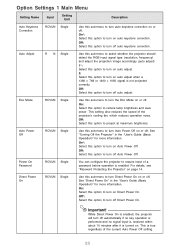
On: Select this option to project at maximum brightness. Off: Select this option to reduce lamp brightness and save power. On*: Select this option to turn on auto keystone correction. Important! Option Settings 1 Main Menu Setting Name Input Setting Unit Description...; 1050 signal is true regardless of the current Auto Power Off setting. 25 Auto Adjust RCVUN Single Use this sub-menu to select whether the projector should detect the RGB input signal type (resolution, frequency) and adjust the projection image accordingly (auto adjust). 1*: Select this option to turn on auto adjust...
On: Select this option to project at maximum brightness. Off: Select this option to reduce lamp brightness and save power. On*: Select this option to turn on auto keystone correction. Important! Option Settings 1 Main Menu Setting Name Input Setting Unit Description...; 1050 signal is true regardless of the current Auto Power Off setting. 25 Auto Adjust RCVUN Single Use this sub-menu to select whether the projector should detect the RGB input signal type (resolution, frequency) and adjust the projection image accordingly (auto adjust). 1*: Select this option to turn on auto adjust...
Owners Manual
Page 28
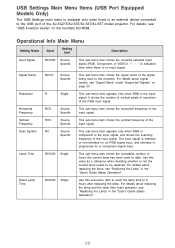
... available only when there is an external device connected to 0 hours after replacing the lamp. Use this sub-menu item to reset the lamp time to the USB port of the XJ-SC215/XJ-S37/XJ-S47/XJ-S57 model projector. It shows the number of vertical pixels of resolution of the input signal. Signal ...Name RCVU Source Specific This sub-menu item shows the signal name of hours the current lamp has been used to date. Lamp Time RCVUN Single This...
... available only when there is an external device connected to 0 hours after replacing the lamp. Use this sub-menu item to reset the lamp time to the USB port of the XJ-SC215/XJ-S37/XJ-S47/XJ-S57 model projector. It shows the number of vertical pixels of resolution of the input signal. Signal ...Name RCVU Source Specific This sub-menu item shows the signal name of hours the current lamp has been used to date. Lamp Time RCVUN Single This...


