

Owners Manual
Page 1
E DATA PROJECTOR XJ-S31/XJ-S36 XJ-S41/XJ-S46 User's Guide z Be sure to keep all user documentation handy for future reference. For details about setting up the projector and lamp replacement, see the User's Guide (Basic Operation). z Be sure to read the precautions in the separate User's Guide (Basic Operation).
E DATA PROJECTOR XJ-S31/XJ-S36 XJ-S41/XJ-S46 User's Guide z Be sure to keep all user documentation handy for future reference. For details about setting up the projector and lamp replacement, see the User's Guide (Basic Operation). z Be sure to read the precautions in the separate User's Guide (Basic Operation).
Owners Manual
Page 3
...Image 8 Changing the aspect ratio of the projected image 9 Eco Mode ...9 Using the [FUNC] Key 10 Configuring Advanced Projector Settings 11 Basic Setup Menu Operations 11 Displaying the Setup Menu 11 Configuring Setup Menu Settings 11 Basic Setup Menu Example 12...Projector 15 Restoring Projector Settings to Their Initial Factory Defaults 16 Setup Menu Contents 17 Image Adjustment Main Menu 18 Volume Adjustment Main Menu 20 Screen Settings Main Menu 21 Input Settings Main Menu 23 Option Settings 1 Main Menu 24 Option Settings 2 Main Menu 26 USB Settings Main Menu Items (XJ-S36/XJ...
...Image 8 Changing the aspect ratio of the projected image 9 Eco Mode ...9 Using the [FUNC] Key 10 Configuring Advanced Projector Settings 11 Basic Setup Menu Operations 11 Displaying the Setup Menu 11 Configuring Setup Menu Settings 11 Basic Setup Menu Example 12...Projector 15 Restoring Projector Settings to Their Initial Factory Defaults 16 Setup Menu Contents 17 Image Adjustment Main Menu 18 Volume Adjustment Main Menu 20 Screen Settings Main Menu 21 Input Settings Main Menu 23 Option Settings 1 Main Menu 24 Option Settings 2 Main Menu 26 USB Settings Main Menu Items (XJ-S36/XJ...
Owners Manual
Page 4
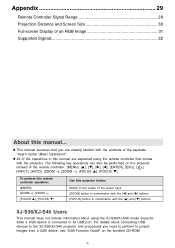
... [X] buttons [FOCUS] button in this manual are explained using the XJ-S36/XJ-S46 model projector while a USB device is connected to project images from a USB device, see "USB Function Guide" on the projector instead of the separate "User's Guide (Basic Operation)". z All ...of the operations in combination with the [S] and [T] buttons XJ-S36/XJ-S46 Users This manual does not include information about connecting USB devices to the XJ-S36/XJ-S46 projector and procedures you are already familiar with the contents of the remote controller: [MENU], [S], ...
... [X] buttons [FOCUS] button in this manual are explained using the XJ-S36/XJ-S46 model projector while a USB device is connected to project images from a USB device, see "USB Function Guide" on the projector instead of the separate "User's Guide (Basic Operation)". z All ...of the operations in combination with the [S] and [T] buttons XJ-S36/XJ-S46 Users This manual does not include information about connecting USB devices to the XJ-S36/XJ-S46 projector and procedures you are already familiar with the contents of the remote controller: [MENU], [S], ...
Owners Manual
Page 5
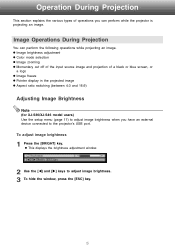
... to adjust image brightness. 3 To hide the window, press the [ESC] key. 5 Image Operations During Projection You can perform while the projector is projecting an image. Operation During Projection This section explains the various types of a black or blue screen, or a logo z Image freeze... z Pointer display in the projected image z Aspect ratio switching (between 4:3 and 16:9) Adjusting Image Brightness Note (for XJ-S36/XJ-S46 model users) Use the setup menu (page 11) to adjust image brightness when you can perform the following operations while projecting an image....
... to adjust image brightness. 3 To hide the window, press the [ESC] key. 5 Image Operations During Projection You can perform while the projector is projecting an image. Operation During Projection This section explains the various types of a black or blue screen, or a logo z Image freeze... z Pointer display in the projected image z Aspect ratio switching (between 4:3 and 16:9) Adjusting Image Brightness Note (for XJ-S36/XJ-S46 model users) Use the setup menu (page 11) to adjust image brightness when you can perform the following operations while projecting an image....
Owners Manual
Page 6
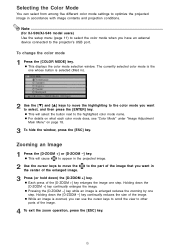
Note (for XJ-S36/XJ-S46 model users) Use the setup menu (page 11) to select the color mode when you can select from among five different color mode settings ... hide the window, press the [ESC] key. z Each press of the image. z While an image is zoomed, you have an external device connected to the projector's USB port. The currently selected color mode is the one whose button is enlarged reduces the zooming by one step. z This will cause to appear...
Note (for XJ-S36/XJ-S46 model users) Use the setup menu (page 11) to select the color mode when you can select from among five different color mode settings ... hide the window, press the [ESC] key. z Each press of the image. z While an image is zoomed, you have an external device connected to the projector's USB port. The currently selected color mode is the one whose button is enlarged reduces the zooming by one step. z This will cause to appear...
Owners Manual
Page 7
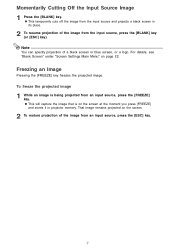
... "Blank Screen" under "Screen Settings Main Menu" on the screen. 2 To restore projection of the image from the input source and projects a black screen in projector memory. That image remains projected on page 22. z This will capture the image that is being projected from the input source, press the [BLANK] key...
... "Blank Screen" under "Screen Settings Main Menu" on the screen. 2 To restore projection of the image from the input source and projects a black screen in projector memory. That image remains projected on page 22. z This will capture the image that is being projected from the input source, press the [BLANK] key...
Owners Manual
Page 9
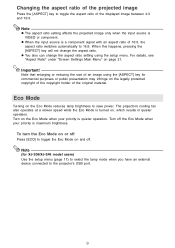
...] key will not change the aspect ratio setting using the [ASPECT] key for XJ-S36/XJ-S46 model users) Use the setup menu (page 11) to select the lamp mode when you have an external device connected to the projector's USB port. 9 Note that enlarging or reducing the size of the original material... turn the Eco Mode on or off Press [ECO] to toggle the Eco Mode on the Eco Mode when your priority is quieter operation. The projector's cooling fan also operates at a slower speed while the Eco Mode is VIDEO or component. Changing the aspect ratio of the projected image Press the...
...] key will not change the aspect ratio setting using the [ASPECT] key for XJ-S36/XJ-S46 model users) Use the setup menu (page 11) to select the lamp mode when you have an external device connected to the projector's USB port. 9 Note that enlarging or reducing the size of the original material... turn the Eco Mode on or off Press [ECO] to toggle the Eco Mode on the Eco Mode when your priority is quieter operation. The projector's cooling fan also operates at a slower speed while the Eco Mode is VIDEO or component. Changing the aspect ratio of the projected image Press the...
Owners Manual
Page 10
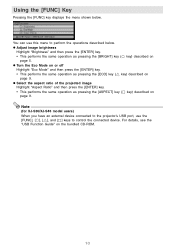
... [FUNC], [ ], [U], and […] keys to perform the operations described below . Using the [FUNC] Key Pressing the [FUNC] key displays the menu shown below . Note (for XJ-S36/XJ-S46 model users) When you have an external device connected to the projector's USB port, use this menu to control the connected device.
... [FUNC], [ ], [U], and […] keys to perform the operations described below . Using the [FUNC] Key Pressing the [FUNC] key displays the menu shown below . Note (for XJ-S36/XJ-S46 model users) When you have an external device connected to the projector's USB port, use this menu to control the connected device.
Owners Manual
Page 11
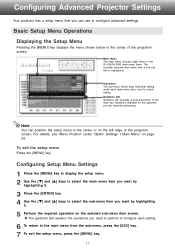
... need to perform to configure each setting. 6 To return to configure advanced settings. To exit the setup menu Press the [MENU] key. Configuring Advanced Projector Settings Your projector has a setup menu that is the one that you can position the setup menu in the center of the main key operations available for... shows each main menu item, and its current setting. For details, see "Menu Position" under each individual setting under "Option Settings 1 Main Menu" on the XJ-S36/XJ-S46) main menu items. The currently selected main menu item is highlighted.
... need to perform to configure each setting. 6 To return to configure advanced settings. To exit the setup menu Press the [MENU] key. Configuring Advanced Projector Settings Your projector has a setup menu that is the one that you can position the setup menu in the center of the main key operations available for... shows each main menu item, and its current setting. For details, see "Menu Position" under each individual setting under "Option Settings 1 Main Menu" on the XJ-S36/XJ-S46) main menu items. The currently selected main menu item is highlighted.
Owners Manual
Page 12
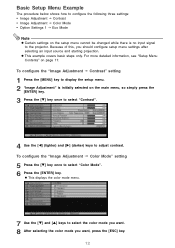
To configure the "Image Adjustment J Contrast" setting 1 Press the [MENU] key to display the setup menu. 2 "Image Adjustment" is no input signal to the projector. Because of this, you want, press the [ESC] key. 12 For more detailed information, see "Setup Menu Contents" on the main menu, so simply press ...
To configure the "Image Adjustment J Contrast" setting 1 Press the [MENU] key to display the setup menu. 2 "Image Adjustment" is no input signal to the projector. Because of this, you want, press the [ESC] key. 12 For more detailed information, see "Setup Menu Contents" on the main menu, so simply press ...
Owners Manual
Page 13
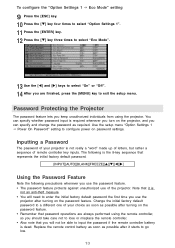
...Eco Mode". 13 Use the [W] and [X] keys to select "On" or "Off". 14 After you are always performed using the projector. Password Protecting the Projector The password feature lets you can specify and change the password as possible after turning on password settings. Use the setup menu "Option...Using the Password Feature Note the following precautions whenever you use the password feature. • The password feature protects against unauthorized use the projector after it is not an anti-theft measure. • You will not be able to input the password if the remote controller battery...
...Eco Mode". 13 Use the [W] and [X] keys to select "On" or "Off". 14 After you are always performed using the projector. Password Protecting the Projector The password feature lets you can specify and change the password as possible after turning on password settings. Use the setup menu "Option...Using the Password Feature Note the following precautions whenever you use the password feature. • The password feature protects against unauthorized use the projector after it is not an anti-theft measure. • You will not be able to input the password if the remote controller battery...
Owners Manual
Page 14
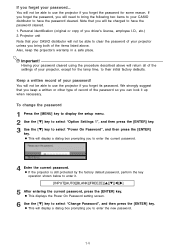
... Note that you will not be charged to clear the password of your projector, except for some reason. Having your CASIO distributor to enter it up when necessary. To change the password 1 Press the [MENU] key to display the setup menu. 2 Use the [T] key to select "...Option Settings 1", and then press the [ENTER] key. 3 Use the [T] key to select "Change Password", and then press the [ENTER] key. z If the projector is...
... Note that you will not be charged to clear the password of your projector, except for some reason. Having your CASIO distributor to enter it up when necessary. To change the password 1 Press the [MENU] key to display the setup menu. 2 Use the [T] key to select "...Option Settings 1", and then press the [ENTER] key. 3 Use the [T] key to select "Change Password", and then press the [ENTER] key. z If the projector is...

Owners Manual
Page 15
... the [ESC] key. appears. z The message "Your new password has been registered." Entering the Password when Turning On the Projector When you turn on the projector while password protection is selected on password setting from the one you entered in step 7 and then press [ENTER]. Note You can...dialog box to exit the setup menu. Press the [ESC] key to return to step 7. 10 After you to eight key operations long. All projector operations will display a dialog box prompting you are finished, press the [MENU] key to turn password protection on and off operation ([ ] key)...
... the [ESC] key. appears. z The message "Your new password has been registered." Entering the Password when Turning On the Projector When you turn on the projector while password protection is selected on password setting from the one you entered in step 7 and then press [ENTER]. Note You can...dialog box to exit the setup menu. Press the [ESC] key to return to step 7. 10 After you to eight key operations long. All projector operations will display a dialog box prompting you are finished, press the [MENU] key to turn password protection on and off operation ([ ] key)...
Owners Manual
Page 16
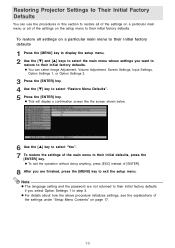
Restoring Projector Settings to Their Initial Factory Defaults You can select Image Adjustment, Volume Adjustment, Screen Settings, Input Settings, Option Settings 1, or Option Settings 2. 3 Press the [ENTER] ...
Restoring Projector Settings to Their Initial Factory Defaults You can select Image Adjustment, Volume Adjustment, Screen Settings, Input Settings, Option Settings 1, or Option Settings 2. 3 Press the [ENTER] ...
Owners Manual
Page 19
...cause the image to appear. When this happens, use this setting to adjust the phase manually. Use this sub-menu to return all of signal (XGA/60Hz, SXGA/60Hz, etc.) that the phase setting is not correct. Setting Name Input Vertical Position Horizontal Position Frequency RCV RCV R Setting Unit ... in the projected image while RGB is optimized for the specific type of the sub-menu items on the Image Adjustment main menu to the projector's VIDEO terminal. Use it means that is selected as the input source. z Restoring menu defaults when there is performed, and not for the ...
...cause the image to appear. When this happens, use this setting to adjust the phase manually. Use this sub-menu to return all of signal (XGA/60Hz, SXGA/60Hz, etc.) that the phase setting is not correct. Setting Name Input Vertical Position Horizontal Position Frequency RCV RCV R Setting Unit ... in the projected image while RGB is optimized for the specific type of the sub-menu items on the Image Adjustment main menu to the projector's VIDEO terminal. Use it means that is selected as the input source. z Restoring menu defaults when there is performed, and not for the ...

Owners Manual
Page 20
Volume Adjustment Main Menu Setting Name Input Setting Unit Description Volume RCVUN Source Specific Use this sub-menu to its initial default setting. z Changing this sub-menu to return Volume to adjust the volume level of the currently selected signal source. z Restoring menu defaults when there is no input signal will restore defaults for the currently selected input source. 20 Restore Menu Defaults RCVUN Source Specific Use this setting when there is no input signal changes the volume setting of the projector's speaker.
Volume Adjustment Main Menu Setting Name Input Setting Unit Description Volume RCVUN Source Specific Use this sub-menu to its initial default setting. z Changing this sub-menu to return Volume to adjust the volume level of the currently selected signal source. z Restoring menu defaults when there is no input signal will restore defaults for the currently selected input source. 20 Restore Menu Defaults RCVUN Source Specific Use this setting when there is no input signal changes the volume setting of the projector's speaker.
Owners Manual
Page 21
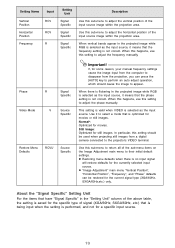
...as a movie screen, high-definition TV, etc. Note When the input source is positioned upside down. Use this sub-menu to configure the projector for use in an installation in logo screen at startup. Off*: Projects a normal image. Note that has been squeezed to a 4:3 image causes...aspect ratio, which it is a component signal with its normal 16:9 aspect ratio. Using this sub-menu to be projected whenever the projector is turned on the legally protected copyright of the copyright holder of the following aspect ratios for commercial purposes or public presentation may infringe ...
...as a movie screen, high-definition TV, etc. Note When the input source is positioned upside down. Use this sub-menu to configure the projector for use in an installation in logo screen at startup. Off*: Projects a normal image. Note that has been squeezed to a 4:3 image causes...aspect ratio, which it is a component signal with its normal 16:9 aspect ratio. Using this sub-menu to be projected whenever the projector is turned on the legally protected copyright of the copyright holder of the following aspect ratios for commercial purposes or public presentation may infringe ...

Owners Manual
Page 22
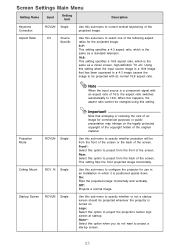
... Select this option to project a blue screen. Logo: Select this option to project a blue screen. Blue: Select this option to project the projector's built-in logo screen. Logo: Select this option to project a black screen. Use this sub-menu to return all of the sub-menu ... Settings main menu to their initial defaults, regardless of the currently selected input source. 22 Black: Select this option to project the projector's built-in logo screen. Setting Name No Signal Screen Input Setting Unit RCVUN Single Blank Screen RCVUN Single Restore Menu Defaults RCVUN Source...
... Select this option to project a blue screen. Logo: Select this option to project a blue screen. Blue: Select this option to project the projector's built-in logo screen. Logo: Select this option to project a black screen. Use this sub-menu to return all of the sub-menu ... Settings main menu to their initial defaults, regardless of the currently selected input source. 22 Black: Select this option to project the projector's built-in logo screen. Setting Name No Signal Screen Input Setting Unit RCVUN Single Blank Screen RCVUN Single Restore Menu Defaults RCVUN Source...
Owners Manual
Page 23
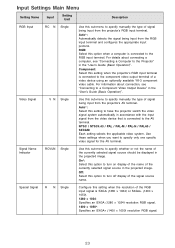
...Input Setting Unit Description RGB Input RCUVN Single Use this sub-menu to specify manually the type of signal being input from the projector's AV terminal. For information about connecting a computer, see "Connecting to the AV terminal. Use these settings when you want ...*: Specifies an SXGA+ (1400 × 1050) resolution RGB signal. 23 For details about connection, see "Connecting a Computer to the Projector" in the "User's Guide (Basic Operation)". Special Signal RUUUN Single Configure this setting to specify whether or not the name of signal being ...
...Input Setting Unit Description RGB Input RCUVN Single Use this sub-menu to specify manually the type of signal being input from the projector's AV terminal. For information about connecting a computer, see "Connecting to the AV terminal. Use these settings when you want ...*: Specifies an SXGA+ (1400 × 1050) resolution RGB signal. 23 For details about connection, see "Connecting a Computer to the Projector" in the "User's Guide (Basic Operation)". Special Signal RUUUN Single Configure this setting to specify whether or not the name of signal being ...
Owners Manual
Page 24
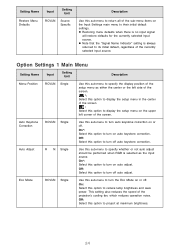
z Note that the "Signal Name Indicator" setting is always returned to its initial default, regardless of the projector's cooling fan, which reduces operation noise. Off: Select this option to turn on or off auto adjust. This setting also reduces the speed of the ...
z Note that the "Signal Name Indicator" setting is always returned to its initial default, regardless of the projector's cooling fan, which reduces operation noise. Off: Select this option to turn on or off auto adjust. This setting also reduces the speed of the ...

