
User Guide
Page 9
... an extension cord. TPrinthead and Ink Tanks z Store the ink tanks out of the reach of the printhead become extremely hot during normal operation. Gripping either end of the printer. Always grip the plug to cool.... z To avoid staining clothing or your work area with spilled ink, never shake or drop the printhead or an ink tank. z The electrical contacts of small children. If a child accidentally ingests ink from... tank, contact a physician immediately. TMoving the Printer z The W7200 printer unit weighs 72 kg (159 lb.), and the W7250 printer unit weighs 60kg (132 lb.).
... an extension cord. TPrinthead and Ink Tanks z Store the ink tanks out of the reach of the printhead become extremely hot during normal operation. Gripping either end of the printer. Always grip the plug to cool.... z To avoid staining clothing or your work area with spilled ink, never shake or drop the printhead or an ink tank. z The electrical contacts of small children. If a child accidentally ingests ink from... tank, contact a physician immediately. TMoving the Printer z The W7200 printer unit weighs 72 kg (159 lb.), and the W7250 printer unit weighs 60kg (132 lb.).

User Guide
Page 11
... 2-18 Selecting the Cut Sheet Source 2-18 Loading Cut Sheets 2-20 Select the Cut Sheet Type 2-24 High Quality Printing on Film 2-25 Adjusting Printhead Height 2-25 Aligning the Printhead 2-28 Re-adjusting Printhead Height 2-28 Using the Media Take-up Unit 2-29 Settings for Using the Media Take-up Unit 2-30 ix
... 2-18 Selecting the Cut Sheet Source 2-18 Loading Cut Sheets 2-20 Select the Cut Sheet Type 2-24 High Quality Printing on Film 2-25 Adjusting Printhead Height 2-25 Aligning the Printhead 2-28 Re-adjusting Printhead Height 2-28 Using the Media Take-up Unit 2-29 Settings for Using the Media Take-up Unit 2-30 ix
User Guide
Page 13
... Inside the Upper Cover 6-11 Cleaning the Paper Restraint 6-13 Cleaning the Carriage Rail 6-15 Replacing the Printhead 6-18 Handing Printhead Precautions 6-18 How to Replace the Printhead 6-19 Chapter 7 Troubleshooting Having a Problem 7-2 Printer Not Operating Correctly 7-3 Cannot Print 7-3 Printing Does Not...Jam 7-18 Removing a Cut Sheet Jam 7-26 Checking the Print Status 7-29 Cleaning the Printhead 7-31 Types of Printhead Cleaning 7-31 Printhead Cleaning Procedure 7-31 Aligning the Printhead 7-33 Adjusting Amount of Media Feed 7-36 Reducing the Amount of Cut Waste 7-38 ...
... Inside the Upper Cover 6-11 Cleaning the Paper Restraint 6-13 Cleaning the Carriage Rail 6-15 Replacing the Printhead 6-18 Handing Printhead Precautions 6-18 How to Replace the Printhead 6-19 Chapter 7 Troubleshooting Having a Problem 7-2 Printer Not Operating Correctly 7-3 Cannot Print 7-3 Printing Does Not...Jam 7-18 Removing a Cut Sheet Jam 7-26 Checking the Print Status 7-29 Cleaning the Printhead 7-31 Types of Printhead Cleaning 7-31 Printhead Cleaning Procedure 7-31 Aligning the Printhead 7-33 Adjusting Amount of Media Feed 7-36 Reducing the Amount of Cut Waste 7-38 ...

User Guide
Page 16
... casters to load roll media. (Æ P.2-7) d Roll media tray Holds the roll holder and roll media. The output stacker, or optional Media Take-up Unit (W7200 only), can be mounted inside the printer. (Æ P.6-18, P.7-26) b Left cover Open to replace the mist filter. (Æ Filter Instructions provided with stand) A cloth...feed cut sheets and to receive printed output from the printer. Printer Part Names Printer Main Unit TFront View a b g c d h e i f j a Upper cover Open to install the printhead or to remove paper jams inside the stand. 1-2 Before Using the Printer
... casters to load roll media. (Æ P.2-7) d Roll media tray Holds the roll holder and roll media. The output stacker, or optional Media Take-up Unit (W7200 only), can be mounted inside the printer. (Æ P.6-18, P.7-26) b Left cover Open to replace the mist filter. (Æ Filter Instructions provided with stand) A cloth...feed cut sheets and to receive printed output from the printer. Printer Part Names Printer Main Unit TFront View a b g c d h e i f j a Upper cover Open to install the printhead or to remove paper jams inside the stand. 1-2 Before Using the Printer

User Guide
Page 18
... path. b Paper restraint Required for the printer power cord. c Platen Supports the paper from below while the printhead moves from side to side on the surface of the Media Take-up Unit connector (Only W7200) Provides a connection point for the carriage as it moves from side to load a cut sheet, feed a cut...
... path. b Paper restraint Required for the printer power cord. c Platen Supports the paper from below while the printhead moves from side to side on the surface of the Media Take-up Unit connector (Only W7200) Provides a connection point for the carriage as it moves from side to load a cut sheet, feed a cut...

User Guide
Page 19
...Cover) a e b f c d a Carriage cover Protects the carriage. Open to install the printhead. (Æ Setup Guide) e Printhead height adjustment lever Lever used to install the printhead. (Æ Setup Guide) c Printhead Equipped with the nozzles that supply the inks for the media in use the printer. (Æ ... . (Æ P.2-27) f Carriage Holds the printhead and moves it before shipping, so you must be adjusted for printing. Open the carriage cover to install the printhead. (Æ Setup Guide) b Printhead lock cover Holds the printhead in place. Open to adjust the height of the...
...Cover) a e b f c d a Carriage cover Protects the carriage. Open to install the printhead. (Æ Setup Guide) e Printhead height adjustment lever Lever used to install the printhead. (Æ Setup Guide) c Printhead Equipped with the nozzles that supply the inks for the media in use the printer. (Æ ... . (Æ P.2-27) f Carriage Holds the printhead and moves it before shipping, so you must be adjusted for printing. Open the carriage cover to install the printhead. (Æ Setup Guide) b Printhead lock cover Holds the printhead in place. Open to adjust the height of the...

User Guide
Page 51
... quality image printing. Paper Source Roll Media Cut Sheet Data Message Power Cancel Enter Online High Quality Printing on Film 2-25 Adjusting Printhead Height 1 Press the Online button to display "Offline". Otherwise, the print job will not achieve the best results. High Quality ... Windows or a Macintosh. (Æ Chapter 3, or Chapter 4) • After completing the special print job, return the printhead height to its original setting and re-align the printhead. (Æ P.2-28) Important z When adjusting the height of printing, or if you need eliminate coarse texture in the down...
... quality image printing. Paper Source Roll Media Cut Sheet Data Message Power Cancel Enter Online High Quality Printing on Film 2-25 Adjusting Printhead Height 1 Press the Online button to display "Offline". Otherwise, the print job will not achieve the best results. High Quality ... Windows or a Macintosh. (Æ Chapter 3, or Chapter 4) • After completing the special print job, return the printhead height to its original setting and re-align the printhead. (Æ P.2-28) Important z When adjusting the height of printing, or if you need eliminate coarse texture in the down...

User Guide
Page 52
Important z To avoid soiling your hands or damaging the printer, never touch any part inside the printer unless instructed to clean the printhead height adjustment lever. 2-26 Print Media You Can Use 2 Press and hold for more than 1 second. z If the printhead height adjustment lever is dirty, before continuing with this procedure, wring out a damp cloth and use it to do so. Paper Source Roll Media Cut Sheet Data Message Power Cancel Enter Online The carriage moves to the center. 3 Open the upper cover.
Important z To avoid soiling your hands or damaging the printer, never touch any part inside the printer unless instructed to clean the printhead height adjustment lever. 2-26 Print Media You Can Use 2 Press and hold for more than 1 second. z If the printhead height adjustment lever is dirty, before continuing with this procedure, wring out a damp cloth and use it to do so. Paper Source Roll Media Cut Sheet Data Message Power Cancel Enter Online The carriage moves to the center. 3 Open the upper cover.

User Guide
Page 53
For printing on thick paper, or on paper, set the lever to the up position (c). For printing on paper that wrinkles easily, set the lever to print. The carriage returns to the home position, the Online lamp lights, and the printer is ready to the down position (a). c b a 5 Close the upper cover. For printing on Film 2-27 High Quality Printing on film-base media, set the lever to the center(standard) position (b). 4 Adjust the height of the printhead with the printhead height adjustment lever.
For printing on thick paper, or on paper, set the lever to the up position (c). For printing on paper that wrinkles easily, set the lever to print. The carriage returns to the home position, the Online lamp lights, and the printer is ready to the down position (a). c b a 5 Close the upper cover. For printing on Film 2-27 High Quality Printing on film-base media, set the lever to the center(standard) position (b). 4 Adjust the height of the printhead with the printhead height adjustment lever.

User Guide
Page 54
... Pattern A", then adjust the printhead alignment. (Æ "Aligning the Printhead" P.7-33) Re-adjusting Printhead Height After the print job is finished, especially before starting the next print with another type of media, you must do the procedure to reset the printhead height adjustment lever to the center... (standard) position. (Æ "Adjusting Printhead Height" P.2-25) After re-adjusting the printhead height position, you should once again use the operation panel to align the...
... Pattern A", then adjust the printhead alignment. (Æ "Aligning the Printhead" P.7-33) Re-adjusting Printhead Height After the print job is finished, especially before starting the next print with another type of media, you must do the procedure to reset the printhead height adjustment lever to the center... (standard) position. (Æ "Adjusting Printhead Height" P.2-25) After re-adjusting the printhead height position, you should once again use the operation panel to align the...
User Guide
Page 93
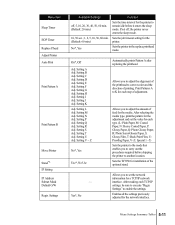
... to return to execute functions. Function Menus 5-7 Enter Press to the previous level above. Ink Tank *4 Roll Media Type *3 Cut Sheet Type Take-up Reel". *3 W7200 only. *4 Displayed only when "Cut Sheet" is selected as the Media Source. *5 Displayed only when "Roll Media" is selected as the Media Source and "Cutter... menus. TMain Menu MAIN MENU *2,3 *1 Auto Feed Force Cutting Head Cleaning *5 Auto Cut Rep. Press to move to make system and option settings, clean the printhead, print test prints, and display information about the printer settings.
... to return to execute functions. Function Menus 5-7 Enter Press to the previous level above. Ink Tank *4 Roll Media Type *3 Cut Sheet Type Take-up Reel". *3 W7200 only. *4 Displayed only when "Cut Sheet" is selected as the Media Source. *5 Displayed only when "Roll Media" is selected as the Media Source and "Cutter... menus. TMain Menu MAIN MENU *2,3 *1 Auto Feed Force Cutting Head Cleaning *5 Auto Cut Rep. Press to move to make system and option settings, clean the printhead, print test prints, and display information about the printer settings.

User Guide
Page 96
..., Heavy Coated, Glossy Paper, Photo Glossy, Semi-Glossy, Glossy Film, Back Print Film, Proof, Special 1~5 No*, Yes Yes*, Print Cut Line, No Function Cleans the printhead. However, when the media is automatically switched off and on. When "Enable" is selected, the cutter is within 10 cm (4 in the tables are the... Feed*2,3 Take-up Unit. Menu Settings Summary Tables The menus provide the functions listed and described in the replace ink tank mode. Re-fills the printhead with ink. If you select "Print Cut Line", a line prints to guide manual cutting.
..., Heavy Coated, Glossy Paper, Photo Glossy, Semi-Glossy, Glossy Film, Back Print Film, Proof, Special 1~5 No*, Yes Yes*, Print Cut Line, No Function Cleans the printhead. However, when the media is automatically switched off and on. When "Enable" is selected, the cutter is within 10 cm (4 in the tables are the... Feed*2,3 Take-up Unit. Menu Settings Summary Tables The menus provide the functions listed and described in the replace ink tank mode. Re-fills the printhead with ink. If you select "Print Cut Line", a line prints to guide manual cutting.
User Guide
Page 97
...Adj. Setting V ~ Z No*, Yes Use*, No Use Automatically prints Pattern A after replacing the printhead. After making each step of adjustment. Menu Settings Summary Tables 5-11 Sets the printer in the replace printhead mode. Setting B Adj. After selecting the media type, print the pattern for the adjustment and set... to correct color and the direction of the optional stand. - Print Patterns A to remain idle before shipping the printer to adjust the amount of the printhead to set off , 5, 10, 20, 30, 40, 50, 60 min. (Default: 20 min.) 10, 30 sec.; 1, 2, 5, 10, 30, 60 min. (Default...
...Adj. Setting V ~ Z No*, Yes Use*, No Use Automatically prints Pattern A after replacing the printhead. After making each step of adjustment. Menu Settings Summary Tables 5-11 Sets the printer in the replace printhead mode. Setting B Adj. After selecting the media type, print the pattern for the adjustment and set... to correct color and the direction of the optional stand. - Print Patterns A to remain idle before shipping the printer to adjust the amount of the printhead to set off , 5, 10, 20, 30, 40, 50, 60 min. (Default: 20 min.) 10, 30 sec.; 1, 2, 5, 10, 30, 60 min. (Default...

User Guide
Page 100
... screen or in the printer operation panel display warns you when the ink tank level in a tank is very low, you may not be replaced. z W7200 Ink Tank z W7250 Ink Tank • Yellow Ink BCI-1411Y • Magenta Ink BCI-1411M • Photo Magenta Ink BCI-1411PM • Cyan ... that consume ink. When this message is displayed, this message is displayed, have extra ink tanks on hand for replacement. In such a case, perform printhead cleaning ("Head Cleaning") after replacing the ink tank. 6-2 Maintenance After this means that the ink tank will run out of ink very soon. TWhen the...
... screen or in the printer operation panel display warns you when the ink tank level in a tank is very low, you may not be replaced. z W7200 Ink Tank z W7250 Ink Tank • Yellow Ink BCI-1411Y • Magenta Ink BCI-1411M • Photo Magenta Ink BCI-1411PM • Cyan ... that consume ink. When this message is displayed, this message is displayed, have extra ink tanks on hand for replacement. In such a case, perform printhead cleaning ("Head Cleaning") after replacing the ink tank. 6-2 Maintenance After this means that the ink tank will run out of ink very soon. TWhen the...

User Guide
Page 104
... that the color of an ink tank. b c > ? 7 With the ink ports pointing down and the label facing in the direction shown in the tubes and printhead, causing the printer to print the wrong colors. 8 Close the ink tank cover until you hear it catch. 6-6 Maintenance z To prevent poor print quality, spilling...
... that the color of an ink tank. b c > ? 7 With the ink ports pointing down and the label facing in the direction shown in the tubes and printhead, causing the printer to print the wrong colors. 8 Close the ink tank cover until you hear it catch. 6-6 Maintenance z To prevent poor print quality, spilling...

User Guide
Page 106
Canon is switched off for the ink tank you want to the printhead. Switching Off Ink Level Detection 1 Press the Online button twice to display "MAIN MENU". 2 Press or to display "System Setup", then press . 3 Press or to ... displayed, press or to operate abnormally in other ways. Executing Print Job After switching ink level detection function off could damage the printer, especially the printhead, or could cause ink to leak from running out of the ink tank ("Bk Ink Tank", etc.), then press the Enter button. 5 When "Execute?" z Repeatedly...
Canon is switched off for the ink tank you want to the printhead. Switching Off Ink Level Detection 1 Press the Online button twice to display "MAIN MENU". 2 Press or to display "System Setup", then press . 3 Press or to ... displayed, press or to operate abnormally in other ways. Executing Print Job After switching ink level detection function off could damage the printer, especially the printhead, or could cause ink to leak from running out of the ink tank ("Bk Ink Tank", etc.), then press the Enter button. 5 When "Execute?" z Repeatedly...

User Guide
Page 113
Use the rail cleaner provided with this printer, clean the carriage rail at least once a year or when the printhead is used to wipe and dry the rail. 1 Press and hold the Power button for 3 seconds, then switch the printer off. If the rail cleaner ...
Use the rail cleaner provided with this printer, clean the carriage rail at least once a year or when the printhead is used to wipe and dry the rail. 1 Press and hold the Power button for 3 seconds, then switch the printer off. If the rail cleaner ...

User Guide
Page 116
... after calling a Help Desk or service center in response to a printer service call error and the service technician directs you to handle the printhead during printing. Note z Contact a Canon service center for replacement as soon as a result of small children. z When the ink supply runs low in the printer. If a child accidentally...
... after calling a Help Desk or service center in response to a printer service call error and the service technician directs you to handle the printhead during printing. Note z Contact a Canon service center for replacement as soon as a result of small children. z When the ink supply runs low in the printer. If a child accidentally...

User Guide
Page 117
...the printer on the printer operation panel. • Remove printed and other media from the printhead, remove it. • Install the new printhead. How to Replace the Printhead Before replacing the printhead, you must first replace the two filters provided with the filters) • Execute "Replace...198; P.6-13, P.6-15) • Replace the filters (Æ Instructions provided with the printhead package. If you fail to follow exactly the procedure below when you must follow procedure, the printhead may leak and stain the work area. 1 Press the Power button to display "MAIN MENU...
...the printer on the printer operation panel. • Remove printed and other media from the printhead, remove it. • Install the new printhead. How to Replace the Printhead Before replacing the printhead, you must first replace the two filters provided with the filters) • Execute "Replace...198; P.6-13, P.6-15) • Replace the filters (Æ Instructions provided with the printhead package. If you fail to follow exactly the procedure below when you must follow procedure, the printhead may leak and stain the work area. 1 Press the Power button to display "MAIN MENU...

User Guide
Page 118
... finished, "Open UpperCover" is dirty, clean them with a damp cloth before you replace the printhead. 6-20 Maintenance Replace P.Head Yes "Please Wait" is displayed, and the preparation for printhead replacement begins. z Check the carriage cover, printhead lock cover, and the printhead lock lever. Preparation requires about 2 minutes. Important z To avoid soiling your hands or...
... finished, "Open UpperCover" is dirty, clean them with a damp cloth before you replace the printhead. 6-20 Maintenance Replace P.Head Yes "Please Wait" is displayed, and the preparation for printhead replacement begins. z Check the carriage cover, printhead lock cover, and the printhead lock lever. Preparation requires about 2 minutes. Important z To avoid soiling your hands or...


