

User Guide
Page 5
...used in accordance with Part 15 of FCC Rules. Inc. These limits are designed to provide reasonable protection against harmful interference in the manual. Canon U.S.A. One Canon Plaza, Lake Success, NY 11042, U.S.A. Tel No. 516-328-5600 iii However, there is connected. • Consult the ...by one or more of the following two conditions: (1) This device may not cause harmful interference, and (2) this product FCC Regulations Canon Large Format Printer, Model K90017/K90018 IEEE1394 Expansion Board EB-01, Model K90023 This device complies with the instructions, may cause undesired...
...used in accordance with Part 15 of FCC Rules. Inc. These limits are designed to provide reasonable protection against harmful interference in the manual. Canon U.S.A. One Canon Plaza, Lake Success, NY 11042, U.S.A. Tel No. 516-328-5600 iii However, there is connected. • Consult the ...by one or more of the following two conditions: (1) This device may not cause harmful interference, and (2) this product FCC Regulations Canon Large Format Printer, Model K90017/K90018 IEEE1394 Expansion Board EB-01, Model K90023 This device complies with the instructions, may cause undesired...

User Guide
Page 18
Upper this lever to open the paper restraint when you need to load a cut sheet, feed a cut sheet manually, or clean inside the printer. 1-4 Before Using the Printer g Media Take-up Unit connector (Only W7200) Provides a connection point for the carriage as it moves from side to side on the surface of the...
Upper this lever to open the paper restraint when you need to load a cut sheet, feed a cut sheet manually, or clean inside the printer. 1-4 Before Using the Printer g Media Take-up Unit connector (Only W7200) Provides a connection point for the carriage as it moves from side to side on the surface of the...

User Guide
Page 22
... Take-up Unit d a b e f c a Take-up holder Holds the take -mode between automatic and manual. d Take-up mode switch Switches the take -up mode switch is set for automatic and a sheet of the print media. f Sensor unit Senses the presence ...
... Take-up Unit d a b e f c a Take-up holder Holds the take -mode between automatic and manual. d Take-up mode switch Switches the take -up mode switch is set for automatic and a sheet of the print media. f Sensor unit Senses the presence ...

User Guide
Page 47
... the platen, you are concerned about the sound caused by these suction holes. This is not abnormal. If the roll media has been taken up manually, be sure to close the roll media tray and the tray. 4 With the front side of the cut sheet is skewed, this procedure is not... printer is set it on the platen. 3 If the W7250 is used without the optional stand, open the tray then the roll media tray and manually turn the roll holder to take-up on the stand, this will cause an error.
... the platen, you are concerned about the sound caused by these suction holes. This is not abnormal. If the roll media has been taken up manually, be sure to close the roll media tray and the tray. 4 With the front side of the cut sheet is skewed, this procedure is not... printer is set it on the platen. 3 If the W7250 is used without the optional stand, open the tray then the roll media tray and manually turn the roll holder to take-up on the stand, this will cause an error.

User Guide
Page 57
a Using the Media Take-up mode switch to the left. Store the output stacker where it from the stand. Manual Feed/Forward Auto 2 If the output stacker is installed, remove it will not interfere with the sensors. 3 While pressing down on the slide holder release lever (a), move the slide holder to "Manual". Loading Roll Media 1 On the Media Take-up Unit, set the take-up Unit 2-31
a Using the Media Take-up mode switch to the left. Store the output stacker where it from the stand. Manual Feed/Forward Auto 2 If the output stacker is installed, remove it will not interfere with the sensors. 3 While pressing down on the slide holder release lever (a), move the slide holder to "Manual". Loading Roll Media 1 On the Media Take-up Unit, set the take-up Unit 2-31

User Guide
Page 60
Manual Feed/Forward Auto 12 Press to take -up about two complete roll turns of media. 10 Press to feed some slack into the roll media. 11 On the Media Take-up Unit, press down the take up switch to feed some slack into the roll media. 2-34 Print Media You Can Use
Manual Feed/Forward Auto 12 Press to take -up about two complete roll turns of media. 10 Press to feed some slack into the roll media. 11 On the Media Take-up Unit, press down the take up switch to feed some slack into the roll media. 2-34 Print Media You Can Use

User Guide
Page 62
.... You can now execute print jobs from the Media Take-up Unit When the print job is finished, follow the procedures below to display "Offline". Manual Feed/Forward Auto The completes the installation of the roll. If you want to save the roll media that you are about to remove, feed...
.... You can now execute print jobs from the Media Take-up Unit When the print job is finished, follow the procedures below to display "Offline". Manual Feed/Forward Auto The completes the installation of the roll. If you want to save the roll media that you are about to remove, feed...

User Guide
Page 63
Paper Source Roll Media Cut Sheet Data Message Power Cancel Enter Online 6 Press or to display "MAIN MENU". Manual Feed/Forward Auto 4 Remove the weight roll from inside the roll media. 5 Press the Online button twice to display "Force Cutting" then press . 3 On the Media Take-up Unit, set the take-up Unit 2-37 MAIN MENU Force Cutting Using the Media Take-up mode switch to "Manual".
Paper Source Roll Media Cut Sheet Data Message Power Cancel Enter Online 6 Press or to display "MAIN MENU". Manual Feed/Forward Auto 4 Remove the weight roll from inside the roll media. 5 Press the Online button twice to display "Force Cutting" then press . 3 On the Media Take-up Unit, set the take-up Unit 2-37 MAIN MENU Force Cutting Using the Media Take-up mode switch to "Manual".
User Guide
Page 64
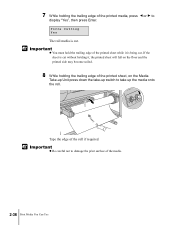
... not to damage the print surface of the roll if required. Force Cutting Yes The roll media is cut without holding it is being cut . Manual Feed/Forward Auto Tape the edge of the media. 2-38 Print Media You Can Use 7 While holding the trailing edge of the printed sheet, on...
... not to damage the print surface of the roll if required. Force Cutting Yes The roll media is cut without holding it is being cut . Manual Feed/Forward Auto Tape the edge of the media. 2-38 Print Media You Can Use 7 While holding the trailing edge of the printed sheet, on...
User Guide
Page 71
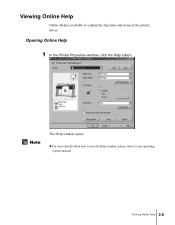
Viewing Online Help Online Help is available to your operating system manual. Viewing Online Help 3-5 Opening Online Help 1 In the Printer Properties window, click the Help button. z For more details about how to use the Help window, please refer to explain the functions and items of the printer driver. Note The Help window opens.
Viewing Online Help Online Help is available to your operating system manual. Viewing Online Help 3-5 Opening Online Help 1 In the Printer Properties window, click the Help button. z For more details about how to use the Help window, please refer to explain the functions and items of the printer driver. Note The Help window opens.

User Guide
Page 85
... Acrobat Reader is available on the User Software CD-ROM in the OS 8/9 folder. z You can copy the Help file to the Adobe Acrobat Reader manual. z For details about how to use Adobe Acrobat Reader, please refer to the hard disk. Viewing Help 4-13 Viewing Help The Help file is required...
... Acrobat Reader is available on the User Software CD-ROM in the OS 8/9 folder. z You can copy the Help file to the Adobe Acrobat Reader manual. z For details about how to use Adobe Acrobat Reader, please refer to the hard disk. Viewing Help 4-13 Viewing Help The Help file is required...

User Guide
Page 90
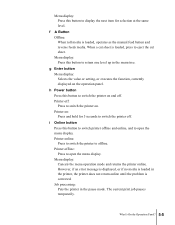
... left . d Button Offline: When roll media is loaded, press to select Roll Media or Cut Sheet. Menu display: Press this button to feed the media manually. b Cancel button Offline: Press and hold for over 1 second to move the carriage to display the previous items on the operation panel are used for...
... left . d Button Offline: When roll media is loaded, press to select Roll Media or Cut Sheet. Menu display: Press this button to feed the media manually. b Cancel button Offline: Press and hold for over 1 second to move the carriage to display the previous items on the operation panel are used for...
User Guide
Page 91
... the menu display. Job processing: Puts the printer in the printer, the printer does not return online until the problem is loaded, operates as the manual feed button and reverse feeds media. Menu display: Press this button to display the next item for 3 seconds to switch the printer off . Menu display...
... the menu display. Job processing: Puts the printer in the printer, the printer does not return online until the problem is loaded, operates as the manual feed button and reverse feeds media. Menu display: Press this button to display the next item for 3 seconds to switch the printer off . Menu display...

User Guide
Page 96
... type setting for the Media Take-up Reel*3 Cut Sheet Type*4 Roll Media Type Rep. If you select "Print Cut Line", a line prints to guide manual cutting. Main Menu Menu Item Head Cleaning Force Cutting*1 Auto Feed*2,3 Take-up Unit. However, when the media is within 10 cm (4 in.) of the...
... type setting for the Media Take-up Reel*3 Cut Sheet Type*4 Roll Media Type Rep. If you select "Print Cut Line", a line prints to guide manual cutting. Main Menu Menu Item Head Cleaning Force Cutting*1 Auto Feed*2,3 Take-up Unit. However, when the media is within 10 cm (4 in.) of the...

User Guide
Page 102
.... Ink Tank" then press . Ink Tank Yes The right cover unlocks and opens automatically. To avoid damaging the right cover, never attempt to force it manually. Paper Source Roll Media Cut Sheet Data Message Power Cancel Enter Online 2 Press or to replace, then open the ink tank cover. 6-4 Maintenance
.... Ink Tank" then press . Ink Tank Yes The right cover unlocks and opens automatically. To avoid damaging the right cover, never attempt to force it manually. Paper Source Roll Media Cut Sheet Data Message Power Cancel Enter Online 2 Press or to replace, then open the ink tank cover. 6-4 Maintenance
User Guide
Page 135
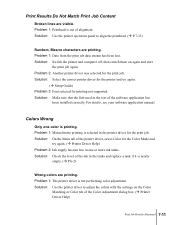
... off, then switch them on the Color Matching or Color tab of the software application has been installed correctly. For details, see your software application manual. Problem 1: Monochrome printing is not performing color adjustment. Solution: Use the printer driver to align the printhead. (Æ P.7-33) Random, Bizarre characters are visible...
... off, then switch them on the Color Matching or Color tab of the software application has been installed correctly. For details, see your software application manual. Problem 1: Monochrome printing is not performing color adjustment. Solution: Use the printer driver to align the printhead. (Æ P.7-33) Random, Bizarre characters are visible...
User Guide
Page 136
...: Printing a photograph or other large image consumes a large amount of the changes on the screen. This is running low. For details, see your software application manual. Solution: Open the printer driver, click the Device Settings tab then select SSC Adjustment. Problem 2: Colors in a nozzle. Problem 3: Color ink is not abnormal. 7-12...
...: Printing a photograph or other large image consumes a large amount of the changes on the screen. This is running low. For details, see your software application manual. Solution: Open the printer driver, click the Device Settings tab then select SSC Adjustment. Problem 2: Colors in a nozzle. Problem 3: Color ink is not abnormal. 7-12...

User Guide
Page 139
... in the first line of the correct load position, or the media is dusty or dirty. Solution: Open the tray, then turn the roll holder manually to feed more media than allowed. Solution: Open the upper cover and clean inside the upper cover or the belt stopper have not been removed...
... in the first line of the correct load position, or the media is dusty or dirty. Solution: Open the tray, then turn the roll holder manually to feed more media than allowed. Solution: Open the upper cover and clean inside the upper cover or the belt stopper have not been removed...

User Guide
Page 140
... with this printer. Solution: Install the printhead correctly. (Æ P.6-18) Problem 2: The printhead installed cannot be processed due to the large amount of the media manually to divide the job. No Media Problem 1: The media in the printer driver. Solution: If roll media is in the printer. No Printhead Problem 1: The...
... with this printer. Solution: Install the printhead correctly. (Æ P.6-18) Problem 2: The printhead installed cannot be processed due to the large amount of the media manually to divide the job. No Media Problem 1: The media in the printer driver. Solution: If roll media is in the printer. No Printhead Problem 1: The...

User Guide
Page 146
3 Move the carriage manually when it is out of the carriage rail before attempting to remove the media. 4 Raise the paper release lever. 5 Hold the jammed sheet by the left and right edges and pull it toward you, then cut it where the printing ends or where it is wrinkled. 7-22 Troubleshooting Move it to the right or left edge of its normally parked position.
3 Move the carriage manually when it is out of the carriage rail before attempting to remove the media. 4 Raise the paper release lever. 5 Hold the jammed sheet by the left and right edges and pull it toward you, then cut it where the printing ends or where it is wrinkled. 7-22 Troubleshooting Move it to the right or left edge of its normally parked position.


