
User Guide
Page 9
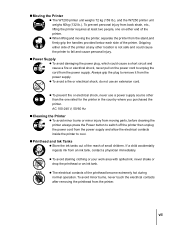
AC 100-240 V, 50/60 Hz TCleaning the Printer z To avoid minor burns or minor injury from moving the printer, separate the printer from an ink tank, contact a physician immediately. Always grip the plug to cool. z To prevent fire or electrical shock, never use an extension cord. TPower Supply z To avoid ... other than the one on the power cord to fall and cause personal injury. To prevent personal injury from the printer. TMoving the Printer z The W7200 printer unit weighs 72 kg (159 lb.), and the W7250 printer unit weighs 60kg (132 lb.).
AC 100-240 V, 50/60 Hz TCleaning the Printer z To avoid minor burns or minor injury from moving the printer, separate the printer from an ink tank, contact a physician immediately. Always grip the plug to cool. z To prevent fire or electrical shock, never use an extension cord. TPower Supply z To avoid ... other than the one on the power cord to fall and cause personal injury. To prevent personal injury from the printer. TMoving the Printer z The W7200 printer unit weighs 72 kg (159 lb.), and the W7250 printer unit weighs 60kg (132 lb.).

User Guide
Page 12
... Flow Summaries 5-7 How to Perform Menu Settings 5-8 Making Settings 5-8 Menu Settings Summary Tables 5-10 Main Menu 5-10 Chapter 6 Maintenance Replacing Ink Tanks 6-2 When to Replace an Ink Tank 6-2 Handling Ink Tank Precautions 6-3 Replacing an Ink Tank 6-4 Caution About Using Refilled Ink Tanks for This Printer 6-8 Switching Off Ink Level Detection 6-8 Executing Print Job 6-8 Cleaning the Printer 6-9 x
... Flow Summaries 5-7 How to Perform Menu Settings 5-8 Making Settings 5-8 Menu Settings Summary Tables 5-10 Main Menu 5-10 Chapter 6 Maintenance Replacing Ink Tanks 6-2 When to Replace an Ink Tank 6-2 Handling Ink Tank Precautions 6-3 Replacing an Ink Tank 6-4 Caution About Using Refilled Ink Tanks for This Printer 6-8 Switching Off Ink Level Detection 6-8 Executing Print Job 6-8 Cleaning the Printer 6-9 x
User Guide
Page 13
... and Replacing the Cutter 7-40 Chapter 8 Other Important Information Options 8-2 Media Take-up Unit 8-2 Stand 8-2 IEEE 1394 Expansion Board 8-3 Roll Holder Sets 8-3 Consumables 8-4 Print Media 8-4 Ink Tanks 8-5 Printhead 8-5 Cutter Blades 8-6 Updating the Firmware 8-7 Obtaining the Firmware Update 8-7 xi
... and Replacing the Cutter 7-40 Chapter 8 Other Important Information Options 8-2 Media Take-up Unit 8-2 Stand 8-2 IEEE 1394 Expansion Board 8-3 Roll Holder Sets 8-3 Consumables 8-4 Print Media 8-4 Ink Tanks 8-5 Printhead 8-5 Cutter Blades 8-6 Updating the Firmware 8-7 Obtaining the Firmware Update 8-7 xi

User Guide
Page 17
... the left side of the port, indicates the communication status of the LAN. h Right cover Open to replace ink tanks, this cover may be unlocked automatically by selecting "Rep. In order to replace ink tanks. Ink Tank" from the MAIN MENU on the roll. i Lift handles Grasp the handles provided on the left...
... the left side of the port, indicates the communication status of the LAN. h Right cover Open to replace ink tanks, this cover may be unlocked automatically by selecting "Rep. In order to replace ink tanks. Ink Tank" from the MAIN MENU on the roll. i Lift handles Grasp the handles provided on the left...

User Guide
Page 19
... you must be adjusted for printing. Printer Part Names 1-5 Open to install the printhead. (Æ Setup Guide) c Printhead Equipped with the nozzles that supply the inks for the media in use. (Æ P.2-27) f Carriage Holds the printhead and moves it before you can use the printer. (Æ Setup Guide) d Printhead lock...
... you must be adjusted for printing. Printer Part Names 1-5 Open to install the printhead. (Æ Setup Guide) c Printhead Equipped with the nozzles that supply the inks for the media in use. (Æ P.2-27) f Carriage Holds the printhead and moves it before you can use the printer. (Æ Setup Guide) d Printhead lock...

User Guide
Page 21
... h PC Ink Tank Cover i C Ink Tank Cover j PM Ink Tank Cover k M Ink Tank Cover l Y Ink Tank Cover The ink tank covers protect the tanks and lock them in place. Open the right cover then raise the ink tank cover. TInside the Right Cover g h i a j b k c l d e f a Bk Ink Tank b PC Ink Tank c C Ink Tank d PM Ink Tank e M Ink Tank f Y Ink Tank These tanks hold the ink. Ink Tank...
... h PC Ink Tank Cover i C Ink Tank Cover j PM Ink Tank Cover k M Ink Tank Cover l Y Ink Tank Cover The ink tank covers protect the tanks and lock them in place. Open the right cover then raise the ink tank cover. TInside the Right Cover g h i a j b k c l d e f a Bk Ink Tank b PC Ink Tank c C Ink Tank d PM Ink Tank e M Ink Tank f Y Ink Tank These tanks hold the ink. Ink Tank...

User Guide
Page 28
... POP artwork and other details are described below . This media is more details about Canon print media, please refer to dry completely before handling the media. In such a case, wait for the ink to the instructions provided with each type, and other graphic designs. TCoated Paper Specially ...You Can Use Suitable for each media package. TGlossy Paper Provided with this printer. Note z For more susceptible to change slightly when the ink on the surface of the media has dried completely. Types of Print Media The types of paper or special media, the print area for ...
... POP artwork and other details are described below . This media is more details about Canon print media, please refer to dry completely before handling the media. In such a case, wait for the ink to the instructions provided with each type, and other graphic designs. TCoated Paper Specially ...You Can Use Suitable for each media package. TGlossy Paper Provided with this printer. Note z For more susceptible to change slightly when the ink on the surface of the media has dried completely. Types of Print Media The types of paper or special media, the print area for ...

User Guide
Page 42
... loaded in the printer, avoid opening and closing the tray causes the printer to ensure that the special settings (1 to 5, the greater the amount of ink used on one at a time. z It is recommended that the surface of the printing area is fed approximately 100 mm (4 in use and the ...content of the media types listed above. The setting may require testing and adjustment, depending on the W7200, the paper is clean. 2-16 Print Media You Can Use z You should remove each sheet output to align the leading edge correctly on the media...
... loaded in the printer, avoid opening and closing the tray causes the printer to ensure that the special settings (1 to 5, the greater the amount of ink used on one at a time. z It is recommended that the surface of the printing area is fed approximately 100 mm (4 in use and the ...content of the media types listed above. The setting may require testing and adjustment, depending on the W7200, the paper is clean. 2-16 Print Media You Can Use z You should remove each sheet output to align the leading edge correctly on the media...

User Guide
Page 49
.... (Æ P.2-24) z You should remove each sheet output to 5, the greater the amount of the image. The Special settings determine in 5 steps the amount of ink used on one at a time. z The media size is detected automatically, therefore no setting for the size is not straight. If the set the correct... type of the media. z It is recommended that the special settings (1 to 5) be used . The higher the number in use and the content of ink used when smudges and blots appear on the media in the range of 1 to the output stacker, one of the media types listed above procedure...
.... (Æ P.2-24) z You should remove each sheet output to 5, the greater the amount of the image. The Special settings determine in 5 steps the amount of ink used on one at a time. z The media size is detected automatically, therefore no setting for the size is not straight. If the set the correct... type of the media. z It is recommended that the special settings (1 to 5) be used . The higher the number in use and the content of ink used when smudges and blots appear on the media in the range of 1 to the output stacker, one of the media types listed above procedure...

User Guide
Page 55
...on sensor to ensure that the printed media is dry when it is output from the take-up reel of ink in the printer driver is switched on, the media will be used with cut . However, if the ...Auto Cut setting in a location where the humidity is high, the media may change slightly when the ink on the MAIN MENU. z The Media Take-up Unit cannot be cut sheets. z The Media Take-up Unit ... up. Using the Media Take-up Unit When the optional Media Take-up Unit is installed on the W7200, the media take-up unit can be used to take up printed roll media as relocation or climate control...
...on sensor to ensure that the printed media is dry when it is output from the take-up reel of ink in the printer driver is switched on, the media will be used with cut . However, if the ...Auto Cut setting in a location where the humidity is high, the media may change slightly when the ink on the MAIN MENU. z The Media Take-up Unit cannot be cut sheets. z The Media Take-up Unit ... up. Using the Media Take-up Unit When the optional Media Take-up Unit is installed on the W7200, the media take-up unit can be used to take up printed roll media as relocation or climate control...

User Guide
Page 69
z Before starting the job. If ink runs out during the print job, you want to select the Media Type, paper feed ... Click the Properties button if you may lose the print job data. Important z You should remove each sheet output to check the ink supply before starting a print job on a very long sheet, or a job where many copies are required, be sure to the... output stacker, one at a time. To check the ink supply level, in the Name box, perform the settings for the "Print range" and "Copies" group, then click the OK button....
z Before starting the job. If ink runs out during the print job, you want to select the Media Type, paper feed ... Click the Properties button if you may lose the print job data. Important z You should remove each sheet output to check the ink supply before starting a print job on a very long sheet, or a job where many copies are required, be sure to the... output stacker, one at a time. To check the ink supply level, in the Name box, perform the settings for the "Print range" and "Copies" group, then click the OK button....

User Guide
Page 78
...Type, Media Source, Print Quality, and other settings. The print job starts. If ink runs out during the print job, you are required, be sure to the output stacker, one at a time. To... check the ink supply level, in the Mac drive click the Main menu, click the Printer Information button, then view...for the Page, number of the printer is displayed. Important z You should remove each sheet output to check the ink supply before starting a print job on a very long sheet, or a job where many copies are using Mac ...
...Type, Media Source, Print Quality, and other settings. The print job starts. If ink runs out during the print job, you are required, be sure to the output stacker, one at a time. To... check the ink supply level, in the Mac drive click the Main menu, click the Printer Information button, then view...for the Page, number of the printer is displayed. Important z You should remove each sheet output to check the ink supply before starting a print job on a very long sheet, or a job where many copies are using Mac ...

User Guide
Page 90
... hold for over 1 second to move the carriage to display the previous items on the operation panel are used for over 0.5 seconds to cancel printing, ink drying, or head cleaning and eject the media. Menu display: Press this button to cancel a paused job and eject the media. e Button Offline: Press and...
... hold for over 1 second to move the carriage to display the previous items on the operation panel are used for over 0.5 seconds to cancel printing, ink drying, or head cleaning and eject the media. Menu display: Press this button to cancel a paused job and eject the media. e Button Offline: Press and...
User Guide
Page 93
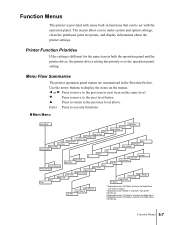
Ink Tank *4 Roll Media Type *3 Cut Sheet Type Take-up Reel". *3 W7200 only. *4 Displayed only when "Cut Sheet" is selected as the Media Source. *6 W7250 only. Function Menus 5-7 The menus allow you to the previous level above. ... the operation panel setting. Enter Press to display the items on the same level. Interface IP Setting Language Ink Check Off CutDustReduct. Function Menus This printer is different for "Take-up Reel RAM Version Ink Nozzle Check Status Print *6 Head Cleaning B Head Cleaning A Stand Move Printer Adjust Printer Replace P.head EOP Timer...
Ink Tank *4 Roll Media Type *3 Cut Sheet Type Take-up Reel". *3 W7200 only. *4 Displayed only when "Cut Sheet" is selected as the Media Source. *6 W7250 only. Function Menus 5-7 The menus allow you to the previous level above. ... the operation panel setting. Enter Press to display the items on the same level. Interface IP Setting Language Ink Check Off CutDustReduct. Function Menus This printer is different for "Take-up Reel RAM Version Ink Nozzle Check Status Print *6 Head Cleaning B Head Cleaning A Stand Move Printer Adjust Printer Replace P.head EOP Timer...

User Guide
Page 96
Menu Settings Summary Tables The menus provide the functions listed and described in the replace ink tank mode. Selects automatic feed for the Media Take-up Unit. Sets the operation for the Media Take-up Reel*3 Cut Sheet Type*4 Roll Media ... Function Cleans the printhead. When the buzzer is cut sheet media. Cuts the roll media at the current position under the cutter. Settings marked with ink. Ink Tank Auto Cut*5 System Setup Cutter Buzzer Available Settings Head Cleaning A Head Cleaning B Yes*, No Yes*, No. Re-fills the printhead with an asterisk (*) in...
Menu Settings Summary Tables The menus provide the functions listed and described in the replace ink tank mode. Selects automatic feed for the Media Take-up Unit. Sets the operation for the Media Take-up Reel*3 Cut Sheet Type*4 Roll Media ... Function Cleans the printhead. When the buzzer is cut sheet media. Cuts the roll media at the current position under the cutter. Settings marked with ink. Ink Tank Auto Cut*5 System Setup Cutter Buzzer Available Settings Head Cleaning A Head Cleaning B Yes*, No Yes*, No. Re-fills the printhead with an asterisk (*) in...

User Guide
Page 98
...of all printer settings. Displays the name of the interface that can be adjusted for the printer unit and the firmware. W7200 only. *4. Switches off the ink level detection function. Displays the amount of media. Error - Displayed only when "Roll Media" is selected for "Take-...Heavy Coated Glossy Paper Photo Glossy Semi-Glossy Glossy Film Back Print Film Proof Special 1~5 Ink Check Off Language Test Print Status Print Off*, On Bk Ink Tank PC Ink Tank C Ink Tank PM Ink Tank M Ink Tank Y Ink Tank English*, , Francais, Deutsch, Italiano, Espanol - When printing on roll media,...
...of all printer settings. Displays the name of the interface that can be adjusted for the printer unit and the firmware. W7200 only. *4. Switches off the ink level detection function. Displays the amount of media. Error - Displayed only when "Roll Media" is selected for "Take-...Heavy Coated Glossy Paper Photo Glossy Semi-Glossy Glossy Film Back Print Film Proof Special 1~5 Ink Check Off Language Test Print Status Print Off*, On Bk Ink Tank PC Ink Tank C Ink Tank PM Ink Tank M Ink Tank Y Ink Tank English*, , Francais, Deutsch, Italiano, Espanol - When printing on roll media,...

User Guide
Page 100
... not be replaced. z W7200 Ink Tank z W7250 Ink Tank • Yellow Ink BCI-1411Y • Magenta Ink BCI-1411M • Photo Magenta Ink BCI-1411PM • Cyan Ink BCI-1411C • Photo Cyan BCI-1411PC • Black Ink BCI-1411Bk • Yellow Ink BCI-1401Y • Magenta Ink BCI-1401M • Photo Magenta Ink BCI-1401PM • Cyan Ink BCI-1401C •...
... not be replaced. z W7200 Ink Tank z W7250 Ink Tank • Yellow Ink BCI-1411Y • Magenta Ink BCI-1411M • Photo Magenta Ink BCI-1411PM • Cyan Ink BCI-1411C • Photo Cyan BCI-1411PC • Black Ink BCI-1411Bk • Yellow Ink BCI-1401Y • Magenta Ink BCI-1401M • Photo Magenta Ink BCI-1401PM • Cyan Ink BCI-1401C •...

User Guide
Page 101
... this message appears. z Do not break the seal of the protective packing on or around the ink port of an ink removed from the printer for every message displayed. Not using the ink tank within six months after its seal could cause poor printing. This could cause poor printing. After... Magenta), C (Cyan), PC (Photo Cyan), Bk (Black). TWhen the "Replace X Tank" Message Is Displayed When an ink tank runs out of ink, the replace tank message is displayed consecutively. After the first ink tank is replaced, the message for each of the tank to avoid staining your clothing or the work...
... this message appears. z Do not break the seal of the protective packing on or around the ink port of an ink removed from the printer for every message displayed. Not using the ink tank within six months after its seal could cause poor printing. This could cause poor printing. After... Magenta), C (Cyan), PC (Photo Cyan), Bk (Black). TWhen the "Replace X Tank" Message Is Displayed When an ink tank runs out of ink, the replace tank message is displayed consecutively. After the first ink tank is replaced, the message for each of the tank to avoid staining your clothing or the work...

User Guide
Page 102
... Online 2 Press or to display "MAIN MENU". Ink Tank 3 Press or to force it manually. Important z You must follow the procedure in Steps 1 to 3 above to open it open. 4 Press the ink tank lever of the color to replace, then open the ink tank cover. 6-4 Maintenance Rep. If the right ...cover does not open completely, open the right cover. Ink Tank" then press . To avoid damaging the right cover, never attempt to...
... Online 2 Press or to display "MAIN MENU". Ink Tank 3 Press or to force it manually. Important z You must follow the procedure in Steps 1 to 3 above to open it open. 4 Press the ink tank lever of the color to replace, then open the ink tank cover. 6-4 Maintenance Rep. If the right ...cover does not open completely, open the right cover. Ink Tank" then press . To avoid damaging the right cover, never attempt to...
User Guide
Page 103
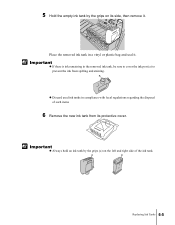
Place the removed ink tank in the removed ink tank, be sure to cover the ink port (a) to prevent the ink from its side, then remove it . a a Replacing Ink Tanks 6-5 Important z Always hold an ink tank by the grips on the left and right side of such items 6 Remove the new ink tank from spilling and staining. a z Discard used ink tanks in compliance with local regulations regarding the disposal of the ink tank. Important z If there is ink remaining in a vinyl or plastic bag and seal it . 5 Hold the empty ink tank by the grips (a) on its protective cover.
Place the removed ink tank in the removed ink tank, be sure to cover the ink port (a) to prevent the ink from its side, then remove it . a a Replacing Ink Tanks 6-5 Important z Always hold an ink tank by the grips on the left and right side of such items 6 Remove the new ink tank from spilling and staining. a z Discard used ink tanks in compliance with local regulations regarding the disposal of the ink tank. Important z If there is ink remaining in a vinyl or plastic bag and seal it . 5 Hold the empty ink tank by the grips (a) on its protective cover.


