

User Guide
Page 16
... casters to load roll media. (Æ P.2-7) d Roll media tray Holds the roll holder and roll media. The output stacker, or optional Media Take-up Unit (W7200 only), can be mounted inside the printer. (Æ P.6-18, P.7-26) b Left cover Open to replace the mist filter. (Æ Filter Instructions provided with stand) A cloth... Main Unit TFront View a b g c d h e i f j a Upper cover Open to install the printhead or to remove paper jams inside the stand. 1-2 Before Using the Printer Open to support the printer main unit.
... casters to load roll media. (Æ P.2-7) d Roll media tray Holds the roll holder and roll media. The output stacker, or optional Media Take-up Unit (W7200 only), can be mounted inside the printer. (Æ P.6-18, P.7-26) b Left cover Open to replace the mist filter. (Æ Filter Instructions provided with stand) A cloth... Main Unit TFront View a b g c d h e i f j a Upper cover Open to install the printhead or to remove paper jams inside the stand. 1-2 Before Using the Printer Open to support the printer main unit.

User Guide
Page 18
... a cut sheet manually, or clean inside the printer. 1-4 Before Using the Printer b Paper restraint Required for media and paper output in the paper path. c Platen Supports the paper from below while the printhead moves from side to side on the surface of the Media Take-up Unit connector (Only... W7200) Provides a connection point for the printer power cord. Upper this lever to open the paper restraint when you need to a computer. (Æ Setup Guide) f Power ...
... a cut sheet manually, or clean inside the printer. 1-4 Before Using the Printer b Paper restraint Required for media and paper output in the paper path. c Platen Supports the paper from below while the printhead moves from side to side on the surface of the Media Take-up Unit connector (Only... W7200) Provides a connection point for the printer power cord. Upper this lever to open the paper restraint when you need to a computer. (Æ Setup Guide) f Power ...

User Guide
Page 65
Important z To avoid poor media feeding, the media core should remain installed when the Media Take-up Unit 2-39 Using the Media Take-up Unit is not in use. 10 If the output stacker was in use, re-attach it to the left, then remove the printed roll media. 9 While supporting the printed media with your hand, press the slide holder release lever to the stand.
Important z To avoid poor media feeding, the media core should remain installed when the Media Take-up Unit 2-39 Using the Media Take-up Unit is not in use. 10 If the output stacker was in use, re-attach it to the left, then remove the printed roll media. 9 While supporting the printed media with your hand, press the slide holder release lever to the stand.
User Guide
Page 135
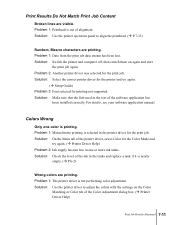
... Color for the print job. Problem 1: Data from the print job data stream has been lost. Problem 2: Another printer driver was selected for printing not supported. Solution: Select the correct printer driver for the printer and try again. (Æ Printer Driver Help) Problem 2: Ink supply has run low in the printer...
... Color for the print job. Problem 1: Data from the print job data stream has been lost. Problem 2: Another printer driver was selected for printing not supported. Solution: Select the correct printer driver for the printer and try again. (Æ Printer Driver Help) Problem 2: Ink supply has run low in the printer...

Setup Guide
Page 17
zW7250 2090mm(82.3in.) 2090mm(82.3in.) 2803mm(110.4in.) 2476mm(97.5in.) 2 Select a Location for the Printer In order to safely use this printer it must be correctly set up in spacious and well ventilated area. 2 Select a Location for the Printer 1-5 T Height zW7200 zW7250 724mm(28.5in.) 1700mm(66.9in.)* 1700mm(66.9in.) 2803mm(110.4in.) TWidth and Depth zW7200 2476mm(97.5in.) * Include the optional support stand. Space Requirements Make sure that there is sufficient space around the printer as shown below.
zW7250 2090mm(82.3in.) 2090mm(82.3in.) 2803mm(110.4in.) 2476mm(97.5in.) 2 Select a Location for the Printer In order to safely use this printer it must be correctly set up in spacious and well ventilated area. 2 Select a Location for the Printer 1-5 T Height zW7200 zW7250 724mm(28.5in.) 1700mm(66.9in.)* 1700mm(66.9in.) 2803mm(110.4in.) TWidth and Depth zW7200 2476mm(97.5in.) * Include the optional support stand. Space Requirements Make sure that there is sufficient space around the printer as shown below.

Setup Guide
Page 23
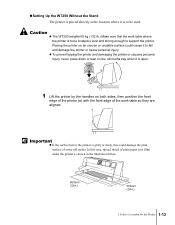
a 2 Lift the printer by the handles on the stand. Adjust the position of the printer so you can see the holes on the bottom of the printer through the two screw holes (c) on both sides, align the printer (a) with the stand (b), then place the printer on both ends of the support plate. a cc b 2 Select a Location for the Printer 1-11 Important z If the floor surface is slippery where the printer is being set up, place the slip prevention sheets (a) under the rear casters.
a 2 Lift the printer by the handles on the stand. Adjust the position of the printer so you can see the holes on the bottom of the printer through the two screw holes (c) on both sides, align the printer (a) with the stand (b), then place the printer on both ends of the support plate. a cc b 2 Select a Location for the Printer 1-11 Important z If the floor surface is slippery where the printer is being set up, place the slip prevention sheets (a) under the rear casters.

Setup Guide
Page 24
3 From the bottom of the stand support plate, attach and tighten two hex screws to both sides of the printer. 4 With the embossed sides facing up, attach the leg covers to the top left and top right side of the stand. 1-12 Setting Up the Printer
3 From the bottom of the stand support plate, attach and tighten two hex screws to both sides of the printer. 4 With the embossed sides facing up, attach the leg covers to the top left and top right side of the stand. 1-12 Setting Up the Printer
Setup Guide
Page 25
... Up the W7250 Without the Stand The printer is placed directly at the location where it to be located is level and strong enough to support the printer. Placing the printer on both sides, then position the front edge of the printer (a) with the front edge of some roll media. Caution...
... Up the W7250 Without the Stand The printer is placed directly at the location where it to be located is level and strong enough to support the printer. Placing the printer on both sides, then position the front edge of the printer (a) with the front edge of some roll media. Caution...

Setup Guide
Page 26
Insert the arms completely into the support brackets for the output stacker on the printer stand when the optional media take-up unit is not installed. 1 To confirm the front and back ...
Insert the arms completely into the support brackets for the output stacker on the printer stand when the optional media take-up unit is not installed. 1 To confirm the front and back ...

Setup Guide
Page 27
Insert the arms completely into the grooves so the arms are diagonal. 4 Insert the longest arms of the output stacker into the front grooves of the support brackets on the left and right side. Insert the arms completely into the grooves so the arms are level. 2 Select a Location for the Printer 1-15 3 Insert the center arms of the output stacker into the center grooves of the support brackets on the left and right side.
Insert the arms completely into the grooves so the arms are diagonal. 4 Insert the longest arms of the output stacker into the front grooves of the support brackets on the left and right side. Insert the arms completely into the grooves so the arms are level. 2 Select a Location for the Printer 1-15 3 Insert the center arms of the output stacker into the center grooves of the support brackets on the left and right side.

Network Guide
Page 10
System Environment Required for Printing The lists below describe the system environments required to support the network in use. „ Using a TCP/IP Network for Printing z Compatible Operating Systems: • Windows Me/Windows 98/Windows 95 • Windows NT ...4.0 • Windows 2000 • Windows XP z Compatible Computers: • IBM PC or IBM compatible PC Important z If you are supported by the network interface of the printer. z Compatible Operating Systems • Mac OS 8.6 or later • Mac OS x 10.1 or later z Compatible AppleTalk •...
System Environment Required for Printing The lists below describe the system environments required to support the network in use. „ Using a TCP/IP Network for Printing z Compatible Operating Systems: • Windows Me/Windows 98/Windows 95 • Windows NT ...4.0 • Windows 2000 • Windows XP z Compatible Computers: • IBM PC or IBM compatible PC Important z If you are supported by the network interface of the printer. z Compatible Operating Systems • Mac OS 8.6 or later • Mac OS x 10.1 or later z Compatible AppleTalk •...

Network Guide
Page 63
... recognize automatically the LAN communication method. Solution: Make sure that the Frame Type and IP Address settings are not connected correctly. This printer does not support the RAW protocol. When You Cannot Print This section describes how to solve printing problems. Cannot print for printing. To correct this job name exceeds...
... recognize automatically the LAN communication method. Solution: Make sure that the Frame Type and IP Address settings are not connected correctly. This printer does not support the RAW protocol. When You Cannot Print This section describes how to solve printing problems. Cannot print for printing. To correct this job name exceeds...


