

User Guide
Page 2
...responsible for any part of this document is prohibited. • The content of this document is correct. Trademarks • Canon and the Canon logo are trademarks of Canon Inc. • Microsoft®, Windows®, Windows NT® and MS-DOS® are registered trademarks of Microsoft ... are trademarks of Apple Computer, Inc., in the U.S.A. • Other brand and product names may be trademarks or registered trademarks of this guide is subject to change without notice. • Every effort has been made to the use of their respective companies. all rights reserved. •...
...responsible for any part of this document is prohibited. • The content of this document is correct. Trademarks • Canon and the Canon logo are trademarks of Canon Inc. • Microsoft®, Windows®, Windows NT® and MS-DOS® are registered trademarks of Microsoft ... are trademarks of Apple Computer, Inc., in the U.S.A. • Other brand and product names may be trademarks or registered trademarks of this guide is subject to change without notice. • Every effort has been made to the use of their respective companies. all rights reserved. •...

User Guide
Page 3
... heading includes tips and hints that you understand what these headings mean and remember the important information described under this guide were created with the W7200 but they also apply to follow the guidelines and advice described under these instructions could cause minor damage to the ...z Failure to the W7250. Always remember and follow these headings. Always remember and follow the guidelines and advice described under this guide, make sure that will help you use this heading to ensure your own safety and the safety of other important information which if...
... heading includes tips and hints that you understand what these headings mean and remember the important information described under this guide were created with the W7200 but they also apply to follow the guidelines and advice described under these instructions could cause minor damage to the ...z Failure to the W7250. Always remember and follow these headings. Always remember and follow the guidelines and advice described under this guide, make sure that will help you use this heading to ensure your own safety and the safety of other important information which if...

User Guide
Page 17
.... i Lift handles Grasp the handles provided on the roll. Lights green for a 100Base connection or lights yellow for a 10Base connection. (Æ Setup Guide) c LAN port Provides a connection point for a LAN cable connected to replace ink tanks. For details, see "Using the Operation Panel Buttons" (Æ...; P.5-4). h Right cover Open to a network hub. (Æ Setup Guide) d DIP switches Allows the switching of communication modes for a USB cable connected to visually check the amount of media remaining on the left ...
.... i Lift handles Grasp the handles provided on the roll. Lights green for a 100Base connection or lights yellow for a 10Base connection. (Æ Setup Guide) c LAN port Provides a connection point for a LAN cable connected to replace ink tanks. For details, see "Using the Operation Panel Buttons" (Æ...; P.5-4). h Right cover Open to a network hub. (Æ Setup Guide) d DIP switches Allows the switching of communication modes for a USB cable connected to visually check the amount of media remaining on the left ...

User Guide
Page 18
... media in the paper path. TTop View (Inside) d a b c a Carriage rail Provides the path for the carriage as it moves from side to a computer. (Æ Setup Guide) f Power connector Provides a connection point for the printer power cord. Upper this lever to open the paper restraint when you need to side. c Platen Supports... for W7250) Provides a connection point for an IEEE 1394 (FireWire) cable connected to side on the surface of the Media Take-up Unit connector (Only W7200) Provides a connection point for the power cord of the paper during printing.
... media in the paper path. TTop View (Inside) d a b c a Carriage rail Provides the path for the carriage as it moves from side to a computer. (Æ Setup Guide) f Power connector Provides a connection point for the printer power cord. Upper this lever to open the paper restraint when you need to side. c Platen Supports... for W7250) Provides a connection point for an IEEE 1394 (FireWire) cable connected to side on the surface of the Media Take-up Unit connector (Only W7200) Provides a connection point for the power cord of the paper during printing.

User Guide
Page 19
...part is not installed before shipping, so you must be adjusted for printing. Open to install the printhead. (Æ Setup Guide) e Printhead height adjustment lever Lever used to install the printhead. (Æ Setup Guide) c Printhead Equipped with the nozzles that supply the inks for the media in use the printer. (Æ Setup... Guide) d Printhead lock lever This lever locks and holds the printhead lock cover in place. Printer Part Names 1-5 Open to adjust the height of the printhead...
...part is not installed before shipping, so you must be adjusted for printing. Open to install the printhead. (Æ Setup Guide) e Printhead height adjustment lever Lever used to install the printhead. (Æ Setup Guide) c Printhead Equipped with the nozzles that supply the inks for the media in use the printer. (Æ Setup... Guide) d Printhead lock lever This lever locks and holds the printhead lock cover in place. Printer Part Names 1-5 Open to adjust the height of the printhead...

User Guide
Page 20
... media tray so you can draw it out of the paper guide on the media in the paper path. When loading roll media, pass the sheet between the paper guide. (Æ Setup Guide) f Roll release lever Releases the pressure of the printer. e Paper guide An important part in the printer. Use this lever to... fasten the belt stopper for storage. (Æ Setup Guide) b Roll stopper Holds the roll media on this lever when loading roll media or when removing jams. 1-6 Before Using the Printer d Roll holder Used when ...
... media tray so you can draw it out of the paper guide on the media in the paper path. When loading roll media, pass the sheet between the paper guide. (Æ Setup Guide) f Roll release lever Releases the pressure of the printer. e Paper guide An important part in the printer. Use this lever to... fasten the belt stopper for storage. (Æ Setup Guide) b Roll stopper Holds the roll media on this lever when loading roll media or when removing jams. 1-6 Before Using the Printer d Roll holder Used when ...

User Guide
Page 23
...on , "Offline" is displayed. Paper Source Roll Media Cut Sheet Data Message Power Cancel Enter Online If no print media is loaded in the Setup Guide to switch the printer on , and "Online" is displayed and the printer waits for you to print. Read the message and perform the required procedure...lamp do not light, check the power cord connections at the printer and the power supply and make sure that they are secure. (Æ Setup Guide) Switching the Printer On and Off 1-9 The printer is loaded in the printer. Switching the Printer On and Off Follow the procedure below to ...
...on , "Offline" is displayed. Paper Source Roll Media Cut Sheet Data Message Power Cancel Enter Online If no print media is loaded in the Setup Guide to switch the printer on , and "Online" is displayed and the printer waits for you to print. Read the message and perform the required procedure...lamp do not light, check the power cord connections at the printer and the power supply and make sure that they are secure. (Æ Setup Guide) Switching the Printer On and Off 1-9 The printer is loaded in the printer. Switching the Printer On and Off Follow the procedure below to ...
User Guide
Page 38
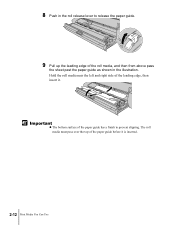
The roll media must pass over the top of the leading edge, then insert it is inserted. 2-12 Print Media You Can Use Hold the roll media near the left and right side of the paper guide before it . Important z The bottom surface of the roll media, and then from above pass the sheet past the paper guide as shown in the roll release lever to release the paper guide. 9 Pull up the leading edge of the paper guide has a finish to prevent slipping. 8 Push in the illustration.
The roll media must pass over the top of the leading edge, then insert it is inserted. 2-12 Print Media You Can Use Hold the roll media near the left and right side of the paper guide before it . Important z The bottom surface of the roll media, and then from above pass the sheet past the paper guide as shown in the roll release lever to release the paper guide. 9 Pull up the leading edge of the paper guide has a finish to prevent slipping. 8 Push in the illustration.

User Guide
Page 39
... lever forward to ensure that the left and right edges of the sheet are parallel with the sides of the roll to lock the paper guide. Pull out enough of the leading edge of the roll sheet so you can align its left and right edges with the edge of the...
... lever forward to ensure that the left and right edges of the sheet are parallel with the sides of the roll to lock the paper guide. Pull out enough of the leading edge of the roll sheet so you can align its left and right edges with the edge of the...

User Guide
Page 40
"Close Tray" is visible below the paper guide. 1~2mm 14 Close the roll media tray. Push the roll media tray in the direction indicated by the arrows to roll the leading edge of the media as far as the paper guide. Turn the roll until approximately 1~2 mm of the leading edge of the roll media is displayed. 2-14 Print Media You Can Use 13 Turn the left and right ends of the roll holder in completely.
"Close Tray" is visible below the paper guide. 1~2mm 14 Close the roll media tray. Push the roll media tray in the direction indicated by the arrows to roll the leading edge of the media as far as the paper guide. Turn the roll until approximately 1~2 mm of the leading edge of the roll media is displayed. 2-14 Print Media You Can Use 13 Turn the left and right ends of the roll holder in completely.

User Guide
Page 45
The Cut Sheet lamp lights. Important z If the roll media is cleared from the paper guide. Loading Cut Sheets 2-19 Paper Source Roll Media Cut Sheet Data Message Power Cancel Enter Online When the printer is set up on the stand ...
The Cut Sheet lamp lights. Important z If the roll media is cleared from the paper guide. Loading Cut Sheets 2-19 Paper Source Roll Media Cut Sheet Data Message Power Cancel Enter Online When the printer is set up on the stand ...

User Guide
Page 47
... the stand, this will cause an error. If the printer is set it straight again. This is straight and aligned with the right guide (a) and the inner guide (b). If the cut sheet is skewed, this procedure is not required because the printer automatically retracts the roll media to within 1 mm ... Important z Set the cut sheet so it is not abnormal. z If you may hear a slight whistling sound, caused by the suction holes, adjust the guide on the left and right to the standby position. 3 If the W7250 is used without the optional stand, open the tray then the roll media...
... the stand, this will cause an error. If the printer is set it straight again. This is straight and aligned with the right guide (a) and the inner guide (b). If the cut sheet is skewed, this procedure is not required because the printer automatically retracts the roll media to within 1 mm ... Important z Set the cut sheet so it is not abnormal. z If you may hear a slight whistling sound, caused by the suction holes, adjust the guide on the left and right to the standby position. 3 If the W7250 is used without the optional stand, open the tray then the roll media...

User Guide
Page 96
... function off and on , it loads as far as the 10 cm (4 in the tables below. If you select "Print Cut Line", a line prints to guide manual cutting. Settings marked with an asterisk (*) in the replace ink tank mode. Re-fills the printhead with roll media. Sets the printer in the...
... function off and on , it loads as far as the 10 cm (4 in the tables below. If you select "Print Cut Line", a line prints to guide manual cutting. Settings marked with an asterisk (*) in the replace ink tank mode. Re-fills the printhead with roll media. Sets the printer in the...
User Guide
Page 127
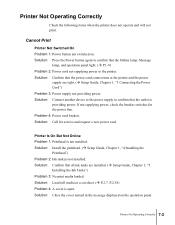
...cord not supplying power to confirm that the outlet is providing power. Problem 4: Power cord broken. Solution: Install the printhead. (Æ Setup Guide, Chapter 1, "4 Installing the Printhead") Problem 2: Ink tank(s) not installed. Solution: Call for the power line. Printer Not Operating Correctly ...7-3 Solution: Confirm that all ink tanks are tight. (Æ Setup Guide, Chapter 1, "3 Connecting the Power Cord") Problem 3: Power supply not providing power. Solution: Connect another device to the power supply ...
...cord not supplying power to confirm that the outlet is providing power. Problem 4: Power cord broken. Solution: Install the printhead. (Æ Setup Guide, Chapter 1, "4 Installing the Printhead") Problem 2: Ink tank(s) not installed. Solution: Call for the power line. Printer Not Operating Correctly ...7-3 Solution: Confirm that all ink tanks are tight. (Æ Setup Guide, Chapter 1, "3 Connecting the Power Cord") Problem 3: Power supply not providing power. Solution: Connect another device to the power supply ...
User Guide
Page 128
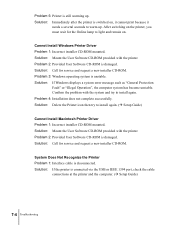
... is connected via the USB or IEEE 1394 port, check the cable connections at the printer and the computer. (Æ Setup Guide) 7-4 Troubleshooting Solution: Call for service and request a new installer CD-ROM. Solution: If Windows displays a system error message such...printer is disconnected. Problem 4: Installation does not complete successfully. Solution: Delete the Printer icon then try to install again. (Æ Setup Guide) Cannot Install Macintosh Printer Driver Problem 1: Incorrect installer CD-ROM mounted. Problem 3: Windows operating system is damaged. System Does Not Recognize...
... is connected via the USB or IEEE 1394 port, check the cable connections at the printer and the computer. (Æ Setup Guide) 7-4 Troubleshooting Solution: Call for service and request a new installer CD-ROM. Solution: If Windows displays a system error message such...printer is disconnected. Problem 4: Installation does not complete successfully. Solution: Delete the Printer icon then try to install again. (Æ Setup Guide) Cannot Install Macintosh Printer Driver Problem 1: Incorrect installer CD-ROM mounted. Problem 3: Windows operating system is damaged. System Does Not Recognize...
User Guide
Page 129
... back of the printer, set . Problem 2: The driver is not set the DIP switches to the correct settings for the LAN in use. (Æ Setup Guide) Problem 4: The destination via the Macintosh network is not installed correctly for the printer connected via a Windows USB port or IEEE 1394 port. Solution: Follow...
... back of the printer, set . Problem 2: The driver is not set the DIP switches to the correct settings for the LAN in use. (Æ Setup Guide) Problem 4: The destination via the Macintosh network is not installed correctly for the printer connected via a Windows USB port or IEEE 1394 port. Solution: Follow...

User Guide
Page 130
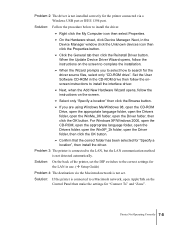
.... Solution: Connect the printer directly to release the print job from paused printing. If you are using Mac OS 8/9, make the network settings. (Æ Setup Guide) Solution: If the printer is displayed. Problem 1: Printer is displayed. Error message is connected to a Macintosh network, use the printer operation panel to select "Phase...
.... Solution: Connect the printer directly to release the print job from paused printing. If you are using Mac OS 8/9, make the network settings. (Æ Setup Guide) Solution: If the printer is displayed. Problem 1: Printer is displayed. Error message is connected to a Macintosh network, use the printer operation panel to select "Phase...
User Guide
Page 135
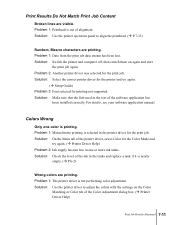
... or Color tab of the software application has been installed correctly. Solution: Select the correct printer driver for the printer and try again. (Æ Setup Guide) Problem 3: Font selected for the Color Mode and try again. (Æ Printer Driver Help) Problem 2: Ink supply has run low in the text of the...
... or Color tab of the software application has been installed correctly. Solution: Select the correct printer driver for the printer and try again. (Æ Setup Guide) Problem 3: Font selected for the Color Mode and try again. (Æ Printer Driver Help) Problem 2: Ink supply has run low in the text of the...
User Guide
Page 136
Problem 3: Color ink is not abnormal. 7-12 Troubleshooting Remove the ink tank from the printer, then insert the correct color ink tank. (Æ Setup Guide) Solution: After doing the above procedure, execute "Nozzle Check". If each color is not printing correctly, on the printer operation panel execute "Head Cleaning B". (Æ P.7-...
Problem 3: Color ink is not abnormal. 7-12 Troubleshooting Remove the ink tank from the printer, then insert the correct color ink tank. (Æ Setup Guide) Solution: After doing the above procedure, execute "Nozzle Check". If each color is not printing correctly, on the printer operation panel execute "Head Cleaning B". (Æ P.7-...

User Guide
Page 139
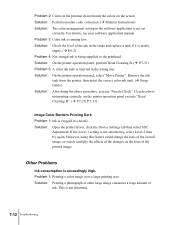
... the ink tank. Solution: Switch the printer off , open the upper cover, remove the tape and belt stopper, then press the Power button. (Æ Setup Guide) Problem 2: The printer has malfunctioned. Solution: Open the tray, then turn the roll holder manually to feed more media than allowed. Size Undetected Problem 1: The...
... the ink tank. Solution: Switch the printer off , open the upper cover, remove the tape and belt stopper, then press the Power button. (Æ Setup Guide) Problem 2: The printer has malfunctioned. Solution: Open the tray, then turn the roll holder manually to feed more media than allowed. Size Undetected Problem 1: The...


