

User Guide
Page 10
... technician. To avoid a fire or electrical shock, never attempt to the printer, never place anything on the printer such as small metal objects like staples, paper clips, or any type of liquid container, especially containers of the cable connector matches the connection point on the printer. viii z To avoid a fire, electrical...
... technician. To avoid a fire or electrical shock, never attempt to the printer, never place anything on the printer such as small metal objects like staples, paper clips, or any type of liquid container, especially containers of the cable connector matches the connection point on the printer. viii z To avoid a fire, electrical...

User Guide
Page 11
... the Printer Online 1-11 Setting the Printer Offline 1-12 Chapter 2 Print Media You Can Use Print Media That Can Be Used 2-2 Types of Print Media 2-2 Paper Sizes 2-4 Printing Area 2-6 Handling Print Media 2-6 Loading Roll Media 2-7 Selecting the Media Source 2-7 Loading the Roll Media 2-8 Selecting the Roll Media Type 2-17 Loading Cut...
... the Printer Online 1-11 Setting the Printer Offline 1-12 Chapter 2 Print Media You Can Use Print Media That Can Be Used 2-2 Types of Print Media 2-2 Paper Sizes 2-4 Printing Area 2-6 Handling Print Media 2-6 Loading Roll Media 2-7 Selecting the Media Source 2-7 Loading the Roll Media 2-8 Selecting the Roll Media Type 2-17 Loading Cut...
User Guide
Page 13
Cleaning the Printer Surfaces 6-9 Cleaning Inside the Upper Cover 6-11 Cleaning the Paper Restraint 6-13 Cleaning the Carriage Rail 6-15 Replacing the Printhead 6-18 Handing Printhead Precautions 6-18 How to Replace the Printhead 6-19 Chapter 7 Troubleshooting Having ...Abnormal 7-9 Poor Print Quality 7-9 Print Results Do Not Match Print Job Content 7-11 Colors Wrong 7-11 Other Problems 7-12 Message Is Displayed 7-13 Removing Paper Jams 7-18 Removing a Roll Media Jam 7-18 Removing a Cut Sheet Jam 7-26 Checking the Print Status 7-29 Cleaning the Printhead 7-31 Types of ...
Cleaning the Printer Surfaces 6-9 Cleaning Inside the Upper Cover 6-11 Cleaning the Paper Restraint 6-13 Cleaning the Carriage Rail 6-15 Replacing the Printhead 6-18 Handing Printhead Precautions 6-18 How to Replace the Printhead 6-19 Chapter 7 Troubleshooting Having ...Abnormal 7-9 Poor Print Quality 7-9 Print Results Do Not Match Print Job Content 7-11 Colors Wrong 7-11 Other Problems 7-12 Message Is Displayed 7-13 Removing Paper Jams 7-18 Removing a Roll Media Jam 7-18 Removing a Cut Sheet Jam 7-26 Checking the Print Status 7-29 Cleaning the Printhead 7-31 Types of ...

User Guide
Page 16
.... f Stand (option for W7250) A stand mounted on four casters to receive printed output from the printer. The output stacker, or optional Media Take-up Unit (W7200 only), can be mounted inside the printer. (Æ P.6-18, P.7-26) b Left cover Open to replace the mist filter. (Æ Filter Instructions provided with stand) A cloth... Holds the roll holder and roll media. Printer Part Names Printer Main Unit TFront View a b g c d h e i f j a Upper cover Open to install the printhead or to remove paper jams inside the stand. 1-2 Before Using the Printer
.... f Stand (option for W7250) A stand mounted on four casters to receive printed output from the printer. The output stacker, or optional Media Take-up Unit (W7200 only), can be mounted inside the printer. (Æ P.6-18, P.7-26) b Left cover Open to replace the mist filter. (Æ Filter Instructions provided with stand) A cloth... Holds the roll holder and roll media. Printer Part Names Printer Main Unit TFront View a b g c d h e i f j a Upper cover Open to install the printhead or to remove paper jams inside the stand. 1-2 Before Using the Printer

User Guide
Page 18
...moves from side to side on the surface of the Media Take-up Unit. g Media Take-up Unit connector (Only W7200) Provides a connection point for the power cord of the paper during printing. TTop View (Inside) d a b c a Carriage rail Provides the path for the carriage as it moves... from side to side. b Paper restraint Required for media and paper output in the paper path. Upper this lever to open the paper restraint when you need to a computer. (Æ Setup Guide) f Power connector Provides a connection point for the...
...moves from side to side on the surface of the Media Take-up Unit. g Media Take-up Unit connector (Only W7200) Provides a connection point for the power cord of the paper during printing. TTop View (Inside) d a b c a Carriage rail Provides the path for the carriage as it moves... from side to side. b Paper restraint Required for media and paper output in the paper path. Upper this lever to open the paper restraint when you need to a computer. (Æ Setup Guide) f Power connector Provides a connection point for the...

User Guide
Page 19
...; Setup Guide) b Printhead lock cover Holds the printhead in place. For high quality printing, the lever position must install it left and right across the paper during printing. Open to adjust the height of the printhead.
...; Setup Guide) b Printhead lock cover Holds the printhead in place. For high quality printing, the lever position must install it left and right across the paper during printing. Open to adjust the height of the printhead.

User Guide
Page 20
... a hole for storage. (Æ Setup Guide) b Roll stopper Holds the roll media on the media in the paper path. d Roll holder Used when loading roll media in the media feed path. e Paper guide An important part in the printer. c Tray open lever Pull on this lever when loading roll media or... when removing jams. 1-6 Before Using the Printer When loading roll media, pass the sheet between the paper guide. (Æ Setup Guide) f Roll release lever Releases the pressure of the printer. Use this lever to fasten the belt stopper for the belt ...
... a hole for storage. (Æ Setup Guide) b Roll stopper Holds the roll media on the media in the paper path. d Roll holder Used when loading roll media in the media feed path. e Paper guide An important part in the printer. c Tray open lever Pull on this lever when loading roll media or... when removing jams. 1-6 Before Using the Printer When loading roll media, pass the sheet between the paper guide. (Æ Setup Guide) f Roll release lever Releases the pressure of the printer. Use this lever to fasten the belt stopper for the belt ...

User Guide
Page 23
...at the printer and the power supply and make sure that they are secure. (Æ Setup Guide) Switching the Printer On and Off 1-9 Paper Source Roll Media Cut Sheet Data Message Power Cancel Enter Online The Online lamp and Message lamp flash for a few seconds while the printer ... to complete the setup procedures before you execute the procedures below. If the printer has not been set up . The printer is displayed. Paper Source Roll Media Cut Sheet Data Message Power Cancel Enter Online If no print media is displayed. After the printer has warmed up completely, ...
...at the printer and the power supply and make sure that they are secure. (Æ Setup Guide) Switching the Printer On and Off 1-9 Paper Source Roll Media Cut Sheet Data Message Power Cancel Enter Online The Online lamp and Message lamp flash for a few seconds while the printer ... to complete the setup procedures before you execute the procedures below. If the printer has not been set up . The printer is displayed. Paper Source Roll Media Cut Sheet Data Message Power Cancel Enter Online If no print media is displayed. After the printer has warmed up completely, ...

User Guide
Page 24
... the printer. 2 Press and hold down the Power button for a few seconds, then the printer goes off. 1-10 Before Using the Printer Paper Source Roll Media Cut Sheet Data Message Power Cancel Enter Online "Please wait .." Switching the Printer Off When you see an error message displayed,...roll media tray and take up the roll media. Important z To prevent damaging the printer or losing valuable data, never switch it . Paper Source Roll Media Cut Sheet Data Online Message Power Cancel Enter Online If you are finished using the printer, follow the procedure to correct the...
... the printer. 2 Press and hold down the Power button for a few seconds, then the printer goes off. 1-10 Before Using the Printer Paper Source Roll Media Cut Sheet Data Message Power Cancel Enter Online "Please wait .." Switching the Printer Off When you see an error message displayed,...roll media tray and take up the roll media. Important z To prevent damaging the printer or losing valuable data, never switch it . Paper Source Roll Media Cut Sheet Data Online Message Power Cancel Enter Online If you are finished using the printer, follow the procedure to correct the...

User Guide
Page 25
... you can accept data from the computer to pause a print job temporarily. Setting the Printer Online Follow this order: Online→ Offline→ MAIN MENU. Paper Source Roll Media Cut Sheet Data Message Power Cancel Enter Online Note The printer can print while the Online lamp is online, the printer can...
... you can accept data from the computer to pause a print job temporarily. Setting the Printer Online Follow this order: Online→ Offline→ MAIN MENU. Paper Source Roll Media Cut Sheet Data Message Power Cancel Enter Online Note The printer can print while the Online lamp is online, the printer can...

User Guide
Page 26
z Pressing the Online button repeatedly cycles the printer through three modes in this order: Online→ Offline→ MAIN MENU. 1-12 Before Using the Printer Paper Source Roll Media Cut Sheet Data Message Power Cancel Enter Online Note When the Online lamp goes off . Setting the Printer Offline Follow the procedure below to set the printer offline so you can feed media, adjust the cutter, move the carriage, and so on. 1 Press the Online button. The Online lamp goes off , the printer is offline.
z Pressing the Online button repeatedly cycles the printer through three modes in this order: Online→ Offline→ MAIN MENU. 1-12 Before Using the Printer Paper Source Roll Media Cut Sheet Data Message Power Cancel Enter Online Note When the Online lamp goes off . Setting the Printer Offline Follow the procedure below to set the printer offline so you can feed media, adjust the cutter, move the carriage, and so on. 1 Press the Online button. The Online lamp goes off , the printer is offline.

User Guide
Page 28
...the stability of plain paper is slightly less because it suitable for use , heavy coated paper is suitable for the ink to change slightly when the ink on copy machines. This media is thicker than coated paper, making it is more details about Canon print media, please refer... to the instructions provided with a brilliant, bright base coat on its print side. THeavy Coated Paper Specially coated for use . Note z Compared to other ...
...the stability of plain paper is slightly less because it suitable for use , heavy coated paper is suitable for the ink to change slightly when the ink on copy machines. This media is thicker than coated paper, making it is more details about Canon print media, please refer... to the instructions provided with a brilliant, bright base coat on its print side. THeavy Coated Paper Specially coated for use . Note z Compared to other ...

User Guide
Page 29
...finishing settings. TGlossy Film Coated with a film base that require the best possible quality. TPhoto Glossy Paper Highest grade glossy paper with a photographic print paper base coating possessing high chromaticity but also possesses properties to suppress reflected light. This media is not required...the reverse side is like a photograph and ideal for graphic and photographic images that reproduces color even more brilliantly than glossy paper. Print Media That Can Be Used 2-3 The finish of photographic images shot with a backlighting device. Realizes the best ...
...finishing settings. TGlossy Film Coated with a film base that require the best possible quality. TPhoto Glossy Paper Highest grade glossy paper with a photographic print paper base coating possessing high chromaticity but also possesses properties to suppress reflected light. This media is not required...the reverse side is like a photograph and ideal for graphic and photographic images that reproduces color even more brilliantly than glossy paper. Print Media That Can Be Used 2-3 The finish of photographic images shot with a backlighting device. Realizes the best ...

User Guide
Page 30
... Media This table lists roll media with maximum diameter of 130 mm (5.1 in.) and media core inside diameter of 2 inch that can be used in .) W7200 Yes Yes Yes Yes Yes Yes Yes Yes Yes Yes Yes Yes Yes Yes Yes Yes Yes Yes Yes Yes Yes Yes W7250 - Yes Yes....6 mm (13 x 19 in.) 215.9 x 279.4 mm (8.5 x 11 in.) 215.9 x 355.6 mm (8.5 x 14 in this printer. Yes Yes - - Yes Yes - Yes Yes - Paper Sizes The below table lists the paper sizes and feed methods that can be used with this printer. Yes Yes Yes - - Name ISO A0 ISO A1 ISO A3 ARCH...
... Media This table lists roll media with maximum diameter of 130 mm (5.1 in.) and media core inside diameter of 2 inch that can be used in .) W7200 Yes Yes Yes Yes Yes Yes Yes Yes Yes Yes Yes Yes Yes Yes Yes Yes Yes Yes Yes Yes Yes Yes W7250 - Yes Yes....6 mm (13 x 19 in.) 215.9 x 279.4 mm (8.5 x 11 in.) 215.9 x 355.6 mm (8.5 x 14 in this printer. Yes Yes - - Yes Yes - Yes Yes - Paper Sizes The below table lists the paper sizes and feed methods that can be used with this printer. Yes Yes Yes - - Name ISO A0 ISO A1 ISO A3 ARCH...

User Guide
Page 33
... not pull out the roll media tray. Store the package in a cool, dry location that the printer is not exposed to display "Offline". Paper Source Roll Media Cut Sheet Data Message Power Cancel Enter Online Loading Roll Media 2-7 If you load roll media in the printer. z Store unused... upper cover, raise the media release lever, then open the roll media tray during printing. Loading Roll Media This is the general procedure for loading a paper cassette. • Remove all printed roll media or cut sheets from the tray. • On the operation panel, select the roll media source. (&#...
... not pull out the roll media tray. Store the package in a cool, dry location that the printer is not exposed to display "Offline". Paper Source Roll Media Cut Sheet Data Message Power Cancel Enter Online Loading Roll Media 2-7 If you load roll media in the printer. z Store unused... upper cover, raise the media release lever, then open the roll media tray during printing. Loading Roll Media This is the general procedure for loading a paper cassette. • Remove all printed roll media or cut sheets from the tray. • On the operation panel, select the roll media source. (&#...
User Guide
Page 34
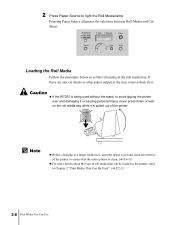
Paper Source Roll Media Cut Sheet Data Message Power Cancel Enter Online Loading the Roll Media Follow the procedure below to Chapter 2 "Print Media That Can ... the roll media in the tray, remove them first. If there are any cut sheets or other paper output in the roll media tray. Note z Before changing to light the Roll Media lamp. 2 Press Paper Source to a larger media size, open the upper cover and clean the interior of the printer. Pressing...
Paper Source Roll Media Cut Sheet Data Message Power Cancel Enter Online Loading the Roll Media Follow the procedure below to Chapter 2 "Print Media That Can ... the roll media in the tray, remove them first. If there are any cut sheets or other paper output in the roll media tray. Note z Before changing to light the Roll Media lamp. 2 Press Paper Source to a larger media size, open the upper cover and clean the interior of the printer. Pressing...

User Guide
Page 36
.... Important z Insert the roll holder all the way into the roll media until it horizontally on a table or other stable flat surface. Remove any remaining paper from the roll. Roll media is tight. Important z Store unused roll media in the lever at the center then pull the holder stopper off. 4 Remove...
.... Important z Insert the roll holder all the way into the roll media until it horizontally on a table or other stable flat surface. Remove any remaining paper from the roll. Roll media is tight. Important z Store unused roll media in the lever at the center then pull the holder stopper off. 4 Remove...
User Guide
Page 38
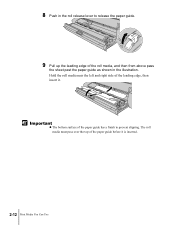
Important z The bottom surface of the paper guide has a finish to release the paper guide. 9 Pull up the leading edge of the roll media, and then from above pass the sheet past the paper guide as shown in the roll release lever to prevent slipping. The roll media must pass over the top of the leading edge, then insert it is inserted. 2-12 Print Media You Can Use Hold the roll media near the left and right side of the paper guide before it . 8 Push in the illustration.
Important z The bottom surface of the paper guide has a finish to release the paper guide. 9 Pull up the leading edge of the roll media, and then from above pass the sheet past the paper guide as shown in the roll release lever to prevent slipping. The roll media must pass over the top of the leading edge, then insert it is inserted. 2-12 Print Media You Can Use Hold the roll media near the left and right side of the paper guide before it . 8 Push in the illustration.

User Guide
Page 39
... lever forward to ensure that it is straight and that the left and right edges with the sides of the roll media to lock the paper guide. 10 Pull out a sufficient amount of the leading edge of the tray.
... lever forward to ensure that it is straight and that the left and right edges with the sides of the roll media to lock the paper guide. 10 Pull out a sufficient amount of the leading edge of the tray.

User Guide
Page 40
"Close Tray" is visible below the paper guide. 1~2mm 14 Close the roll media tray. Turn the roll until approximately 1~2 mm of the leading edge of the media as far as the paper guide. 13 Turn the left and right ends of the roll holder in completely. Push the roll media tray in the direction indicated by the arrows to roll the leading edge of the roll media is displayed. 2-14 Print Media You Can Use
"Close Tray" is visible below the paper guide. 1~2mm 14 Close the roll media tray. Turn the roll until approximately 1~2 mm of the leading edge of the media as far as the paper guide. 13 Turn the left and right ends of the roll holder in completely. Push the roll media tray in the direction indicated by the arrows to roll the leading edge of the roll media is displayed. 2-14 Print Media You Can Use


