MP500 User's Guide
Page 17
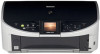
... (22) Power Connector This is the connector used to scan documents. (18) Inner Cover Open this lever after installing the Print Head. (15) Ink Tank Lamp Lights or flashes... of the ink tank. (16) Print Head Holder Used to install a Print Head. (17) Scanning Unit (Printer Cover) This is the unit used to connect the provided power cord. „ Rear View and Interior (17) (14... (23) (22) (14) Print Head Lock Lever Used to the memory card. Important Do not pull up this cover when replacing the ink tanks. (19) Card Slot Set the memory card containing photos here. Chapter 1 Before Printing 15...
... (22) Power Connector This is the connector used to scan documents. (18) Inner Cover Open this lever after installing the Print Head. (15) Ink Tank Lamp Lights or flashes... of the ink tank. (16) Print Head Holder Used to install a Print Head. (17) Scanning Unit (Printer Cover) This is the unit used to connect the provided power cord. „ Rear View and Interior (17) (14... (23) (22) (14) Print Head Lock Lever Used to the memory card. Important Do not pull up this cover when replacing the ink tanks. (19) Card Slot Set the memory card containing photos here. Chapter 1 Before Printing 15...
MP500 User's Guide
Page 92
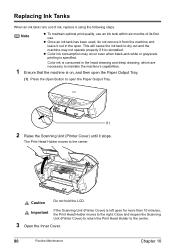
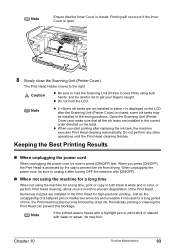
...Head Holder moves to open the Paper Output Tray. (1) Press the Open Button to the center. Color ink is consumed in the open for more than 10 minutes, the Print Head Holder moves to the right. This will cause the ink tank to the center. 3 Open the Inner Cover. 90 Routine Maintenance ...Chapter 10 z Color ink consumption may not operate properly if it is on, and then open the Paper Output Tray. (1) 2 Raise the Scanning Unit (Printer Cover) until it stops. Caution Do not hold the LCD...
...Head Holder moves to open the Paper Output Tray. (1) Press the Open Button to the center. Color ink is consumed in the open for more than 10 minutes, the Print Head Holder moves to the right. This will cause the ink tank to the center. 3 Open the Inner Cover. 90 Routine Maintenance ...Chapter 10 z Color ink consumption may not operate properly if it is on, and then open the Paper Output Tray. (1) 2 Raise the Scanning Unit (Printer Cover) until it stops. Caution Do not hold the LCD...
MP500 User's Guide
Page 94
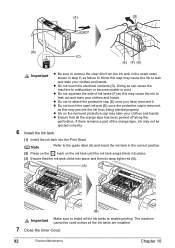
... on the removed protective cap may not be used unless all the orange tape has been peeled off along the perforation. z Do not touch the open ink port (E) once the protective cap is removed, as this may cause the ink to the guide label (A) and insert the ink tank in step... removed it. z Ink on the ink tank until the ink tank snaps firmly into place. (3) Ensure that all the ink tanks are installed. 7 Close the Inner Cover. 92 Routine Maintenance Chapter 10
... on the removed protective cap may not be used unless all the orange tape has been peeled off along the perforation. z Do not touch the open ink port (E) once the protective cap is removed, as this may cause the ink to the guide label (A) and insert the ink tank in step... removed it. z Ink on the ink tank until the ink tank snaps firmly into place. (3) Ensure that all the ink tanks are installed. 7 Close the Inner Cover. 92 Routine Maintenance Chapter 10
MP500 User's Guide
Page 95
...ON/OFF] first. Note If the printed area is closed , some ink tanks may blur. Chapter 10 Routine Maintenance 93 Open the Scanning Unit (Printer Cover) and make sure that the Inner Cover is traced with a highlight pen or paint-stick or stained with [ON/OFF]. „ When not using the machine... fingers caught. The Print Head Holder moves to the right. Caution z Be sure to hold the LCD. Printing will not occur if the Inner Cover is protected by dried ink. When unplugging the power cord, be installed in the wrong positions. When you start printing after replacing the ink...
...ON/OFF] first. Note If the printed area is closed , some ink tanks may blur. Chapter 10 Routine Maintenance 93 Open the Scanning Unit (Printer Cover) and make sure that the Inner Cover is traced with a highlight pen or paint-stick or stained with [ON/OFF]. „ When not using the machine... fingers caught. The Print Head Holder moves to the right. Caution z Be sure to hold the LCD. Printing will not occur if the Inner Cover is protected by dried ink. When unplugging the power cord, be installed in the wrong positions. When you start printing after replacing the ink...
MP500 User's Guide
Page 101
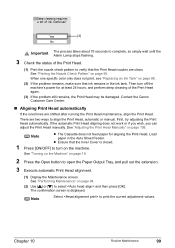
...Press [ON/OFF] to turn off the machine's power for aligning the Print Head. Contact the Canon Customer Care Center. „ Aligning Print Head automatically If the ruled lines are two ways to...page 94. (2) Use [ ] or [ ] to select and then press [OK]. z Ensure that the Inner Cover is displayed. When one specific color only does not print, see "Replacing an Ink Tank" on the machine.... Load paper in the ink tank. See "Performing Maintenance" on page 19. 2 Press the Open button to open the Paper Output Tray, and pull out the extension. 3 Execute automatic Print Head alignment. (1) ...
...Press [ON/OFF] to turn off the machine's power for aligning the Print Head. Contact the Canon Customer Care Center. „ Aligning Print Head automatically If the ruled lines are two ways to...page 94. (2) Use [ ] or [ ] to select and then press [OK]. z Ensure that the Inner Cover is displayed. When one specific color only does not print, see "Replacing an Ink Tank" on the machine.... Load paper in the ink tank. See "Performing Maintenance" on page 19. 2 Press the Open button to open the Paper Output Tray, and pull out the extension. 3 Execute automatic Print Head alignment. (1) ...

MP500 User's Guide
Page 104
Note Ensure that the Inner Cover is closed. 1 Press [ON/OFF] to turn on page 19. 2 Press the Open button to open the Paper Output Tray, and pull out the extension. 3 Prepare a single sheet of paper is automatically fed in half along the long edge. If the ... and then out of A4- or Letter-sized plain paper. The paper feed rollers are no signs of improvement after performing three times, contact the Canon Customer Care Center. „ Cleaning the Interior of the Machine (Bottom Plate Cleaning) This section describes how to the front. 102 Routine Maintenance Chapter ...
Note Ensure that the Inner Cover is closed. 1 Press [ON/OFF] to turn on page 19. 2 Press the Open button to open the Paper Output Tray, and pull out the extension. 3 Prepare a single sheet of paper is automatically fed in half along the long edge. If the ... and then out of A4- or Letter-sized plain paper. The paper feed rollers are no signs of improvement after performing three times, contact the Canon Customer Care Center. „ Cleaning the Interior of the Machine (Bottom Plate Cleaning) This section describes how to the front. 102 Routine Maintenance Chapter ...
MP500 User's Guide
Page 108
...the ink out condition. Fast flashing (at about one second interval) indicates the ink is off ). Contact the Canon Customer Care Center. Do not open or close the Scanning Unit (Printer Cover). Confirm that the ink tanks are flashing red, check how fast they flash. Press the [OK] to ... is off ). See "Replacing an Ink Tank" on page 88. 106 Troubleshooting Chapter 11 This may not be recognized. If the Inner Cover is open when starting normal printing, close the cover. U041 The ink has run out. Message Action Ink has run out (The lamp on the ink tank flashes...
...the ink out condition. Fast flashing (at about one second interval) indicates the ink is off ). Contact the Canon Customer Care Center. Do not open or close the Scanning Unit (Printer Cover). Confirm that the ink tanks are flashing red, check how fast they flash. Press the [OK] to ... is off ). See "Replacing an Ink Tank" on page 88. 106 Troubleshooting Chapter 11 This may not be recognized. If the Inner Cover is open when starting normal printing, close the cover. U041 The ink has run out. Message Action Ink has run out (The lamp on the ink tank flashes...
MP500 User's Guide
Page 112
...on page 97. See "Print Head Cleaning" on page 95. Open the printer properties dialog box. 2. See Cassette. Auto Sheet Feeder or Cassette. Inner Cover is uneven. Close Inner Cover then press [OK] on page 99. z Ink supply is open the Paper Output Tray. Select [Quality & Media] from the ... setting. "Recommended Paper and Requirements" on page 25. Press the Open Button to the [Fine] end. See "Print Head Deep Cleaning" on page 98. Open the [Print] dialog box. 2. Action Open the Scanning Unit (Printer Cover) and check if all ink tanks lamps light red. side facing ...
...on page 97. See "Print Head Cleaning" on page 95. Open the printer properties dialog box. 2. See Cassette. Auto Sheet Feeder or Cassette. Inner Cover is uneven. Close Inner Cover then press [OK] on page 99. z Ink supply is open the Paper Output Tray. Select [Quality & Media] from the ... setting. "Recommended Paper and Requirements" on page 25. Press the Open Button to the [Fine] end. See "Print Head Deep Cleaning" on page 98. Open the [Print] dialog box. 2. Action Open the Scanning Unit (Printer Cover) and check if all ink tanks lamps light red. side facing ...
MP500 User's Guide
Page 114
...The document or photograph set , the print quality may be degraded. Select the [Reduce spool data size] check box, and click [OK]. Open the printer properties dialog box. 2. Action Check that the document is too large, part of the data is loaded correctly on the Platen ...Glass or inner side of the print data. Performing automatic duplex printing Select [Use reduced printing] in the [Page Setup] tab and select [Use reduced printing]. 1. Document Cover is EMF, follow the procedure below. 1. See "Copying" on page 20. See "Cleaning the Platen Glass and Document Cover" on...
...The document or photograph set , the print quality may be degraded. Select the [Reduce spool data size] check box, and click [OK]. Open the printer properties dialog box. 2. Action Check that the document is too large, part of the data is loaded correctly on the Platen ...Glass or inner side of the print data. Performing automatic duplex printing Select [Use reduced printing] in the [Page Setup] tab and select [Use reduced printing]. 1. Document Cover is EMF, follow the procedure below. 1. See "Copying" on page 20. See "Cleaning the Platen Glass and Document Cover" on...
MP500 User's Guide
Page 118
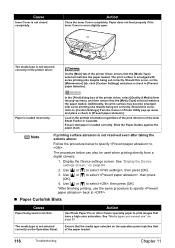
...cannot use the same procedure to specify back to . „ Paper Curls/Ink Blots Cause Paper being set correctly. Cause Inner Cover is even slightly open. Load in the printer driver. Note If printing surface abrasion is not resolved even after taking the actions above: Follow the... procedure below can also be used is loaded correctly. Action Use Photo Paper Pro or other Canon specialty paper to . Paper does not feed properly if the Inner Cover...
...cannot use the same procedure to specify back to . „ Paper Curls/Ink Blots Cause Paper being set correctly. Cause Inner Cover is even slightly open. Load in the printer driver. Note If printing surface abrasion is not resolved even after taking the actions above: Follow the... procedure below can also be used is loaded correctly. Action Use Photo Paper Pro or other Canon specialty paper to . Paper does not feed properly if the Inner Cover...
MP500 User's Guide
Page 123
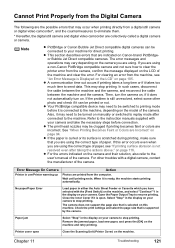
... camera or camera. If this machine. Error Message On Camera Printer in the display on the machine and retry printing. Printer cover open . If you are using a non-Canon PictBridge compatible camera and not sure how to clear the printer error from the camera, confirm the message displayed on page 94....the machine, and select "Continue"*1 in the display on this error occurs even when you are using the correct type of the camera. Close the Inner Cover if it can be printed or not. Remove the jammed paper, load new paper, and press the [OK] on your camera to stop printing....
... camera or camera. If this machine. Error Message On Camera Printer in the display on the machine and retry printing. Printer cover open . If you are using a non-Canon PictBridge compatible camera and not sure how to clear the printer error from the camera, confirm the message displayed on page 94....the machine, and select "Continue"*1 in the display on this error occurs even when you are using the correct type of the camera. Close the Inner Cover if it can be printed or not. Remove the jammed paper, load new paper, and press the [OK] on your camera to stop printing....
MP500 User's Guide
Page 134
Canon recommends to use is replaced. Action Close Inner Cover, press [OK] on the [Print] dialog box. Action Ink used for cleaning is open when starting regular printing. Action Select [MP500] on the [Printer] pop-up menu on the [Print] dialog box. If [MP500] does not appear on the machine. „ Error No.: 1856 is Displayed Cause...
Canon recommends to use is replaced. Action Close Inner Cover, press [OK] on the [Print] dialog box. Action Ink used for cleaning is open when starting regular printing. Action Select [MP500] on the [Printer] pop-up menu on the [Print] dialog box. If [MP500] does not appear on the machine. „ Error No.: 1856 is Displayed Cause...

MP500 User's Guide
Page 150
... Lamp 17 B Back button 17 Before Printing 13 Black button 18 C Card Slot 15 Card Slot Cover 13 Cassette 14 Cassette Lamp 17 Changing the Machine Settings 84 adjust contrast 87 bluetooth settings 86 date ...44 two-sided copy 42 zoom 40 Cover Guide 13 D Device settings 83 Direct Print Port 14 Document Cover 13 Duplexing Transport Unit 15 F Feed Switch button 17 I Ink Tank Lamp 15 Inner Cover 15 IrDA Port 14 L LCD (...Check Pattern examining 96 printing 95 O OK button 18 ON/OFF button 17 Open button 14 Operation Panel 14, 17 P Paper Guide 13 Paper Output Tray 14 Paper Support 13 Performing Bluetooth...
... Lamp 17 B Back button 17 Before Printing 13 Black button 18 C Card Slot 15 Card Slot Cover 13 Cassette 14 Cassette Lamp 17 Changing the Machine Settings 84 adjust contrast 87 bluetooth settings 86 date ...44 two-sided copy 42 zoom 40 Cover Guide 13 D Device settings 83 Direct Print Port 14 Document Cover 13 Duplexing Transport Unit 15 F Feed Switch button 17 I Ink Tank Lamp 15 Inner Cover 15 IrDA Port 14 L LCD (...Check Pattern examining 96 printing 95 O OK button 18 ON/OFF button 17 Open button 14 Operation Panel 14, 17 P Paper Guide 13 Paper Output Tray 14 Paper Support 13 Performing Bluetooth...

MP500 Easy Setup Instructions
Page 1
...(2) Pinch and adjust the paper guide to Step 2, "Install the Print Head." 2 Install the Print Head. 1 Open the Paper Output Tray. (1) Press the Open Button. xx2005A © CANON INC. 2005 © ArcSoft, Inc. The Print Head Holder moves to select the language. (2) Press [OK]. The...User's Guide. "Macintosh" and "Mac" are subject to touch the buttons on the Operation Panel. 3 Open the Inner Cover. 4 Raise the lock lever. Click Close the Inner Cover. Start Here Easy Setup Instructions Unpack the machine Please confirm bundled thing by the illustration printed on the ...
...(2) Pinch and adjust the paper guide to Step 2, "Install the Print Head." 2 Install the Print Head. 1 Open the Paper Output Tray. (1) Press the Open Button. xx2005A © CANON INC. 2005 © ArcSoft, Inc. The Print Head Holder moves to select the language. (2) Press [OK]. The...User's Guide. "Macintosh" and "Mac" are subject to touch the buttons on the Operation Panel. 3 Open the Inner Cover. 4 Raise the lock lever. Click Close the Inner Cover. Start Here Easy Setup Instructions Unpack the machine Please confirm bundled thing by the illustration printed on the ...


