MP500 User's Guide
Page 3
...Legal Limitations on Use of Your Product and Use of Images 12 1 Before Printing 13 Main Components and Their Functions........13 Turning the Machine ON and OFF 19 Document Handling 20 Loading Paper 21 Changing the Print Settings 35 2 Copying 39 Making ...a Compliant Device 63 Connecting to a PictBridge Compliant Device 63 Printing Photographs Directly from a PictBridge Compliant Device 65 Printing Photographs Directly from a Canon Bubble Jet Direct Compatible Digital Camera 67 5 Printing Photographs from a Wireless Communication Device 70 Setting the Page Size, Media Type, and Layout...
...Legal Limitations on Use of Your Product and Use of Images 12 1 Before Printing 13 Main Components and Their Functions........13 Turning the Machine ON and OFF 19 Document Handling 20 Loading Paper 21 Changing the Print Settings 35 2 Copying 39 Making ...a Compliant Device 63 Connecting to a PictBridge Compliant Device 63 Printing Photographs Directly from a PictBridge Compliant Device 65 Printing Photographs Directly from a Canon Bubble Jet Direct Compatible Digital Camera 67 5 Printing Photographs from a Wireless Communication Device 70 Setting the Page Size, Media Type, and Layout...

MP500 User's Guide
Page 8
...it could cause a fire or electrical shock. Never use the machine in any of the power plug come into the power outlet. Always turn OFF the power and unplug the machine from operating properly. Never attempt to plug or unplug the machine from the type of power source ...machine. If further servicing is not exposed to dust. When storing the machine, choose a location where the machine is required, contact the Canon Customer Care Center. Safety Precautions Please read the safety warnings and cautions provided in this guide to ensure that you leave on or accidentally switch...
...it could cause a fire or electrical shock. Never use the machine in any of the power plug come into the power outlet. Always turn OFF the power and unplug the machine from operating properly. Never attempt to plug or unplug the machine from the type of power source ...machine. If further servicing is not exposed to dust. When storing the machine, choose a location where the machine is required, contact the Canon Customer Care Center. Safety Precautions Please read the safety warnings and cautions provided in this guide to ensure that you leave on or accidentally switch...
MP500 User's Guide
Page 9
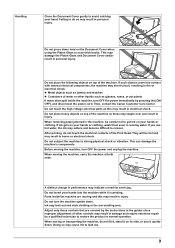
Then contact the Canon Customer Care Center. There are no user serviceable parts inside the machine. Contact may damage..., in injury. (For the weight of these items are looking inside the machine to support its weight. When turning OFF the power, be able to come inside the machine. Do not install the machine near electric products with fluorescent...spilled in such a location may not be sure to disassemble or modify the machine. Installing in the machine, turn OFF the power and unplug the power cord immediately with high-voltage parts inside the machine. If fibers or dust...
Then contact the Canon Customer Care Center. There are no user serviceable parts inside the machine. Contact may damage..., in injury. (For the weight of these items are looking inside the machine to support its weight. When turning OFF the power, be able to come inside the machine. Do not install the machine near electric products with fluorescent...spilled in such a location may not be sure to disassemble or modify the machine. Installing in the machine, turn OFF the power and unplug the power cord immediately with high-voltage parts inside the machine. If fibers or dust...

MP500 User's Guide
Page 10
... you will not be easily accessible. 8 Pulling on local electrical requirements) Do not plug the machine into the machine. During electrical storms, turn OFF the power and unplug the machine, wait at all times so you have followed the instructions in fire or electrical shock. The operating ... unplug the power cord if necessary. These devices generate electrical noise which may affect the print quality of this machine is damaged or frayed. Turn OFF the power and unplug the machine in performance, indicating a need for the machine in again. Do not use a power supply source ...
... you will not be easily accessible. 8 Pulling on local electrical requirements) Do not plug the machine into the machine. During electrical storms, turn OFF the power and unplug the machine, wait at all times so you have followed the instructions in fire or electrical shock. The operating ... unplug the power cord if necessary. These devices generate electrical noise which may affect the print quality of this machine is damaged or frayed. Turn OFF the power and unplug the machine in performance, indicating a need for the machine in again. Do not use a power supply source ...
MP500 User's Guide
Page 11
...topple over and result in burns or electrical shock. Do not press down hard on its side, or turn OFF the power immediately by a qualified technician to restore the product to normal operation. Do not touch the...on the Document Cover when using the Platen Glass to strong physical shock or vibration. When moving the machine, turn the machine upside down . A distinct change in performance may result in running water. Ink may short-circuit, ... into the machine while it upside down . Then, contact the Canon Customer Care Center. Failing to get ink on top of the Print Head.
...topple over and result in burns or electrical shock. Do not press down hard on its side, or turn OFF the power immediately by a qualified technician to restore the product to normal operation. Do not touch the...on the Document Cover when using the Platen Glass to strong physical shock or vibration. When moving the machine, turn the machine upside down . A distinct change in performance may result in running water. Ink may short-circuit, ... into the machine while it upside down . Then, contact the Canon Customer Care Center. Failing to get ink on top of the Print Head.
MP500 User's Guide
Page 19
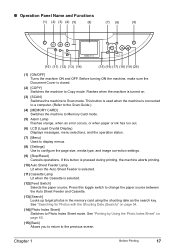
... aborts printing. (10) Auto Sheet Feeder Lamp Lit when the Auto Sheet Feeder is selected. (11) Cassette Lamp Lit when the Cassette is turned on page 60. (15) [Back] Allows you to return to change the paper source between the Auto Sheet Feeder and Cassette. (13) ...SCAN] Switches the machine to configure the page size, media type, and image correction settings. (9) [Stop/Reset] Cancels operations. Chapter 1 Before Printing 17 Before turning ON the machine, make sure the Document Cover is connected to a computer. (Refer to the Scan Guide.) (4) [MEMORY CARD] Switches the machine to Memory...
... aborts printing. (10) Auto Sheet Feeder Lamp Lit when the Auto Sheet Feeder is selected. (11) Cassette Lamp Lit when the Cassette is turned on page 60. (15) [Back] Allows you to return to change the paper source between the Auto Sheet Feeder and Cassette. (13) ...SCAN] Switches the machine to configure the page size, media type, and image correction settings. (9) [Stop/Reset] Cancels operations. Chapter 1 Before Printing 17 Before turning ON the machine, make sure the Document Cover is connected to a computer. (Refer to the Scan Guide.) (4) [MEMORY CARD] Switches the machine to Memory...

MP500 User's Guide
Page 21
... may be unable to check that the Print Head and ink tanks are not lit. Press any button to restore the display. „ Turning off the Machine 1 To turn off . The machine is Displayed on the LCD" on page 93. See "Keeping the Best Printing Results" on page 105. Note If preparatory... the wall outlet with the lamps on the Operation Panel are set into place. If the power plug is not operated for a while, and then turns on the machine, confirm that all Operation Panel lamps are not yet finished, follow the Easy Setup Instructions to complete them. 1 Press [ON/OFF]. [COPY...
... may be unable to check that the Print Head and ink tanks are not lit. Press any button to restore the display. „ Turning off the Machine 1 To turn off . The machine is Displayed on the LCD" on page 93. See "Keeping the Best Printing Results" on page 105. Note If preparatory... the wall outlet with the lamps on the Operation Panel are set into place. If the power plug is not operated for a while, and then turns on the machine, confirm that all Operation Panel lamps are not yet finished, follow the Easy Setup Instructions to complete them. 1 Press [ON/OFF]. [COPY...
MP500 User's Guide
Page 25
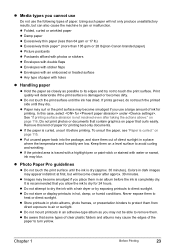
... paper z Damp paper z Excessively thin paper (less than 64 gsm or 17 lb) z Excessively thick paper* (more than 105 gsm or 28 lb)(non-Canon branded paper) z Picture postcards z Postcards affixed with photos or stickers z Envelopes with double flaps z Envelopes with sticker flaps z Envelopes with an embossed or treated... for printing. z Do not attempt to dry the ink with holes z Handling paper z Hold the paper as closely as you allow the ink to turn yellow. Colors in hot, damp, or humid conditions. It is traced with a highlight pen or paint-stick or stained with water or sweat, ink...
... paper z Damp paper z Excessively thin paper (less than 64 gsm or 17 lb) z Excessively thick paper* (more than 105 gsm or 28 lb)(non-Canon branded paper) z Picture postcards z Postcards affixed with photos or stickers z Envelopes with double flaps z Envelopes with sticker flaps z Envelopes with an embossed or treated... for printing. z Do not attempt to dry the ink with holes z Handling paper z Hold the paper as closely as you allow the ink to turn yellow. Colors in hot, damp, or humid conditions. It is traced with a highlight pen or paint-stick or stained with water or sweat, ink...
MP500 User's Guide
Page 41
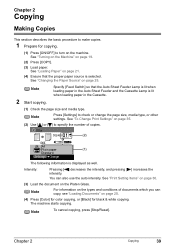
... see "Loading Documents" on page 20. (4) Press [Color] for color copying, or [Black] for copying. (1) Press [ON/OFF] to turn on the machine. The machine starts copying. Note To cancel copying, press [Stop/Reset]. Chapter 2 Copying 39 Chapter 2 Copying Making Copies This ... of copies. (2) (1) The following information is displayed as well. Intensity: Pressing [ ] decreases the intensity, and pressing [ ] increases the intensity. See "Turning on the Machine" on the Platen Glass. See "Changing the Paper Source" on page 35. (2) Use [ ] or [ ] to check or change the...
... see "Loading Documents" on page 20. (4) Press [Color] for color copying, or [Black] for copying. (1) Press [ON/OFF] to turn on the machine. The machine starts copying. Note To cancel copying, press [Stop/Reset]. Chapter 2 Copying 39 Chapter 2 Copying Making Copies This ... of copies. (2) (1) The following information is displayed as well. Intensity: Pressing [ ] decreases the intensity, and pressing [ ] increases the intensity. See "Turning on the Machine" on the Platen Glass. See "Changing the Paper Source" on page 35. (2) Use [ ] or [ ] to check or change the...
MP500 User's Guide
Page 51
... memory card might not be usable with a digital camera. For details on a computer may not be sure to set Read/write attribute to . See "Turning on the Machine" on page 87. After using the Card Slot as the memory card drive of a separate compact flash card adapter for xD-Picture... might not be damaged. If you have edited or processed the data on a memory card on the machine, card direct printing cannot be sure to turn on memory cards that are incompatible with your digital camera. z When you print using the Operation Panel on a computer, be done. z Image data on...
... memory card might not be usable with a digital camera. For details on a computer may not be sure to set Read/write attribute to . See "Turning on the Machine" on page 87. After using the Card Slot as the memory card drive of a separate compact flash card adapter for xD-Picture... might not be damaged. If you have edited or processed the data on a memory card on the machine, card direct printing cannot be sure to turn on memory cards that are incompatible with your digital camera. z When you print using the Operation Panel on a computer, be done. z Image data on...

MP500 User's Guide
Page 52
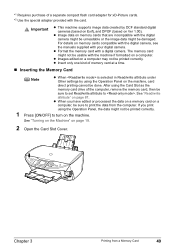
..., follow the instructions for removal of the Card Slot, but do not remove the memory card or the card adapter containing the memory card, nor turn off the machine, as the Memory Card Drive of the Card Slot on the right side. Doing so damages the machine and the memory card...
..., follow the instructions for removal of the Card Slot, but do not remove the memory card or the card adapter containing the memory card, nor turn off the machine, as the Memory Card Drive of the Card Slot on the right side. Doing so damages the machine and the memory card...

MP500 User's Guide
Page 53
See "Loading Paper" on the machine. The photo selection screen is selected. See "Turning on the Machine" on the LCD while reading the photo. Note may be displayed on page 19. (2) Load paper. 2 Ensure that the indicator lamp is ... the Memory Card" on page 49. 2 Select the print menu. (1) Press [MEMORY CARD]. (2) Use [ ] or [ ] to turn on page 21. (3) Ensure that the proper paper source is displayed. Important Removing the memory card or turning off the printer while the indicator lamp is not flashing, then remove the memory card. Note Specify...
See "Loading Paper" on the machine. The photo selection screen is selected. See "Turning on the Machine" on the LCD while reading the photo. Note may be displayed on page 19. (2) Load paper. 2 Ensure that the indicator lamp is ... the Memory Card" on page 49. 2 Select the print menu. (1) Press [MEMORY CARD]. (2) Use [ ] or [ ] to turn on page 21. (3) Ensure that the proper paper source is displayed. Important Removing the memory card or turning off the printer while the indicator lamp is not flashing, then remove the memory card. Note Specify...

MP500 User's Guide
Page 62
... to print starting with the newest one, then press [OK]. (3) Go to step 4. z If you have made. 1 Prepare for printing. (1) Press [ON/OFF] to turn on the Photo Index Sheet. z If you can easily select print options as well as the photos to print using the Photo Index Sheet and... by marking its appropriate circles. „ Printing by Using the Photo Index Sheet With this machine, you selected : (2) Go to step 4. See "Turning on the Machine" on page 25. Note Use white plain paper when printing a Photo Index Sheet. (3) Ensure that the Auto Sheet Feeder Lamp is lit...
... to print starting with the newest one, then press [OK]. (3) Go to step 4. z If you have made. 1 Prepare for printing. (1) Press [ON/OFF] to turn on the Photo Index Sheet. z If you can easily select print options as well as the photos to print using the Photo Index Sheet and... by marking its appropriate circles. „ Printing by Using the Photo Index Sheet With this machine, you selected : (2) Go to step 4. See "Turning on the Machine" on page 25. Note Use white plain paper when printing a Photo Index Sheet. (3) Ensure that the Auto Sheet Feeder Lamp is lit...
MP500 User's Guide
Page 66
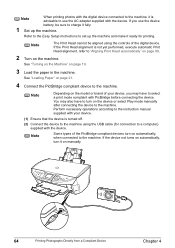
... supplied with your device, you may also have to use the device battery, be aligned using the USB cable (for printing. See "Turning on the Machine" on the model or brand of your device. (1) Ensure that the device is not yet performed, execute automatic Print Head... alignment, refer to "Aligning Print Head automatically" on page 99. 2 Turn on automatically, when connected to set up the machine. Perform necessary operations according to the instruction manual supplied with the device. Note The Print ...
... supplied with your device, you may also have to use the device battery, be aligned using the USB cable (for printing. See "Turning on the Machine" on the model or brand of your device. (1) Ensure that the device is not yet performed, execute automatic Print Head... alignment, refer to "Aligning Print Head automatically" on page 99. 2 Turn on automatically, when connected to set up the machine. Perform necessary operations according to the instruction manual supplied with the device. Note The Print ...
MP500 User's Guide
Page 67
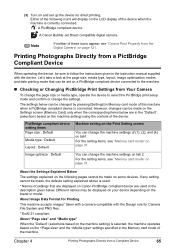
...Let's take a look at the page size, media type, layout, image optimization modes, and date printing mode that are displayed on Canon PictBridge compliant device are in the Memory card mode of the following pages cannot be made on the Settings screen (Memory Card) only when... and the settings specified in the "Default" (selections based on the machine setting) using the controls of (1), (2), and (4) on tab1. (3) Turn on and set on a PictBridge compliant device connected to the machine. „ Checking or Changing PictBridge Print Settings from a PictBridge Compliant Device When ...
...Let's take a look at the page size, media type, layout, image optimization modes, and date printing mode that are displayed on Canon PictBridge compliant device are in the Memory card mode of the following pages cannot be made on the Settings screen (Memory Card) only when... and the settings specified in the "Default" (selections based on the machine setting) using the controls of (1), (2), and (4) on tab1. (3) Turn on and set on a PictBridge compliant device connected to the machine. „ Checking or Changing PictBridge Print Settings from a PictBridge Compliant Device When ...
MP500 User's Guide
Page 71
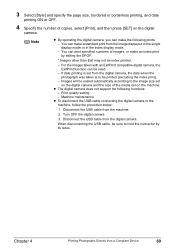
Print quality setting - You can make the following functions: - If date printing is to the image size set on the digital camera. Turn OFF the digital camera. 3. Chapter 4 Printing Photographs Directly from the digital camera. For the images taken with an ExifPrint compatible digital camera, the ExifPrint function ...
Print quality setting - You can make the following functions: - If date printing is to the image size set on the digital camera. Turn OFF the digital camera. 3. Chapter 4 Printing Photographs Directly from the digital camera. For the images taken with an ExifPrint compatible digital camera, the ExifPrint function ...
MP500 User's Guide
Page 72
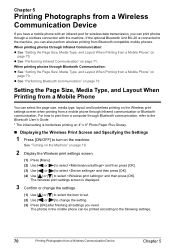
See "Turning on the Machine" on page 73. When printing photos through Bluetooth Communication: z See "Setting the Page Size, Media Type, and Layout When Printing from a Mobile ... Wireless print settings screen. (1) Press [Menu]. (2) Use [ ] or [ ] to select and then press [OK]. (3) Use [ ] or [ ] to select and then press [OK]. (4) Use [ ] or [ ] to turn on page 71. The Wireless print settings screen is borderless printing on 4" x 6" Photo Paper Plus Glossy. „ Displaying the Wireless Print Screen and Specifying the...
See "Turning on the Machine" on page 73. When printing photos through Bluetooth Communication: z See "Setting the Page Size, Media Type, and Layout When Printing from a Mobile ... Wireless print settings screen. (1) Press [Menu]. (2) Use [ ] or [ ] to select and then press [OK]. (3) Use [ ] or [ ] to select and then press [OK]. (4) Use [ ] or [ ] to turn on page 71. The Wireless print settings screen is borderless printing on 4" x 6" Photo Paper Plus Glossy. „ Displaying the Wireless Print Screen and Specifying the...

MP500 User's Guide
Page 73
... 5 Printing Photographs from a Mobile Phone" on page 19. (2) Load paper. When printing through infrared communication, also refer to turn on page 21. (3) Ensure that the proper paper source is or . See "Setting the Page Size, Media Type, and .... (3) Corrects the contours and smoothes out the jaggedness. Note For information on wireless print compatible page size and type, see "Recommended Paper and Requirements" on Canon Photo Stickers, make the settings as below . See "Changing the Paper Source" on paper other than sticker: Bordered x 1, x 2, x 4, x 8 Borderless x 1, x 2, x...
... 5 Printing Photographs from a Mobile Phone" on page 19. (2) Load paper. When printing through infrared communication, also refer to turn on page 21. (3) Ensure that the proper paper source is or . See "Setting the Page Size, Media Type, and .... (3) Corrects the contours and smoothes out the jaggedness. Note For information on wireless print compatible page size and type, see "Recommended Paper and Requirements" on Canon Photo Stickers, make the settings as below . See "Changing the Paper Source" on paper other than sticker: Bordered x 1, x 2, x 4, x 8 Borderless x 1, x 2, x...
MP500 User's Guide
Page 75
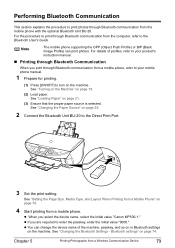
See "Turning on the Machine" on page 74. z You can print photos. See "Changing the Bluetooth Settings - Bluetooth settings" on page 19. (2) Load paper. See "Setting the ... 5 Printing Photographs from the mobile phone with the optional Bluetooth Unit BU-20. z When you select the device name, select the initial value "Canon MP500-1." For the procedure to turn on the machine. Note The mobile phone supporting the OPP (Object Push Profile) or BIP (Basic Image Profile) can change the device name...
See "Turning on the Machine" on page 74. z You can print photos. See "Changing the Bluetooth Settings - Bluetooth settings" on page 19. (2) Load paper. See "Setting the ... 5 Printing Photographs from the mobile phone with the optional Bluetooth Unit BU-20. z When you select the device name, select the initial value "Canon MP500-1." For the procedure to turn on the machine. Note The mobile phone supporting the OPP (Object Push Profile) or BIP (Basic Image Profile) can change the device name...
MP500 User's Guide
Page 76
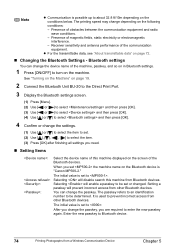
... set the machine name on the machine. The initial value is "Canon MP500-2." You can change the passkey. The initial value is used to ... : Select the device name of the machine, passkey, and so on in Bluetooth settings. 1 Press [ON/OFF] to turn on the Bluetooth device is set . (2) Use to select the item. (3) Press [OK] after finishing all settings you ... the Bluetooth devices. Bluetooth settings You can change the device name of this machine from other Bluetooth devices. See "Turning on the Machine" on page 19. 2 Connect the Bluetooth Unit BU-20 to the Direct Print Port. 3 ...
... set the machine name on the machine. The initial value is "Canon MP500-2." You can change the passkey. The initial value is used to ... : Select the device name of the machine, passkey, and so on in Bluetooth settings. 1 Press [ON/OFF] to turn on the Bluetooth device is set . (2) Use to select the item. (3) Press [OK] after finishing all settings you ... the Bluetooth devices. Bluetooth settings You can change the device name of this machine from other Bluetooth devices. See "Turning on the Machine" on page 19. 2 Connect the Bluetooth Unit BU-20 to the Direct Print Port. 3 ...


