User's Guide
Page 3
... Device 70 Printing Photographs Directly from a PictBridge Compliant Device 73 Printing Photographs Directly from a Canon Bubble Jet Direct Compatible Digital Camera 76 5 Faxing 79 Preparing Your Machine for Fax 79 ...134 The Print Settings 135 Fax Settings 136 Other Settings 140 Language selection 141 Reset setting 141 Save settings 141 Load settings 141 10 Routine Maintenance 142 Replacing an...Ink Tanks 143 Keeping the Best Printing Results 147 When Printing Becomes Faint or Colors are Incorrect 148 Cleaning Your Machine 154 11 Troubleshooting 159 If the Power Disconnects...
... Device 70 Printing Photographs Directly from a PictBridge Compliant Device 73 Printing Photographs Directly from a Canon Bubble Jet Direct Compatible Digital Camera 76 5 Faxing 79 Preparing Your Machine for Fax 79 ...134 The Print Settings 135 Fax Settings 136 Other Settings 140 Language selection 141 Reset setting 141 Save settings 141 Load settings 141 10 Routine Maintenance 142 Replacing an...Ink Tanks 143 Keeping the Best Printing Results 147 When Printing Becomes Faint or Colors are Incorrect 148 Cleaning Your Machine 154 11 Troubleshooting 159 If the Power Disconnects...
User's Guide
Page 18
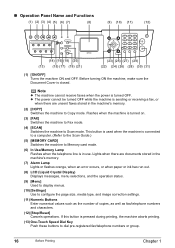
... image correction settings. (11) Numeric Buttons Enter numerical values such as the number of copies, as well as fax/telephone numbers and characters. (12) [Stop/Reset] Cancels operations. Note z The machine cannot receive faxes when the power is closed. If this button is sending or receiving a fax, or when there are...
... image correction settings. (11) Numeric Buttons Enter numerical values such as the number of copies, as well as fax/telephone numbers and characters. (12) [Stop/Reset] Cancels operations. Note z The machine cannot receive faxes when the power is closed. If this button is sending or receiving a fax, or when there are...
User's Guide
Page 45
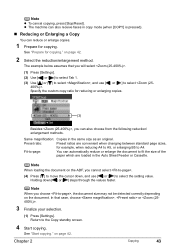
... use [ ] or [ ] to move the cursor down [ ] or [ ] steps through the values faster. Fit-to select the setting value. Note z To cancel copying, press [Stop/Reset]. Return to fit the size of the paper which are convenient when changing between standard page sizes, for copying. Chapter 2 Copying 43 See "Prepare for...
... use [ ] or [ ] to move the cursor down [ ] or [ ] steps through the values faster. Fit-to select the setting value. Note z To cancel copying, press [Stop/Reset]. Return to fit the size of the paper which are convenient when changing between standard page sizes, for copying. Chapter 2 Copying 43 See "Prepare for...
User's Guide
Page 59
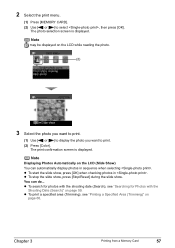
...)" on page 60. 2 Select the print menu. (1) Press [MEMORY CARD]. (2) Use [ ] or [ ] to print. (2) Press [Color]. The photo selection screen is displayed. The print confirmation screen is displayed. z To stop the slide show, press [Stop/Reset] during the slide show , press [OK] when checking photos in sequence when selecting . z To print a specified...
...)" on page 60. 2 Select the print menu. (1) Press [MEMORY CARD]. (2) Use [ ] or [ ] to print. (2) Press [Color]. The photo selection screen is displayed. The print confirmation screen is displayed. z To stop the slide show, press [Stop/Reset] during the slide show , press [OK] when checking photos in sequence when selecting . z To print a specified...
User's Guide
Page 60
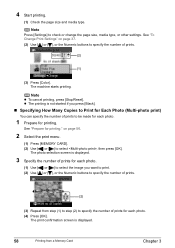
... Each Photo (Multi-photo print) You can specify the number of prints for each photo. 1 Prepare for printing. Note z To cancel printing, press [Stop/Reset]. The print confirmation screen is displayed. 3 Specify the number of prints for each photo. (1) Use [ ] or [ ] to select the image you press... [Black]. „ Specifying How Many Copies to specify the number of prints. (2) (1) (3) Press [Color]. See "To Change Print Settings" on page 56. 2 Select the print menu. (1) Press [MEMORY CARD]. (2) Use [ ] or [ ] to check or change the page...
... Each Photo (Multi-photo print) You can specify the number of prints for each photo. 1 Prepare for printing. Note z To cancel printing, press [Stop/Reset]. The print confirmation screen is displayed. 3 Specify the number of prints for each photo. (1) Use [ ] or [ ] to select the image you press... [Black]. „ Specifying How Many Copies to specify the number of prints. (2) (1) (3) Press [Color]. See "To Change Print Settings" on page 56. 2 Select the print menu. (1) Press [MEMORY CARD]. (2) Use [ ] or [ ] to check or change the page...
User's Guide
Page 61
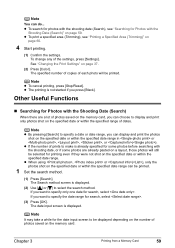
...make is not started if you can choose to display and print only photos shot on the memory card. Note z To cancel printing, press [Stop/Reset]. If you want to specify only one date for search, select . (3) Press [OK]. Chapter 3 Printing from a Memory Card 59 The Search ... range. The specified number of copies of the settings, press [Settings]. z When using , or (), only the photos shot on page 37. (2) Press [Color]. See "Changing the Print Settings" on the specified date or within the specified date range can do... Note z By pressing [Search] to specify a date ...
...make is not started if you can choose to display and print only photos shot on the memory card. Note z To cancel printing, press [Stop/Reset]. If you want to specify only one date for search, select . (3) Press [OK]. Chapter 3 Printing from a Memory Card 59 The Search ... range. The specified number of copies of the settings, press [Settings]. z When using , or (), only the photos shot on page 37. (2) Press [Color]. See "Changing the Print Settings" on the specified date or within the specified date range can do... Note z By pressing [Search] to specify a date ...
User's Guide
Page 63
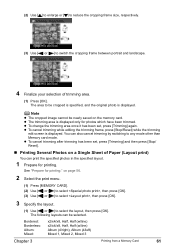
...area to any mode other than Memory card mode. z To change the trimming area once it has been set , press [Trimming] and then press [Stop/ Reset]. „ Printing Several Photos on a Single Sheet of trimming area. (1) Press [OK]. z To cancel trimming after trimming has been set , press [Trimming]...is specified, and the original photo is displayed. You can be selected. z To cancel trimming while editing the trimming frame, press [Stop/Reset] while the trimming edit screen is displayed only for printing." z The trimming area is displayed. See "Prepare for photos which have been ...
...area to any mode other than Memory card mode. z To change the trimming area once it has been set , press [Trimming] and then press [Stop/ Reset]. „ Printing Several Photos on a Single Sheet of trimming area. (1) Press [OK]. z To cancel trimming after trimming has been set , press [Trimming]...is specified, and the original photo is displayed. You can be selected. z To cancel trimming while editing the trimming frame, press [Stop/Reset] while the trimming edit screen is displayed only for printing." z The trimming area is displayed. See "Prepare for photos which have been ...

User's Guide
Page 64
... can select Mixed 1-3 only when the page size is set to cancel the last pasted photo. Go to cancel all pasted photos. (3) Press [Color] after pasting all photos saved on the Sticker (Sticker Print) You can do... The print confirmation screen is displayed. 5 Paste photos one by one...select the pasting method. Note You can print your favorite photo with a frame on Canon Photo Stickers. 1 Prepare for Photos with the shooting date (Search), see "Printing a Specified Area (Trimming)" on page 56. Press [Stop/Reset] to step 6. on page 58. „ Printing on the memory card are ...
... can select Mixed 1-3 only when the page size is set to cancel the last pasted photo. Go to cancel all pasted photos. (3) Press [Color] after pasting all photos saved on the Sticker (Sticker Print) You can do... The print confirmation screen is displayed. 5 Paste photos one by one...select the pasting method. Note You can print your favorite photo with a frame on Canon Photo Stickers. 1 Prepare for Photos with the shooting date (Search), see "Printing a Specified Area (Trimming)" on page 56. Press [Stop/Reset] to step 6. on page 58. „ Printing on the memory card are ...
User's Guide
Page 71
... continue to print photographs using subsequent Photo Index Sheets, repeat the procedure from a Memory Card 69 z If is printing. Note z To cancel printing, press [Stop/Reset]. z If the Platen Glass is dirty, the machine may not read the settings. z If the memory card has been removed and then reinserted before printing...
... continue to print photographs using subsequent Photo Index Sheets, repeat the procedure from a Memory Card 69 z If is printing. Note z To cancel printing, press [Stop/Reset]. z If the Platen Glass is dirty, the machine may not read the settings. z If the memory card has been removed and then reinserted before printing...
User's Guide
Page 86
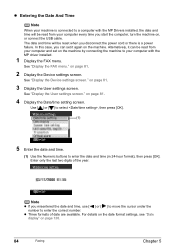
... and time, use [ ] or [ ] to move the cursor under the number to your computer with the MP Drivers installed, the date and time will be reset when you start the computer, turn the machine on, or connect the USB cable. Alternatively, it again on the machine by connecting the machine to...
... and time, use [ ] or [ ] to move the cursor under the number to your computer with the MP Drivers installed, the date and time will be reset when you start the computer, turn the machine on, or connect the USB cable. Alternatively, it again on the machine by connecting the machine to...
User's Guide
Page 111
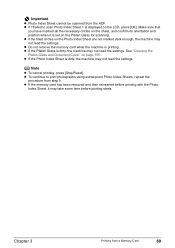
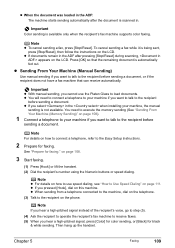
... dialing, see "How to the Easy Setup Instructions. 2 Prepare for faxing. Then hang up the handset. Note z To cancel sending a fax, press [Stop/Reset]. Important z With manual sending, you pressed [Hook], dial on how to connect a telephone, refer to Use Speed Dialing" on page 111. Chapter 5 Faxing... document, or if the recipient does not have a fax machine that the remaining document is available only when the recipient's fax machine supports color faxing. z When the document was loaded in the ADF: The machine starts sending automatically after the document is scanned in the ADF after ...
... dialing, see "How to the Easy Setup Instructions. 2 Prepare for faxing. Then hang up the handset. Note z To cancel sending a fax, press [Stop/Reset]. Important z With manual sending, you pressed [Hook], dial on how to connect a telephone, refer to Use Speed Dialing" on page 111. Chapter 5 Faxing... document, or if the recipient does not have a fax machine that the remaining document is available only when the recipient's fax machine supports color faxing. z When the document was loaded in the ADF: The machine starts sending automatically after the document is scanned in the ADF after ...
User's Guide
Page 112
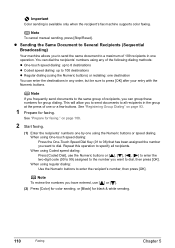
...8 destinations z Coded speed dialing: up to 100 destinations z Regular dialing (using Coded speed dialing: Press [Coded Dial], use [ ] or [ ]. (2) Press [Color] for color sending, or [Black] for faxing. See "Registering Group Dialing" on page 108. 2 Start faxing. (1) Enter the recipients' numbers one by one or a few ... the Numeric buttons) or redialing: one destination You can group these numbers for faxing." Note To cancel manual sending, press [Stop/Reset]. This will allow you want to specify all recipients in the group at the press of one using One-touch speed dialing: Press...
...8 destinations z Coded speed dialing: up to 100 destinations z Regular dialing (using Coded speed dialing: Press [Coded Dial], use [ ] or [ ]. (2) Press [Color] for color sending, or [Black] for faxing. See "Registering Group Dialing" on page 108. 2 Start faxing. (1) Enter the recipients' numbers one by one or a few ... the Numeric buttons) or redialing: one destination You can group these numbers for faxing." Note To cancel manual sending, press [Stop/Reset]. This will allow you want to specify all recipients in the group at the press of one using One-touch speed dialing: Press...

User's Guide
Page 113
...be canceled. To cancel sending a fax while it is being sent, press [Stop/Reset], then follow the instructions on the Platen Glass. Important Color sending is available only when the recipient's fax machine supports color faxing. Three speed dialing methods are provided: z One-touch speed dialing z Coded ...dialing buttons, see "Speed Dialing Methods" on how to a computer, you press [Stop/Reset], sending to send faxes, see "Sending Methods" on how to all pages of document to scan, go to step (6). (4) Press [Color] or [Black]. (5) Repeat steps (3) and (4) to dial them easily. z When...
...be canceled. To cancel sending a fax while it is being sent, press [Stop/Reset], then follow the instructions on the Platen Glass. Important Color sending is available only when the recipient's fax machine supports color faxing. Three speed dialing methods are provided: z One-touch speed dialing z Coded ...dialing buttons, see "Speed Dialing Methods" on how to a computer, you press [Stop/Reset], sending to send faxes, see "Sending Methods" on how to all pages of document to scan, go to step (6). (4) Press [Color] or [Black]. (5) Repeat steps (3) and (4) to dial them easily. z When...

User's Guide
Page 115
z To cancel automatic redialing, wait until the machine starts redialing, press [Stop/Reset], then follow the instructions on page 81. 2 Display the Memory reference screen. (1) Use [ ] or [ ] to lose them before disconnecting the power cord. z You can print ... FAX menu." Note z For details on memory sending, see "Sending From Your Machine (Memory Sending)" on page 114. z To cancel manual redialing, press [Stop/Reset]. z Automatic Redialing When using memory sending to suit your machine will redial the number after a specified interval. For details, see "Printing or Deleting a Document in...
z To cancel automatic redialing, wait until the machine starts redialing, press [Stop/Reset], then follow the instructions on page 81. 2 Display the Memory reference screen. (1) Use [ ] or [ ] to lose them before disconnecting the power cord. z You can print ... FAX menu." Note z For details on memory sending, see "Sending From Your Machine (Memory Sending)" on page 114. z To cancel manual redialing, press [Stop/Reset]. z Automatic Redialing When using memory sending to suit your machine will redial the number after a specified interval. For details, see "Printing or Deleting a Document in...
User's Guide
Page 117
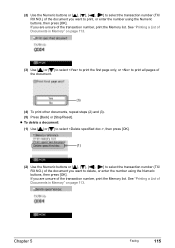
... using the Numeric buttons, then press [OK]. If you are unsure of the document. (3) (4) To print other documents, repeat steps (2) and (3). (5) Press [Back] or [Stop/Reset].
... using the Numeric buttons, then press [OK]. If you are unsure of the document. (3) (4) To print other documents, repeat steps (2) and (3). (5) Press [Back] or [Stop/Reset].
User's Guide
Page 118
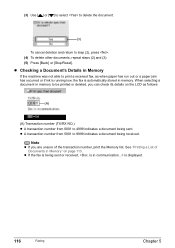
..., as follows: (A) (A) Transaction number (TX/RX NO.) z A transaction number from 5001 to step (2), press . (4) To delete other documents, repeat steps (2) and (3). (5) Press [Back] or [Stop/Reset]. See "Printing a List of the transaction number, print the Memory list. z Checking a Document's Details in memory to 4999 indicates a document being sent.
..., as follows: (A) (A) Transaction number (TX/RX NO.) z A transaction number from 5001 to step (2), press . (4) To delete other documents, repeat steps (2) and (3). (5) Press [Back] or [Stop/Reset]. See "Printing a List of the transaction number, print the Memory list. z Checking a Document's Details in memory to 4999 indicates a document being sent.
User's Guide
Page 124
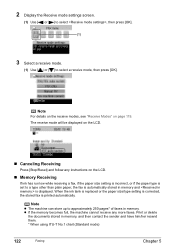
The receive mode will be displayed on the LCD. „ Canceling Receiving Press [Stop/Reset] and follow any more faxes. Note For details on the receive modes, see "Receive Modes" on the LCD. „ Memory Receiving If ink has run ...
The receive mode will be displayed on the LCD. „ Canceling Receiving Press [Stop/Reset] and follow any more faxes. Note For details on the receive modes, see "Receive Modes" on the LCD. „ Memory Receiving If ink has run ...

User's Guide
Page 128
... the machine. For details, refer to stop printing. z The steps described in this section are for printing in progress by simply pressing [Stop/Reset] on the taskbar. See "Turning on the Machine" on page 18. 2 Load the paper on page 22. 126 Printing from Your Computer ...z Menu and command names may differ between application softwares, and more steps may be required. See "Loading Paper" on the machine. To show Canon IJ Status Monitor, click [Canon MP830 Series Printer] on the machine. The machine starts printing. (1) Note z You can cancel a print job in Mac® OS X v.10...
... the machine. For details, refer to stop printing. z The steps described in this section are for printing in progress by simply pressing [Stop/Reset] on the taskbar. See "Turning on the Machine" on page 18. 2 Load the paper on page 22. 126 Printing from Your Computer ...z Menu and command names may differ between application softwares, and more steps may be required. See "Loading Paper" on the machine. To show Canon IJ Status Monitor, click [Canon MP830 Series Printer] on the machine. The machine starts printing. (1) Note z You can cancel a print job in Mac® OS X v.10...
User's Guide
Page 134
... corresponding countermeasure. z A computer error may have occurred if scanning does not start after scanning the document depends on the scan operation setting you press [Stop/Reset] while scanning, the computer displays an error message. Close this message. „ Scanning from an Application Software You can scan an image from a TWAIN- For...
... corresponding countermeasure. z A computer error may have occurred if scanning does not start after scanning the document depends on the scan operation setting you press [Stop/Reset] while scanning, the computer displays an error message. Close this message. „ Scanning from an Application Software You can scan an image from a TWAIN- For...
User's Guide
Page 143
.... The initial value is too low or too high. „ Slide show setting Specifies the image display quality of your machine. Note When is enabled. Reset setting Reverts all settings you are displayed at 5-second intervals. You can select from , , or . Load settings Loads the settings for the Settings screen that...
.... The initial value is too low or too high. „ Slide show setting Specifies the image display quality of your machine. Note When is enabled. Reset setting Reverts all settings you are displayed at 5-second intervals. You can select from , , or . Load settings Loads the settings for the Settings screen that...


