User's Guide
Page 3
... This Guide 10 Legal Limitations on Use of Your Product and Use of Images 11 1 Before Printing 12 Main Components and Their Functions........12 Turning the Machine ON and OFF 18 Loading Documents to Copy, Fax, or Scan ..19 Loading Paper 22 Changing the Print Settings 37 2 Copying 42 Making Copies 42 Changing the Copy Settings 46 Using Useful Copy Functions 47 3 Printing from a Memory Card 53 Using the Memory Card 53 Printing Photograph 56 Other Useful Functions 59 4 Printing Photographs Directly from a Compliant Device 70 Connecting to a PictBridge Compliant Device 70 Printing...
... This Guide 10 Legal Limitations on Use of Your Product and Use of Images 11 1 Before Printing 12 Main Components and Their Functions........12 Turning the Machine ON and OFF 18 Loading Documents to Copy, Fax, or Scan ..19 Loading Paper 22 Changing the Print Settings 37 2 Copying 42 Making Copies 42 Changing the Copy Settings 46 Using Useful Copy Functions 47 3 Printing from a Memory Card 53 Using the Memory Card 53 Printing Photograph 56 Other Useful Functions 59 4 Printing Photographs Directly from a Compliant Device 70 Connecting to a PictBridge Compliant Device 70 Printing...
User's Guide
Page 18
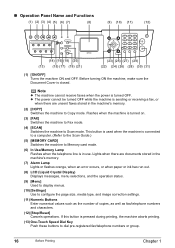
...messages, menu selections, and the operation status. (9) [Menu] Used to display menus. (10) [Settings] Use to Scan mode. If this button is sending or receiving a fax, or when there are documents stored in the machine's memory. (2) [COPY] Switches the machine to dial pre-registered fax/telephone numbers or group. 16 Before Printing Chapter 1 Note z The machine cannot receive faxes when the power is turned on. (3) [FAX] Switches the machine to Fax mode. (4) [SCAN] Switches the machine to configure the page size, media type, and image correction settings. (11) Numeric Buttons Enter...
...messages, menu selections, and the operation status. (9) [Menu] Used to display menus. (10) [Settings] Use to Scan mode. If this button is sending or receiving a fax, or when there are documents stored in the machine's memory. (2) [COPY] Switches the machine to dial pre-registered fax/telephone numbers or group. 16 Before Printing Chapter 1 Note z The machine cannot receive faxes when the power is turned on. (3) [FAX] Switches the machine to Fax mode. (4) [SCAN] Switches the machine to configure the page size, media type, and image correction settings. (11) Numeric Buttons Enter...
User's Guide
Page 39
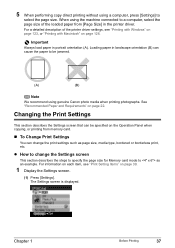
... specify the page size for Memory card mode to be specified on the Operation Panel when copying, or printing from [Page Size] in the printer driver. Important Always load paper in landscape orientation (B) can be jammed. (A) (B) Note We recommend using genuine Canon photo media when printing photographs. z How to change the print settings such as an example. The Settings screen is displayed. Changing the Print Settings This section describes the Settings screen that can cause the paper to as page size, media type, bordered or...
... specify the page size for Memory card mode to be specified on the Operation Panel when copying, or printing from [Page Size] in the printer driver. Important Always load paper in landscape orientation (B) can be jammed. (A) (B) Note We recommend using genuine Canon photo media when printing photographs. z How to change the print settings such as an example. The Settings screen is displayed. Changing the Print Settings This section describes the Settings screen that can cause the paper to as page size, media type, bordered or...

User's Guide
Page 121
...; Paper Size and Type Load A4- cannot be set to a size other modes they are printed approximately three minutes after they are received. Chapter 5 Faxing 119 Important z Load legal-sized paper in the specified paper source with Your Machine, or Have a Dedicated Telephone Line for paper size. Correct the paper size and type, and then press [OK]. For details on page 37. z When feeding paper from the cassette. Note If the sender sends a document that are received are received...
...; Paper Size and Type Load A4- cannot be set to a size other modes they are printed approximately three minutes after they are received. Chapter 5 Faxing 119 Important z Load legal-sized paper in the specified paper source with Your Machine, or Have a Dedicated Telephone Line for paper size. Correct the paper size and type, and then press [OK]. For details on page 37. z When feeding paper from the cassette. Note If the sender sends a document that are received are received...
User's Guide
Page 130
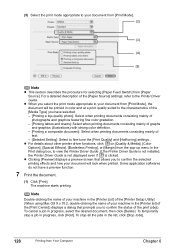
... [Paper Feed Switch] from [Print Mode], the document will look when printed. z Clicking [Preview] displays a preview screen that prompts you to confirm the status of text. - [Detailed Setting]: Select to the characteristics of the [Media Type] you to your machine in the [Printer list] of the [Print Center]) displays a dialog that allows you have a preview function. 7 Print the document. (1) Click [Print]. To stop a job in progress, select the desired document, then click [Delete]. z For details about other printer driver functions...
... [Paper Feed Switch] from [Print Mode], the document will look when printed. z Clicking [Preview] displays a preview screen that prompts you to confirm the status of text. - [Detailed Setting]: Select to the characteristics of the [Media Type] you to your machine in the [Printer list] of the [Print Center]) displays a dialog that allows you have a preview function. 7 Print the document. (1) Click [Print]. To stop a job in progress, select the desired document, then click [Delete]. z For details about other printer driver functions...

User's Guide
Page 132
... connected to your computer by using Windows XP The program selection screen is not displayed. Click [Options] at sleep or standby mode. Note If you select [Preferences] from the [Go] menu, then double click [Image Capture]. For detailed operations of the MP Navigator, refer to the Scan Guide. „ Scanning Using the Operation Panel of the Machine You can scan documents to the machine before starting application software in Image Capture under [Applications] of Mac OS X. z Make...
... connected to your computer by using Windows XP The program selection screen is not displayed. Click [Options] at sleep or standby mode. Note If you select [Preferences] from the [Go] menu, then double click [Image Capture]. For detailed operations of the MP Navigator, refer to the Scan Guide. „ Scanning Using the Operation Panel of the Machine You can scan documents to the machine before starting application software in Image Capture under [Applications] of Mac OS X. z Make...

User's Guide
Page 165
... problem continues after connecting the camera to turn the power back on . Slide the Scanner Lock Switch to the release position , press [ON/OFF] to a strong light source. If the same error occurs, contact the Canon Customer Care Center. Remove the document page jammed after checking document on the model or brand of A4/Letter-sized paper in , turn the power off . Two-sided scanning can be used only for twosided scanning. See "Document Jams" on page 177. Remove...
... problem continues after connecting the camera to turn the power back on . Slide the Scanner Lock Switch to the release position , press [ON/OFF] to a strong light source. If the same error occurs, contact the Canon Customer Care Center. Remove the document page jammed after checking document on the model or brand of A4/Letter-sized paper in , turn the power off . Two-sided scanning can be used only for twosided scanning. See "Document Jams" on page 177. Remove...
User's Guide
Page 194
... (or the [Details] tab), or reinstall the MP Drivers. Load paper and press [OK]. If the paper source is securely connected to change the port setting according to resolve the error, see "An Error Message is preventing the Print Head Holder from moving, cancel printing from your machine. 3. Check the printer port settings. 1. Open the [File] menu and select [Properties]. 4. Ensure that the paper source (the Auto Sheet Feeder or Cassette) is initializing. z There could also...
... (or the [Details] tab), or reinstall the MP Drivers. Load paper and press [OK]. If the paper source is securely connected to change the port setting according to resolve the error, see "An Error Message is preventing the Print Head Holder from moving, cancel printing from your machine. 3. Check the printer port settings. 1. Open the [File] menu and select [Properties]. 4. Ensure that the paper source (the Auto Sheet Feeder or Cassette) is initializing. z There could also...
User's Guide
Page 196
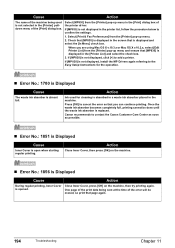
... replaced. If [MP830] is not displayed, install the MP Drivers again referring to the Easy Setup Instructions for cleaning is absorbed in a waste ink absorber placed in the printer list, follow the procedure below to cancel the error so that page again. 194 Troubleshooting Chapter 11 Press [OK] to confirm the settings. 1. One page of the print data being used for the operation. „ Error No.: 1700 is Displayed Cause The waste ink absorber is displayed...
... replaced. If [MP830] is not displayed, install the MP Drivers again referring to the Easy Setup Instructions for cleaning is absorbed in a waste ink absorber placed in the printer list, follow the procedure below to cancel the error so that page again. 194 Troubleshooting Chapter 11 Press [OK] to confirm the settings. 1. One page of the print data being used for the operation. „ Error No.: 1700 is Displayed Cause The waste ink absorber is displayed...
User's Guide
Page 197
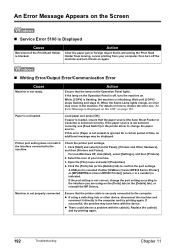
.... Perform necessary operations for displaying the scanner driver operating instruction is not displayed. Use a digital camera or digital video camcorder compatible with the PictBridge compliant device, and then connect the cable again. on page 163. „ For Windows Users Cause The [Instructions] button is not displayed on -screen manuals (instruction manuals). Set the "Setup CD-ROM" in your computer and install the onscreen manuals (instruction manuals). Unplug the connecting cable and clear the error. Chapter 11 Troubleshooting 195 Set the "Setup CDROM" in...
.... Perform necessary operations for displaying the scanner driver operating instruction is not displayed. Use a digital camera or digital video camcorder compatible with the PictBridge compliant device, and then connect the cable again. on page 163. „ For Windows Users Cause The [Instructions] button is not displayed on -screen manuals (instruction manuals). Set the "Setup CD-ROM" in your computer and install the onscreen manuals (instruction manuals). Unplug the connecting cable and clear the error. Chapter 11 Troubleshooting 195 Set the "Setup CDROM" in...

User's Guide
Page 201
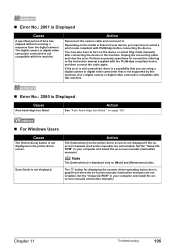
... of the machine that you can install them will be deleted collectively. 1 Click [Start], and select [All Programs] (or [Programs]), [Canon MP830 Manual], and then [Uninstall]. 2 Click [OK] when the confirmation message appears. If the on your computer, download it . If Safari is displayed, click [OK] to restart your Web browser to view the HTML format On-screen Manuals. Browser: Help Viewer Note z The on-screen manual may not...
... of the machine that you can install them will be deleted collectively. 1 Click [Start], and select [All Programs] (or [Programs]), [Canon MP830 Manual], and then [Uninstall]. 2 Click [OK] when the confirmation message appears. If the on your computer, download it . If Safari is displayed, click [OK] to restart your Web browser to view the HTML format On-screen Manuals. Browser: Help Viewer Note z The on-screen manual may not...
User's Guide
Page 203
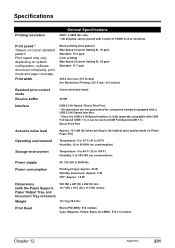
... Printing: 215.9 mm / 8.5 inches) Resident print control mode Receive buffer Canon extended mode 42 KB Interface USB 2.0 Hi-Speed / Direct Print Port * All operations are not guaranteed for computers standard-equipped with a USB 2.0 Hi-Speed interface. * Since the USB 2.0 Hi-Speed interface is fully upwardly compatible with USB Full-Speed (USB 1.1), it can be used at minimum. Print speed * *Based on system configuration, software, document complexity, print mode and page coverage. Print speed may vary depending on Canon standard pattern. Direct Print Port...
... Printing: 215.9 mm / 8.5 inches) Resident print control mode Receive buffer Canon extended mode 42 KB Interface USB 2.0 Hi-Speed / Direct Print Port * All operations are not guaranteed for computers standard-equipped with a USB 2.0 Hi-Speed interface. * Since the USB 2.0 Hi-Speed interface is fully upwardly compatible with USB Full-Speed (USB 1.1), it can be used at minimum. Print speed * *Based on system configuration, software, document complexity, print mode and page coverage. Print speed may vary depending on Canon standard pattern. Direct Print Port...
Easy Setup Instructions
Page 1
... machine. 5 Close the Inner Cover and the Scanning Unit (Printer Cover). ning Unit (Printer Cover) by moving the Scanner Lock Switch towards the lock mark. 3 Connect the telephone line and any necessary external device. (1) Press [ ] or [ ] to the stack. Open Button Paper Output Tray Connect the telephone line cord to the center. The Print Head Holder moves to the wall jack. Paper Guide AB Inner Cover Serial Number Location IMPORTANT If the Scanning Unit (Printer Cover) is not removed completely, problems with the print side face down . 3 Install...
... machine. 5 Close the Inner Cover and the Scanning Unit (Printer Cover). ning Unit (Printer Cover) by moving the Scanner Lock Switch towards the lock mark. 3 Connect the telephone line and any necessary external device. (1) Press [ ] or [ ] to the stack. Open Button Paper Output Tray Connect the telephone line cord to the center. The Print Head Holder moves to the wall jack. Paper Guide AB Inner Cover Serial Number Location IMPORTANT If the Scanning Unit (Printer Cover) is not removed completely, problems with the print side face down . 3 Install...
Easy Setup Instructions
Page 2
... want to [Printer List]. All other countries. Press the [ON/OFF]. 2. Remove the USB cable connected to choose the options you product serial number, which is shown in again, or turn the machine OFF then back ON again. 11 After restarting the computer, start Printer Setup Utility (start Windows. The setup program should run automatically. Select [Custom Install] in order to your Mac. 3 Insert the Setup Software & User's Guide CD-ROM. If a message asking for...
... want to [Printer List]. All other countries. Press the [ON/OFF]. 2. Remove the USB cable connected to choose the options you product serial number, which is shown in again, or turn the machine OFF then back ON again. 11 After restarting the computer, start Printer Setup Utility (start Windows. The setup program should run automatically. Select [Custom Install] in order to your Mac. 3 Insert the Setup Software & User's Guide CD-ROM. If a message asking for...

Service Manual
Page 9
... pages Black text: When printing the Canon standard pattern (1,500 characters per page) on A4 size plain paper, with the default settings in the Windows XP driver, using Photoshop 7.0. Color chart: When printing the ISO/JIS-SCID N5 pattern on A4 size plain paper in bordered printing, with the default settings in the Windows XP driver, using the ink tank immediately after the machine is turned on, the scanning unit is opened, and the carriage moves to the Open button...
... pages Black text: When printing the Canon standard pattern (1,500 characters per page) on A4 size plain paper, with the default settings in the Windows XP driver, using Photoshop 7.0. Color chart: When printing the ISO/JIS-SCID N5 pattern on A4 size plain paper in bordered printing, with the default settings in the Windows XP driver, using the ink tank immediately after the machine is turned on, the scanning unit is opened, and the carriage moves to the Open button...
Service Manual
Page 16
... button. => Automatic print head alignment is not correct. Change the setting after removing the card. With a memory card inserted in scanning the Photo Index the orientation, position and marking. The card is selected. Set to With the memory card set to the Read/write mode, The error message is cancelled, and the LCD returns to the ink tank replacement position. before printing was attempted. Check the page size you have set . Non-supported size of The error message is displayed, indicating the print...
... button. => Automatic print head alignment is not correct. Change the setting after removing the card. With a memory card inserted in scanning the Photo Index the orientation, position and marking. The card is selected. Set to With the memory card set to the Read/write mode, The error message is cancelled, and the LCD returns to the ink tank replacement position. before printing was attempted. Check the page size you have set . Non-supported size of The error message is displayed, indicating the print...
Service Manual
Page 20
Other settings (e. g. such as automatic dialing) b. Sample print of the trouble h. User name, telephone number, fax number, and model name f. Frequency and error type of a faulty fax reception c. Number of a non-Canon machine. Memo: The number of sheets / times of communication and error code can be a help for the communication test with a non-Canon machine, and if a Canon machine operates properly without any problems, it is recommended to let the user understand that the non-Canon machine needs to handle communication troubles. 1) Investigate...
Other settings (e. g. such as automatic dialing) b. Sample print of the trouble h. User name, telephone number, fax number, and model name f. Frequency and error type of a faulty fax reception c. Number of a non-Canon machine. Memo: The number of sheets / times of communication and error code can be a help for the communication test with a non-Canon machine, and if a Canon machine operates properly without any problems, it is recommended to let the user understand that the non-Canon machine needs to handle communication troubles. 1) Investigate...
Service Manual
Page 22
...-6526 Timing slit disk film QC1-6229 - Verification Items, (1) 4. Perform the print head alignment in the discharge of the logic board After replacement: ass'y, remove the power cord, and 1. Confirm no grease is on replacement*1 Adjustment / settings Operation check Logic board ass'y QM2-3659 - Set the destination in the user mode. Initialize the EEPROM. Service test print, or (2) EEPROM 6. Perform the print head alignment in the user mode. 1-17 REPAIR 3-1. Adjustment / Settings, (6) Service mode.] - Check the ink system function. [See...
...-6526 Timing slit disk film QC1-6229 - Verification Items, (1) 4. Perform the print head alignment in the discharge of the logic board After replacement: ass'y, remove the power cord, and 1. Confirm no grease is on replacement*1 Adjustment / settings Operation check Logic board ass'y QM2-3659 - Set the destination in the user mode. Initialize the EEPROM. Service test print, or (2) EEPROM 6. Perform the print head alignment in the user mode. 1-17 REPAIR 3-1. Adjustment / Settings, (6) Service mode.] - Check the ink system function. [See...
Service Manual
Page 57
...Cleaning date & time (BK/CL) 11. Ink status (PBK/BK/Y/M/C) 14. Manual print head alignment by user 16. Camera Direct Print-supported device connection record (LG = Legacy, PB = Canon PictBridge-supported camera, OPB = Other PictBridge-supported camera) 20. ASF feed pages (total, plain paper, High Resolution Paper & Matte Photo Paper, Photo Paper Pro & Photo Paper Plus Glossy & Photo Paper Plus Semi-gloss, Glossy Photo Paper, postcard, Envelope) 23. Auto duplex print pages (total, Photo Paper Plus Double Sided, postcard) 1-51 Waste ink amount (%) 6. Installation date & time 7. Power...
...Cleaning date & time (BK/CL) 11. Ink status (PBK/BK/Y/M/C) 14. Manual print head alignment by user 16. Camera Direct Print-supported device connection record (LG = Legacy, PB = Canon PictBridge-supported camera, OPB = Other PictBridge-supported camera) 20. ASF feed pages (total, plain paper, High Resolution Paper & Matte Photo Paper, Photo Paper Pro & Photo Paper Plus Glossy & Photo Paper Plus Semi-gloss, Glossy Photo Paper, postcard, Envelope) 23. Auto duplex print pages (total, Photo Paper Plus Double Sided, postcard) 1-51 Waste ink amount (%) 6. Installation date & time 7. Power...
Service Manual
Page 58
... Paper & Matte Photo Paper, Photo Paper Pro & Photo Paper Plus Glossy & Photo Paper Plus Semi-gloss, Glossy Photo Paper, postcard) 51. Card Direct print pages: Photo Paper Plus Glossy (4 x 6, 5 x 7, Japanese post card, A4/Letter) 40. Color copy pages fed via the U-turn back side), not used in servicing the MP830 33. Line inspection information (not used in servicing) HDEEPROM 60. Ink ejection level (PBK, BK, Y, M, M2, C, C2) 65. Language 34. Memory card use count 37. Reception count 54. The last 2 errors (including user errors and copy scan errors. Business card...
... Paper & Matte Photo Paper, Photo Paper Pro & Photo Paper Plus Glossy & Photo Paper Plus Semi-gloss, Glossy Photo Paper, postcard) 51. Card Direct print pages: Photo Paper Plus Glossy (4 x 6, 5 x 7, Japanese post card, A4/Letter) 40. Color copy pages fed via the U-turn back side), not used in servicing the MP830 33. Line inspection information (not used in servicing) HDEEPROM 60. Ink ejection level (PBK, BK, Y, M, M2, C, C2) 65. Language 34. Memory card use count 37. Reception count 54. The last 2 errors (including user errors and copy scan errors. Business card...


