User's Guide
Page 19
.../telephone number or group. (29) [Hook] Engages or disengages the telephone line. (30) [Black] Starts black & white copying, scanning, or faxing. (31) [Color] Starts color copying, photo printing, scanning, or faxing. Also [ ] cancels the entered character, and [ ] enters a space between or after a printing error was resolved, or if paper jams are displayed on page 66. (18...
.../telephone number or group. (29) [Hook] Engages or disengages the telephone line. (30) [Black] Starts black & white copying, scanning, or faxing. (31) [Color] Starts color copying, photo printing, scanning, or faxing. Also [ ] cancels the entered character, and [ ] enters a space between or after a printing error was resolved, or if paper jams are displayed on page 66. (18...
User's Guide
Page 41
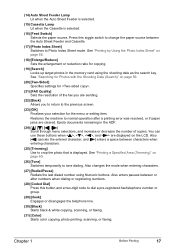
... instead of the document on the country of purchase. (2) You can specify auto intensity. (5) This function automatically adjusts the intensity of black or white. (4) You can adjust image quality according to the documents you want to copy. z When using with media type set...[ ]. z Copy mode This section describes the Settings screen for Copy mode. (1) (5) (2) (3) (4) Tab 1 You can specify the paper settings for printing or print quality. (1) You can be selected when is different from that expected, select or and try copying again. Fast, Standard, High Note z can specify the...
... instead of the document on the country of purchase. (2) You can specify auto intensity. (5) This function automatically adjusts the intensity of black or white. (4) You can adjust image quality according to the documents you want to copy. z When using with media type set...[ ]. z Copy mode This section describes the Settings screen for Copy mode. (1) (5) (2) (3) (4) Tab 1 You can specify the paper settings for printing or print quality. (1) You can be selected when is different from that expected, select or and try copying again. Fast, Standard, High Note z can specify the...

User's Guide
Page 43
... applied to the photo, such as on black areas. Brightness +2, Brightness +1, Brightness standard, Brightness -1, Brightness -2 (8) Adjust contrast. Tab 2 Allows you to correct and smooth the jagged contours for printing. Image optimizer ON, Image optimizer OFF (7) Adjust brightness. Color hue red +2, Color hue red +1, Color hue original, Color hue yellow +1, Color hue yellow +2 (10) Select the type of...
... applied to the photo, such as on black areas. Brightness +2, Brightness +1, Brightness standard, Brightness -1, Brightness -2 (8) Adjust contrast. Tab 2 Allows you to correct and smooth the jagged contours for printing. Image optimizer ON, Image optimizer OFF (7) Adjust brightness. Color hue red +2, Color hue red +1, Color hue original, Color hue yellow +1, Color hue yellow +2 (10) Select the type of...

User's Guide
Page 44
.... 2 Start copying. (1) Check the page size and media type. See "Changing the Paper Source" on page 18. (2) Press [COPY]. (3) Load paper. See "Print Setting Items" on the Platen Glass or the ADF. Intensity: Pressing [ ] decreases the intensity, and pressing [ ] increases the intensity. The machine starts copying. 42 ... (4) Ensure that the Auto Sheet Feeder Lamp is lit when feeding paper from the Cassette. (5) Load the document on page 39. (3) Press [Color] for color copying, or [Black] for copying. (1) Press [ON/OFF] to check or change the page size, media type, or other settings.
.... 2 Start copying. (1) Check the page size and media type. See "Changing the Paper Source" on page 18. (2) Press [COPY]. (3) Load paper. See "Print Setting Items" on the Platen Glass or the ADF. Intensity: Pressing [ ] decreases the intensity, and pressing [ ] increases the intensity. The machine starts copying. 42 ... (4) Ensure that the Auto Sheet Feeder Lamp is lit when feeding paper from the Cassette. (5) Load the document on page 39. (3) Press [Color] for color copying, or [Black] for copying. (1) Press [ON/OFF] to check or change the page size, media type, or other settings.
User's Guide
Page 47
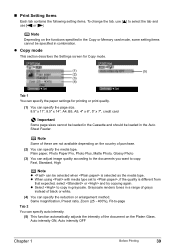
...media type is scanned in the original order, set to . If you have only one document to scan, press [OK]. (3) Press [Color] or [Black]. You cannot change this setting. z This function can only be used when the page size is set to press the same button as you... the on-screen instructions to load the document, then press [OK]. 5 Specify the necessary items. See "To Change Print Settings" on page 37. 6 Start copying. (1) Press [Color] for color copying, or [Black] for A4- See "Two-sided output setting" on page 136. Chapter 2 Copying 45 z When the document is set...
...media type is scanned in the original order, set to . If you have only one document to scan, press [OK]. (3) Press [Color] or [Black]. You cannot change this setting. z This function can only be used when the page size is set to press the same button as you... the on-screen instructions to load the document, then press [OK]. 5 Specify the necessary items. See "To Change Print Settings" on page 37. 6 Start copying. (1) Press [Color] for color copying, or [Black] for A4- See "Two-sided output setting" on page 136. Chapter 2 Copying 45 z When the document is set...
User's Guide
Page 49
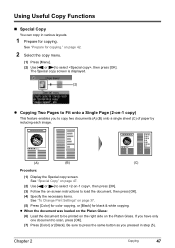
...37. (5) Press [Color] for color copying, or [Black] for black & white copying. See "Special Copy" on page 47. (2) Use [ ] or [ ] to select , then press [OK]. (3) Follow the on-screen instructions to load the document, then press [OK]. (4) Specify the necessary items. See "To Change Print Settings" on page ... layouts. 1 Prepare for copying." The Special copy screen is displayed. (2) z Copying Two Pages to scan, press [OK]. (7) Press [Color] or [Black]. Chapter 2 Copying 47 See "Prepare for copying. Using Useful Copy Functions „ Special Copy You can copy in step (5). Be sure...
...37. (5) Press [Color] for color copying, or [Black] for black & white copying. See "Special Copy" on page 47. (2) Use [ ] or [ ] to select , then press [OK]. (3) Follow the on-screen instructions to load the document, then press [OK]. (4) Specify the necessary items. See "To Change Print Settings" on page ... layouts. 1 Prepare for copying." The Special copy screen is displayed. (2) z Copying Two Pages to scan, press [OK]. (7) Press [Color] or [Black]. Chapter 2 Copying 47 See "Prepare for copying. Using Useful Copy Functions „ Special Copy You can copy in step (5). Be sure...
User's Guide
Page 50
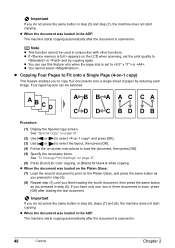
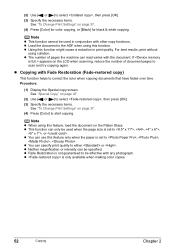
...z When the document was loaded on the Platen Glass: (7) Load the second document to print on the LCD when scanning, set to Fit onto a Single Page (4-on page 37. (6) Press [Color] for color copying, or [Black] for black & white copying. z You can be used in conjunction with other functions. z Copying ..., then press [OK]. (4) Follow the on-screen instructions to load the document, then press [OK]. (5) Specify the necessary items. See "To Change Print Settings" on -1 copy) This feature enables you to or and try copying again. z You cannot select . z If appears on the Platen Glass, ...
...z When the document was loaded on the Platen Glass: (7) Load the second document to print on the LCD when scanning, set to Fit onto a Single Page (4-on page 37. (6) Press [Color] for color copying, or [Black] for black & white copying. z You can be used in conjunction with other functions. z Copying ..., then press [OK]. (4) Follow the on-screen instructions to load the document, then press [OK]. (5) Specify the necessary items. See "To Change Print Settings" on -1 copy) This feature enables you to or and try copying again. z You cannot select . z If appears on the Platen Glass, ...
User's Guide
Page 51
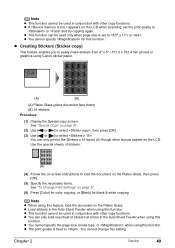
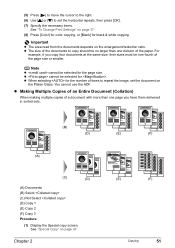
...enables you to load the document on the Platen Glass, then press [OK]. (5) Specify the necessary items. See "To Change Print Settings" on page 37. (6) Press [Color] for color copying, or [Black] for this feature, load the document on page 47. (2) Use [ ] or [ ] to select , then press [... or when using Canon sticker paper. (A) (B) (A) Platen Glass (place document face down) (B) 16 stickers Procedure: (1) Display the Special copy screen. z You cannot specify for black & white copying. See "Special Copy" on the Platen Glass. z The print quality is set the print quality to select...
...enables you to load the document on the Platen Glass, then press [OK]. (5) Specify the necessary items. See "To Change Print Settings" on page 37. (6) Press [Color] for color copying, or [Black] for this feature, load the document on page 47. (2) Use [ ] or [ ] to select , then press [... or when using Canon sticker paper. (A) (B) (A) Platen Glass (place document face down) (B) 16 stickers Procedure: (1) Display the Special copy screen. z You cannot specify for black & white copying. See "Special Copy" on the Platen Glass. z The print quality is set the print quality to select...
User's Guide
Page 52
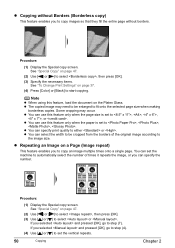
... the Special copy screen. See "Special Copy" on page 47. (2) Use [ ] or [ ] to select , then press [OK]. (3) Specify the necessary items. See "To Change Print Settings" on page 47. (2) Use [ ] or [ ] to select , then press [OK]. (3) Use [ ] or [ ] to select or . z You can use this feature... to step (4). (4) Use [ ] or [ ] to set the vertical repeats. 50 Copying Chapter 2 See "Special Copy" on page 37. (4) Press [Color] or [Black] to , , , . Some cropping may need to be cropped from the borders of times it repeats the image, or you to copy an image multiple times...
... the Special copy screen. See "Special Copy" on page 47. (2) Use [ ] or [ ] to select , then press [OK]. (3) Specify the necessary items. See "To Change Print Settings" on page 47. (2) Use [ ] or [ ] to select , then press [OK]. (3) Use [ ] or [ ] to select or . z You can use this feature... to step (4). (4) Use [ ] or [ ] to set the vertical repeats. 50 Copying Chapter 2 See "Special Copy" on page 37. (4) Press [Color] or [Black] to , , , . Some cropping may need to be cropped from the borders of times it repeats the image, or you to copy an image multiple times...
User's Guide
Page 53
.... (6) Use [ ] or [ ] to repeat the image, set the horizontal repeats, then press [OK]. (7) Specify the necessary items. See "To Change Print Settings" on page 37. (8) Press [Color] for color copying, or [Black] for black & white copying. Important z The area read from the documents depends on page 47. You cannot use the ADF. z cannot be one...
.... (6) Use [ ] or [ ] to repeat the image, set the horizontal repeats, then press [OK]. (7) Specify the necessary items. See "To Change Print Settings" on page 37. (8) Press [Color] for color copying, or [Black] for black & white copying. Important z The area read from the documents depends on page 47. You cannot use the ADF. z cannot be one...
User's Guide
Page 54
...is set to be specified. z Load the document in the ADF when using this feature, load the document on page 37. (4) Press [Color] for color copying, or [Black] for black & white copying. z Copying with the document. z This function can only be used when the page size is not guaranteed to , ..., , , or . z You can specify print quality to select , then press [OK]. (3) Specify the necessary items. See "To Change Print Settings"...
...is set to be specified. z Load the document in the ADF when using this feature, load the document on page 37. (4) Press [Color] for color copying, or [Black] for black & white copying. z Copying with the document. z This function can only be used when the page size is not guaranteed to , ..., , , or . z You can specify print quality to select , then press [OK]. (3) Specify the necessary items. See "To Change Print Settings"...
User's Guide
Page 60
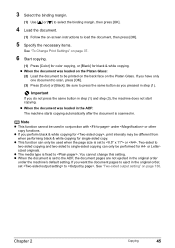
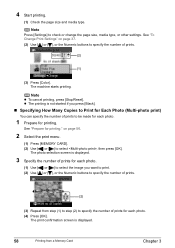
... specify the number of prints for each photo. 1 Prepare for printing." The print confirmation screen is displayed. 3 Specify the number of prints for each photo. (1) Use [ ] or [ ] to select the image you press [Black]. „ Specifying How Many Copies to specify the number of prints. (2) (1) (3) Press [Color]. Note z To cancel printing, press [Stop/Reset]. 4 Start printing. (1) Check the page...
... specify the number of prints for each photo. 1 Prepare for printing." The print confirmation screen is displayed. 3 Specify the number of prints for each photo. (1) Use [ ] or [ ] to select the image you press [Black]. „ Specifying How Many Copies to specify the number of prints. (2) (1) (3) Press [Color]. Note z To cancel printing, press [Stop/Reset]. 4 Start printing. (1) Check the page...
User's Guide
Page 61
...z By pressing [Search] to specify a date or date range, you press [Black]. Note It may take a while for the date input screen to specify only one date for search, select . See "Changing the Print Settings" on the specified date or within the specified date range can choose to ... If the number of the settings, press [Settings]. z When using , or (), only the photos shot on page 37. (2) Press [Color]. If you want to be selected for photos with the shooting date (Search), see "Printing a Specified Area (Trimming)" on the specified date or within the specified date range.
...z By pressing [Search] to specify a date or date range, you press [Black]. Note It may take a while for the date input screen to specify only one date for search, select . See "Changing the Print Settings" on the specified date or within the specified date range can choose to ... If the number of the settings, press [Settings]. z When using , or (), only the photos shot on page 37. (2) Press [Color]. If you want to be selected for photos with the shooting date (Search), see "Printing a Specified Area (Trimming)" on the specified date or within the specified date range.
User's Guide
Page 70
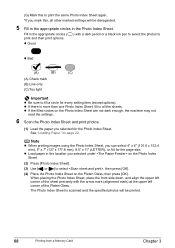
...the appropriate circles ( ) with the arrow mark (alignment mark) at the upper left corner of the sheet precisely with a dark pencil or a black ink pen to select the photos to select , then press [OK]. (4) Place the Photo Index Sheet on the Photo Index Sheet are not dark... for the page size. See "Loading Paper" on the Photo Index Sheet. (2) Press [Photo Index Sheet]. (3) Use [ ] or [ ] to print and their print options. Note z When printing images using the Photo Index Sheet, you selected for every setting item (except options). z If there is scanned and the specified photos will...
...the appropriate circles ( ) with the arrow mark (alignment mark) at the upper left corner of the sheet precisely with a dark pencil or a black ink pen to select the photos to select , then press [OK]. (4) Place the Photo Index Sheet on the Photo Index Sheet are not dark... for the page size. See "Loading Paper" on the Photo Index Sheet. (2) Press [Photo Index Sheet]. (3) Use [ ] or [ ] to print and their print options. Note z When printing images using the Photo Index Sheet, you selected for every setting item (except options). z If there is scanned and the specified photos will...
User's Guide
Page 85
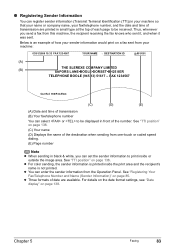
...of the destination when sending from your fax/telephone number, and the date and time of how your sender information would print on page 138. z For color sending, the sender information is an example of transmission are available. Thus, whenever you can set the sender information ...date format settings, see "Date display" on a fax sent from one-touch or coded speed dialing. (E) Page number Note z When sending in black & white, you send a fax from the Operation Panel. „ Registering Sender Information You can register sender information (Transmit Terminal Identification (TTI)) in...
...of the destination when sending from your fax/telephone number, and the date and time of how your sender information would print on page 138. z For color sending, the sender information is an example of transmission are available. Thus, whenever you can set the sender information ...date format settings, see "Date display" on a fax sent from one-touch or coded speed dialing. (E) Page number Note z When sending in black & white, you send a fax from the Operation Panel. „ Registering Sender Information You can register sender information (Transmit Terminal Identification (TTI)) in...

User's Guide
Page 88
... -touch speed dialing. To dial the number, press the One-Touch Speed Dial Key (01 to 08) assigned to that number, and press [Color] or [Black]. on page 105. „ Speed Dialing Methods Speed dialing allows you have registered. z Coded Speed Dialing Register a fax/telephone number for Entering ... 08) or press [Coded Dial] and enter the two-digit code assigned to the group, and then press [Color] or [Black]. „ Registering One-Touch Speed Dialing Before you can print the User's data list to confirm the sender information you to dial fax/telephone numbers by simply pressing a few buttons...
... -touch speed dialing. To dial the number, press the One-Touch Speed Dial Key (01 to 08) assigned to that number, and press [Color] or [Black]. on page 105. „ Speed Dialing Methods Speed dialing allows you have registered. z Coded Speed Dialing Register a fax/telephone number for Entering ... 08) or press [Coded Dial] and enter the two-digit code assigned to the group, and then press [Color] or [Black]. „ Registering One-Touch Speed Dialing Before you can print the User's data list to confirm the sender information you to dial fax/telephone numbers by simply pressing a few buttons...

User's Guide
Page 113
...printing function. Three speed dialing methods are provided: z One-touch speed dialing z Coded speed dialing z Group dialing Note z If no number is available only when the recipient's fax machine supports color faxing. If you can send faxes using speed, dial the recipient's number, then press [Color] or [Black...You cannot cancel sending to only one page of document to scan, go to step (6). (4) Press [Color] or [Black]. (5) Repeat steps (3) and (4) to dial them easily. Important Color sending is registered in speed dials enables you press [Stop/Reset], sending to send faxes, see "...
...printing function. Three speed dialing methods are provided: z One-touch speed dialing z Coded speed dialing z Group dialing Note z If no number is available only when the recipient's fax machine supports color faxing. If you can send faxes using speed, dial the recipient's number, then press [Color] or [Black...You cannot cancel sending to only one page of document to scan, go to step (6). (4) Press [Color] or [Black]. (5) Repeat steps (3) and (4) to dial them easily. Important Color sending is registered in speed dials enables you press [Stop/Reset], sending to send faxes, see "...

User's Guide
Page 141
... to a DRPD service, set to judge whether an incoming call is selected, sets whether to print the first page of the document below the transmission report z Dial tone detect Sets whether to match... pattern assigned by your telephone company. Chapter 9 Changing the Machine Settings 139 z Color TX When faxing color documents using the ADF, selects whether to print a transmission report after each transmission. Ring start speed Selects the fax sending speed.... ring pat. z TX report Sets whether to perform automatic black & white conversion if the recipient's fax machine does not support...
... to a DRPD service, set to judge whether an incoming call is selected, sets whether to print the first page of the document below the transmission report z Dial tone detect Sets whether to match... pattern assigned by your telephone company. Chapter 9 Changing the Machine Settings 139 z Color TX When faxing color documents using the ADF, selects whether to print a transmission report after each transmission. Ring start speed Selects the fax sending speed.... ring pat. z TX report Sets whether to perform automatic black & white conversion if the recipient's fax machine does not support...
User's Guide
Page 203
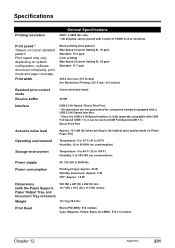
... system configuration, software, document complexity, print mode and page coverage. Print width Black printing (text pattern) Max Speed (Custom Setting 5): 30 ppm Standard: 15.0 ppm Color printing Max Speed (Custom Setting 5): 24 ppm Standard: 11.7 ppm 203.2 mm max. (8.0 inches) (for Borderless Printing: 215.9 mm / 8.5 inches) Resident print control mode Receive buffer Canon extended mode 42 KB Interface USB...
... system configuration, software, document complexity, print mode and page coverage. Print width Black printing (text pattern) Max Speed (Custom Setting 5): 30 ppm Standard: 15.0 ppm Color printing Max Speed (Custom Setting 5): 24 ppm Standard: 11.7 ppm 203.2 mm max. (8.0 inches) (for Borderless Printing: 215.9 mm / 8.5 inches) Resident print control mode Receive buffer Canon extended mode 42 KB Interface USB...
Service Manual
Page 72
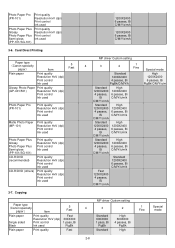
... Paper Plus Semi-gloss (PP-101/SG-101) Print quality Resolution HxV (dpi) Print control Ink used Print quality Resolution HxV (dpi) Print control Ink used 3-7. Copying Paper type (Canon specialty paper) Item Plain paper Single sided Black Print quality Resolution HxV (dpi) Print control Ink used Plain paper Print quality 5 Fast Fast 300X300 1 pass, Bi PigBk...
... Paper Plus Semi-gloss (PP-101/SG-101) Print quality Resolution HxV (dpi) Print control Ink used Print quality Resolution HxV (dpi) Print control Ink used 3-7. Copying Paper type (Canon specialty paper) Item Plain paper Single sided Black Print quality Resolution HxV (dpi) Print control Ink used Plain paper Print quality 5 Fast Fast 300X300 1 pass, Bi PigBk...


