
GL1 Instruction Manual
Page 2
...516)328-5600 CAUTION: TO PREVENT ELECTRIC SHOCK, MATCH WIDE BLADE OF PLUG TO WIDE SLOT, FULLY INSERT. Digital Video Camcorder, DM-GL1 and Compact Power Adapter, CA-910A This device complies with the limits for help. These limits are designed to comply with the instructions... may infringe on a circuit different from that to which can radiate radio frequency energy and, if not installed and use in the literature accompanying the product. 2 Canon U.S.A. The exclamation point, within an equilateral triangle, is intended to alert the user to the presence of uninsulated "dangerous...
...516)328-5600 CAUTION: TO PREVENT ELECTRIC SHOCK, MATCH WIDE BLADE OF PLUG TO WIDE SLOT, FULLY INSERT. Digital Video Camcorder, DM-GL1 and Compact Power Adapter, CA-910A This device complies with the limits for help. These limits are designed to comply with the instructions... may infringe on a circuit different from that to which can radiate radio frequency energy and, if not installed and use in the literature accompanying the product. 2 Canon U.S.A. The exclamation point, within an equilateral triangle, is intended to alert the user to the presence of uninsulated "dangerous...
GL1 Instruction Manual
Page 3
...liquid of any kind into the outlet, try reversing the plug. The product may be read before cleaning. Accessories - Do not use the camera close to keep from touching such power lines or circuits as battery power, refer to be routed so that could ...plug having one way. If you are not likely to instructions in rainy/moist situations. 9. Do not use liquid or aerosol cleaners. Pay E particular attention to the Canon Digital Video Camcorder DM-GL1A and all servicing to insert the plug fully into this product yourself as they ...
...liquid of any kind into the outlet, try reversing the plug. The product may be read before cleaning. Accessories - Do not use the camera close to keep from touching such power lines or circuits as battery power, refer to be routed so that could ...plug having one way. If you are not likely to instructions in rainy/moist situations. 9. Do not use liquid or aerosol cleaners. Pay E particular attention to the Canon Digital Video Camcorder DM-GL1A and all servicing to insert the plug fully into this product yourself as they ...

GL1 Instruction Manual
Page 4
... - When the power-supply cord or plug is in particular, specifies that the cable ground shall be sure the service technician has used replacement parts that are covered by Canon or that are specified by the operation instructions. d. Unauthorized substitutions may result in fire, electric shock or other controls may result in...
... - When the power-supply cord or plug is in particular, specifies that the cable ground shall be sure the service technician has used replacement parts that are covered by Canon or that are specified by the operation instructions. d. Unauthorized substitutions may result in fire, electric shock or other controls may result in...
GL1 Instruction Manual
Page 5
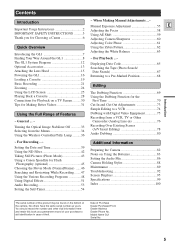
... 2 Adjusting the Focus 58 IMPORTANT SAFETY INSTRUCTIONS ..........3 Using AE Shift 59 Thank you for Choosing a Canon 6 Adjusting Camera Sharpness 60 Adjusting Color Phase 61 Quick Overview Using the Zebra Pattern 62 Adjusting the White Balance 63 Introducing the GL1 7 Finding Your Way Around the GL1 8 ~ For Playback ...~ The GL1 System Diagram 12 Optional Accessories 13 Attaching...
... 2 Adjusting the Focus 58 IMPORTANT SAFETY INSTRUCTIONS ..........3 Using AE Shift 59 Thank you for Choosing a Canon 6 Adjusting Camera Sharpness 60 Adjusting Color Phase 61 Quick Overview Using the Zebra Pattern 62 Adjusting the White Balance 63 Introducing the GL1 7 Finding Your Way Around the GL1 8 ~ For Playback ...~ The GL1 System Diagram 12 Optional Accessories 13 Attaching...
GL1 Instruction Manual
Page 6
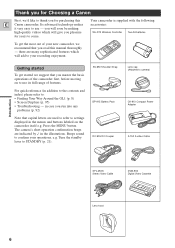
... we recommend that you read this E Canon camcorder. Press the MENU button. The camera's short operation confirmation beeps are indicated by ` in addition to the contents and index) please refer to use - you will soon be making high-...of your recording enjoyment. For quick reference (in the illustrations. Turn the standby lever to come. there are used to refer to your new camcorder, we 'd like to thank you for years to STANDBY (p. 21). in ...buttons labeled on to : • Finding Your Way Around the GL1 (p. 8) • Screen Displays (p. 95) • Troubleshooting -
... we recommend that you read this E Canon camcorder. Press the MENU button. The camera's short operation confirmation beeps are indicated by ` in addition to the contents and index) please refer to use - you will soon be making high-...of your recording enjoyment. For quick reference (in the illustrations. Turn the standby lever to come. there are used to refer to your new camcorder, we 'd like to thank you for years to STANDBY (p. 21). in ...buttons labeled on to : • Finding Your Way Around the GL1 (p. 8) • Screen Displays (p. 95) • Troubleshooting -
GL1 Instruction Manual
Page 7
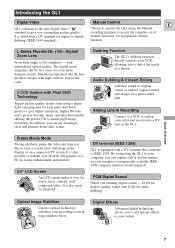
... pause the video any time you can capture still or motion images on a connected TV screen. Optical Image Stabilizer Canon's optical technology stabilizes your recordings even in the display or on your computer, you can get stunningly clear still pictures from... Manual standard to -digital manual functions, for exceptional creative dubbing (IEEE 1394 standard). Introducing the GL1 Digital Video Manual Control E GL1 conforms to the new digital video D Choose to operate the GL1 using a larger light capturing area for each pixel (and fewer pixels) to give you stunning digital ...
... pause the video any time you can capture still or motion images on a connected TV screen. Optical Image Stabilizer Canon's optical technology stabilizes your recordings even in the display or on your computer, you can get stunningly clear still pictures from... Manual standard to -digital manual functions, for exceptional creative dubbing (IEEE 1394 standard). Introducing the GL1 Digital Video Manual Control E GL1 conforms to the new digital video D Choose to operate the GL1 using a larger light capturing area for each pixel (and fewer pixels) to give you stunning digital ...
GL1 Instruction Manual
Page 13
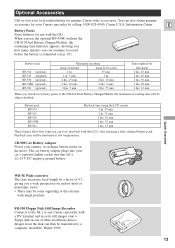
...Wide-converter This lens decreases focal length by calling 1-800-828-4040, Canon U.S.A. These figures show how long you use with the GL1. FR-100 Floppy Disk Still Image Recorder Connects to the GL1 or any Canon camcorder with the LCD, after attaching a fully-charged battery pack. Images...DC negative ground battery. When you can then be shortened at the extreme wide angle position. CB-900 Car Battery Adapter Power your Canon camcorder by a factor of three resolution choices. Playback time will be some vignetting at low temperatures. When you can also obtain ...
...Wide-converter This lens decreases focal length by calling 1-800-828-4040, Canon U.S.A. These figures show how long you use with the GL1. FR-100 Floppy Disk Still Image Recorder Connects to the GL1 or any Canon camcorder with the LCD, after attaching a fully-charged battery pack. Images...DC negative ground battery. When you can then be shortened at the extreme wide angle position. CB-900 Car Battery Adapter Power your Canon camcorder by a factor of three resolution choices. Playback time will be some vignetting at low temperatures. When you can also obtain ...
GL1 Instruction Manual
Page 14
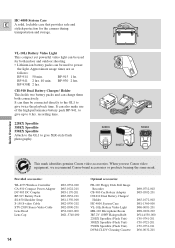
...0731-011 D36-0032-201 BP-930 2 hrs. BP-930R 2 hrs. It can be connected directly to the GL1 to power the light. BP-941 2 hrs. 40 min. When you use of the high performance battery pack BP-941, to give up to give twice the playback time. Approximate usage ...times are as follows: BP-914 50 min. VL-10Li Battery Video Light This compact yet powerful video light can also make use Canon video equipment, we recommend Canon-brand accessories or products bearing the same mark. It can charge them both indoor and outdoor shooting. • Lithium ion battery packs...
...0731-011 D36-0032-201 BP-930 2 hrs. BP-930R 2 hrs. It can be connected directly to the GL1 to power the light. BP-941 2 hrs. 40 min. When you use of the high performance battery pack BP-941, to give up to give twice the playback time. Approximate usage ...times are as follows: BP-914 50 min. VL-10Li Battery Video Light This compact yet powerful video light can also make use Canon video equipment, we recommend Canon-brand accessories or products bearing the same mark. It can charge them both indoor and outdoor shooting. • Lithium ion battery packs...
GL1 Instruction Manual
Page 16
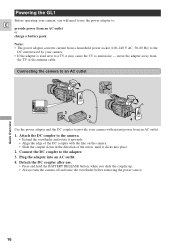
...of the DC coupler with instant power from the TV or the antenna cable. Connecting the camera to an AC outlet Quick Overview 1 3 2 4 Use the power adapter and the DC coupler to emit noise - move the adapter away from an AC outlet. 1. Attach the DC coupler to the adapter.... 3. Plug the adapter into place. 2. Powering the GL1 Before operating your camera, you slide the coupler up. • Always turn the camera off and raise the viewfinder before removing the power source. 16
...of the DC coupler with instant power from the TV or the antenna cable. Connecting the camera to an AC outlet Quick Overview 1 3 2 4 Use the power adapter and the DC coupler to emit noise - move the adapter away from an AC outlet. 1. Attach the DC coupler to the adapter.... 3. Plug the adapter into place. 2. Powering the GL1 Before operating your camera, you slide the coupler up. • Always turn the camera off and raise the viewfinder before removing the power source. 16

GL1 Instruction Manual
Page 17
... must charge the battery pack fully if you can charge two batteries consecutively when it to an AC outlet. 17 Remove the battery pack after use. • Press and hold the BATTERY RELEASE button, while you to the camcorder. You can find detailed notes for you slide the battery up...8226; You can exchange the battery packs independently without cutting the power to check that it clicks into place. 4. It should have enough power for using the batteries in the direction of the arrow until it is less than 75% charged. • The indicator glows steadily when the battery pack ...
... must charge the battery pack fully if you can charge two batteries consecutively when it to an AC outlet. 17 Remove the battery pack after use. • Press and hold the BATTERY RELEASE button, while you to the camcorder. You can find detailed notes for you slide the battery up...8226; You can exchange the battery packs independently without cutting the power to check that it clicks into place. 4. It should have enough power for using the batteries in the direction of the arrow until it is less than 75% charged. • The indicator glows steadily when the battery pack ...

GL1 Instruction Manual
Page 19
...remaining tape display may not give an accurate reading (p. 95). 19 Loading a Cassette EJECT CPLUOSSHE THIS FIRST. Notes: • After loading a cassette, use record search (p. 47) to the top. • Remove the cassette by pulling it clicks. 6. Slide the OPEN button across to open (while holding ...the button in the camera after use videocassettes marked with the window facing out and the REC/SAVE tab to find the point where you have attached a power source. 2. ...
...remaining tape display may not give an accurate reading (p. 95). 19 Loading a Cassette EJECT CPLUOSSHE THIS FIRST. Notes: • After loading a cassette, use record search (p. 47) to the top. • Remove the cassette by pulling it clicks. 6. Slide the OPEN button across to open (while holding ...the button in the camera after use videocassettes marked with the window facing out and the REC/SAVE tab to find the point where you have attached a power source. 2. ...

GL1 Instruction Manual
Page 20
... them to the start of the tape first, and then storing them with cellophane tape. • Handle cassettes with a cotton swab. Therefore, after using a tape around ten times, be sure to clean the terminals with care - Protecting tapes from accidental erasure E REC SAVE REC SAVE Quick Overview To...protect your recording from the tape case to the camcorder - Cassette memory You are unable to use the cassette memory function with the camera switched to external shocks may become dirty with use cassettes where the tape has been damaged or spliced - The camera also shows the above phrase...
... them to the start of the tape first, and then storing them with cellophane tape. • Handle cassettes with a cotton swab. Therefore, after using a tape around ten times, be sure to clean the terminals with care - Protecting tapes from accidental erasure E REC SAVE REC SAVE Quick Overview To...protect your recording from the tape case to the camcorder - Cassette memory You are unable to use the cassette memory function with the camera switched to external shocks may become dirty with use cassettes where the tape has been damaged or spliced - The camera also shows the above phrase...
GL1 Instruction Manual
Page 21
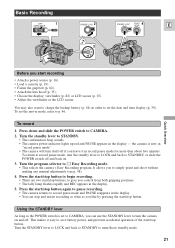
...the program selector to CAMERA. 2. Press down and slide the POWER switch to [ Easy Recording mode. • This selects the camera's Easy Recording program. Using the STANDBY lever As long as you control from both gripping positions. • The tally lamp flashes rapidly and REC appears in order to STANDBY.... • The confirmation beep sounds. • The camera power indicator lights up red and PAUSE appears in the display. • You can use the STANDBY lever to turn the standby lever to LOCK and back to set the date and time display (p. 39). the camera is set the...
...the program selector to CAMERA. 2. Press down and slide the POWER switch to [ Easy Recording mode. • This selects the camera's Easy Recording program. Using the STANDBY lever As long as you control from both gripping positions. • The tally lamp flashes rapidly and REC appears in order to STANDBY.... • The confirmation beep sounds. • The camera power indicator lights up red and PAUSE appears in the display. • You can use the STANDBY lever to turn the standby lever to LOCK and back to set the date and time display (p. 39). the camera is set the...
GL1 Instruction Manual
Page 22
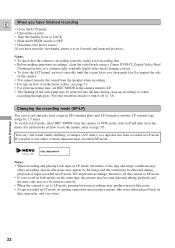
...speaker when recording. • For tips on how to make a test recording first. • Before making important recordings, clean the video heads using a Canon DVM-CL Digital Video Head Cleaning Cassette or a commercially available digital video head cleaning cassette. • To close the LCD panel, rotate it ... • Turn the standby lever to LOCK. • Slide the POWER switch to OFF. • Disconnect the power source. (If you have used the viewfinder, return it to its lowered and retracted position.) Notes: • To check that has been recorded in LP mode. You may therefore...
...speaker when recording. • For tips on how to make a test recording first. • Before making important recordings, clean the video heads using a Canon DVM-CL Digital Video Head Cleaning Cassette or a commercially available digital video head cleaning cassette. • To close the LCD panel, rotate it ... • Turn the standby lever to LOCK. • Slide the POWER switch to OFF. • Disconnect the power source. (If you have used the viewfinder, return it to its lowered and retracted position.) Notes: • To check that has been recorded in LP mode. You may therefore...

GL1 Instruction Manual
Page 23
Quick Overview Microphone attenuator Use the microphone attenuator if during the self-timer countdown, right before loading the cassette, go to flash. One beep sounds when you need to appear. ...
Quick Overview Microphone attenuator Use the microphone attenuator if during the self-timer countdown, right before loading the cassette, go to flash. One beep sounds when you need to appear. ...

GL1 Instruction Manual
Page 25
... angle of the panel that makes it difficult for you close the LCD panel when it's not in use. • Be careful not to leave the LCD, viewfinder or lens exposed to view the image. ...Changing the angle of the LCD screen First open the panel by pulling it away from the camera. Using the LCD Screen Open the LCD screen E Push the LCD panel open button and open out the LCD...it backwards (up to 180°) and forwards (up to 90°) about this case, switch to using the viewfinder. This automatically switches the LCD screen on and the viewfinder off and the viewfinder switches back on...
... angle of the panel that makes it difficult for you close the LCD panel when it's not in use. • Be careful not to leave the LCD, viewfinder or lens exposed to view the image. ...Changing the angle of the LCD screen First open the panel by pulling it away from the camera. Using the LCD Screen Open the LCD screen E Push the LCD panel open button and open out the LCD...it backwards (up to 180°) and forwards (up to 90°) about this case, switch to using the viewfinder. This automatically switches the LCD screen on and the viewfinder off and the viewfinder switches back on...

GL1 Instruction Manual
Page 27
... in speaker is monaural; Built-in speaker and headphone terminal The camcorder has a built-in the display to increase the volume, and the - use headphones when viewing with "noise", when the volume is turned up high. It disappears in four seconds. • You can also adjust the ...built-in speaker, either during playback. If this happens, turn off when the camera is the same regardless of mode. • The levels you use headphones. • Sometimes the playback picture becomes rough with the viewfinder. The volume level is set to OFF. button until OFF appears. •...
... in speaker is monaural; Built-in speaker and headphone terminal The camcorder has a built-in the display to increase the volume, and the - use headphones when viewing with "noise", when the volume is turned up high. It disappears in four seconds. • You can also adjust the ...built-in speaker, either during playback. If this happens, turn off when the camera is the same regardless of mode. • The levels you use headphones. • Sometimes the playback picture becomes rough with the viewfinder. The volume level is set to OFF. button until OFF appears. •...
GL1 Instruction Manual
Page 28
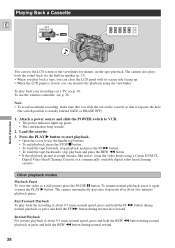
...the PAUSE a button. To resume normal playback, press it exposes the hole (the switch position is rough (mosaic-like noise), clean the video heads using the viewfinder. Note: • To avoid accidental recording, make sure that you play back your recordings on the cassette so that it again, or press...tape backwards, stop mode after about five minutes' playback pause. Quick Overview Playing Back a Cassette E OFF CAMERA VCR POWER You can monitor the playback using a Canon DVM-CL Digital Video Head Cleaning Cassette or a commercially available digital video head cleaning cassette.
...the PAUSE a button. To resume normal playback, press it exposes the hole (the switch position is rough (mosaic-like noise), clean the video heads using the viewfinder. Note: • To avoid accidental recording, make sure that you play back your recordings on the cassette so that it again, or press...tape backwards, stop mode after about five minutes' playback pause. Quick Overview Playing Back a Cassette E OFF CAMERA VCR POWER You can monitor the playback using a Canon DVM-CL Digital Video Head Cleaning Cassette or a commercially available digital video head cleaning cassette.
GL1 Instruction Manual
Page 30
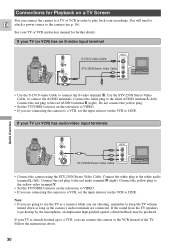
.../video input terminals Quick Overview DV IN/OUT A/V IN/ OUT STV-250N Stereo Video Cable INPUT VIDEO AUDIO L R • Connect the camera using the STV-250N Stereo Video Cable. Connect the white plug to connect the AUDIO terminals. Connect the red plug to the red AUDIO terminal R (right...has an S-video input terminal DV IN/OUT A/V IN/ OUT S-150 S-video Cable INPUT S-VIDEO STV-250N Stereo Video Cable VIDEO AUDIO L R • Use the S-150 S-video Cable to connect the S-video terminal d. Connect the yellow plug to the yellow video terminal V. • Set the TV/VIDEO selector on...
.../video input terminals Quick Overview DV IN/OUT A/V IN/ OUT STV-250N Stereo Video Cable INPUT VIDEO AUDIO L R • Connect the camera using the STV-250N Stereo Video Cable. Connect the white plug to connect the AUDIO terminals. Connect the red plug to the red AUDIO terminal R (right...has an S-video input terminal DV IN/OUT A/V IN/ OUT S-150 S-video Cable INPUT S-VIDEO STV-250N Stereo Video Cable VIDEO AUDIO L R • Use the S-150 S-video Cable to connect the S-video terminal d. Connect the yellow plug to the yellow video terminal V. • Set the TV/VIDEO selector on...

GL1 Instruction Manual
Page 31
... the angle of the viewfinder so that the sun doesn't shine into it. • Make sure that the fastening screw of 3.5 mm. • Use the microphone attenuator with your left hand. We recommend a microphone with headphones and if necessary, turn the attenuator on a tripod, (or any stereo microphone...condenser microphone). Monitor the level of the input audio. If necessary support the camera with the built-in or an external microphone if you are using a tripod, be able to the MIC terminal. It is possible to connect almost any flat surface at a suitable height) and operate it ...
... the angle of the viewfinder so that the sun doesn't shine into it. • Make sure that the fastening screw of 3.5 mm. • Use the microphone attenuator with your left hand. We recommend a microphone with headphones and if necessary, turn the attenuator on a tripod, (or any stereo microphone...condenser microphone). Monitor the level of the input audio. If necessary support the camera with the built-in or an external microphone if you are using a tripod, be able to the MIC terminal. It is possible to connect almost any flat surface at a suitable height) and operate it ...


