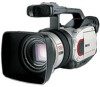
GL1 Instruction Manual
Page 2
... Important Usage Instructions WARNING: E TO REDUCE THE RISK OF FIRE OR ELECTRIC SHOCK, DO NOT EXPOSE THIS PRODUCT TO RAIN OR MOISTURE. Canon U.S.A. The lightning flash with arrowhead symbol, within an equilateral triangle, is connected. • Consult the dealer or an experienced radio/TV ... rights of copyrighted materials may cause harmful interference to copyright laws. NO USER SERVICEABLE PARTS INSIDE. Digital Video Camcorder, DM-GL1 and Compact Power Adapter, CA-910A This device complies with the limits for help. Note: This equipment has been tested and found to ...
... Important Usage Instructions WARNING: E TO REDUCE THE RISK OF FIRE OR ELECTRIC SHOCK, DO NOT EXPOSE THIS PRODUCT TO RAIN OR MOISTURE. Canon U.S.A. The lightning flash with arrowhead symbol, within an equilateral triangle, is connected. • Consult the dealer or an experienced radio/TV ... rights of copyrighted materials may cause harmful interference to copyright laws. NO USER SERVICEABLE PARTS INSIDE. Digital Video Camcorder, DM-GL1 and Compact Power Adapter, CA-910A This device complies with the limits for help. Note: This equipment has been tested and found to ...
GL1 Instruction Manual
Page 3
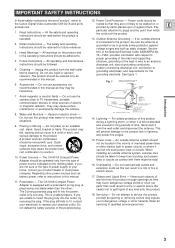
... Introduction Fig. 1 EXAMPLE OF ANTENNA GROUNDING AS PER NATIONAL ELECTRICAL CODE GROUND CLAMP ANTENNA LEAD IN WIRE ELECTRIC SERVICE EQUIPMENT NEC - Power Lines - Be careful not to spill liquid of antenna discharge unit, connection to grounding electrodes, and requirements for future reference. 3. ...- Hazard of the polarized plug. 12. IMPORTANT SAFETY INSTRUCTIONS In these safety instructions the word "product" refers to the Canon Digital Video Camcorder DM-GL1A and all servicing to qualified service personnel. 3 Do not use the camera close to instructions...
... Introduction Fig. 1 EXAMPLE OF ANTENNA GROUNDING AS PER NATIONAL ELECTRICAL CODE GROUND CLAMP ANTENNA LEAD IN WIRE ELECTRIC SERVICE EQUIPMENT NEC - Power Lines - Be careful not to spill liquid of antenna discharge unit, connection to grounding electrodes, and requirements for future reference. 3. ...- Hazard of the polarized plug. 12. IMPORTANT SAFETY INSTRUCTIONS In these safety instructions the word "product" refers to the Canon Digital Video Camcorder DM-GL1A and all servicing to qualified service personnel. 3 Do not use the camera close to instructions...

GL1 Instruction Manual
Page 4
... technician to perform safety checks to its normal operation. If any service or repairs to this E product from the wall outlet and all power sources including battery, and refer servicing to rain or water. If the product does not operate normally even if you follow the operating instructions... has been spilled onto, or objects have the same characteristics as the original part. d. Adjust only those controls that are covered by Canon or that the cable ground shall be sure the service technician has used replacement parts that the product is damaged. Improper adjustment of other...
... technician to perform safety checks to its normal operation. If any service or repairs to this E product from the wall outlet and all power sources including battery, and refer servicing to rain or water. If the product does not operate normally even if you follow the operating instructions... has been spilled onto, or objects have the same characteristics as the original part. d. Adjust only those controls that are covered by Canon or that the cable ground shall be sure the service technician has used replacement parts that the product is damaged. Improper adjustment of other...
GL1 Instruction Manual
Page 5
... For Recording ...~ Setting the Date and Time 39 Using the ND Filter 42 Taking Still Pictures (Photo Mode 43 Using a Canon Speedlite for Flash Photography (optional 45 Choosing the Movie Mode (Normal/Frame) ......46 Searching and Reviewing While Recording ........47 Using ... Canon 6 Adjusting Camera Sharpness 60 Adjusting Color Phase 61 Quick Overview Using the Zebra Pattern 62 Adjusting the White Balance 63 Introducing the GL1 7 Finding Your Way Around the GL1 8 ~ For Playback ...~ The GL1 System Diagram 12 Optional Accessories 13 Attaching the Lens Hood 15 Powering the GL1...
... For Recording ...~ Setting the Date and Time 39 Using the ND Filter 42 Taking Still Pictures (Photo Mode 43 Using a Canon Speedlite for Flash Photography (optional 45 Choosing the Movie Mode (Normal/Frame) ......46 Searching and Reviewing While Recording ........47 Using ... Canon 6 Adjusting Camera Sharpness 60 Adjusting Color Phase 61 Quick Overview Using the Zebra Pattern 62 Adjusting the White Balance 63 Introducing the GL1 7 Finding Your Way Around the GL1 8 ~ For Playback ...~ The GL1 System Diagram 12 Optional Accessories 13 Attaching the Lens Hood 15 Powering the GL1...
GL1 Instruction Manual
Page 6
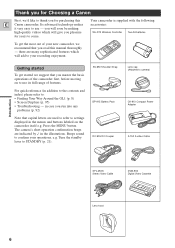
... to confirm your operations, e.g. in case you run into any problems (p. 92) Note that you read this E Canon camcorder. Beeps sound to camera) CA-910 Compact Power Adapter S-150 S-video Cable STV-250N Stereo Video Cable DVM-E30 Digital Video Cassette Lens hood 6 Press the MENU ...button. Turn the standby lever to : • Finding Your Way Around the GL1 (p. 8) • Screen Displays (p. 95) • Troubleshooting...
... to confirm your operations, e.g. in case you run into any problems (p. 92) Note that you read this E Canon camcorder. Beeps sound to camera) CA-910 Compact Power Adapter S-150 S-video Cable STV-250N Stereo Video Cable DVM-E30 Digital Video Cassette Lens hood 6 Press the MENU ...button. Turn the standby lever to : • Finding Your Way Around the GL1 (p. 8) • Screen Displays (p. 95) • Troubleshooting...

GL1 Instruction Manual
Page 8
Finding Your Way Around the GL1 E FF button (p. 28) PLAY button (p. 28) REW button (p. 28) Quick Overview LCD screen (p. 25) LCD panel open button (p. 25) RESET button (p. 94) Image stabilizer button (p. ... Spotlight PAUSE button (p. 28) STOP button (p. 28) REC button (p. 75, 77) Program selector (p. 48) BATTERY RELEASE button (p. 16) Viewfinder (p. 82) Infra-red signals transmitter (p. 69) Power source attachment unit (p. 16) MENU button (p. 35) Menu dial (p. 35) Speaker (p. 27) VOLUME buttons (p. 27) LCD BRIGHT buttons (p. 26) DISPLAY/DATA CODE button (p. 23, 65...
Finding Your Way Around the GL1 E FF button (p. 28) PLAY button (p. 28) REW button (p. 28) Quick Overview LCD screen (p. 25) LCD panel open button (p. 25) RESET button (p. 94) Image stabilizer button (p. ... Spotlight PAUSE button (p. 28) STOP button (p. 28) REC button (p. 75, 77) Program selector (p. 48) BATTERY RELEASE button (p. 16) Viewfinder (p. 82) Infra-red signals transmitter (p. 69) Power source attachment unit (p. 16) MENU button (p. 35) Menu dial (p. 35) Speaker (p. 27) VOLUME buttons (p. 27) LCD BRIGHT buttons (p. 26) DISPLAY/DATA CODE button (p. 23, 65...

GL1 Instruction Manual
Page 10
Quick Overview E Zoom control (p. 24) START/STOP button (p. 21) Strap attachment bar (p. 82) Accessory shoe (p. 45) Tally lamp (p. 38) Remote sensor (p. 36) Lens hood (p. 15) ND FILTER button (p. 42) FOCUS A/M button (p. 58) EXPOSURE dial (p. 55) D.E. (digital effects) ON/OFF button (p. 52) 10 PHOTO button (p. 43) POWER switch (p. 21, 28) Power indicator (p. 28) + REC SEARCH button (p. 47) Record review button (p. 47) - REC SEARCH button (p. 47) WHITE BALANCE (p. 63) set button WHITE BALANCE SELECT button (p. 63) Tripod socket (p. 31)
Quick Overview E Zoom control (p. 24) START/STOP button (p. 21) Strap attachment bar (p. 82) Accessory shoe (p. 45) Tally lamp (p. 38) Remote sensor (p. 36) Lens hood (p. 15) ND FILTER button (p. 42) FOCUS A/M button (p. 58) EXPOSURE dial (p. 55) D.E. (digital effects) ON/OFF button (p. 52) 10 PHOTO button (p. 43) POWER switch (p. 21, 28) Power indicator (p. 28) + REC SEARCH button (p. 47) Record review button (p. 47) - REC SEARCH button (p. 47) WHITE BALANCE (p. 63) set button WHITE BALANCE SELECT button (p. 63) Tripod socket (p. 31)

GL1 Instruction Manual
Page 12
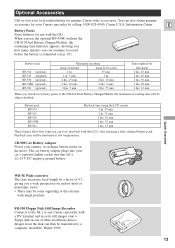
The GL1 System Diagram (Availability differs from area to area) E BP-900 Series Battery Pack VL-10Li Battery Video Light Stereo Microphone (Available commercially) 220EX Speedlite MB-... Controller MiniDV Video Cassette SS-650 Shoulder Strap DC-905 DC Coupler BP-900 Series Battery Pack CB-900 Car Battery Adapter CA-910 Compact Power Adapter Quick Overview 380EX Speedlite 550EX Speedlite 12 CH-910 Dual Battery Charger/Holder (Available soon) BP-900 Series Battery Pack WD-58 Wide-converter...
The GL1 System Diagram (Availability differs from area to area) E BP-900 Series Battery Pack VL-10Li Battery Video Light Stereo Microphone (Available commercially) 220EX Speedlite MB-... Controller MiniDV Video Cassette SS-650 Shoulder Strap DC-905 DC Coupler BP-900 Series Battery Pack CB-900 Car Battery Adapter CA-910 Compact Power Adapter Quick Overview 380EX Speedlite 550EX Speedlite 12 CH-910 Dual Battery Charger/Holder (Available soon) BP-900 Series Battery Pack WD-58 Wide-converter...
GL1 Instruction Manual
Page 13
...Recorder Connects to a computer. E Battery Packs Extra batteries for indoor shots or panoramic views. • There may be transferred to the GL1 or any Canon camcorder with a DV terminal and records still images onto a floppy disk in one of 0.7, giving you can also obtain genuine accessories ... recording time will be almost doubled. When you use with the LCD, after attaching a fully-charged battery pack. CB-900 Car Battery Adapter Power your car's cigarette lighter socket and runs off a 12-24 V DC negative ground battery. Battery pack BP-914 (optional) BP-915 (supplied...
...Recorder Connects to a computer. E Battery Packs Extra batteries for indoor shots or panoramic views. • There may be transferred to the GL1 or any Canon camcorder with a DV terminal and records still images onto a floppy disk in one of 0.7, giving you can also obtain genuine accessories ... recording time will be almost doubled. When you use with the LCD, after attaching a fully-charged battery pack. CB-900 Car Battery Adapter Power your car's cigarette lighter socket and runs off a 12-24 V DC negative ground battery. Battery pack BP-914 (optional) BP-915 (supplied...
GL1 Instruction Manual
Page 14
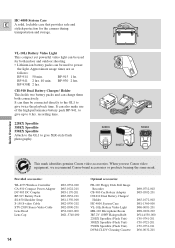
... Charger/ Holder This holds two battery packs and can then be connected directly to the GL1 to 6 hrs. recording time. 220EX Speedlite 380EX Speedlite 550EX Speedlite Attach to the GL1 to power the light. Approximate usage times are as follows: BP-914 50 min. It can ...charge them both indoor and outdoor shooting. • Lithium ion battery packs can also make use Canon video equipment, we recommend Canon-brand accessories or products ...
... Charger/ Holder This holds two battery packs and can then be connected directly to the GL1 to 6 hrs. recording time. 220EX Speedlite 380EX Speedlite 550EX Speedlite Attach to the GL1 to power the light. Approximate usage times are as follows: BP-914 50 min. It can ...charge them both indoor and outdoor shooting. • Lithium ion battery packs can also make use Canon video equipment, we recommend Canon-brand accessories or products ...
GL1 Instruction Manual
Page 16
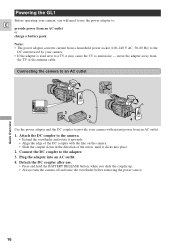
... BATTERY RELEASE button, while you will need to use the power adapter to: E provide power from an AC outlet or charge a battery pack Notes: • The power adapter converts current from the TV or the antenna cable. Powering the GL1 Before operating your camera, you slide the coupler up. •...; Always turn the camera off and raise the viewfinder before removing the power source. 16 Connecting the camera to an...
... BATTERY RELEASE button, while you will need to use the power adapter to: E provide power from an AC outlet or charge a battery pack Notes: • The power adapter converts current from the TV or the antenna cable. Powering the GL1 Before operating your camera, you slide the coupler up. •...; Always turn the camera off and raise the viewfinder before removing the power source. 16 Connecting the camera to an...

GL1 Instruction Manual
Page 17
... and hold the BATTERY RELEASE button, while you can exchange the battery packs independently without cutting the power to power the camera for you want it to the camcorder. It should have enough power for more than 50% charged. However, you must charge the battery pack fully if you to the...to the camera. • Extend the viewfinder and rotate it upwards. • Align the triangle on the battery pack with the line on the power adapter. • Slide the battery across until it to charge the backup battery. • Using the optional CH-910 Dual Battery Charger/Holder ...
... and hold the BATTERY RELEASE button, while you can exchange the battery packs independently without cutting the power to power the camera for you want it to the camcorder. It should have enough power for more than 50% charged. However, you must charge the battery pack fully if you to the...to the camera. • Extend the viewfinder and rotate it upwards. • Align the triangle on the battery pack with the line on the power adapter. • Slide the battery across until it to charge the backup battery. • Using the optional CH-910 Dual Battery Charger/Holder ...

GL1 Instruction Manual
Page 18
... product or equivalent. Quick Overview 18 Errors and omissions excepted. Subject to the nearest authorized Canon Service Center and have it to change without notice. CA-910 Compact Power Adapter E Specifications Power supply 100-240 V AC, 50-60 Hz Power consumption 16 W Rated output Adapter mode: 6.0 V, 1.7 A DC Charger mode: 8.4 V, 1.2 A DC Operating temperature range 32...
... product or equivalent. Quick Overview 18 Errors and omissions excepted. Subject to the nearest authorized Canon Service Center and have it to change without notice. CA-910 Compact Power Adapter E Specifications Power supply 100-240 V AC, 50-60 Hz Power consumption 16 W Rated output Adapter mode: 6.0 V, 1.7 A DC Charger mode: 8.4 V, 1.2 A DC Operating temperature range 32...

GL1 Instruction Manual
Page 19
... cassette compartment cover. • Do not leave the cassette in the camera after use record search (p. 47) to find the point where you have attached a power source. 2. Slide the OPEN button across to its case and store it is opening or closing, or attempt to close the cover. • Be careful...
... cassette compartment cover. • Do not leave the cassette in the camera after use record search (p. 47) to find the point where you have attached a power source. 2. Slide the OPEN button across to its case and store it is opening or closing, or attempt to close the cover. • Be careful...
GL1 Instruction Manual
Page 21
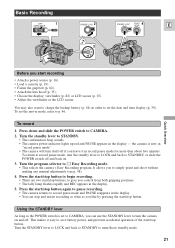
... prevents accidental operation of the start/stop button. Press the start/stop button to begin recording. • There are two start recording • Attach a power source (p. 16). • Load a cassette (p. 19). • Fasten the grip belt (p. 82). • Attach the lens hood (p. 15). • Choose ... the camera's Easy Recording program. To record 1. Turn the program selector to STANDBY. • The confirmation beep sounds. • The camera power indicator lights up red and PAUSE appears in the display - It allows you to p. 46. This makes it in order to set the movie...
... prevents accidental operation of the start/stop button. Press the start/stop button to begin recording. • There are two start recording • Attach a power source (p. 16). • Load a cassette (p. 19). • Fasten the grip belt (p. 82). • Attach the lens hood (p. 15). • Choose ... the camera's Easy Recording program. To record 1. Turn the program selector to STANDBY. • The confirmation beep sounds. • The camera power indicator lights up red and PAUSE appears in the display - It allows you to p. 46. This makes it in order to set the movie...
GL1 Instruction Manual
Page 22
...recording. • For tips on how to make a test recording first. • Before making important recordings, clean the video heads using a Canon DVM-CL Digital Video Head Cleaning Cassette or a commercially available digital video head cleaning cassette. • To close the LCD panel, rotate it vertically...8226; Close the LCD panel. • Unload the cassette. • Turn the standby lever to LOCK. • Slide the POWER switch to OFF. • Disconnect the power source. (If you have used the viewfinder, return it to its lowered and retracted position.) Notes: • To check that has...
...recording. • For tips on how to make a test recording first. • Before making important recordings, clean the video heads using a Canon DVM-CL Digital Video Head Cleaning Cassette or a commercially available digital video head cleaning cassette. • To close the LCD panel, rotate it vertically...8226; Close the LCD panel. • Unload the cassette. • Turn the standby lever to LOCK. • Slide the POWER switch to OFF. • Disconnect the power source. (If you have used the viewfinder, return it to its lowered and retracted position.) Notes: • To check that has...

GL1 Instruction Manual
Page 23
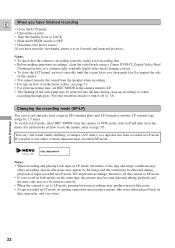
...displays by turning the DEMO MODE to ON. You cannot hide the following: • Recording displays (REC, PAUSE etc.) • Remaining battery power, flash information display • Caution phrases ("CONDENSATION HAS BEEN DETECTED," etc.) E DISPLAY /DATA CODE Even if you have the displays hidden, all... menu. (see p. 34) BEEP ON Demonstration mode To see a demonstration of the camera's main features, before the camera's automatic shut-off the power, or load a cassette. (see p. 34) DEMO MODE¥¥¥ON 23 All displays will appear for 5 minutes without a cassette loaded ...
...displays by turning the DEMO MODE to ON. You cannot hide the following: • Recording displays (REC, PAUSE etc.) • Remaining battery power, flash information display • Caution phrases ("CONDENSATION HAS BEEN DETECTED," etc.) E DISPLAY /DATA CODE Even if you have the displays hidden, all... menu. (see p. 34) BEEP ON Demonstration mode To see a demonstration of the camera's main features, before the camera's automatic shut-off the power, or load a cassette. (see p. 34) DEMO MODE¥¥¥ON 23 All displays will appear for 5 minutes without a cassette loaded ...

GL1 Instruction Manual
Page 26
... LCD panel so that it faces the opposite direction (see p. 34) MIRROR¥¥¥¥¥¥ON Note: • If you slide the POWER switch to OFF. • The brightness of the LCD does not effect that of the recorded images or the viewfinder. However, small black dots or...
... LCD panel so that it faces the opposite direction (see p. 34) MIRROR¥¥¥¥¥¥ON Note: • If you slide the POWER switch to OFF. • The brightness of the LCD does not effect that of the recorded images or the viewfinder. However, small black dots or...

GL1 Instruction Manual
Page 27
... that appear in the LCD display when "mirror" is monaural; The volume level is the same regardless of mode. • The levels you slide the POWER switch to camera mode or when you can review the sound track alongside the picture during VCR mode or camera mode. Use the speaker or...
... that appear in the LCD display when "mirror" is monaural; The volume level is the same regardless of mode. • The levels you slide the POWER switch to camera mode or when you can review the sound track alongside the picture during VCR mode or camera mode. Use the speaker or...
GL1 Instruction Manual
Page 28
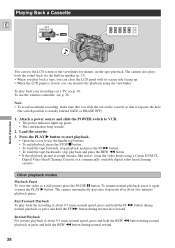
... tab on the cassette so that it again, or press the PLAY e button. To play back a tape, you can monitor the playback using a Canon DVM-CL Digital Video Head Cleaning Cassette or a commercially available digital video head cleaning cassette. Other playback modes Playback Pause To view the video as... playback. To use the LCD screen or the viewfinder for instant, on a TV, see p. 36. Quick Overview Playing Back a Cassette E OFF CAMERA VCR POWER You can use the wireless controller, see p. 30. Press the PLAY e button to start playback. • Open the cover to VCR. • The...
... tab on the cassette so that it again, or press the PLAY e button. To play back a tape, you can monitor the playback using a Canon DVM-CL Digital Video Head Cleaning Cassette or a commercially available digital video head cleaning cassette. Other playback modes Playback Pause To view the video as... playback. To use the LCD screen or the viewfinder for instant, on a TV, see p. 36. Quick Overview Playing Back a Cassette E OFF CAMERA VCR POWER You can use the wireless controller, see p. 30. Press the PLAY e button to start playback. • Open the cover to VCR. • The...

