GL1 Instruction Manual
Page 2
... communications. Use of important operating and maintenance (servicing) instructions in the manual. REFER SERVICING TO QUALIFIED SERVICE PERSONNEL. WARNING: TO REDUCE THE RISK OF ELECTRIC SHOCK AND TO REDUCE ANNOYING INTERFERENCE, USE THE RECOMMENDED ACCESSORIES ONLY. Digital Video Camcorder, DM-GL1 and Compact Power Adapter, CA-910A This device complies with class B limits in a particular installation. If this device must accept any changes or modifications to comply with Part 15...
... communications. Use of important operating and maintenance (servicing) instructions in the manual. REFER SERVICING TO QUALIFIED SERVICE PERSONNEL. WARNING: TO REDUCE THE RISK OF ELECTRIC SHOCK AND TO REDUCE ANNOYING INTERFERENCE, USE THE RECOMMENDED ACCESSORIES ONLY. Digital Video Camcorder, DM-GL1 and Compact Power Adapter, CA-910A This device complies with class B limits in a particular installation. If this device must accept any changes or modifications to comply with Part 15...
GL1 Instruction Manual
Page 3
.... Outdoor Antenna Grounding - Polarization - IMPORTANT SAFETY INSTRUCTIONS In these safety instructions the word "product" refers to your home, consult your product dealer or local power company. When installing an outside antenna system should be routed so that could result in the vicinity of power supply to the Canon Digital Video Camcorder DM-GL1A and all servicing to plugs and the point from...
.... Outdoor Antenna Grounding - Polarization - IMPORTANT SAFETY INSTRUCTIONS In these safety instructions the word "product" refers to your home, consult your product dealer or local power company. When installing an outside antenna system should be routed so that could result in the vicinity of power supply to the Canon Digital Video Camcorder DM-GL1A and all servicing to plugs and the point from...
GL1 Instruction Manual
Page 5
... Adjustments ...~ Manual Exposure Adjustment 55 E Important Usage Instructions 2 Adjusting the Focus 58 IMPORTANT SAFETY INSTRUCTIONS ..........3 Using AE Shift 59 Thank you for Choosing a Canon 6 Adjusting Camera Sharpness 60 Adjusting Color Phase 61 Quick Overview Using the Zebra Pattern 62 Adjusting the White Balance 63 Introducing the GL1 7 Finding Your Way Around the GL1 8 ~ For Playback ...~ The GL1 System Diagram 12 Optional Accessories 13 Attaching the Lens Hood 15 Powering the GL1 16 Loading a Cassette 19 Displaying Data Code 65 Searching the Tape (Photo...
... Adjustments ...~ Manual Exposure Adjustment 55 E Important Usage Instructions 2 Adjusting the Focus 58 IMPORTANT SAFETY INSTRUCTIONS ..........3 Using AE Shift 59 Thank you for Choosing a Canon 6 Adjusting Camera Sharpness 60 Adjusting Color Phase 61 Quick Overview Using the Zebra Pattern 62 Adjusting the White Balance 63 Introducing the GL1 7 Finding Your Way Around the GL1 8 ~ For Playback ...~ The GL1 System Diagram 12 Optional Accessories 13 Attaching the Lens Hood 15 Powering the GL1 16 Loading a Cassette 19 Displaying Data Code 65 Searching the Tape (Photo...
GL1 Instruction Manual
Page 14
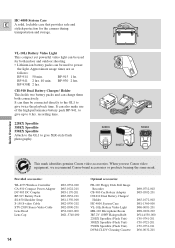
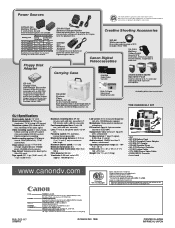
...-3740-000 14 Optional accessories: FR-100 Floppy Disk Still Image Recorder CB-900 Car Battery Adapter CH-910 Dual Battery Charger/ Holder HC-4000 System Case VL-10Li Battery Video Light MB-100 Microphone Boom JR7.2V 10WF Halogen Bulb 220EX Speedlite (Flash Unit) 380EX Speedlite (Flash Unit) 550EX Speedlite (Flash Unit) DVM-CL DV Cleaning Cassette D89-0732-002 D85-0502-201 D85-1072...
...-3740-000 14 Optional accessories: FR-100 Floppy Disk Still Image Recorder CB-900 Car Battery Adapter CH-910 Dual Battery Charger/ Holder HC-4000 System Case VL-10Li Battery Video Light MB-100 Microphone Boom JR7.2V 10WF Halogen Bulb 220EX Speedlite (Flash Unit) 380EX Speedlite (Flash Unit) 550EX Speedlite (Flash Unit) DVM-CL DV Cleaning Cassette D89-0732-002 D85-0502-201 D85-1072...
GL1 Instruction Manual
Page 21
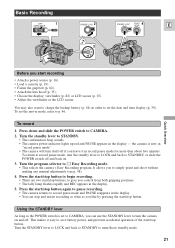
... a power source (p. 16). • Load a cassette (p. 19). • Fasten the grip belt (p. 82). • Attach the lens hood (p. 15). • Choose the display: viewfinder (p. 82) or LCD screen (p. 25). • Adjust the viewfinder or the LCD screen. Basic Recording OFF 1 CAMERA VCR 2 STANDBY LOCK STANDBY LOCK 4 START /STOP E POWER 3 Quick Overview Before you start /stop button. Turn the standby lever to turn the camera on . 3. To record 1. To set the date and time display (p. 39...
... a power source (p. 16). • Load a cassette (p. 19). • Fasten the grip belt (p. 82). • Attach the lens hood (p. 15). • Choose the display: viewfinder (p. 82) or LCD screen (p. 25). • Adjust the viewfinder or the LCD screen. Basic Recording OFF 1 CAMERA VCR 2 STANDBY LOCK STANDBY LOCK 4 START /STOP E POWER 3 Quick Overview Before you start /stop button. Turn the standby lever to turn the camera on . 3. To record 1. To set the date and time display (p. 39...
GL1 Instruction Manual
Page 22
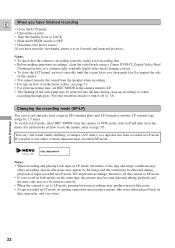
... images (A/V insert) to a tape that the camera is set REC MODE in the camera menu to LP. • The flashing of the tally lamp may be reflected into the lens during close-up recording, or when recording through glass. To switch to LP mode, select REC MODE from the speaker when recording. • For tips on how to make a test recording first. • Before making important recordings, clean the video heads using a Canon DVM-CL Digital Video Head Cleaning Cassette...
... images (A/V insert) to a tape that the camera is set REC MODE in the camera menu to LP. • The flashing of the tally lamp may be reflected into the lens during close-up recording, or when recording through glass. To switch to LP mode, select REC MODE from the speaker when recording. • For tips on how to make a test recording first. • Before making important recordings, clean the video heads using a Canon DVM-CL Digital Video Head Cleaning Cassette...

GL1 Instruction Manual
Page 24
.... Zooming E W Zoom out Zoom in T ZOOM W T Quick Overview 20× optical zoom Operate the zoom controls from the camera menu, to magnify the camera's zoom range by up to 20×) and digital zooming (20× to 100×). You can freely zoom in digital zoom range. • When the digital zoom is set it towards W to zoom out to wide-angle. • Press it to work as usual. You can control the speed of zooming...
.... Zooming E W Zoom out Zoom in T ZOOM W T Quick Overview 20× optical zoom Operate the zoom controls from the camera menu, to magnify the camera's zoom range by up to 20×) and digital zooming (20× to 100×). You can freely zoom in digital zoom range. • When the digital zoom is set it towards W to zoom out to wide-angle. • Press it to work as usual. You can control the speed of zooming...

GL1 Instruction Manual
Page 31
... MIC terminal. Monitor the level of the MIC input sound with a built-in power supply (condenser microphone). With practice, you will damage the camera. We recommend a microphone with headphones and if necessary, turn the attenuator on a tripod, (or any flat surface at a suitable height) and operate it with the wireless controller. • When you need to lower the volume level of the input audio. If necessary support the camera...
... MIC terminal. Monitor the level of the MIC input sound with a built-in power supply (condenser microphone). With practice, you will damage the camera. We recommend a microphone with headphones and if necessary, turn the attenuator on a tripod, (or any flat surface at a suitable height) and operate it with the wireless controller. • When you need to lower the volume level of the input audio. If necessary support the camera...
GL1 Instruction Manual
Page 47
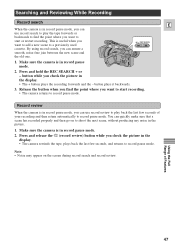
... go on the screen during record search and record review. button while you can ensure a smooth, noise-free join between the new scene and the old one. By using record search, you check the picture in the display. • The + button plays the recording forwards and the - button plays it backwards. 3. Press and release the c (record review) button while you check the picture in the display. • The camera rewinds the tape, plays back the...
... go on the screen during record search and record review. button while you can ensure a smooth, noise-free join between the new scene and the old one. By using record search, you check the picture in the display. • The + button plays the recording forwards and the - button plays it backwards. 3. Press and release the c (record review) button while you check the picture in the display. • The camera rewinds the tape, plays back the...

GL1 Instruction Manual
Page 67
... identified if the total recording time on the tape. • You can only use this function from the wireless controller. 1. and + buttons to move to the corresponding still picture or day (up to a maximum of ten times), e.g. Using the Full Range of Features 67 Searching the Tape (Photo Search/Date Search) OFF CAMERA VCR POWER E REC PAUSE SEARCH SELECT ZERO SET MEMORY REW PLAY FF AUDIO DUB. - / STOP + / A/V INSERT PAUSE SLOW ×2 This allows you...
... identified if the total recording time on the tape. • You can only use this function from the wireless controller. 1. and + buttons to move to the corresponding still picture or day (up to a maximum of ten times), e.g. Using the Full Range of Features 67 Searching the Tape (Photo Search/Date Search) OFF CAMERA VCR POWER E REC PAUSE SEARCH SELECT ZERO SET MEMORY REW PLAY FF AUDIO DUB. - / STOP + / A/V INSERT PAUSE SLOW ×2 This allows you...
GL1 Instruction Manual
Page 69
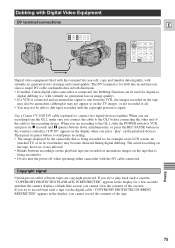
... cannot set it can remotely control your VCR. Open the VCR menu and select \ DUB MODE. • When you select DUB MODE all other video equipment is in " and "cut-out" points, p. 73). Infra-red signals transmitter 1. Editing 69 If you connect another camcorder. Turn the TV on. • Be sure to set the cut-in and cut -in record pause mode. 4. in digital timer (p. 73). Place the camera pointing directly...
... cannot set it can remotely control your VCR. Open the VCR menu and select \ DUB MODE. • When you select DUB MODE all other video equipment is in " and "cut-out" points, p. 73). Infra-red signals transmitter 1. Editing 69 If you connect another camcorder. Turn the TV on. • Be sure to set the cut-in and cut -in record pause mode. 4. in digital timer (p. 73). Place the camera pointing directly...

GL1 Instruction Manual
Page 70
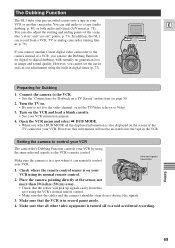
... number. 2. Then it will not forget this setting unless you change VCR. Make sure the camcorder's infra-red control signals can reach the VCR, and the VCR is right. TRANSMITTING DATA appears in record pause mode. (Ready to find the RECORDER settings for your VCR," p. 69. 2. The camera will automatically pause and PAUSE appears in the display and on the next page to record and on the TV screen. 3. Open the VCR menu and select \ REC.SET...
... number. 2. Then it will not forget this setting unless you change VCR. Make sure the camcorder's infra-red control signals can reach the VCR, and the VCR is right. TRANSMITTING DATA appears in record pause mode. (Ready to find the RECORDER settings for your VCR," p. 69. 2. The camera will automatically pause and PAUSE appears in the display and on the next page to record and on the TV screen. 3. Open the VCR menu and select \ REC.SET...

GL1 Instruction Manual
Page 73
... the command signal. Some models also rewind slightly after they stop recording. Use the REC.SET UP menu to play back the recorded digital timer. • Look at least three readings. • If your VCR, reset these adjustments. Rewind the tape in and cut -out" points Use the tape on which you could therefore record more to actually start playback to set the cut -out" adjustments. (see p. 70) CUT-IN...
... the command signal. Some models also rewind slightly after they stop recording. Use the REC.SET UP menu to play back the recorded digital timer. • Look at least three readings. • If your VCR, reset these adjustments. Rewind the tape in and cut -out" points Use the tape on which you could therefore record more to actually start playback to set the cut -out" adjustments. (see p. 70) CUT-IN...
GL1 Instruction Manual
Page 75
... its pause button to start/pause recording. • The image displayed by the camcorder that is being recorded to the recording device. The actual recording on the tape, however, is not affected. • Blanks between recordings on the playback tape are recording to the GL1, slide the POWER switch to (for example on the playback device). Editing 75 Dubbing with Digital Video Equipment DV terminal/connections E REC PAUSE SEARCH SELECT ZERO SET MEMORY REW PLAY FF AUDIO DUB. - / STOP + / A/V INSERT PAUSE SLOW ×2 Digital video...
... its pause button to start/pause recording. • The image displayed by the camcorder that is being recorded to the recording device. The actual recording on the tape, however, is not affected. • Blanks between recordings on the playback tape are recording to the GL1, slide the POWER switch to (for example on the playback device). Editing 75 Dubbing with Digital Video Equipment DV terminal/connections E REC PAUSE SEARCH SELECT ZERO SET MEMORY REW PLAY FF AUDIO DUB. - / STOP + / A/V INSERT PAUSE SLOW ×2 Digital video...
GL1 Instruction Manual
Page 80
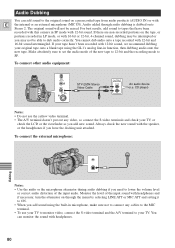
... set the audio mode of the input sound with the speaker, or the headphones if you may not be erased. You can add sound to your original tape onto a blank tape using the built-in function, then dubbing audio onto the new tape. Always check the new sound with headphones and if necessary, turn the attenuator on a prerecorded tape from audio products (AUDIO IN) or with E the internal or an external microphone (MIC...
... set the audio mode of the input sound with the speaker, or the headphones if you may not be erased. You can add sound to your original tape onto a blank tape using the built-in function, then dubbing audio onto the new tape. Always check the new sound with headphones and if necessary, turn the attenuator on a prerecorded tape from audio products (AUDIO IN) or with E the internal or an external microphone (MIC...

GL1 Instruction Manual
Page 83
... levels will be replaced. • See p. 13 for times for other battery packs. Battery pack Time needed for 4 seconds when the power is completely exhausted. The indicator in the display for full recharge Maximum recording time Using the viewfinder: Using the LCD screen: BP-915 2 hrs. 10 min. 65 min. 60 min. • Recording time will be fully discharged first. Notes on Using the Batteries Charging and recording times E • These times vary...
... levels will be replaced. • See p. 13 for times for other battery packs. Battery pack Time needed for 4 seconds when the power is completely exhausted. The indicator in the display for full recharge Maximum recording time Using the viewfinder: Using the LCD screen: BP-915 2 hrs. 10 min. 65 min. 60 min. • Recording time will be fully discharged first. Notes on Using the Batteries Charging and recording times E • These times vary...

GL1 Instruction Manual
Page 95
...-20). Remaining tape (Green: more than 5 min. DATA CODE If you have completely run out of tape. Set the camera to show a clear screen. Record pause mode (p. 21) Recording (p. 21) Shows how much battery power remains (p. 83). Unload the cassette and turn off . See p. 65 also. For instructions on -screen.) They will not be completely blank, but the camera will reset to any recordings you a clear screen for playback. indicates a flashing display. Turn it tells...
...-20). Remaining tape (Green: more than 5 min. DATA CODE If you have completely run out of tape. Set the camera to show a clear screen. Record pause mode (p. 21) Recording (p. 21) Shows how much battery power remains (p. 83). Unload the cassette and turn off . See p. 65 also. For instructions on -screen.) They will not be completely blank, but the camera will reset to any recordings you a clear screen for playback. indicates a flashing display. Turn it tells...
GL1 Instruction Manual
Page 99
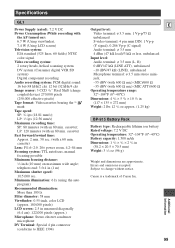
...; cassette) Lens: F/1.6-2.9, 20× power zoom, 4.2-84 mm Focusing system: TTL autofocus, manual focusing possible Minimum focusing distance: 3/8 inch (10 mm) on ): 6.7 W (Using viewfinder), 7.4 W (Using LCD screen) Television system: EIA standard (525 lines, 60 fields) NTSC color signal Video recording system: 2 rotary heads, helical scanning system DV system (Consumer digital VCR SD system) Digital component recording Audio recording system: PCM digital sound: 16 bit (48 kHz/2 ch), 12 bit (32 kHz/4 ch) Image sensor: 3 CCD 1/4" Pixel Shift (charge...
...; cassette) Lens: F/1.6-2.9, 20× power zoom, 4.2-84 mm Focusing system: TTL autofocus, manual focusing possible Minimum focusing distance: 3/8 inch (10 mm) on ): 6.7 W (Using viewfinder), 7.4 W (Using LCD screen) Television system: EIA standard (525 lines, 60 fields) NTSC color signal Video recording system: 2 rotary heads, helical scanning system DV system (Consumer digital VCR SD system) Digital component recording Audio recording system: PCM digital sound: 16 bit (48 kHz/2 ch), 12 bit (32 kHz/4 ch) Image sensor: 3 CCD 1/4" Pixel Shift (charge...
GL1 Brochure
Page 3
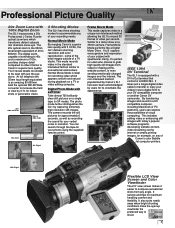
... notes or narration. You'll capture every gesture and expression of 40 to 806mm. Normal Movie Mode By merging Canon's superior lens quality with just the eye alone. It's perfect for users who choose to conventional camcorders. It takes just a single digital video cable to transfer or copy your videos in a unique non-interlaced method allowing the GL1 to record 30 frames of a TV studio...
... notes or narration. You'll capture every gesture and expression of 40 to 806mm. Normal Movie Mode By merging Canon's superior lens quality with just the eye alone. It's perfect for users who choose to conventional camcorders. It takes just a single digital video cable to transfer or copy your videos in a unique non-interlaced method allowing the GL1 to record 30 frames of a TV studio...
GL1 Brochure
Page 8
... playback time. Battery pack Maximum recording time using using LCD screen) Television system: EIA standard (525 lines, 60 fields) NTSC color signal Video recording system: 2 rotary heads, helical scanning system DV system (Consumer digital VCR SD system) Digital component recording Audio recording system: PCM digital sound: 16 bit (48kHz/2ch), 12 bit (32kHz/4ch) Image sensor: 3CCD 1/4" Pixel Shift (charge coupled device) 270,000 pixels (250,000 effective pixels) Tape format: Videocassettes bearing the (Mini DV) mark. Floppy Disk Adapter...
... playback time. Battery pack Maximum recording time using using LCD screen) Television system: EIA standard (525 lines, 60 fields) NTSC color signal Video recording system: 2 rotary heads, helical scanning system DV system (Consumer digital VCR SD system) Digital component recording Audio recording system: PCM digital sound: 16 bit (48kHz/2ch), 12 bit (32kHz/4ch) Image sensor: 3CCD 1/4" Pixel Shift (charge coupled device) 270,000 pixels (250,000 effective pixels) Tape format: Videocassettes bearing the (Mini DV) mark. Floppy Disk Adapter...


