
Users Manual - English
Page 8
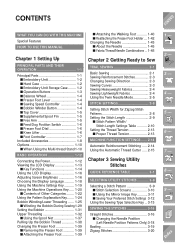
... YOU CAN DO WITH THIS MACHINE Special Features HOW TO USE THIS MANUAL Chapter 1 Setting Up PRINCIPAL PARTS AND THEIR OPERATION 1-1 Principal Parts 1-1 s Embroidery Unit 1-2 s Hard Case 1-2 s Embroidery Unit Storage Case ........ 1-2 s Operation Buttons 1-3 s Balance Wheel 1-4 s Presser Foot Lever 1-4 s Sewing Speed Controller 1-4 s Bobbin Winder Button 1-4 s Top Cover 1-5 s Supplemental Spool Pin 1-5 s Free Arm 1-5 s Feed Dog Position...
... YOU CAN DO WITH THIS MACHINE Special Features HOW TO USE THIS MANUAL Chapter 1 Setting Up PRINCIPAL PARTS AND THEIR OPERATION 1-1 Principal Parts 1-1 s Embroidery Unit 1-2 s Hard Case 1-2 s Embroidery Unit Storage Case ........ 1-2 s Operation Buttons 1-3 s Balance Wheel 1-4 s Presser Foot Lever 1-4 s Sewing Speed Controller 1-4 s Bobbin Winder Button 1-4 s Top Cover 1-5 s Supplemental Spool Pin 1-5 s Free Arm 1-5 s Feed Dog Position...
Users Manual - English
Page 11
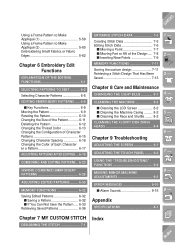
...- ERROR MESSAGES 9-10 s Alarm Sounds 9-15 Appendix SPECIFICATIONS A-1 9 - ?! CLEANING THE MACHINE 8-2 s Cleaning the LCD Screen 8-2 s Cleaning the Machine Casing ......... 8-2 s Cleaning the Race and Shuttle ........ 8-2 CLEANING THE FLOPPY DISK DRIVE HEADS 8-4 Chapter 9 Troubleshooting ADJUSTING THE SCREEN 9-1 ADJUSTING THE TOUCH PANEL ...........in a Pattern 6-17 ADJUSTING PATTERNS AFTER EDITING .. 6-18 COMBINING AND EDITING PATTERNS .. 6-20 SEWING COMBINED EMBROIDERY PATTERNS 6-28 ADJUSTING EDITED PATTERNS ........ 6-30 MEMORY FUNCTIONS 6-32 Saving Edited Patterns 6-32 s Saving a ...
...- ERROR MESSAGES 9-10 s Alarm Sounds 9-15 Appendix SPECIFICATIONS A-1 9 - ?! CLEANING THE MACHINE 8-2 s Cleaning the LCD Screen 8-2 s Cleaning the Machine Casing ......... 8-2 s Cleaning the Race and Shuttle ........ 8-2 CLEANING THE FLOPPY DISK DRIVE HEADS 8-4 Chapter 9 Troubleshooting ADJUSTING THE SCREEN 9-1 ADJUSTING THE TOUCH PANEL ...........in a Pattern 6-17 ADJUSTING PATTERNS AFTER EDITING .. 6-18 COMBINING AND EDITING PATTERNS .. 6-20 SEWING COMBINED EMBROIDERY PATTERNS 6-28 ADJUSTING EDITED PATTERNS ........ 6-30 MEMORY FUNCTIONS 6-32 Saving Edited Patterns 6-32 s Saving a ...
Users Manual - English
Page 13
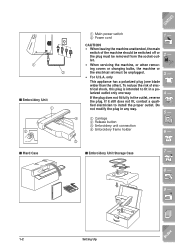
If the plug does not fit fully in any way. 2 - 3 - 4 - 5 - 4 1 Carriage 2 Release button 3 Embroidery unit connection 4 Embroidery frame holder 6 - 3 s Embroidery Unit Storage Case 7 - 8 - 9 - ?! 1-2 Setting Up Index If it still does not fit, contact a qualified electrician to fit in a polarized outlet only ..., or when removing covers or changing bulbs, the machine or the electrical set must be unplugged. • For U.S.A. 1 2 s Embroidery Unit 1 2 s Hard Case CONTENTS 1 Main power switch 2 Power cord 1 - Do not modify the plug in the outlet, reverse the plug.
If the plug does not fit fully in any way. 2 - 3 - 4 - 5 - 4 1 Carriage 2 Release button 3 Embroidery unit connection 4 Embroidery frame holder 6 - 3 s Embroidery Unit Storage Case 7 - 8 - 9 - ?! 1-2 Setting Up Index If it still does not fit, contact a qualified electrician to fit in a polarized outlet only ..., or when removing covers or changing bulbs, the machine or the electrical set must be unplugged. • For U.S.A. 1 2 s Embroidery Unit 1 2 s Hard Case CONTENTS 1 Main power switch 2 Power cord 1 - Do not modify the plug in the outlet, reverse the plug.
Users Manual - English
Page 176
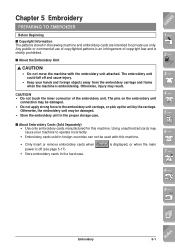
... the inner connector of copyright law and is displayed, or when the main CONTENTS 1 - 2 - 3 - 4 - 5 - 6 - 7 - 8 - 9 - ?! Otherwise, the embroidery unit may be damaged. • Store the embroidery unit in the proper storage case. Using unauthorized cards may result. Embroidery 5-1 Index Chapter 5 Embroidery PREPARING TO EMBROIDER Before Beginning s Copyright Information The patterns stored in the sewing machine and...
... the inner connector of copyright law and is displayed, or when the main CONTENTS 1 - 2 - 3 - 4 - 5 - 6 - 7 - 8 - 9 - ?! Otherwise, the embroidery unit may be damaged. • Store the embroidery unit in the proper storage case. Using unauthorized cards may result. Embroidery 5-1 Index Chapter 5 Embroidery PREPARING TO EMBROIDER Before Beginning s Copyright Information The patterns stored in the sewing machine and...
Users Manual - English
Page 177
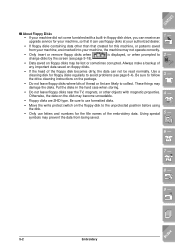
...position before using the disk. • Only use letters and numbers for this machine, or patterns saved from being saved. 1 - 2 - 3 - 4 - 5 - 6 - 7 - 8 - 9 - ?! 5-2 Embroidery Index Otherwise, the data on the floppy disk to avoid problems (see page 5-18). Be sure to collect. Put the disks in floppy disk drive...are likely to use floppy disks at your authorized dealer. • If floppy disks containing data other objects with a built-in the hard case when storing. • Do not leave floppy disks near the TV, magnets, or other than that it can not be lost or ...
...position before using the disk. • Only use letters and numbers for this machine, or patterns saved from being saved. 1 - 2 - 3 - 4 - 5 - 6 - 7 - 8 - 9 - ?! 5-2 Embroidery Index Otherwise, the data on the floppy disk to avoid problems (see page 5-18). Be sure to collect. Put the disks in floppy disk drive...are likely to use floppy disks at your authorized dealer. • If floppy disks containing data other objects with a built-in the hard case when storing. • Do not leave floppy disks near the TV, magnets, or other than that it can not be lost or ...
Users Manual - English
Page 178
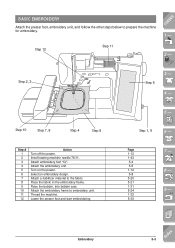
..., and follow the other steps below to embroidery unit. Step 12 Step 11 2 - Attach the embroidery unit. Select an embroidery design. Attach the embroidery frame to prepare the machine for embroidery. Step 1, 5 6 - CONTENTS 1 - Install sewing machine needle 75...9 10 11 12 Action Turn off the power. Lower the presser foot and start embroidering. 5 - Attach embroidery foot "Q". Place the bobbin, into bobbin case. Page 7 - 1-12 1-43 5-4 5-5 1-12 8 - 5-8 5-20 5-21 1-31 5-24 9 - 1-32 ?! 5-30 Embroidery 5-3 Index Turn on the power. Place the fabric in the...
..., and follow the other steps below to embroidery unit. Step 12 Step 11 2 - Attach the embroidery unit. Select an embroidery design. Attach the embroidery frame to prepare the machine for embroidery. Step 1, 5 6 - CONTENTS 1 - Install sewing machine needle 75...9 10 11 12 Action Turn off the power. Lower the presser foot and start embroidering. 5 - Attach embroidery foot "Q". Place the bobbin, into bobbin case. Page 7 - 1-12 1-43 5-4 5-5 1-12 8 - 5-8 5-20 5-21 1-31 5-24 9 - 1-32 ?! 5-30 Embroidery 5-3 Index Turn on the power. Place the fabric in the...

Users Manual - English
Page 182
... the main power switch. Hold the back left side of the embroidery unit. Otherwise, the machine may strike the embroidery foot, resulting in the storage case if this step is not done. s Removing the Embroidery Unit 1. Hold down the release button, and pull the embroidery unit away from the machine as shown. Press either or...
... the main power switch. Hold the back left side of the embroidery unit. Otherwise, the machine may strike the embroidery foot, resulting in the storage case if this step is not done. s Removing the Embroidery Unit 1. Hold down the release button, and pull the embroidery unit away from the machine as shown. Press either or...
Users Manual - English
Page 204
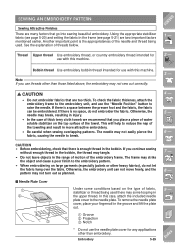
... this machine. s Needle Plate Cover 1 2 3 Under some conditions based on large garments (especially jackets or other than those listed above, the embroidery may break, resulting in injury. • In the case of the towel. Using the appropriate stabilizer fabric (see page 5-20) and setting the fabric in the frame (see page 5-21...
... this machine. s Needle Plate Cover 1 2 3 Under some conditions based on large garments (especially jackets or other than those listed above, the embroidery may break, resulting in injury. • In the case of the towel. Using the appropriate stabilizer fabric (see page 5-20) and setting the fabric in the frame (see page 5-21...
Users Manual - English
Page 214
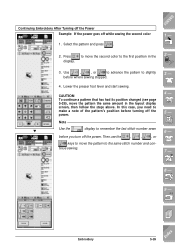
... before turning off the power. CONTENTS 1 - 2. Press to move the second color to remember the last stitch number sewn 6 - In this case, you turn off the power. 4 - 5 - Note w Use the display to the first position in the layout display screen, then follow ... Then use the , , , or keys to move the pattern the same amount in the display. 2 - 3. before where sewing stopped. 3 - 4. Embroidery 5-39 Index Continuing Embroidery After Turning off the Power Example: If the power goes off while sewing the second color 1. Lower the presser foot lever and start sewing.
... before turning off the power. CONTENTS 1 - 2. Press to move the second color to remember the last stitch number sewn 6 - In this case, you turn off the power. 4 - 5 - Note w Use the display to the first position in the layout display screen, then follow ... Then use the , , , or keys to move the pattern the same amount in the display. 2 - 3. before where sewing stopped. 3 - 4. Embroidery 5-39 Index Continuing Embroidery After Turning off the Power Example: If the power goes off while sewing the second color 1. Lower the presser foot lever and start sewing.
Users Manual - English
Page 312
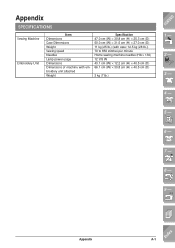
... Weight Sewing speed Needles Lamp power usage Dimensions Dimensions of machine with embroidery unit attached Weight Specification 47.0 cm (W) × 30.8 cm (H) × 25.3 cm (D) 50.0 cm (W) × 31.5 cm (H) × 27.0 cm (D) 11 kg (25 lb.) (with case: 12.5 kg (28 lb.)) 70 to 850 stitches per minute Home sewing machine...
... Weight Sewing speed Needles Lamp power usage Dimensions Dimensions of machine with embroidery unit attached Weight Specification 47.0 cm (W) × 30.8 cm (H) × 25.3 cm (D) 50.0 cm (W) × 31.5 cm (H) × 27.0 cm (D) 11 kg (25 lb.) (with case: 12.5 kg (28 lb.)) 70 to 850 stitches per minute Home sewing machine...

Users Manual - English
Page 314
... spacing 6-16 connecting characters 5-56 selecting for editing 6-5 Character spacing key 6-8, 6-16 Checking combined character/decorative stitch patterns 4-26 position of embroidery patterns 5-27 Cleaning floppy disk drive heads 8-4 LCD 8-2 machine casing 8-2 race and shuttle 8-2 Color changing color in character patterns 5-48, 6-17 changing thread color 6-13 Combining patterns character/decorative stitch...
... spacing 6-16 connecting characters 5-56 selecting for editing 6-5 Character spacing key 6-8, 6-16 Checking combined character/decorative stitch patterns 4-26 position of embroidery patterns 5-27 Cleaning floppy disk drive heads 8-4 LCD 8-2 machine casing 8-2 race and shuttle 8-2 Color changing color in character patterns 5-48, 6-17 changing thread color 6-13 Combining patterns character/decorative stitch...
Users Manual - English
Page 315
... that use appliqué 5-33 previewing the pattern 5-28 revising 5-44 retrieving saved patterns 5-53, 6-36 saving edited patterns 6-32 selecting 5-8 selecting for editing 6-2 types 5-8 Embroidery sheet 5-23 Embroidery unit 1-2, 5-1 attaching 5-5 removing 5-7 storage case 1-2 End key 6-8, 6-18 Error messages 9-10 Eyelet 3-63 sizes 3-64 F Fabric needle/fabric/thread combinations 1-45 setting in an...
... that use appliqué 5-33 previewing the pattern 5-28 revising 5-44 retrieving saved patterns 5-53, 6-36 saving edited patterns 6-32 selecting 5-8 selecting for editing 6-2 types 5-8 Embroidery sheet 5-23 Embroidery unit 1-2, 5-1 attaching 5-5 removing 5-7 storage case 1-2 End key 6-8, 6-18 Error messages 9-10 Eyelet 3-63 sizes 3-64 F Fabric needle/fabric/thread combinations 1-45 setting in an...
Users Manual - English
Page 316
... 5-26, 6-9 Multi color key 5-44, 5-48, 6-8 Multi-directional sewing 3-65 Multi-thread stand 1-10 MY CUSTOM STITCHTM 7-1 H Hard case 1-2 Heavyweight fabrics 1-45, 2-4 Heirloom 3-49 Hemstitching 3-49 Horizontal mirror image key character/decorative stitches 4-14, 4-16 embroidery 5-44, 5-46 embroidery edit 6-8 utility stitches 3-11 I Included accessories 1-8 K Key functions 1-14 editing character/decorative stitches 4-14...
... 5-26, 6-9 Multi color key 5-44, 5-48, 6-8 Multi-directional sewing 3-65 Multi-thread stand 1-10 MY CUSTOM STITCHTM 7-1 H Hard case 1-2 Heavyweight fabrics 1-45, 2-4 Heirloom 3-49 Hemstitching 3-49 Horizontal mirror image key character/decorative stitches 4-14, 4-16 embroidery 5-44, 5-46 embroidery edit 6-8 utility stitches 3-11 I Included accessories 1-8 K Key functions 1-14 editing character/decorative stitches 4-14...


