

Accessory Catalog
Page 3
...embroidery, edit and size designs, and make your creative dreams come true with this state-of the Art machine with leading-edge technology Brother's new and exciting high-end sewing and embroidery machine Quattro™ 6000D is 1200, 1000 Affordable Sewing & Embroidery Combination Machines Everyday... of the corresponding illustration. if you the best in sewing and embroidery utilizing the latest innovations including USB media and touch screen technology. Loaded with these compact and mid-sized sewing machines. PE750, PE700/PE700 Embroidery Only Machines Packed with models ...
...embroidery, edit and size designs, and make your creative dreams come true with this state-of the Art machine with leading-edge technology Brother's new and exciting high-end sewing and embroidery machine Quattro™ 6000D is 1200, 1000 Affordable Sewing & Embroidery Combination Machines Everyday... of the corresponding illustration. if you the best in sewing and embroidery utilizing the latest innovations including USB media and touch screen technology. Loaded with these compact and mid-sized sewing machines. PE750, PE700/PE700 Embroidery Only Machines Packed with models ...
Users Manual - English
Page 5
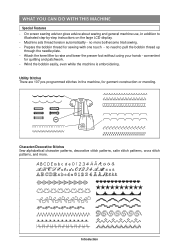
...patchwork. - A-4 Introduction Attach the knee lifter to pull the bobbin thread up through the needle plate. - convenient for sewing with one touch - Character/Decorative Stitches Sew alphabetical character patterns, decorative stitch patterns, satin stitch patterns, cross stitch patterns, and more bothersome trial sewing. ...step-by-step instructions on the large LCD display. - Wind the bobbin easily, even while the machine is embroidering. On screen sewing advisor gives advice about sewing and general machine use, in the machine, for garment construction or mending. no need ...
...patchwork. - A-4 Introduction Attach the knee lifter to pull the bobbin thread up through the needle plate. - convenient for sewing with one touch - Character/Decorative Stitches Sew alphabetical character patterns, decorative stitch patterns, satin stitch patterns, cross stitch patterns, and more bothersome trial sewing. ...step-by-step instructions on the large LCD display. - Wind the bobbin easily, even while the machine is embroidering. On screen sewing advisor gives advice about sewing and general machine use, in the machine, for garment construction or mending. no need ...
Users Manual - English
Page 11
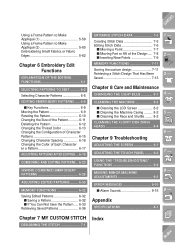
... the Machine Casing ......... 8-2 s Cleaning the Race and Shuttle ........ 8-2 CLEANING THE FLOPPY DISK DRIVE HEADS 8-4 Chapter 9 Troubleshooting ADJUSTING THE SCREEN 9-1 ADJUSTING THE TOUCH PANEL ........ 9-2 5 - 6 - 7 - Chapter 7 MY CUSTOM STITCH Index DESIGNING THE STITCH 7-1 Index CONTENTS Using a Frame Pattern to Make Appliqué (1 5-59 Using a Frame Pattern to Make Appliqu&#...
... the Machine Casing ......... 8-2 s Cleaning the Race and Shuttle ........ 8-2 CLEANING THE FLOPPY DISK DRIVE HEADS 8-4 Chapter 9 Troubleshooting ADJUSTING THE SCREEN 9-1 ADJUSTING THE TOUCH PANEL ........ 9-2 5 - 6 - 7 - Chapter 7 MY CUSTOM STITCH Index DESIGNING THE STITCH 7-1 Index CONTENTS Using a Frame Pattern to Make Appliqué (1 5-59 Using a Frame Pattern to Make Appliqu&#...
Users Manual - English
Page 24
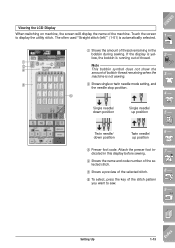
...position 6 - 3 Presser foot code. The often used "Straight stitch (left)" (1-01) is running out of the stitch pattern you want to display the utility stitch. Touch the screen to sew. 7 - 8 - 9 - ?! CONTENTS 1 - 1 3 2 4 1 Shows the amount of thread remaining in this display before sewing. 4 Shows ... - Setting Up 1-13 Index Attach the presser foot indicated in the bobbin during sewing. Viewing the LCD Display When switching on machine, the screen will display the name of bobbin thread remaining when the machine is not sewing. 2 - 3 - 5 2 Shows single or twin needle ...
...position 6 - 3 Presser foot code. The often used "Straight stitch (left)" (1-01) is running out of the stitch pattern you want to display the utility stitch. Touch the screen to sew. 7 - 8 - 9 - ?! CONTENTS 1 - 1 3 2 4 1 Shows the amount of thread remaining in this display before sewing. 4 Shows ... - Setting Up 1-13 Index Attach the presser foot indicated in the bobbin during sewing. Viewing the LCD Display When switching on machine, the screen will display the name of bobbin thread remaining when the machine is not sewing. 2 - 3 - 5 2 Shows single or twin needle ...

Users Manual - English
Page 27
...a sharp object may sometimes become darker or lighter because of the LCD back light screen, and it is not necessary to press hard on the screen. CAUTION Only touch the screen with your finger or the included touch pen. Do not use a sharp pencil, screwdriver, or other changes in the environment... around the screen. This is normal and is not a sign of brightness after turning on the power. The screen will return to...
...a sharp object may sometimes become darker or lighter because of the LCD back light screen, and it is not necessary to press hard on the screen. CAUTION Only touch the screen with your finger or the included touch pen. Do not use a sharp pencil, screwdriver, or other changes in the environment... around the screen. This is normal and is not a sign of brightness after turning on the power. The screen will return to...

Users Manual - English
Page 82
Sewing Utility Stitches 3-9 Index CONTENTS 1 - 2 - 2. Touch the key of the selected stitch 2 Stitch selection screen 3. Turn the main power switch to view this screen if another screen displays. Use to find the stitch pat- 2 tern you want . 1 Preview of the stitch pattern you want to sew to select it. 3 - 4 - 5 - 6 - 7 - 8 - 9 - ?! The often-used "1-01 Straight (left is automatically selected. * Press to ON. SELECTING UTILITY STITCHES Selecting a Stitch Pattern 1 1. The screen shown at left )" stitch pattern is displayed.
Sewing Utility Stitches 3-9 Index CONTENTS 1 - 2 - 2. Touch the key of the selected stitch 2 Stitch selection screen 3. Turn the main power switch to view this screen if another screen displays. Use to find the stitch pat- 2 tern you want . 1 Preview of the stitch pattern you want to sew to select it. 3 - 4 - 5 - 6 - 7 - 8 - 9 - ?! The often-used "1-01 Straight (left is automatically selected. * Press to ON. SELECTING UTILITY STITCHES Selecting a Stitch Pattern 1 1. The screen shown at left )" stitch pattern is displayed.

Users Manual - English
Page 279
... the coordinates of the first 3 - Once you make a mistake while setting points, press the erase the last point set. 7 - to 7. key to sew three stitches, touch the key so that it ap- point that you have finished entering the stitch data, press the key. 8 - 9 - ?! 7-4 My Custom Stitch Index pears as . 2 - 4. pears... is drawn on page 7-1). 5. the first two points. Repeat steps 3 through 5 for each point that was made on the grid sheet (from step 2 on the screen as a continuous line. 6 - CONTENTS 3. Select whether one stitch, press so that it ap-
... the coordinates of the first 3 - Once you make a mistake while setting points, press the erase the last point set. 7 - to 7. key to sew three stitches, touch the key so that it ap- point that you have finished entering the stitch data, press the key. 8 - 9 - ?! 7-4 My Custom Stitch Index pears as . 2 - 4. pears... is drawn on page 7-1). 5. the first two points. Repeat steps 3 through 5 for each point that was made on the grid sheet (from step 2 on the screen as a continuous line. 6 - CONTENTS 3. Select whether one stitch, press so that it ap-

Users Manual - English
Page 286
Touch (it will return to retrieve a pattern which has been stored. Refer to the next page for the pattern to be stored. CAUTION Do not turn off the power while the "Saving" screen is displayed. CONTENTS 1 - 2 - 3 - 4 - 5 - My Custom Stitch 7-11 Index Otherwise, you may lose the pattern you are saving. 6 - 7 - 8 - 9 - ?! Once the pattern has been saved, the display will take approximately 10 seconds for details on how to the previous screen. MEMORY FUNCTIONS Storing the custom design Up to fifteen custom stitch patterns can be saved).
Touch (it will return to retrieve a pattern which has been stored. Refer to the next page for the pattern to be stored. CAUTION Do not turn off the power while the "Saving" screen is displayed. CONTENTS 1 - 2 - 3 - 4 - 5 - My Custom Stitch 7-11 Index Otherwise, you may lose the pattern you are saving. 6 - 7 - 8 - 9 - ?! Once the pattern has been saved, the display will take approximately 10 seconds for details on how to the previous screen. MEMORY FUNCTIONS Storing the custom design Up to fifteen custom stitch patterns can be saved).
Users Manual - English
Page 297
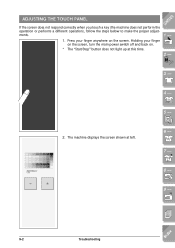
Press your finger on the screen, turn the main power switch off and back on the screen. The machine displays the screen shown at this time. Holding your finger anywhere on . * The "Start/Stop" button does not light up at left. 6 - 7 - 8 - 9 - ?! 9-2 Troubleshooting Index ADJUSTING THE TOUCH PANEL If the screen does not respond correctly when you touch a key (the machine does not perform the operation or performs a different operation), follow the steps below to make the proper adjustments. 1. CONTENTS 1 - 2 - 3 - 4 - 5 - 2.
Press your finger on the screen, turn the main power switch off and back on the screen. The machine displays the screen shown at this time. Holding your finger anywhere on . * The "Start/Stop" button does not light up at left. 6 - 7 - 8 - 9 - ?! 9-2 Troubleshooting Index ADJUSTING THE TOUCH PANEL If the screen does not respond correctly when you touch a key (the machine does not perform the operation or performs a different operation), follow the steps below to make the proper adjustments. 1. CONTENTS 1 - 2 - 3 - 4 - 5 - 2.
Users Manual - English
Page 298
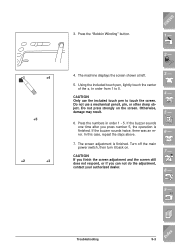
...the operation is finished. Do not press strongly on . Press the numbers in order from 1 to touch the screen. +1 +4 +5 +2 +3 3. Turn off the main power switch, then turn it back on the screen. Using the included touch pen, lightly touch the center of the +, in order 1 - 5. Otherwise, damage may result. 3 - 4... - 5 - 6. If the buzzer sounds twice, there was an error. The screen adjustment is finished. If the buzzer ...
...the operation is finished. Do not press strongly on . Press the numbers in order from 1 to touch the screen. +1 +4 +5 +2 +3 3. Turn off the main power switch, then turn it back on the screen. Using the included touch pen, lightly touch the center of the +, in order 1 - 5. Otherwise, damage may result. 3 - 4... - 5 - 6. If the buzzer sounds twice, there was an error. The screen adjustment is finished. If the buzzer ...

Users Manual - English
Page 314
... A Accessories 1-8 Adjusting character/decorative stitch patterns 4-11 edited patterns 6-30 embroidery patterns after editing 6-18 embroidery speed setting 5-41 minor machine adjustments 9-5 screen brightness 1-16, 9-1 thread tension 2-13, 5-40 touch panel 9-2 Alarm 1-19, 9-15 Aligning the left side 5-55 Alphabetical characters 4-6 character/decorative stitches 4-6 embroidery 5-11 embroidery edit 6-5 Appliqué 3-37 embroidery...
... A Accessories 1-8 Adjusting character/decorative stitch patterns 4-11 edited patterns 6-30 embroidery patterns after editing 6-18 embroidery speed setting 5-41 minor machine adjustments 9-5 screen brightness 1-16, 9-1 thread tension 2-13, 5-40 touch panel 9-2 Alarm 1-19, 9-15 Aligning the left side 5-55 Alphabetical characters 4-6 character/decorative stitches 4-6 embroidery 5-11 embroidery edit 6-5 Appliqué 3-37 embroidery...


