
Users Manual - English
Page 2
... The machine should never be supervised to be taken, including the following: Read all moving parts. Always unplug before cleaning. 2. Replace bulb with any opening. 6. Close attention is necessary when the machine is intended for examination, repair, electrical or mechanical adjustment. 4. Do ..., grasp the plug, not the cord. 10.Keep fingers away from the electrical outlet immediately after using and before changing the light bulb. Always unplug the machine from all instructions before using. To reduce the risk of electric shock: 1. Never operate the machine ...
... The machine should never be supervised to be taken, including the following: Read all moving parts. Always unplug before cleaning. 2. Replace bulb with any opening. 6. Close attention is necessary when the machine is intended for examination, repair, electrical or mechanical adjustment. 4. Do ..., grasp the plug, not the cord. 10.Keep fingers away from the electrical outlet immediately after using and before changing the light bulb. Always unplug the machine from all instructions before using. To reduce the risk of electric shock: 1. Never operate the machine ...
Users Manual - English
Page 11
... the Race and Shuttle ........ 8-2 CLEANING THE FLOPPY DISK DRIVE HEADS 8-4 Chapter 9 Troubleshooting ADJUSTING THE SCREEN 9-1 ADJUSTING THE TOUCH PANEL ........ 9-2 5 - 6 - 7 - Chapter 8 Care and Maintenance CHANGING THE LIGHT BULB 8-1 4 -
... the Race and Shuttle ........ 8-2 CLEANING THE FLOPPY DISK DRIVE HEADS 8-4 Chapter 9 Troubleshooting ADJUSTING THE SCREEN 9-1 ADJUSTING THE TOUCH PANEL ........ 9-2 5 - 6 - 7 - Chapter 8 Care and Maintenance CHANGING THE LIGHT BULB 8-1 4 -
Users Manual - English
Page 292
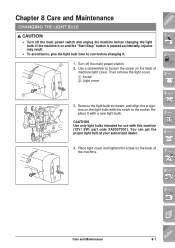
Use a screwdriver to cool before changing the light bulb. Remove the light bulb as shown, and align the projection on and the "Start/Stop" button is on the light bulb with a new light bulb. You can get the proper light bulb at your authorized dealer. 5 - 6 - 4. Turn off the main power switch and ...unplug the machine before changing it with the notch in the socket. Place light cover and tighten the screw on...
Use a screwdriver to cool before changing the light bulb. Remove the light bulb as shown, and align the projection on and the "Start/Stop" button is on the light bulb with a new light bulb. You can get the proper light bulb at your authorized dealer. 5 - 6 - 4. Turn off the main power switch and ...unplug the machine before changing it with the notch in the socket. Place light cover and tighten the screw on...
Users Manual - English
Page 316
.../decorative stitches 4-14 embroidery edit functions 6-8 embroidery pattern revision 5-44 Knee lifter 1-6 L Lamp 1-19 LCD 1-16 adjusting 1-16, 9-1 choosing display language 1-18 viewing 1-13, 5-19 Light bulb 8-1 Lightweight fabrics 1-45, 2-4 Lower threading see Bobbin winding Low shank adapter 1-9, 1-40 M Machine operations key 1-20 Machine settings key 1-19 Main power switch 1-12 Maintenance...
.../decorative stitches 4-14 embroidery edit functions 6-8 embroidery pattern revision 5-44 Knee lifter 1-6 L Lamp 1-19 LCD 1-16 adjusting 1-16, 9-1 choosing display language 1-18 viewing 1-13, 5-19 Light bulb 8-1 Lightweight fabrics 1-45, 2-4 Lower threading see Bobbin winding Low shank adapter 1-9, 1-40 M Machine operations key 1-20 Machine settings key 1-19 Main power switch 1-12 Maintenance...


