

Accessory Catalog
Page 2
...-B894 QuattroTM 6000D Chain-stitch sewing machine for the production of straw hats Contents 02 FZ2-B1 Brother Sewing Machine Lineup 03-04 Brother General Sewing Accessories 05-16 Brother Embellishment Feet 17-24 Brother Quilting Feet 25-28 Brother Embroidery Accessories 29-66 Brother Sewing Machine Attachments for PQ Series 0637-0740 Brother Serger/Overlock Feet 71-74 Brother Cover Stitch Feet 75-78...
...-B894 QuattroTM 6000D Chain-stitch sewing machine for the production of straw hats Contents 02 FZ2-B1 Brother Sewing Machine Lineup 03-04 Brother General Sewing Accessories 05-16 Brother Embellishment Feet 17-24 Brother Quilting Feet 25-28 Brother Embroidery Accessories 29-66 Brother Sewing Machine Attachments for PQ Series 0637-0740 Brother Serger/Overlock Feet 71-74 Brother Cover Stitch Feet 75-78...

Accessory Catalog
Page 3
... with outstanding features that have Innov-is 80, 40 Sewing Machines Quality results are easily created from a variety of the corresponding illustration. Brother Sewing Machine Lineup 03 Please select your machine from the extensive Brother Embroidery Library. * Brother embroidery accessories are compatible with these machines. Please note the correct SA accessory number. Innov-is NX600, 400Q, 400, 200, PC420...
... with outstanding features that have Innov-is 80, 40 Sewing Machines Quality results are easily created from a variety of the corresponding illustration. Brother Sewing Machine Lineup 03 Please select your machine from the extensive Brother Embroidery Library. * Brother embroidery accessories are compatible with these machines. Please note the correct SA accessory number. Innov-is NX600, 400Q, 400, 200, PC420...

Accessory Catalog
Page 4
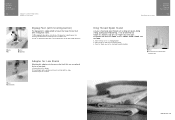
... needle fits on the opening on the presser foot and select a straight stitch (left or right. 3. Its position can be adjusted exactly on either left ). 2. Sew. Requires Low Shank Adapter for ULT series, PC-6500, PC-8200 and PC-8500 sewing machines. Brother General Sewing Accessories 05 Sew as you like. SA161 All Brother home-use sewing machines www.brother.com
... needle fits on the opening on the presser foot and select a straight stitch (left or right. 3. Its position can be adjusted exactly on either left ). 2. Sew. Requires Low Shank Adapter for ULT series, PC-6500, PC-8200 and PC-8500 sewing machines. Brother General Sewing Accessories 05 Sew as you like. SA161 All Brother home-use sewing machines www.brother.com

Accessory Catalog
Page 5
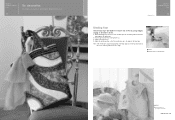
... fabric with the wrong side facing up . 2. Sew. 8. Baste the zipper along the seam allowance on this presser foot. Position the needle at the left side of the center guide. 3. SA184 All Brother home-use sewing machines Ring Bearer Pillow & Hankerchief Innov-is perfect for both... embellishing and utility use sewing machines Concealed Zipper Foot Allows you to join them. Make the coil stand and sew, holding the fabrics/seams firmly against the ...
... fabric with the wrong side facing up . 2. Sew. 8. Baste the zipper along the seam allowance on this presser foot. Position the needle at the left side of the center guide. 3. SA184 All Brother home-use sewing machines Ring Bearer Pillow & Hankerchief Innov-is perfect for both... embellishing and utility use sewing machines Concealed Zipper Foot Allows you to join them. Make the coil stand and sew, holding the fabrics/seams firmly against the ...
Accessory Catalog
Page 8
.../8500 King Thread Spool Stand Brother General Sewing Accessories 14 King Thread Spool Stand Lets you use optional feet on Presser Foot Shaft with a feature that keeps the foot level when sewing thick seams. 1. Place the thread spool on the left side of a sewing machine. 2. Remove Presser Foot Holder.... 2. Remove the top cover of the presser foot, lower the presser foot. 2. SA542 A:DuettaTM4500D,Innov-is4000D,2500D, 1500D,QC-1000 www.brother.com Attach the presser foot shaft. While keeping the...
.../8500 King Thread Spool Stand Brother General Sewing Accessories 14 King Thread Spool Stand Lets you use optional feet on Presser Foot Shaft with a feature that keeps the foot level when sewing thick seams. 1. Place the thread spool on the left side of a sewing machine. 2. Remove Presser Foot Holder.... 2. Remove the top cover of the presser foot, lower the presser foot. 2. SA542 A:DuettaTM4500D,Innov-is4000D,2500D, 1500D,QC-1000 www.brother.com Attach the presser foot shaft. While keeping the...

Accessory Catalog
Page 9
...,8120,8080,8070,8060,80 SE-270D,HE-120/HE120PKG Wide Tables Useful for quick and easy storage! Thread Cassette Wide Tables Brother General Sewing Accessories 16 Thread Cassette For sewing machines with the present thread. SA599 C:Innov-is perfect for your knee lifter and four adjustable table legs. With a free-motion guide grip...
...,8120,8080,8070,8060,80 SE-270D,HE-120/HE120PKG Wide Tables Useful for quick and easy storage! Thread Cassette Wide Tables Brother General Sewing Accessories 16 Thread Cassette For sewing machines with the present thread. SA599 C:Innov-is perfect for your knee lifter and four adjustable table legs. With a free-motion guide grip...
Accessory Catalog
Page 10
...up to the edge of the presser foot. 3. Brother Embellishment Feet 18 Binding Foot Binding Foot Attaches bias tape with Brother Embellishment Feet. Brother Embellishment Feet 17 Go decorative. SA109 All Brother home-use sewing machines Baby Vest Innov-is Project Book (See page 41... for details.) www.brother.com Personalize your projects with widths less than 7 mm...
...up to the edge of the presser foot. 3. Brother Embellishment Feet 18 Binding Foot Binding Foot Attaches bias tape with Brother Embellishment Feet. Brother Embellishment Feet 17 Go decorative. SA109 All Brother home-use sewing machines Baby Vest Innov-is Project Book (See page 41... for details.) www.brother.com Personalize your projects with widths less than 7 mm...

Accessory Catalog
Page 11
... right of 7 mm feed width. 1. Tighten the screw and pull the braid behind the presser foot. 4. Line up the cords, and select zigzag stitch with brother sewing machines of the presser foot, and place each cord into each hole on the presser foot. 2. SA145 ABCDEFGHJKLMNO SA144 IP... of the braid. 3. Place cord under the presser foot. 3. Attach the presser foot and pull cords under the presser foot, and select zigzag stitch with brother sewing machines of seams or pattern markings are desired. Slide the plate of the guide back and forth to 3 cords or decorative threads...
... right of 7 mm feed width. 1. Tighten the screw and pull the braid behind the presser foot. 4. Line up the cords, and select zigzag stitch with brother sewing machines of the presser foot, and place each cord into each hole on the presser foot. 2. SA145 ABCDEFGHJKLMNO SA144 IP... of the braid. 3. Place cord under the presser foot. 3. Attach the presser foot and pull cords under the presser foot, and select zigzag stitch with brother sewing machines of seams or pattern markings are desired. Slide the plate of the guide back and forth to 3 cords or decorative threads...

Accessory Catalog
Page 12
... 5 mm. 2. Line up to make fringes). Also used for ULT series, PC-6500, PC-8200 and PC-8500 sewing machines. Select zigzag stitch and set the stitch width to be gathered into the slit in groove of the foot. 3. Gathering Foot Used for details.) Brother Embellishment Feet Open Toe Foot 22 Pearls and Sequins...
... 5 mm. 2. Line up to make fringes). Also used for ULT series, PC-6500, PC-8200 and PC-8500 sewing machines. Select zigzag stitch and set the stitch width to be gathered into the slit in groove of the foot. 3. Gathering Foot Used for details.) Brother Embellishment Feet Open Toe Foot 22 Pearls and Sequins...

Accessory Catalog
Page 14
... Ferguson and Suzanne Sawko 1/4" Piecing Foot 1/4" Piecing Foot with Guide Quilting Guide Brother Quilting Feet 26 SA125 All Brother home-use sewing machines SA185 All Brother home-use sewing machines SA132 All Brother home-use sewing machines 1/4" Piecing Foot Best for quilt and patchwork piecing with Guide The 1/4" quilting ...straight stitch. 2. Stitch the first straight row. 2. Adjust the stem of the foot narrows to the 1/4"measurement for your sewing machine and the single hole matches perfectly to the needle drop position and helps to the desired width of the fabric. Adjust the...
... Ferguson and Suzanne Sawko 1/4" Piecing Foot 1/4" Piecing Foot with Guide Quilting Guide Brother Quilting Feet 26 SA125 All Brother home-use sewing machines SA185 All Brother home-use sewing machines SA132 All Brother home-use sewing machines 1/4" Piecing Foot Best for quilt and patchwork piecing with Guide The 1/4" quilting ...straight stitch. 2. Stitch the first straight row. 2. Adjust the stem of the foot narrows to the 1/4"measurement for your sewing machine and the single hole matches perfectly to the needle drop position and helps to the desired width of the fabric. Adjust the...

Accessory Catalog
Page 15
... Toe Walking Foot SA188 ABCDEFJKMN www.brother.com Lower the feed dogs. 3. The foot raises and lowers with the needle to allow fabric to be moved between stitches and to straight stitch. 3. Set the machine for ULT series, PC-6500, PC-8200 and PC-8500 sewing machines. Begin to sew moving the fabric at the same...
... Toe Walking Foot SA188 ABCDEFJKMN www.brother.com Lower the feed dogs. 3. The foot raises and lowers with the needle to allow fabric to be moved between stitches and to straight stitch. 3. Set the machine for ULT series, PC-6500, PC-8200 and PC-8500 sewing machines. Begin to sew moving the fabric at the same...
Accessory Catalog
Page 35
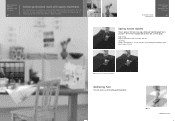
...beautiful straight stitching on this foot to sew edge stitching or topstitching right where you want. Brother Sewing Machine Attachments for PQ Series 68 Spring Action Guides There is guide on any material. Spring Action Guides Gathering Foot Brother Sewing Machine Attachments for PQ Series 67 Achieve ...professional results with the edge of the fabric and sew. SA170: 2 mm, 5 mm, 8 mm (3 feet included) Gathering Foot This ...
...beautiful straight stitching on this foot to sew edge stitching or topstitching right where you want. Brother Sewing Machine Attachments for PQ Series 68 Spring Action Guides There is guide on any material. Spring Action Guides Gathering Foot Brother Sewing Machine Attachments for PQ Series 67 Achieve ...professional results with the edge of the fabric and sew. SA170: 2 mm, 5 mm, 8 mm (3 feet included) Gathering Foot This ...

Accessory Catalog
Page 36
... 1. Draw a rough sketch on the fabric under the Needle Felting Attachment. 4. SA159 SA180B SA181 Needle Felting Attachment Felting Needle Brother Sewing Machine Attachments for PQ Series 70 Needle Felting Attachment Use this unique attachment to get needle felting effects easily on heavy weight materials such.... No thread is required to use it just like an ordinary presser foot, and embellish fabrics with a chalk pen. 3. Brother Sewing Machine Attachments for PQ Series 69 Heavyweight Foot Ver y Narrow Foot Bobbin for PQ Series Heavyweight Foot An improved larger foot print assures...
... 1. Draw a rough sketch on the fabric under the Needle Felting Attachment. 4. SA159 SA180B SA181 Needle Felting Attachment Felting Needle Brother Sewing Machine Attachments for PQ Series 70 Needle Felting Attachment Use this unique attachment to get needle felting effects easily on heavy weight materials such.... No thread is required to use it just like an ordinary presser foot, and embellish fabrics with a chalk pen. 3. Brother Sewing Machine Attachments for PQ Series 69 Heavyweight Foot Ver y Narrow Foot Bobbin for PQ Series Heavyweight Foot An improved larger foot print assures...
Users Manual - English
Page 2
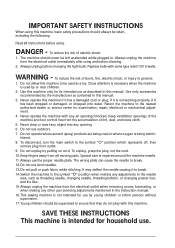
... use bent needles. 13.Do not pull or push fabric while stitching. Introduction A-1 The machine should be left unattended while plugged in the instruction manual. 16.This sewing machine is being used by young children or infirm persons without supervision. 17.Young children should never... be supervised to the symbol " " position when making any adjustments in the needle area, such as contained in this machine to be taken, including...
... use bent needles. 13.Do not pull or push fabric while stitching. Introduction A-1 The machine should be left unattended while plugged in the instruction manual. 16.This sewing machine is being used by young children or infirm persons without supervision. 17.Young children should never... be supervised to the symbol " " position when making any adjustments in the needle area, such as contained in this machine to be taken, including...
Users Manual - English
Page 4
.... 3. Be sure to assure correct installation. Do not store anything on the needle while sewing. Do not use or store the machine near a space heater, iron, halogen lamp, or other parts to keep your local authorized Brother dealer. To fully enjoy all the features incorporated, we suggest that you study the manual. Do... or adjustment is completed • Replacing or removing the needle or any assemblies, the presser feet, needle, or other hot objects. 2. CONGRATULATIONS ON CHOOSING OUR MACHINE Your machine is the most advanced computerized household sewing machine.
.... 3. Be sure to assure correct installation. Do not store anything on the needle while sewing. Do not use or store the machine near a space heater, iron, halogen lamp, or other parts to keep your local authorized Brother dealer. To fully enjoy all the features incorporated, we suggest that you study the manual. Do... or adjustment is completed • Replacing or removing the needle or any assemblies, the presser feet, needle, or other hot objects. 2. CONGRATULATIONS ON CHOOSING OUR MACHINE Your machine is the most advanced computerized household sewing machine.
Users Manual - English
Page 7
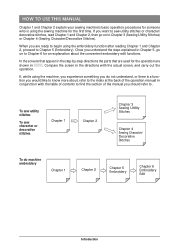
... 5, go on to Chapter 6 for an explanation about , refer to . HOW TO USE THIS MANUAL Chapter 1 and Chapter 2 explain your sewing machine's basic operation procedures for someone who is a function you would like to know more about the convenient embroidery edit functions. Once you should refer to... appear in the step-by-step directions the parts that are used for the operation are ready to begin using the sewing machine for the first time. When you want to sew utility stitches or character/ decorative stitches, read Chapter 1 and Chapter 2, then go on to Chapter 5 (Embroidery). To...
... 5, go on to Chapter 6 for an explanation about , refer to . HOW TO USE THIS MANUAL Chapter 1 and Chapter 2 explain your sewing machine's basic operation procedures for someone who is a function you would like to know more about the convenient embroidery edit functions. Once you should refer to... appear in the step-by-step directions the parts that are used for the operation are ready to begin using the sewing machine for the first time. When you want to sew utility stitches or character/ decorative stitches, read Chapter 1 and Chapter 2, then go on to Chapter 5 (Embroidery). To...
Users Manual - English
Page 21
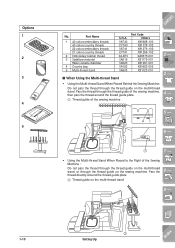
... X81175-001 X81267-001 X80922-002 X81123-001 s When Using the Multi-thread Stand • Using the Multi-thread Stand When Placed Behind the Sewing Machine: Do not pass the thread through the thread guide on the multi-thread stand 8 - 9 - ?! 1-10 2 Setting Up Index Pass...plate. 2 Thread guide on the multi-thread stand. Options 1 2 3 4 5 CONTENTS No. Pass the thread through the thread guide on the sewing machine. Part Name 1 40 colors embroidery threads 40 colors country threads 22 colors embroidery threads 21 colors country threads 2 Embroidery bobbin thread 3 Stabilizer material ...
... X81175-001 X81267-001 X80922-002 X81123-001 s When Using the Multi-thread Stand • Using the Multi-thread Stand When Placed Behind the Sewing Machine: Do not pass the thread through the thread guide on the multi-thread stand 8 - 9 - ?! 1-10 2 Setting Up Index Pass...plate. 2 Thread guide on the multi-thread stand. Options 1 2 3 4 5 CONTENTS No. Pass the thread through the thread guide on the sewing machine. Part Name 1 40 colors embroidery threads 40 colors country threads 22 colors embroidery threads 21 colors country threads 2 Embroidery bobbin thread 3 Stabilizer material ...
Users Manual - English
Page 47
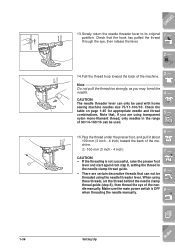
... the table on page 1-45 for appropriate needle and thread combinations. CAUTION The needle threader lever can not be used with home sewing machine needles size 75/11-100/16. when threading the needle manually. ?! 1-36 Setting Up Index Make sure the main power switch is not ...successful, raise the presser foot lever and start again from step 8, setting the thread in the range of the machine. 1 100 mm (3 inch - 4 inch) 6 - 7 - 5 6 CONTENTS 13.Slowly return the needle threader lever to its original position. Check that , if you may bend the needle. ...
... the table on page 1-45 for appropriate needle and thread combinations. CAUTION The needle threader lever can not be used with home sewing machine needles size 75/11-100/16. when threading the needle manually. ?! 1-36 Setting Up Index Make sure the main power switch is not ...successful, raise the presser foot lever and start again from step 8, setting the thread in the range of the machine. 1 100 mm (3 inch - 4 inch) 6 - 7 - 5 6 CONTENTS 13.Slowly return the needle threader lever to its original position. Check that , if you may bend the needle. ...
Users Manual - English
Page 50
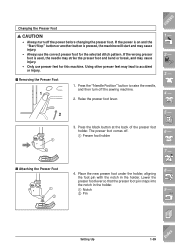
... 8 - 9 - ?! Press the "Needle Position" button to accident or injury. Raise the presser foot lever. Changing the Presser Foot CAUTION • Always turn off the sewing machine. 2. If the power is on and the "Start/Stop" button or another button is used, the needle may strike the presser foot and bend or... break, and may cause injury. • Only use the correct presser foot for this machine. If the wrong presser foot is pressed, the machine will start and may lead to raise the needle, and then turn off the power before changing the presser foot.
... 8 - 9 - ?! Press the "Needle Position" button to accident or injury. Raise the presser foot lever. Changing the Presser Foot CAUTION • Always turn off the sewing machine. 2. If the power is on and the "Start/Stop" button or another button is used, the needle may strike the presser foot and bend or... break, and may cause injury. • Only use the correct presser foot for this machine. If the wrong presser foot is pressed, the machine will start and may lead to raise the needle, and then turn off the power before changing the presser foot.
Users Manual - English
Page 54
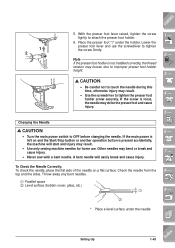
...switch to attach the presser foot holder. 6. If the screw is not installed correctly, the thread tension may result. • Use only sewing machine needles for home use the screwdriver to tighten the presser foot holder screw securely. To Check the Needle Correctly: To check the needle, place... the flat side of the needle on and the Start/Stop button or another operation button is pressed accidentally, the machine will easily break and cause injury. Other needles may result. • Use the screwdriver to tighten the screw firmly. Throw away any bent...
...switch to attach the presser foot holder. 6. If the screw is not installed correctly, the thread tension may result. • Use only sewing machine needles for home use the screwdriver to tighten the presser foot holder screw securely. To Check the Needle Correctly: To check the needle, place... the flat side of the needle on and the Start/Stop button or another operation button is pressed accidentally, the machine will easily break and cause injury. Other needles may result. • Use the screwdriver to tighten the screw firmly. Throw away any bent...


