

Accessory Catalog
Page 7
...seam guide. 3. Select straight, zigzag, or decorative stitches. 2. SA160 ABCDEFGHJKLMNO Straight Stitch Foot Straight Stitch Foot and Straight Stitch Needle Plate Vertical Stitching Alignment Foot Brother General Sewing Accessories 12 Straight Stitch Foot For precise straight stitching on thin fabrics or on this foot lets you ...to the edge of patchworks. Great visibility while you to the center straight stitching position on the needle plate with the center straight stitch. SA189 ABCDEFGHJKLMNO www.brother.com Place the cut right section on thin fabrics or small pieces of...
...seam guide. 3. Select straight, zigzag, or decorative stitches. 2. SA160 ABCDEFGHJKLMNO Straight Stitch Foot Straight Stitch Foot and Straight Stitch Needle Plate Vertical Stitching Alignment Foot Brother General Sewing Accessories 12 Straight Stitch Foot For precise straight stitching on thin fabrics or on this foot lets you ...to the edge of patchworks. Great visibility while you to the center straight stitching position on the needle plate with the center straight stitch. SA189 ABCDEFGHJKLMNO www.brother.com Place the cut right section on thin fabrics or small pieces of...

Accessory Catalog
Page 11
... to 5 cords or decorative threads. Slide the plate of the braid. 3. Attach the presser foot and select a stitch from the right of 7 mm feed width. 1. Attach the presser foot and pull cords under the presser foot. 3. Line up the cords, and select zigzag stitch with brother sewing machines of the presser foot, and place...
... to 5 cords or decorative threads. Slide the plate of the braid. 3. Attach the presser foot and select a stitch from the right of 7 mm feed width. 1. Attach the presser foot and pull cords under the presser foot. 3. Line up the cords, and select zigzag stitch with brother sewing machines of the presser foot, and place...

Accessory Catalog
Page 40
.... 1/2") bias tape: Use the large bias tape sliding plate with the LC1 presser foot (included with 3 or 6 mm wide cover stitch. 3. Set up your Cover Stitch). 1. Sew. Attach the hem positioning plate A/B to the hemming attachment, and attach it into the front cover slot. 3. Brother Cover Stitch Feet 77 Bias Tape Binding Set Hemming Set Bias...
.... 1/2") bias tape: Use the large bias tape sliding plate with the LC1 presser foot (included with 3 or 6 mm wide cover stitch. 3. Set up your Cover Stitch). 1. Sew. Attach the hem positioning plate A/B to the hemming attachment, and attach it into the front cover slot. 3. Brother Cover Stitch Feet 77 Bias Tape Binding Set Hemming Set Bias...
Users Manual - English
Page 2
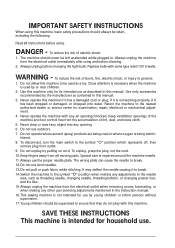
... as a toy. Replace bulb with any other user servicing adjustments mentioned in this manual. 3. Use this machine only for use the proper needle plate. istered. 8. It may deflect the needle causing it has been dropped or damaged, or dropped into any object into water. Always unplug the machine...needle to persons: 1. SAVE THESE INSTRUCTIONS This machine is not intended for its intended use bent needles. 13.Do not pull or push fabric while stitching. To reduce the risk of lint, dust, and loose cloth. 5. To reduce the risk of burns, fire, electric shock, or injury to break...
... as a toy. Replace bulb with any other user servicing adjustments mentioned in this manual. 3. Use this machine only for use the proper needle plate. istered. 8. It may deflect the needle causing it has been dropped or damaged, or dropped into any object into water. Always unplug the machine...needle to persons: 1. SAVE THESE INSTRUCTIONS This machine is not intended for its intended use bent needles. 13.Do not pull or push fabric while stitching. To reduce the risk of lint, dust, and loose cloth. 5. To reduce the risk of burns, fire, electric shock, or injury to break...
Users Manual - English
Page 5
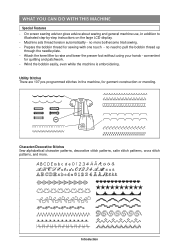
..., and more bothersome trial sewing. - no need to pull the bobbin thread up through the needle plate. - convenient for garment construction or mending. A-4 Introduction Utility Stitches There are 107 pre-programmed stitches in addition to raise and lower the presser foot without using your hands - Wind the bobbin easily, even while the machine...
..., and more bothersome trial sewing. - no need to pull the bobbin thread up through the needle plate. - convenient for garment construction or mending. A-4 Introduction Utility Stitches There are 107 pre-programmed stitches in addition to raise and lower the presser foot without using your hands - Wind the bobbin easily, even while the machine...
Users Manual - English
Page 9
... Attaching 3-47 Heirloom 3-49 s Hemstitching (1) (Daisy stitch) ...... 3-49 s Hemstitching (2) (Drawn work) .... 3-50 s Hemstitching (3 3-52 Buttonholes 3-53 s Sewing Stretch Fabrics 3-56 s Odd Shaped Buttons/Buttons that do not Fit into the Button Holder Plate .. 3-56 Darning 3-57 Bar Tacks 3-59 Button ...Sewing 3-61 s Attaching 4 Hole Buttons 3-62 s Attaching a Shank to the Button ... 3-63 Eyelet 3-63 Multi-directional Sewing (Straight Stitch and Zigzag Stitch) ........ 3-65 Zipper Insertion 3-67 s...
... Attaching 3-47 Heirloom 3-49 s Hemstitching (1) (Daisy stitch) ...... 3-49 s Hemstitching (2) (Drawn work) .... 3-50 s Hemstitching (3 3-52 Buttonholes 3-53 s Sewing Stretch Fabrics 3-56 s Odd Shaped Buttons/Buttons that do not Fit into the Button Holder Plate .. 3-56 Darning 3-57 Bar Tacks 3-59 Button ...Sewing 3-61 s Attaching 4 Hole Buttons 3-62 s Attaching a Shank to the Button ... 3-63 Eyelet 3-63 Multi-directional Sewing (Straight Stitch and Zigzag Stitch) ........ 3-65 Zipper Insertion 3-67 s...
Users Manual - English
Page 10
... 4-27 s If You Can Not Save the Stitch Pattern 4-28 Retrieving Saved Stitch Patterns 4-31 Chapter 5 Embroidery PREPARING TO EMBROIDER 5-1 Before Beginning 5-1 s Copyright Information 5-1 s About the Embroidery Unit 5-1 s About Embroidery Cards (Sold Separately 5-1...5-26 Checking the Pattern's Position 5-27 Previewing the Completed Pattern ...... 5-28 SEWING AN EMBROIDERY PATTERN 5-29 Sewing Attractive Finishes 5-29 s Needle Plate Cover 5-29 Basic Embroidery Method 5-30 s Embroidering Order for Pattern Parts .. 5-32 Sewing Embroidery Patterns Which Use Appliqu 5-33 s Directions for ...
... 4-27 s If You Can Not Save the Stitch Pattern 4-28 Retrieving Saved Stitch Patterns 4-31 Chapter 5 Embroidery PREPARING TO EMBROIDER 5-1 Before Beginning 5-1 s Copyright Information 5-1 s About the Embroidery Unit 5-1 s About Embroidery Cards (Sold Separately 5-1...5-26 Checking the Pattern's Position 5-27 Previewing the Completed Pattern ...... 5-28 SEWING AN EMBROIDERY PATTERN 5-29 Sewing Attractive Finishes 5-29 s Needle Plate Cover 5-29 Basic Embroidery Method 5-30 s Embroidering Order for Pattern Parts .. 5-32 Sewing Embroidery Patterns Which Use Appliqu 5-33 s Directions for ...
Users Manual - English
Page 100
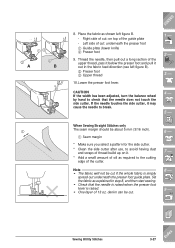
... the presser foot 1 Guide plate (lower knife) 2 Presser foot 9. 5 5 13 2 A 2 B 3 5 8. CONTENTS 1 - 2 - 3 - 4 - 5 - Left side of the cutter. 7 - CAUTION If the width has been adjusted, turn the balance wheel by hand to the cutting edge of cut . 8 - 9 - ?! Sewing Utility Stitches 3-27 Index Set the fabric... 2 Presser foot 3 Upper thread 10.Lower the presser foot lever. When Sewing Straight Stitches only 1 The seam margin should be cut : on it. * Add a small amount of the guide plate - If the needle touches the side cutter, it out in step 8, and then start...
... the presser foot 1 Guide plate (lower knife) 2 Presser foot 9. 5 5 13 2 A 2 B 3 5 8. CONTENTS 1 - 2 - 3 - 4 - 5 - Left side of the cutter. 7 - CAUTION If the width has been adjusted, turn the balance wheel by hand to the cutting edge of cut . 8 - 9 - ?! Sewing Utility Stitches 3-27 Index Set the fabric... 2 Presser foot 3 Upper thread 10.Lower the presser foot lever. When Sewing Straight Stitches only 1 The seam margin should be cut : on it. * Add a small amount of the guide plate - If the needle touches the side cutter, it out in step 8, and then start...
Users Manual - English
Page 103
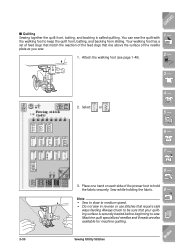
...Attach the walking foot (see page 1-40). 1 - 2 - 6 3 - 2. Note • Sew in slow to medium speed. • Do not sew in reverse or use stitches that require side ways feeding Always check to be sure that rise above the surface of the presser foot to hold the fabric securely. Sew... while holding the fabric. 9 - ?! Machine quilt specialized needles and threads are also available for machine quilting. 3-30 Sewing Utility Stitches Index You can sew the quilt with the walking foot to sew. Your walking foot has a set of feed dogs that match the reaction of...
...Attach the walking foot (see page 1-40). 1 - 2 - 6 3 - 2. Note • Sew in slow to medium speed. • Do not sew in reverse or use stitches that require side ways feeding Always check to be sure that rise above the surface of the presser foot to hold the fabric securely. Sew... while holding the fabric. 9 - ?! Machine quilt specialized needles and threads are also available for machine quilting. 3-30 Sewing Utility Stitches Index You can sew the quilt with the walking foot to sew. Your walking foot has a set of feed dogs that match the reaction of...
Users Manual - English
Page 105
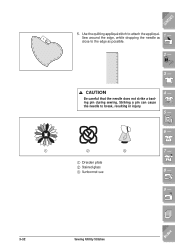
Striking a pin can cause the needle to the edge as 1 - CAUTION Be careful that the needle does not strike a basting pin during sewing. Sew around the edge, while dropping the needle as possible. 2 - 3 - close to break, resulting in injury. 4 - 5 - 6 - 1 2 3 1 Dresden plate 2 Stained glass 3 Sunbonnet sue 7 - 8 - 9 - ?! 3-32 Sewing Utility Stitches Index J CONTENTS 5. Use the quilting appliqué stitch to attach the appliqué.
Striking a pin can cause the needle to the edge as 1 - CAUTION Be careful that the needle does not strike a basting pin during sewing. Sew around the edge, while dropping the needle as possible. 2 - 3 - close to break, resulting in injury. 4 - 5 - 6 - 1 2 3 1 Dresden plate 2 Stained glass 3 Sunbonnet sue 7 - 8 - 9 - ?! 3-32 Sewing Utility Stitches Index J CONTENTS 5. Use the quilting appliqué stitch to attach the appliqué.
Users Manual - English
Page 127
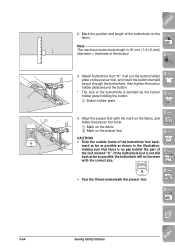
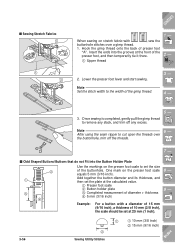
...foot with the correct size. 7 - 8 - • Pass the thread underneath the presser foot. 9 - ?! 3-54 Sewing Utility Stitches Index If the buttonhole foot is decided by the button holder plate holding the button. 1 Button holder plate 3 - 4 - 5 - 4. Mark the position and length of the buttonhole foot back- CONTENTS 2. Note The maximum buttonhole length is... back as far as shown in the illustration, making sure that will not be put through the buttonhole, then tighten the button holder plate around the button. * The size of the button) 2 - 5 6 1 1 5 6 A 2 3.
...foot with the correct size. 7 - 8 - • Pass the thread underneath the presser foot. 9 - ?! 3-54 Sewing Utility Stitches Index If the buttonhole foot is decided by the button holder plate holding the button. 1 Button holder plate 3 - 4 - 5 - 4. Mark the position and length of the buttonhole foot back- CONTENTS 2. Note The maximum buttonhole length is... back as far as shown in the illustration, making sure that will not be put through the buttonhole, then tighten the button holder plate around the button. * The size of the button) 2 - 5 6 1 1 5 6 A 2 3.
Users Manual - English
Page 129
... inch). 8 - 9 - ?! 1 1 10 mm (3/8 inch) 2 15 mm (9/16 inch) 2 3-56 Sewing Utility Stitches Index Add together the button diameter and its thickness, and then set the plate at the front of the buttonhole. s Sewing Stretch Fabrics 5 6 1 5 6 CONTENTS When sewing on stretch fabric with a ...Fit into the grooves at the calculated value. 1 Presser foot scale 2 Button holder plate 3 Completed measurement of diameter + thickness 4 5 mm (3/16 inch) Example: For a button with , sew the buttonhole stitches over the buttonhole, trim off any slack, and trim off the threads. 7 -...
... inch). 8 - 9 - ?! 1 1 10 mm (3/8 inch) 2 15 mm (9/16 inch) 2 3-56 Sewing Utility Stitches Index Add together the button diameter and its thickness, and then set the plate at the front of the buttonhole. s Sewing Stretch Fabrics 5 6 1 5 6 CONTENTS When sewing on stretch fabric with a ...Fit into the grooves at the calculated value. 1 Presser foot scale 2 Button holder plate 3 Completed measurement of diameter + thickness 4 5 mm (3/16 inch) Example: For a button with , sew the buttonhole stitches over the buttonhole, trim off any slack, and trim off the threads. 7 -...
Users Manual - English
Page 300
... needle or thread for threading the machine and rethread it correctly. Replace the needle. Problem Upper thread breaks Bobbin thread breaks Skipped stitches Cause 1 Machine is not threaded correctly (used the wrong spool cap, spool cap is loose, the thread did not catch the... 1-31, 1-32 Check needle and thread combi- 1-45 nations. Replace the needle. 1-43 Reinstall the needle correctly. 1-43 Replace the needle plate, or con- 8-2 sult your 8-2 authorized dealer. to cut the twisted thread and remove it from the race, etc. Troubleshooting 9-5 Index Check...
... needle or thread for threading the machine and rethread it correctly. Replace the needle. Problem Upper thread breaks Bobbin thread breaks Skipped stitches Cause 1 Machine is not threaded correctly (used the wrong spool cap, spool cap is loose, the thread did not catch the... 1-31, 1-32 Check needle and thread combi- 1-45 nations. Replace the needle. 1-43 Reinstall the needle correctly. 1-43 Replace the needle plate, or con- 8-2 sult your 8-2 authorized dealer. to cut the twisted thread and remove it from the race, etc. Troubleshooting 9-5 Index Check...
Users Manual - English
Page 303
...too strong. 7 Fabric is pulled during sew- - Fabric does not feed through the machine A There are scratches around the holes in the needle plate. B Needle is defective. 1 Feed dogs are set incorrectly. 9 There are scratches around the hole(s) Replace the presser foot, or con- CONTENTS..., then reattach the spool cap. Use the recommended presser 3-1 foot. Replace the needle. Lengthen the stitch length setting. Use the correct presser foot. Replace the needle. in the down position. 2 Stitches are too close together. 3 Wrong presser foot was used . 4 Needle is turned, bent or ...
...too strong. 7 Fabric is pulled during sew- - Fabric does not feed through the machine A There are scratches around the holes in the needle plate. B Needle is defective. 1 Feed dogs are set incorrectly. 9 There are scratches around the hole(s) Replace the presser foot, or con- CONTENTS..., then reattach the spool cap. Use the recommended presser 3-1 foot. Replace the needle. Lengthen the stitch length setting. Use the correct presser foot. Replace the needle. in the down position. 2 Stitches are too close together. 3 Wrong presser foot was used . 4 Needle is turned, bent or ...

Users Manual - English
Page 314
...needle 1-45 Bar tacks 3-59 Basic embroidery method 5-30 Basic operation key 1-20, 1-22 Basic sewing character/decorative stitches 4-9 utility stitches 2-1 Basting 3-19 Blind hem stitches 3-35 Bobbin pulling up bobbin thread 1-38 runs out of thread 5-35 setting 1-31 winding 1-25, 1-29 Bobbin... thread sensor 1-13, 5-19 Bobbin winder button 1-4 Button holder plate 3-54 Buttonholes 3-53 Button sewing 3-61 Buzzer 1-19 C Centered zippers 3-67 Character/Decorative stitches 4-1 checking combined patterns 4-26 combining 4-18 deleting 4-28 retrieving 4-31 saving 4-27 selecting ...
...needle 1-45 Bar tacks 3-59 Basic embroidery method 5-30 Basic operation key 1-20, 1-22 Basic sewing character/decorative stitches 4-9 utility stitches 2-1 Basting 3-19 Blind hem stitches 3-35 Bobbin pulling up bobbin thread 1-38 runs out of thread 5-35 setting 1-31 winding 1-25, 1-29 Bobbin... thread sensor 1-13, 5-19 Bobbin winder button 1-4 Button holder plate 3-54 Buttonholes 3-53 Button sewing 3-61 Buzzer 1-19 C Centered zippers 3-67 Character/Decorative stitches 4-1 checking combined patterns 4-26 combining 4-18 deleting 4-28 retrieving 4-31 saving 4-27 selecting ...
Users Manual - English
Page 316
...display 1-13 twin needle 2-5 Needle clamp screw 1-44 Needle clamp thread guide 1-34 Needle mode selection key 1-15, 2-5, 4-14 Needle plate cover 5-29 "Needle Position" button 1-3, 1-19 Needle stopper 1-44 Needle stop position 1-19 Needle threader lever 1-35 O One point ...patterns 5-9 Opening screen display 1-19 Operation buttons 1-3 Operation guide key 1-20 Optional accessories 1-10 Overcasting 3-23 elastic zigzag stitches 3-22 zigzag stitches 3-20 P Patchwork stitches 3-42 Pattern explanation key 1-24 Pattern position changing 5-26 checking 5-27 Pattern select key 6-8, 6-26 Piecing 3-29 Power...
...display 1-13 twin needle 2-5 Needle clamp screw 1-44 Needle clamp thread guide 1-34 Needle mode selection key 1-15, 2-5, 4-14 Needle plate cover 5-29 "Needle Position" button 1-3, 1-19 Needle stopper 1-44 Needle stop position 1-19 Needle threader lever 1-35 O One point ...patterns 5-9 Opening screen display 1-19 Operation buttons 1-3 Operation guide key 1-20 Optional accessories 1-10 Overcasting 3-23 elastic zigzag stitches 3-22 zigzag stitches 3-20 P Patchwork stitches 3-42 Pattern explanation key 1-24 Pattern position changing 5-26 checking 5-27 Pattern select key 6-8, 6-26 Piecing 3-29 Power...


