

Accessory Catalog
Page 13
...Makes ruffles with this presser foot. 1. Adjust the amount of tuck or gather by placing the completed row in the center position. 3. www.brother.com Further rows can be evenly spaced by trying different combinations of the grooves. 4. Move fabric about 1" (2.5 cm) past the needle ...to sew the first row in one of stitch length, tuck setting and depth setting. 2. Install and manually thread a twin needle. 2. The ruffling blade on lightweight fabric. Brother Embellishment Feet 23 Bed Runner & Pillowcase Innov-is Project Book (See pages 16 and 17 for most consistent ...
...Makes ruffles with this presser foot. 1. Adjust the amount of tuck or gather by placing the completed row in the center position. 3. www.brother.com Further rows can be evenly spaced by trying different combinations of the grooves. 4. Move fabric about 1" (2.5 cm) past the needle ...to sew the first row in one of stitch length, tuck setting and depth setting. 2. Install and manually thread a twin needle. 2. The ruffling blade on lightweight fabric. Brother Embellishment Feet 23 Bed Runner & Pillowcase Innov-is Project Book (See pages 16 and 17 for most consistent ...

Accessory Catalog
Page 34
... page 33 for the Quattro™ 6000D, Duetta™ 4500D/Innov-is 4000D, 2500D, 1500D, 1200 series, PC and ULT series machines and the PE-400D and Innov-is 500D. Pacesetter embroidery thread is color keyed to hoop your sewing counter or can...approx. 1,100-yds) spun thread is ideal for your instruction manual for advice on the top surface of fabrics. Consult your machine. Dependable thread delivery through machine tensions. Brother Embroidery Accessories PacesetterTM Polyester Threads 65 Brother Country Yarn Embroidery Threads Metallic Threads For the best embroidery results,...
... page 33 for the Quattro™ 6000D, Duetta™ 4500D/Innov-is 4000D, 2500D, 1500D, 1200 series, PC and ULT series machines and the PE-400D and Innov-is 500D. Pacesetter embroidery thread is color keyed to hoop your sewing counter or can...approx. 1,100-yds) spun thread is ideal for your instruction manual for advice on the top surface of fabrics. Consult your machine. Dependable thread delivery through machine tensions. Brother Embroidery Accessories PacesetterTM Polyester Threads 65 Brother Country Yarn Embroidery Threads Metallic Threads For the best embroidery results,...
Users Manual - English
Page 2
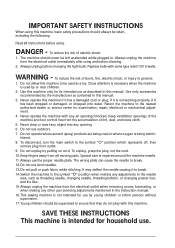
... always be taken, including the following: Read all moving parts. Replace bulb with any other user servicing adjustments mentioned in the instruction manual. 16.This sewing machine is not working properly, if it has been dropped or damaged, or dropped into any adjustments in the needle... area, such as contained in this manual. 3. Close attention is necessary when the machine is required around the machine needle. 11. Never operate this manual. Return the machine to the symbol " " position when making any air openings blocked...
... always be taken, including the following: Read all moving parts. Replace bulb with any other user servicing adjustments mentioned in the instruction manual. 16.This sewing machine is not working properly, if it has been dropped or damaged, or dropped into any adjustments in the needle... area, such as contained in this manual. 3. Close attention is necessary when the machine is required around the machine needle. 11. Never operate this manual. Return the machine to the symbol " " position when making any air openings blocked...
Users Manual - English
Page 4
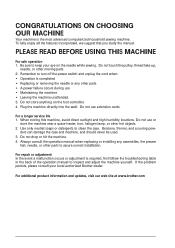
...feet, needle, or other moving parts. 2. To fully enjoy all the features incorporated, we suggest that you study the manual. Be sure to keep your local authorized Brother dealer. Remember to assure correct installation. Benzene, thinner, and scouring pow- Do not drop or hit the machine. 4....Plug the machine directly into the wall. If the problem persists, please consult your eye on the foot controller. 4. Always consult the operation manual when replacing or installing any other hot objects. 2. PLEASE READ BEFORE USING THIS MACHINE For safe operation 1. Do not touch the pulley,...
...feet, needle, or other moving parts. 2. To fully enjoy all the features incorporated, we suggest that you study the manual. Be sure to keep your local authorized Brother dealer. Remember to assure correct installation. Benzene, thinner, and scouring pow- Do not drop or hit the machine. 4....Plug the machine directly into the wall. If the problem persists, please consult your eye on the foot controller. 4. Always consult the operation manual when replacing or installing any other hot objects. 2. PLEASE READ BEFORE USING THIS MACHINE For safe operation 1. Do not touch the pulley,...
Users Manual - English
Page 7
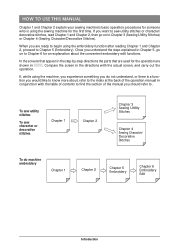
.... If you would like to know more about the convenient embroidery edit functions. When you should refer to Chapter 5 (Embroidery). HOW TO USE THIS MANUAL Chapter 1 and Chapter 2 explain your sewing machine's basic operation procedures for someone who is a function you want to sew utility stitches or character/ ...decorative stitches, read Chapter 1 and Chapter 2, then go on to the index at the back of the manual you are used for the first time. Compare the screen in the directions with the table of contents to find the section of the ...
.... If you would like to know more about the convenient embroidery edit functions. When you should refer to Chapter 5 (Embroidery). HOW TO USE THIS MANUAL Chapter 1 and Chapter 2 explain your sewing machine's basic operation procedures for someone who is a function you want to sew utility stitches or character/ ...decorative stitches, read Chapter 1 and Chapter 2, then go on to the index at the back of the manual you are used for the first time. Compare the screen in the directions with the table of contents to find the section of the ...
Users Manual - English
Page 8
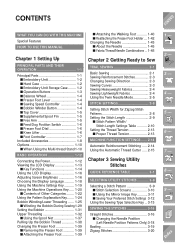
Index CONTENTS WHAT YOU CAN DO WITH THIS MACHINE Special Features HOW TO USE THIS MANUAL Chapter 1 Setting Up PRINCIPAL PARTS AND THEIR OPERATION 1-1 Principal Parts 1-1 s Embroidery Unit 1-2 s Hard Case 1-2 s Embroidery Unit Storage Case ........ 1-2 s Operation Buttons 1-3 s Balance Wheel 1-4 s Presser Foot Lever 1-4 s ...
Index CONTENTS WHAT YOU CAN DO WITH THIS MACHINE Special Features HOW TO USE THIS MANUAL Chapter 1 Setting Up PRINCIPAL PARTS AND THEIR OPERATION 1-1 Principal Parts 1-1 s Embroidery Unit 1-2 s Hard Case 1-2 s Embroidery Unit Storage Case ........ 1-2 s Operation Buttons 1-3 s Balance Wheel 1-4 s Presser Foot Lever 1-4 s ...
Users Manual - English
Page 20
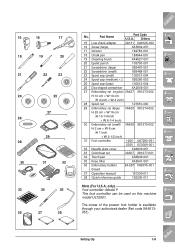
... sheet set SA507 X81277-001 34 Touch pen XA9949-001 35 Knee lifter XA6941-001 36 Embroidery bobbin SA-EBT XA8375-001 thread 37 Operation manual 191200-011 38 Quick reference guide 192200-011 Note (For U.S.A. 15 16 17 18 19 20 21 22 23 24 25 27 26 29 28...
... sheet set SA507 X81277-001 34 Touch pen XA9949-001 35 Knee lifter XA6941-001 36 Embroidery bobbin SA-EBT XA8375-001 thread 37 Operation manual 191200-011 38 Quick reference guide 192200-011 Note (For U.S.A. 15 16 17 18 19 20 21 22 23 24 25 27 26 29 28...
Users Manual - English
Page 26
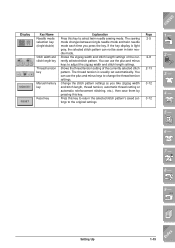
... 2-5 2-8 2-13 3-12 3-12 CONTENTS 1 - 2 - 3 - 4 - 5 - 6 - 7 - 8 - 9 - ?! Press this key. Display Key Name Needle mode selection key (single/double) Stitch width and stitch length key Thread tension key Manual memory key Reset key Explanation Press this key to change the thread tension settings.
... 2-5 2-8 2-13 3-12 3-12 CONTENTS 1 - 2 - 3 - 4 - 5 - 6 - 7 - 8 - 9 - ?! Press this key. Display Key Name Needle mode selection key (single/double) Stitch width and stitch length key Thread tension key Manual memory key Reset key Explanation Press this key to change the thread tension settings.
Users Manual - English
Page 47
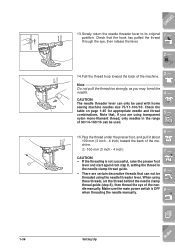
... (3 inch - 4 inch) 6 - 7 - Check the table on page 1-45 for appropriate needle and thread combinations. when threading the needle manually. ?! 1-36 Setting Up Index Note that the hook has pulled the thread 1 - dle manually. through the eye, then release the lever. 2 - 5 6 3 - 14.Pull the thread loop toward the back of the machine. CAUTION...
... (3 inch - 4 inch) 6 - 7 - Check the table on page 1-45 for appropriate needle and thread combinations. when threading the needle manually. ?! 1-36 Setting Up Index Note that the hook has pulled the thread 1 - dle manually. through the eye, then release the lever. 2 - 5 6 3 - 14.Pull the thread loop toward the back of the machine. CAUTION...
Users Manual - English
Page 60
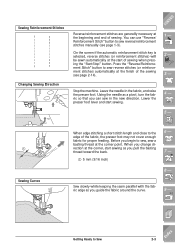
..., start sewing as you begin to sew reverse stitches (or reinforcement stitches) automatically at the finish of sewing. Getting Ready to sew reverse/reinforcement stitches manually (see page 2-14). CONTENTS 1 - 2 - 3 - You can sew in the fabric, and raise the presser foot. Before you guide the fabric around the curve. 9 - ?! Sewing Reinforcement...
..., start sewing as you begin to sew reverse stitches (or reinforcement stitches) automatically at the finish of sewing. Getting Ready to sew reverse/reinforcement stitches manually (see page 2-14). CONTENTS 1 - 2 - 3 - You can sew in the fabric, and raise the presser foot. Before you guide the fabric around the curve. 9 - ?! Sewing Reinforcement...
Users Manual - English
Page 67
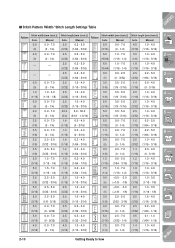
... 7.0 (0 - 1/4) 2.5 - 5.0 (3/32 - 3/16) 2.5 - 5.0 (3/32 - 3/16) 1.5 - 7.0 (1/16 - 1/4) 1.5 - 7.0 (1/16 - 1/4) 2.5 - 5.0 (3/32 - 3/16) 2.5 - 5.0 (3/32 - 3/16) 3.5 - 5.0 (1/8 - 3/16) 0.0 - 7.0 (0 - 9/32) 0.0 - 7.0 (0 - 9/32) 0.0 - 7.0 (0 - 1/4) Stitch length [mm (inch.)] Auto. Index Manual 2.5 0.2 - 5.0 (3/32) (1/64 - 3/16) 2.5 0.2 - 5.0 (3/32) (1/64 - 3/16) 2.5 0.2 - 5.0 (3/32) (1/64 - 3/16) 2.5 0.2 - 5.0 (3/32) (1/64 - 3/16) 2.5 1.5 - 4.0 (3/32) (1/16 - 3/16) 2.5 1.0 - 4.0 (3/32) (1/16 - 3/16) 2.5 1.0 - 4.0 (3/32) (1/16 - 3/16) 20.0 5.0 - 30.0 (3/4) (3/16 - 1-3/16...
... 7.0 (0 - 1/4) 2.5 - 5.0 (3/32 - 3/16) 2.5 - 5.0 (3/32 - 3/16) 1.5 - 7.0 (1/16 - 1/4) 1.5 - 7.0 (1/16 - 1/4) 2.5 - 5.0 (3/32 - 3/16) 2.5 - 5.0 (3/32 - 3/16) 3.5 - 5.0 (1/8 - 3/16) 0.0 - 7.0 (0 - 9/32) 0.0 - 7.0 (0 - 9/32) 0.0 - 7.0 (0 - 1/4) Stitch length [mm (inch.)] Auto. Index Manual 2.5 0.2 - 5.0 (3/32) (1/64 - 3/16) 2.5 0.2 - 5.0 (3/32) (1/64 - 3/16) 2.5 0.2 - 5.0 (3/32) (1/64 - 3/16) 2.5 0.2 - 5.0 (3/32) (1/64 - 3/16) 2.5 1.5 - 4.0 (3/32) (1/16 - 3/16) 2.5 1.0 - 4.0 (3/32) (1/16 - 3/16) 2.5 1.0 - 4.0 (3/32) (1/16 - 3/16) 20.0 5.0 - 30.0 (3/4) (3/16 - 1-3/16...
Users Manual - English
Page 68
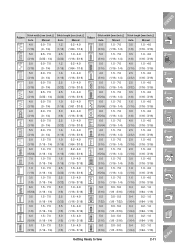
...- 4.0 (1/16) (1/16 - 3/16) 0.4 0.2 - 1.0 (1/64) (1/64 - 1/16) 0.4 0.2 - 1.0 (1/64) (1/64 - 1/16) 0.4 0.2 - 1.0 (1/64) (1/64 - 1/16) 0.4 0.2 - 1.0 (1/64) (1/64 - 1/16) 0.4 0.2 - 1.0 (1/64) (1/64 - 1/16) Getting Ready to Sew 2-11 1 - 2 - 3 - 4 - 5 - 6 - 7 - 8 - 9 - ?! Manual 1.2 0.2 - 4.0 (1/16) (1/64 - 1/16) 2.5 1.0 - 4.0 (3/32) (1/16 - 3/16) 1.2 0.2 - 4.0 (1/16) (1/64 - 1/16) 1.6 1.0 - 4.0 (1/16) (1/16 - 3/16) 2.5 1.0 - 4.0 (3/32) (1/16 - 3/16) 2.5 1.0 - 4.0 (3/32) (1/16 - 3/16) 1.0 0.2 - 4.0 (1/16) (1/61 - 3/16) 3.0 2.0 - 4.0 (1/8) (1/16 - 3/16...
...- 4.0 (1/16) (1/16 - 3/16) 0.4 0.2 - 1.0 (1/64) (1/64 - 1/16) 0.4 0.2 - 1.0 (1/64) (1/64 - 1/16) 0.4 0.2 - 1.0 (1/64) (1/64 - 1/16) 0.4 0.2 - 1.0 (1/64) (1/64 - 1/16) 0.4 0.2 - 1.0 (1/64) (1/64 - 1/16) Getting Ready to Sew 2-11 1 - 2 - 3 - 4 - 5 - 6 - 7 - 8 - 9 - ?! Manual 1.2 0.2 - 4.0 (1/16) (1/64 - 1/16) 2.5 1.0 - 4.0 (3/32) (1/16 - 3/16) 1.2 0.2 - 4.0 (1/16) (1/64 - 1/16) 1.6 1.0 - 4.0 (1/16) (1/16 - 3/16) 2.5 1.0 - 4.0 (3/32) (1/16 - 3/16) 2.5 1.0 - 4.0 (3/32) (1/16 - 3/16) 1.0 0.2 - 4.0 (1/16) (1/61 - 3/16) 3.0 2.0 - 4.0 (1/8) (1/16 - 3/16...
Users Manual - English
Page 69
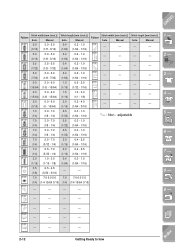
CONTENTS Stitch width [mm (inch.)] Stitch length [mm (inch.)] Stitch width [mm (inch.)] Stitch length [mm (inch.)] Pattern Pattern Auto. Manual 5.0 (3/16) 3.0 - 5.0 (1/8 - 3/16) 0.4 0.2 - 1.0 (1/64) (1/64 - 1/16) - - - - 5.0 (3/16) 3.0 - 5.0 (1/8 - 3/16) 0.4 0.2 - ...15/64) 2.0 0.2 - 4.0 (1/16) (1/64 - 3/16) - - - - 7.0 3.0 - 7.0 0.5 0.3 - 1.0 (1/4) (1/8 - 1/4) (1/32) (1/64 - 1/16) *- : Non - Manual Auto. adjustable 7.0 3.0 - 7.0 0.5 0.3 - 1.0 (1/4) (1/8 - 1/4) (1/32) (1/64 - 1/16) 7.0 3.0 - 7.0 0.5 0.3 - 1.0 (1/4) (1/8 - 1/4) (1/32) (1/64 - 1/16)...
CONTENTS Stitch width [mm (inch.)] Stitch length [mm (inch.)] Stitch width [mm (inch.)] Stitch length [mm (inch.)] Pattern Pattern Auto. Manual 5.0 (3/16) 3.0 - 5.0 (1/8 - 3/16) 0.4 0.2 - 1.0 (1/64) (1/64 - 1/16) - - - - 5.0 (3/16) 3.0 - 5.0 (1/8 - 3/16) 0.4 0.2 - ...15/64) 2.0 0.2 - 4.0 (1/16) (1/64 - 3/16) - - - - 7.0 3.0 - 7.0 0.5 0.3 - 1.0 (1/4) (1/8 - 1/4) (1/32) (1/64 - 1/16) *- : Non - Manual Auto. adjustable 7.0 3.0 - 7.0 0.5 0.3 - 1.0 (1/4) (1/8 - 1/4) (1/32) (1/64 - 1/16) 7.0 3.0 - 7.0 0.5 0.3 - 1.0 (1/4) (1/8 - 1/4) (1/32) (1/64 - 1/16)...

Users Manual - English
Page 122
... pattern, attach presser foot "J", and start sewing. * Select any pattern between 3-01 and 3-22. If using a wing needle and the stitch width has been set manually, check that the needle will not touch the presser foot before starting sewing by hand, from front to medium weight homespun fabric with a little stiffness. 2.
... pattern, attach presser foot "J", and start sewing. * Select any pattern between 3-01 and 3-22. If using a wing needle and the stitch width has been set manually, check that the needle will not touch the presser foot before starting sewing by hand, from front to medium weight homespun fabric with a little stiffness. 2.
Users Manual - English
Page 316
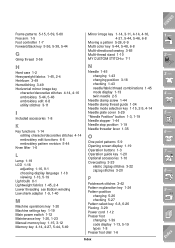
..., 2-4 Lower threading see Bobbin winding Low shank adapter 1-9, 1-40 M Machine operations key 1-20 Machine settings key 1-19 Main power switch 1-12 Maintenance key 1-20, 1-23 Manual memory key 1-15, 3-12 Memory key 4-14, 4-27, 5-44, 5-49 N Needle 1-45 changing 1-43 changing position 3-18 checking 1-43 needle/fabric/thread combinations 1-45 mode...
..., 2-4 Lower threading see Bobbin winding Low shank adapter 1-9, 1-40 M Machine operations key 1-20 Machine settings key 1-19 Main power switch 1-12 Maintenance key 1-20, 1-23 Manual memory key 1-15, 3-12 Memory key 4-14, 4-27, 5-44, 5-49 N Needle 1-45 changing 1-43 changing position 3-18 checking 1-43 needle/fabric/thread combinations 1-45 mode...


