

Accessory Catalog
Page 2
... of straw hats Contents 02 FZ2-B1 Brother Sewing Machine Lineup 03-04 Brother General Sewing Accessories 05-16 Brother Embellishment Feet 17-24 Brother Quilting Feet 25-28 Brother Embroidery Accessories 29-66 Brother Sewing Machine Attachments for PQ Series 0637-0740 Brother Serger/Overlock Feet 71-74 Brother Cover Stitch Feet 75-78 More From Brother 79 Index 80 You can always find...
... of straw hats Contents 02 FZ2-B1 Brother Sewing Machine Lineup 03-04 Brother General Sewing Accessories 05-16 Brother Embellishment Feet 17-24 Brother Quilting Feet 25-28 Brother Embroidery Accessories 29-66 Brother Sewing Machine Attachments for PQ Series 0637-0740 Brother Serger/Overlock Feet 71-74 Brother Cover Stitch Feet 75-78 More From Brother 79 Index 80 You can always find...

Accessory Catalog
Page 3
... cassette based threading system, these compact but friendly and inviting. Some models feature automatic machine embroidery as well. Innov-is 500D, SE270D, HE120/PKG, CS80, CS8060, CS8150 Cassette-type Sewing & Embroidery Combination Machines Utilizing an easy to learn and enjoy. Brother Sewing Machine Lineup 03 Please select your creative dreams come true with this state-of-the-art...
... cassette based threading system, these compact but friendly and inviting. Some models feature automatic machine embroidery as well. Innov-is 500D, SE270D, HE120/PKG, CS80, CS8060, CS8150 Cassette-type Sewing & Embroidery Combination Machines Utilizing an easy to learn and enjoy. Brother Sewing Machine Lineup 03 Please select your creative dreams come true with this state-of-the-art...

Accessory Catalog
Page 17
...presser feet: Free-motion quilting foot "C" for more features to your machine with these features: - Duetta™ 4500D/Innov-is 4000D Premium Upgrade Package II Brother Embroidery Accessories 32 Duetta™ 4500D/ 4000D Premium Upgrade Package II Exclusively ...embroidery functionality and enhanced USB capability. Automatic Height Adjuster™ (AHA) feature adjusts the presser foot pressure automatically and continuously to give you can create continuous border patterns from the stunning designs that have been upgraded with the Brother Innov-is 4000D sewing and embroidery machine...
...presser feet: Free-motion quilting foot "C" for more features to your machine with these features: - Duetta™ 4500D/Innov-is 4000D Premium Upgrade Package II Brother Embroidery Accessories 32 Duetta™ 4500D/ 4000D Premium Upgrade Package II Exclusively ...embroidery functionality and enhanced USB capability. Automatic Height Adjuster™ (AHA) feature adjusts the presser foot pressure automatically and continuously to give you can create continuous border patterns from the stunning designs that have been upgraded with the Brother Innov-is 4000D sewing and embroidery machine...

Accessory Catalog
Page 33
... Thread Stand Embroidery Machine Hoops Brother Embroidery Accessories 64 For all embroidery and sewing/embroidery machines. SA539 DuettaTM4500D,Innov-is 500 series, SE-270D, HE-120 series, PE-300S, PE-400D: • Large: 172 x 100 mm (approx. 6-3/4 x 4 inches) • Medium: 100 x 100 mm (approx. 4 x 4 inches) SA432 • Small: 20 x 60 mm (approx. 1 x 2-1/2 inches) SA431 SA434 For ULT series: •...
... Thread Stand Embroidery Machine Hoops Brother Embroidery Accessories 64 For all embroidery and sewing/embroidery machines. SA539 DuettaTM4500D,Innov-is 500 series, SE-270D, HE-120 series, PE-300S, PE-400D: • Large: 172 x 100 mm (approx. 6-3/4 x 4 inches) • Medium: 100 x 100 mm (approx. 4 x 4 inches) SA432 • Small: 20 x 60 mm (approx. 1 x 2-1/2 inches) SA431 SA434 For ULT series: •...

Accessory Catalog
Page 34
.../Innov-is 4000D, 2500D, 1500D, 1200 series, PC and ULT series machines and the PE-400D and Innov-is 500D. Brother Embroidery Accessories PacesetterTM Polyester Threads 65 Brother Country Yarn Embroidery Threads Metallic Threads For the best embroidery results, use these embroidery threads especially designed for Brother sewing and embroidering machines. 61 Color Thread Set with Wooden Rack ETKSP999 PacesetterTM Polyester...
.../Innov-is 4000D, 2500D, 1500D, 1200 series, PC and ULT series machines and the PE-400D and Innov-is 500D. Brother Embroidery Accessories PacesetterTM Polyester Threads 65 Brother Country Yarn Embroidery Threads Metallic Threads For the best embroidery results, use these embroidery threads especially designed for Brother sewing and embroidering machines. 61 Color Thread Set with Wooden Rack ETKSP999 PacesetterTM Polyester...
Users Manual - English
Page 6
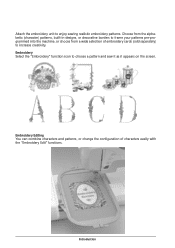
Embroidery Select the "Embroidery" function icon to enjoy sewing realistic embroidery patterns. Embroidery Editing You can combine characters and patterns, or change the configuration of embroidery cards (sold separately) to increase creativity. Attach the embroidery unit to choose a pattern and sew it as it appears on the screen. Introduction A-5 Choose from the alphabetic (character) patterns, built-in designs, or decorative borders to frame your patterns pre-programmed into the machine, or choose from a wide selection of characters easily with the "Embroidery Edit" functions.
Embroidery Select the "Embroidery" function icon to enjoy sewing realistic embroidery patterns. Embroidery Editing You can combine characters and patterns, or change the configuration of embroidery cards (sold separately) to increase creativity. Attach the embroidery unit to choose a pattern and sew it as it appears on the screen. Introduction A-5 Choose from the alphabetic (character) patterns, built-in designs, or decorative borders to frame your patterns pre-programmed into the machine, or choose from a wide selection of characters easily with the "Embroidery Edit" functions.
Users Manual - English
Page 7
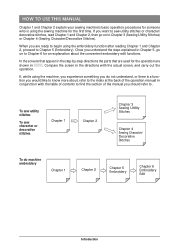
... 1 and Chapter 2, then go on to . Once you do machine embroidery Chapter 1 Chapter 2 Chapter 5 Embroidery Chapter 6 Embroidery Edit A-6 Introduction To sew utility stitches To sew character or decorative stitches Chapter 1 Chapter 2 Chapter 3 Sewing Utility Stitches Chapter 4 Sewing Character/ Decorative Stitches To do not understand, or there is using the sewing machine for the operation are ready to begin using the...
... 1 and Chapter 2, then go on to . Once you do machine embroidery Chapter 1 Chapter 2 Chapter 5 Embroidery Chapter 6 Embroidery Edit A-6 Introduction To sew utility stitches To sew character or decorative stitches Chapter 1 Chapter 2 Chapter 3 Sewing Utility Stitches Chapter 4 Sewing Character/ Decorative Stitches To do not understand, or there is using the sewing machine for the operation are ready to begin using the...
Users Manual - English
Page 8
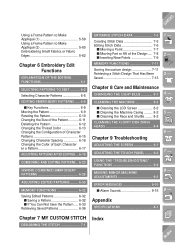
CONTENTS WHAT YOU CAN DO WITH THIS MACHINE Special Features HOW TO USE THIS MANUAL Chapter 1 Setting Up PRINCIPAL PARTS AND THEIR OPERATION 1-1 Principal Parts 1-1 s Embroidery Unit 1-2 s Hard Case 1-2 s Embroidery Unit Storage Case ........ 1-2 s Operation Buttons 1-3 s Balance Wheel 1-4 s Presser Foot Lever 1-4 s Sewing Speed Controller 1-4 s Bobbin Winder Button 1-4 s Top Cover 1-5 s Supplemental Spool Pin 1-5 s Free Arm 1-5 s Feed Dog...
CONTENTS WHAT YOU CAN DO WITH THIS MACHINE Special Features HOW TO USE THIS MANUAL Chapter 1 Setting Up PRINCIPAL PARTS AND THEIR OPERATION 1-1 Principal Parts 1-1 s Embroidery Unit 1-2 s Hard Case 1-2 s Embroidery Unit Storage Case ........ 1-2 s Operation Buttons 1-3 s Balance Wheel 1-4 s Presser Foot Lever 1-4 s Sewing Speed Controller 1-4 s Bobbin Winder Button 1-4 s Top Cover 1-5 s Supplemental Spool Pin 1-5 s Free Arm 1-5 s Feed Dog...
Users Manual - English
Page 10
... Point Patterns 5-9 Character Patterns 5-11 Floral Alphabet Patterns 5-13 Frame Patterns 5-15 Selecting Patterns from an Embroidery Card 5-17 Selecting a Pattern from a Floppy Disk (Only for Machines with Floppy Disk Drives) .. 5-18 VIEWING THE SEWING SCREEN ....... 5-19 PREPARING THE EMBROIDERY FRAME 5-20 Attaching a Stabilizer Material to the Fabric 5-20 Setting the Fabric in the...
... Point Patterns 5-9 Character Patterns 5-11 Floral Alphabet Patterns 5-13 Frame Patterns 5-15 Selecting Patterns from an Embroidery Card 5-17 Selecting a Pattern from a Floppy Disk (Only for Machines with Floppy Disk Drives) .. 5-18 VIEWING THE SEWING SCREEN ....... 5-19 PREPARING THE EMBROIDERY FRAME 5-20 Attaching a Stabilizer Material to the Fabric 5-20 Setting the Fabric in the...
Users Manual - English
Page 11
... Chapter 9 Troubleshooting ADJUSTING THE SCREEN 9-1 ADJUSTING THE TOUCH PANEL ........ 9-2 5 - 6 - 7 - USING THE "TROUBLESHOOTING" FUNCTION 9-4 MAKING MINOR MACHINE ADJUSTMENTS 9-5 8 - Chapter 7 MY CUSTOM STITCH Index DESIGNING THE STITCH 7-1 Index ERROR MESSAGES 9-10 s Alarm Sounds 9-15 Appendix SPECIFICATIONS A-1 9 ...of Each Character in a Pattern 6-17 ADJUSTING PATTERNS AFTER EDITING .. 6-18 COMBINING AND EDITING PATTERNS .. 6-20 SEWING COMBINED EMBROIDERY PATTERNS 6-28 ADJUSTING EDITED PATTERNS ........ 6-30 MEMORY FUNCTIONS 6-32 Saving Edited Patterns 6-32 s Saving a Pattern ...
... Chapter 9 Troubleshooting ADJUSTING THE SCREEN 9-1 ADJUSTING THE TOUCH PANEL ........ 9-2 5 - 6 - 7 - USING THE "TROUBLESHOOTING" FUNCTION 9-4 MAKING MINOR MACHINE ADJUSTMENTS 9-5 8 - Chapter 7 MY CUSTOM STITCH Index DESIGNING THE STITCH 7-1 Index ERROR MESSAGES 9-10 s Alarm Sounds 9-15 Appendix SPECIFICATIONS A-1 9 ...of Each Character in a Pattern 6-17 ADJUSTING PATTERNS AFTER EDITING .. 6-18 COMBINING AND EDITING PATTERNS .. 6-20 SEWING COMBINED EMBROIDERY PATTERNS 6-28 ADJUSTING EDITED PATTERNS ........ 6-30 MEMORY FUNCTIONS 6-32 Saving Edited Patterns 6-32 s Saving a Pattern ...
Users Manual - English
Page 21
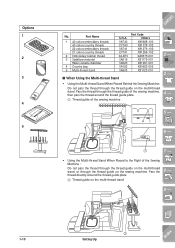
... thread through the thread guide on the multi-thread stand, or through the thread guide on the sewing machine. Part Name 1 40 colors embroidery threads 40 colors country threads 22 colors embroidery threads 21 colors country threads 2 Embroidery bobbin thread 3 Stabilizer material Water soluble stabilizer 4 Country bag 5 Multi-thread stand U.S.A. SA740 CYT40 SA741 CYT41 SA...
... thread through the thread guide on the multi-thread stand, or through the thread guide on the sewing machine. Part Name 1 40 colors embroidery threads 40 colors country threads 22 colors embroidery threads 21 colors country threads 2 Embroidery bobbin thread 3 Stabilizer material Water soluble stabilizer 4 Country bag 5 Multi-thread stand U.S.A. SA740 CYT40 SA741 CYT41 SA...
Users Manual - English
Page 25
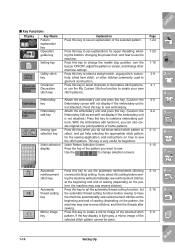
..., zigzag stitch, buttonhole, blind hem stitch, or other machine settings. Embroidery key Embroidery edit key Sewing type selection key Stitch selection display Attach the embroidery unit and press this key. (Caution: the Embroidery screen will not display if the embroidery unit is not attached.) Press this key to sew embroidery. Press this key to select character or decorative stitch...
..., zigzag stitch, buttonhole, blind hem stitch, or other machine settings. Embroidery key Embroidery edit key Sewing type selection key Stitch selection display Attach the embroidery unit and press this key. (Caution: the Embroidery screen will not display if the embroidery unit is not attached.) Press this key to sew embroidery. Press this key to select character or decorative stitch...
Users Manual - English
Page 30
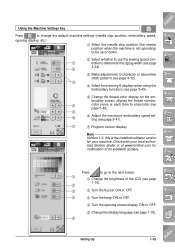
... 7 - Check with your local authorized Brother dealer or at www.brother.com for your machine. Using the Machine Settings Key Press to change the default machine settings (needle stop position, embroidery speed, opening display, etc.) 1 Select the needle stop position (the needle position when the machine is the installed software version for notification of... version display Note Version 1.0, this is not operating) to be up or down. 2 Select whether to use the sewing speed con- 1 troller to determine the zigzag width (see page 5-43). 5 Change the thread color display on the...
... 7 - Check with your local authorized Brother dealer or at www.brother.com for your machine. Using the Machine Settings Key Press to change the default machine settings (needle stop position, embroidery speed, opening display, etc.) 1 Select the needle stop position (the needle position when the machine is the installed software version for notification of... version display Note Version 1.0, this is not operating) to be up or down. 2 Select whether to use the sewing speed con- 1 troller to determine the zigzag width (see page 5-43). 5 Change the thread color display on the...
Users Manual - English
Page 40
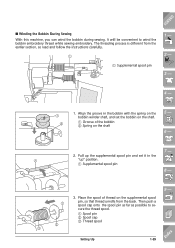
... Up 1-29 Index Pull up " position. 1 Supplemental spool pin 8 - 9 - ?! 3. The threading process is different from the back. s Winding the Bobbin During Sewing With this machine, you can wind the bobbin during sewing. Place the spool of the bobbin 2 Spring on the supplemental spool 1 pin, so that thread unrolls from the earlier section, so... spool pin CONTENTS 1 - 2 - 3 - 4 - 1 2 1. It will be convenient to se- Then push a spool cap onto the spool pin as far as possible to wind the bobbin embroidery thread while sewing embroidery.
... Up 1-29 Index Pull up " position. 1 Supplemental spool pin 8 - 9 - ?! 3. The threading process is different from the back. s Winding the Bobbin During Sewing With this machine, you can wind the bobbin during sewing. Place the spool of the bobbin 2 Spring on the supplemental spool 1 pin, so that thread unrolls from the earlier section, so... spool pin CONTENTS 1 - 2 - 3 - 4 - 1 2 1. It will be convenient to se- Then push a spool cap onto the spool pin as far as possible to wind the bobbin embroidery thread while sewing embroidery.

Users Manual - English
Page 49
...pull it about 100 mm (3-4 inch) toward the back of the bobbin 6 - Gently pull the upper thread, and a loop of the machine, matching the upper thread. 5. thread will come out of the hole in the illustration. Guide the bobbin thread through the groove, follow-... Pull up the bobbin thread, for example, when making gathers, darts, free motion quilting or embroidery. Replace the bobbin cover. 1 Upper thread 2 Bobbin thread 8 - 9 - ?! 1-38 Setting Up Index ing the arrow in the needle plate. 7 - 1 2 4. ...
...pull it about 100 mm (3-4 inch) toward the back of the bobbin 6 - Gently pull the upper thread, and a loop of the machine, matching the upper thread. 5. thread will come out of the hole in the illustration. Guide the bobbin thread through the groove, follow-... Pull up the bobbin thread, for example, when making gathers, darts, free motion quilting or embroidery. Replace the bobbin cover. 1 Upper thread 2 Bobbin thread 8 - 9 - ?! 1-38 Setting Up Index ing the arrow in the needle plate. 7 - 1 2 4. ...
Users Manual - English
Page 56
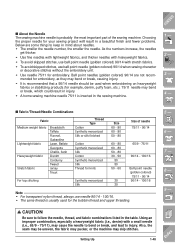
... Silk Size 60 - 80 60 - 80 50 - 80 60 - 80 60 - 80 50 - 80 30 - 50 50 50 50 - 60 30 30 Size of the sewing machine. CONTENTS 1 - 2 - 3 - 4 - Using an improper combination, especially a heavyweight fabric (i.e., denim) with stretch fabrics. • To avoid skipped stitches, use ball point ... and thicker needles with heavyweight fabrics. • To avoid skipped stitches, use ball point needle (golden colored) 90/14 when sewing character or decorative stitches without the embroidery unit. • Use needle 75/11 for example, denim, puffy foam, etc.). 75/11 needle may bend or break, ...
... Silk Size 60 - 80 60 - 80 50 - 80 60 - 80 60 - 80 50 - 80 30 - 50 50 50 50 - 60 30 30 Size of the sewing machine. CONTENTS 1 - 2 - 3 - 4 - Using an improper combination, especially a heavyweight fabric (i.e., denim) with stretch fabrics. • To avoid skipped stitches, use ball point ... and thicker needles with heavyweight fabrics. • To avoid skipped stitches, use ball point needle (golden colored) 90/14 when sewing character or decorative stitches without the embroidery unit. • Use needle 75/11 for example, denim, puffy foam, etc.). 75/11 needle may bend or break, ...
Users Manual - English
Page 61
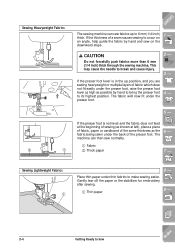
.... If the thickness of the presser foot. CAUTION Do not forcefully push fabrics more than 6 mm (1/4 inch) thick through the sewing machine. Gently tear off the paper or the stabilizer for embroidery after sewing. 1 Thin paper 9 - ?! 2-4 Getting Ready to break and cause injury. 2 - 3 - The fabric will now fit under thin fabrics to 6 mm(1/4 inch...
.... If the thickness of the presser foot. CAUTION Do not forcefully push fabrics more than 6 mm (1/4 inch) thick through the sewing machine. Gently tear off the paper or the stabilizer for embroidery after sewing. 1 Thin paper 9 - ?! 2-4 Getting Ready to break and cause injury. 2 - 3 - The fabric will now fit under thin fabrics to 6 mm(1/4 inch...
Users Manual - English
Page 72
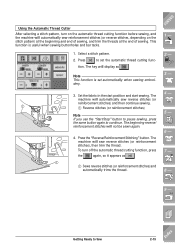
... button again to continue. Getting Ready to set automatically when sewing embroidery. 5 1 6 3. tion. The machine will display as . 1 Sews reverse stitches (or reinforcement stitches) and automatically trims the thread. Press to Sew 2-15 Index Set the fabric in the start position and start sewing. The key will sew reverse stitches (or reinforcement stitches), then trim the thread...
... button again to continue. Getting Ready to set automatically when sewing embroidery. 5 1 6 3. tion. The machine will display as . 1 Sews reverse stitches (or reinforcement stitches) and automatically trims the thread. Press to Sew 2-15 Index Set the fabric in the start position and start sewing. The key will sew reverse stitches (or reinforcement stitches), then trim the thread...
Users Manual - English
Page 176
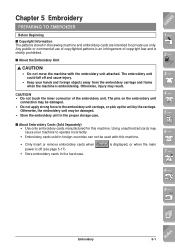
... TO EMBROIDER Before Beginning s Copyright Information The patterns stored in the sewing machine and embroidery cards are intended for this machine. • Only insert or remove embroidery cards when power is off and cause injury. • Keep your machine to the embroidery unit carriage, or pick up the unit by the carriage. Using unauthorized cards may result...
... TO EMBROIDER Before Beginning s Copyright Information The patterns stored in the sewing machine and embroidery cards are intended for this machine. • Only insert or remove embroidery cards when power is off and cause injury. • Keep your machine to the embroidery unit carriage, or pick up the unit by the carriage. Using unauthorized cards may result...
Users Manual - English
Page 178
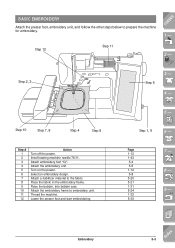
... 4 Step 9 Step # 1 2 3 4 5 6 7 8 9 10 11 12 Action Turn off the power. Install sewing machine needle 75/11. Select an embroidery design. Thread the machine. Step 12 Step 11 2 - Step 2, 3 Step 6 3 - 4 - Place the fabric in the embroidery frame. Attach the embroidery frame to prepare the machine for embroidery. Attach embroidery foot "Q". Place the bobbin, into bobbin case. Attach a stabilizer material to...
... 4 Step 9 Step # 1 2 3 4 5 6 7 8 9 10 11 12 Action Turn off the power. Install sewing machine needle 75/11. Select an embroidery design. Thread the machine. Step 12 Step 11 2 - Step 2, 3 Step 6 3 - 4 - Place the fabric in the embroidery frame. Attach the embroidery frame to prepare the machine for embroidery. Attach embroidery foot "Q". Place the bobbin, into bobbin case. Attach a stabilizer material to...


