
Users Manual - English
Page 6
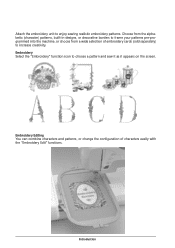
Choose from the alphabetic (character) patterns, built-in designs, or decorative borders to frame your patterns pre-programmed into the machine, or choose from a wide selection of characters easily with the "Embroidery Edit" functions. Embroidery Editing You can combine characters and patterns, or change the configuration of embroidery cards (sold separately) to choose a pattern and sew it as it appears on the screen. Introduction A-5 Embroidery Select the "Embroidery" function icon to increase creativity. Attach the embroidery unit to enjoy sewing realistic embroidery patterns.
Choose from the alphabetic (character) patterns, built-in designs, or decorative borders to frame your patterns pre-programmed into the machine, or choose from a wide selection of characters easily with the "Embroidery Edit" functions. Embroidery Editing You can combine characters and patterns, or change the configuration of embroidery cards (sold separately) to choose a pattern and sew it as it appears on the screen. Introduction A-5 Embroidery Select the "Embroidery" function icon to increase creativity. Attach the embroidery unit to enjoy sewing realistic embroidery patterns.
Users Manual - English
Page 8
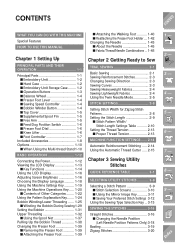
CONTENTS WHAT YOU CAN DO WITH THIS MACHINE Special Features HOW TO USE THIS MANUAL Chapter 1 Setting Up PRINCIPAL PARTS AND THEIR OPERATION 1-1 Principal Parts 1-1 s Embroidery Unit 1-2 s Hard Case 1-2 s Embroidery Unit Storage Case ........ 1-2 s Operation Buttons 1-3 s Balance Wheel 1-4 s Presser Foot Lever 1-4 s Sewing Speed Controller 1-4 s Bobbin Winder Button 1-4 s Top Cover 1-5 s Supplemental Spool Pin 1-5 s Free Arm 1-5 s Feed Dog...
CONTENTS WHAT YOU CAN DO WITH THIS MACHINE Special Features HOW TO USE THIS MANUAL Chapter 1 Setting Up PRINCIPAL PARTS AND THEIR OPERATION 1-1 Principal Parts 1-1 s Embroidery Unit 1-2 s Hard Case 1-2 s Embroidery Unit Storage Case ........ 1-2 s Operation Buttons 1-3 s Balance Wheel 1-4 s Presser Foot Lever 1-4 s Sewing Speed Controller 1-4 s Bobbin Winder Button 1-4 s Top Cover 1-5 s Supplemental Spool Pin 1-5 s Free Arm 1-5 s Feed Dog...
Users Manual - English
Page 10
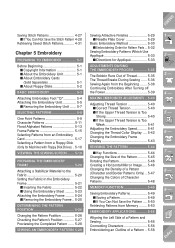
... You Can Not Save the Stitch Pattern 4-28 Retrieving Saved Stitch Patterns 4-31 Chapter 5 Embroidery PREPARING TO EMBROIDER 5-1 Before Beginning 5-1 s Copyright Information 5-1 s About the Embroidery Unit 5-1 s About Embroidery Cards (Sold Separately 5-1 s About Floppy Disks 5-2 BASIC EMBROIDERY 5-3 Attaching Embroidery Foot "Q 5-4 Attaching the Embroidery Unit 5-5 s Removing the Embroidery Unit ...... 5-7 SELECTING PATTERNS 5-8 One Point Patterns 5-9 Character Patterns 5-11 Floral Alphabet Patterns 5-13 Frame...
... You Can Not Save the Stitch Pattern 4-28 Retrieving Saved Stitch Patterns 4-31 Chapter 5 Embroidery PREPARING TO EMBROIDER 5-1 Before Beginning 5-1 s Copyright Information 5-1 s About the Embroidery Unit 5-1 s About Embroidery Cards (Sold Separately 5-1 s About Floppy Disks 5-2 BASIC EMBROIDERY 5-3 Attaching Embroidery Foot "Q 5-4 Attaching the Embroidery Unit 5-5 s Removing the Embroidery Unit ...... 5-7 SELECTING PATTERNS 5-8 One Point Patterns 5-9 Character Patterns 5-11 Floral Alphabet Patterns 5-13 Frame...
Users Manual - English
Page 13
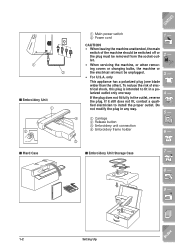
... must be unplugged. • For U.S.A. If the plug does not fit fully in any way. 2 - 3 - 4 - 5 - 4 1 Carriage 2 Release button 3 Embroidery unit connection 4 Embroidery frame holder 6 - 3 s Embroidery Unit Storage Case 7 - 8 - 9 - ?! 1-2 Setting Up Index only This appliance has a polarized plug (one way. Do not modify the plug in the outlet, reverse the... When leaving the machine unattended, the main switch of electrical shock, this plug is intended to install the proper outlet. 1 2 s Embroidery Unit 1 2 s Hard Case CONTENTS 1 Main power switch 2 Power cord 1 -
... must be unplugged. • For U.S.A. If the plug does not fit fully in any way. 2 - 3 - 4 - 5 - 4 1 Carriage 2 Release button 3 Embroidery unit connection 4 Embroidery frame holder 6 - 3 s Embroidery Unit Storage Case 7 - 8 - 9 - ?! 1-2 Setting Up Index only This appliance has a polarized plug (one way. Do not modify the plug in the outlet, reverse the... When leaving the machine unattended, the main switch of electrical shock, this plug is intended to install the proper outlet. 1 2 s Embroidery Unit 1 2 s Hard Case CONTENTS 1 Main power switch 2 Power cord 1 -
Users Manual - English
Page 25
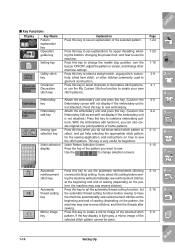
.... Attach the embroidery unit and press this key. (Caution: the Embroidery Edit screen will not display if the embroidery unit is not attached.) Press this key to combine embroidery pat- Press this key to set the automatic thread cutting function. Embroidery key Embroidery edit key Sewing... type selection key Stitch selection display Attach the embroidery unit and press this key. (Caution: the Embroidery screen will not display if the embroidery unit is not attached.) Press this key when ...
.... Attach the embroidery unit and press this key. (Caution: the Embroidery Edit screen will not display if the embroidery unit is not attached.) Press this key to combine embroidery pat- Press this key to set the automatic thread cutting function. Embroidery key Embroidery edit key Sewing... type selection key Stitch selection display Attach the embroidery unit and press this key. (Caution: the Embroidery screen will not display if the embroidery unit is not attached.) Press this key when ...
Users Manual - English
Page 31
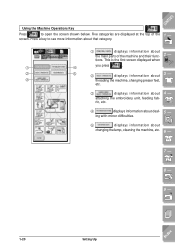
tions. ing with minor difficulties. 5 displays information about deal- 5 - attaching the embroidery unit, feeding fabric, etc. 4 displays information about changing the lamp, cleaning the machine, etc. 6 - 7 - 8 - 9 - ?! 1-20 Setting Up Index Using the Machine Operations Key CONTENTS Press to ...
tions. ing with minor difficulties. 5 displays information about deal- 5 - attaching the embroidery unit, feeding fabric, etc. 4 displays information about changing the lamp, cleaning the machine, etc. 6 - 7 - 8 - 9 - ?! 1-20 Setting Up Index Using the Machine Operations Key CONTENTS Press to ...
Users Manual - English
Page 56
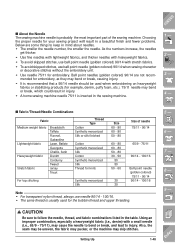
... - 100/16 Note • For transparent nylon thread, always use ball point needle (golden colored) 90/14 when sewing character or decorative stitches without the embroidery unit. • Use needle 75/11 for your sewing project will result in a beautiful finish and fewer problems. Below are not recommended for... embroidery, as they may bend or break, which could result in injury. • A home sewing machine needle 75/11 is probably the most important part of ...
... - 100/16 Note • For transparent nylon thread, always use ball point needle (golden colored) 90/14 when sewing character or decorative stitches without the embroidery unit. • Use needle 75/11 for your sewing project will result in a beautiful finish and fewer problems. Below are not recommended for... embroidery, as they may bend or break, which could result in injury. • A home sewing machine needle 75/11 is probably the most important part of ...
Users Manual - English
Page 176
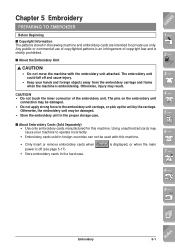
... injury. • Keep your machine to operate incorrectly. • Embroidery cards sold in the hard case. s About the Embroidery Unit CAUTION • Do not move the machine with this machine. Otherwise, the embroidery unit may result. Embroidery 5-1 Index The embroidery unit could fall off (see page 5-17). • Store embroidery cards in foreign countries can not be damaged. •...
... injury. • Keep your machine to operate incorrectly. • Embroidery cards sold in the hard case. s About the Embroidery Unit CAUTION • Do not move the machine with this machine. Otherwise, the embroidery unit may result. Embroidery 5-1 Index The embroidery unit could fall off (see page 5-17). • Store embroidery cards in foreign countries can not be damaged. •...
Users Manual - English
Page 178
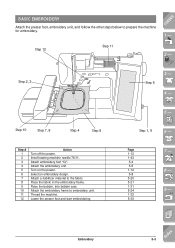
... follow the other steps below to the fabric. Attach a stabilizer material to prepare the machine for embroidery. Thread the machine. Select an embroidery design. Attach the embroidery frame to embroidery unit. Step 12 Step 11 2 - Step 2, 3 Step 6 3 - 4 - Attach embroidery foot "Q". Install sewing machine needle 75/11. Turn on the power. Page 7 - 1-12 1-43 5-4 5-5 1-12 8 - 5-8 5-20 5-21...
... follow the other steps below to the fabric. Attach a stabilizer material to prepare the machine for embroidery. Thread the machine. Select an embroidery design. Attach the embroidery frame to embroidery unit. Step 12 Step 11 2 - Step 2, 3 Step 6 3 - 4 - Attach embroidery foot "Q". Install sewing machine needle 75/11. Turn on the power. Page 7 - 1-12 1-43 5-4 5-5 1-12 8 - 5-8 5-20 5-21...
Users Manual - English
Page 180
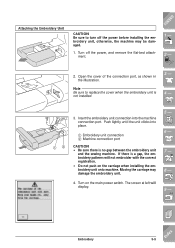
... CAUTION • Be sure there is not installed. 3 - 4 - 12 3. Turn on the carriage when installing the embroidery unit onto machine. Attaching the Embroidery Unit CAUTION Be sure to replace the cover when the embroidery unit is no gap between the embroidery unit and the sewing machine. Open the cover of the connection port, as shown in the illustration...
... CAUTION • Be sure there is not installed. 3 - 4 - 12 3. Turn on the carriage when installing the embroidery unit onto machine. Attaching the Embroidery Unit CAUTION Be sure to replace the cover when the embroidery unit is no gap between the embroidery unit and the sewing machine. Open the cover of the connection port, as shown in the illustration...
Users Manual - English
Page 181
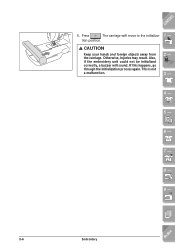
tion position. Also, if the embroidery unit could not be initialized correctly, a buzzer will move to the initializa- 1 - CONTENTS 5. If this happens, go through the initialization process again. This is not a malfunction. 2 - 3 - 4 - 5 - 6 - 7 - 8 - 9 - ?! 5-6 Embroidery Index The carriage will sound. CAUTION Keep your hands and foreign objects away from the carriage. Press . Otherwise, injuries may result.
tion position. Also, if the embroidery unit could not be initialized correctly, a buzzer will move to the initializa- 1 - CONTENTS 5. If this happens, go through the initialization process again. This is not a malfunction. 2 - 3 - 4 - 5 - 6 - 7 - 8 - 9 - ?! 5-6 Embroidery Index The carriage will sound. CAUTION Keep your hands and foreign objects away from the carriage. Press . Otherwise, injuries may result.

Users Manual - English
Page 182
... main power switch. Hold the back left side of the embroidery unit. ill 6_09 2. s Removing the Embroidery Unit 1. Turn off the main power switch. CAUTION Be sure to the removal position. The carriage will not fit in injury. Otherwise, the machine may strike the embroidery foot, resulting in the storage case if this step is...
... main power switch. Hold the back left side of the embroidery unit. ill 6_09 2. s Removing the Embroidery Unit 1. Turn off the main power switch. CAUTION Be sure to the removal position. The carriage will not fit in injury. Otherwise, the machine may strike the embroidery foot, resulting in the storage case if this step is...
Users Manual - English
Page 204
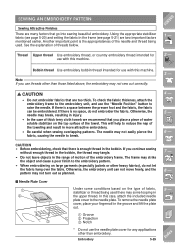
...out. 1 Groove 2 Projection 3 Notch * Do not use with this case, attach the included needle plate cover to the embroidery unit, and use with this machine. Index CONTENTS 1 - 2 - The needle may some conditions based on large garments (especially jackets or other than... embroidery. Otherwise, the embroidery unit can be embroidered. If there is enough thread in injury. • In the case of thick terry cloth towels we recommend that go into sewing beautiful embroidery. Otherwise, the needle may tangle. • ...
...out. 1 Groove 2 Projection 3 Notch * Do not use with this case, attach the included needle plate cover to the embroidery unit, and use with this machine. Index CONTENTS 1 - 2 - The needle may some conditions based on large garments (especially jackets or other than... embroidery. Otherwise, the embroidery unit can be embroidered. If there is enough thread in injury. • In the case of thick terry cloth towels we recommend that go into sewing beautiful embroidery. Otherwise, the needle may tangle. • ...
Users Manual - English
Page 210
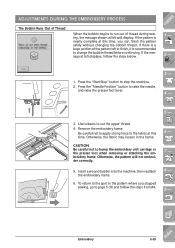
Press the "Start/Stop" button to bump the embroidery unit carriage or the presser foot when removing or attaching the embroidery frame. CAUTION Be careful not to stop the machine. 2. Remove the embroidery frame. Use scissors to raise the needle, and raise the presser foot lever. 3 - 4 - 1 2 5 - 3. Insert a ...the fabric at this time. Otherwise, the pattern will display. To return to the spot in the frame. Embroidery 5-35 Index ADJUSTMENTS DURING THE EMBROIDERY PROCESS The Bobbin Runs Out of Thread When the bobbin begins to run out of the pattern left displays, ...
Press the "Start/Stop" button to bump the embroidery unit carriage or the presser foot when removing or attaching the embroidery frame. CAUTION Be careful not to stop the machine. 2. Remove the embroidery frame. Use scissors to raise the needle, and raise the presser foot lever. 3 - 4 - 1 2 5 - 3. Insert a ...the fabric at this time. Otherwise, the pattern will display. To return to the spot in the frame. Embroidery 5-35 Index ADJUSTMENTS DURING THE EMBROIDERY PROCESS The Bobbin Runs Out of Thread When the bobbin begins to run out of the pattern left displays, ...
Users Manual - English
Page 211
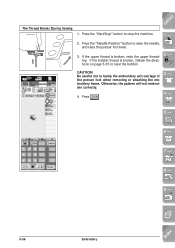
Press the "Start/Stop" button to bump the embroidery unit carriage or the presser foot when removing or attaching the embroidery frame. Press . 3 - 4 - 5 - 6 - 7 - 8 - 9 - ?! 5-36 Embroidery Index The Thread Breaks During Sewing 1. If the upper thread is broken, follow the directions on page 5-35 to raise the needle, and raise the ...
Press the "Start/Stop" button to bump the embroidery unit carriage or the presser foot when removing or attaching the embroidery frame. Press . 3 - 4 - 5 - 6 - 7 - 8 - 9 - ?! 5-36 Embroidery Index The Thread Breaks During Sewing 1. If the upper thread is broken, follow the directions on page 5-35 to raise the needle, and raise the ...
Users Manual - English
Page 236
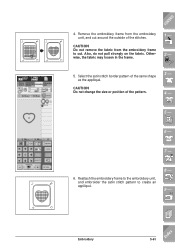
... embroider the satin stitch pattern to cut around the outside of the stitches. CAUTION Do not remove the fabric from the embroidery unit, and cut . Embroidery 5-61 Index Otherwise, the fabric may loosen in the frame. Select the satin stitch border pattern of the pattern. 3 - 4 - 5 - 6 - 7 - 6. Also, do not pull strongly on ...the fabric. CAUTION Do not change the size or position of the same shape as the appliqué. Remove the embroidery frame from the embroidery frame to create an appliqué. 8 - 9 - ?! 4.
... embroider the satin stitch pattern to cut around the outside of the stitches. CAUTION Do not remove the fabric from the embroidery unit, and cut . Embroidery 5-61 Index Otherwise, the fabric may loosen in the frame. Select the satin stitch border pattern of the pattern. 3 - 4 - 5 - 6 - 7 - 6. Also, do not pull strongly on ...the fabric. CAUTION Do not change the size or position of the same shape as the appliqué. Remove the embroidery frame from the embroidery frame to create an appliqué. 8 - 9 - ?! 4.
Users Manual - English
Page 239
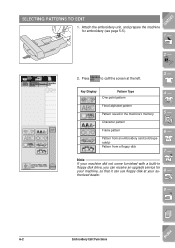
... machine's memory 5 - Character pattern Frame pattern Pattern from an embroidery card (sold separately) Pattern from a floppy disk 6 - 7 - Attach the embroidery unit, and prepare the machine for your machine, so that it can receive an upgrade service for embroidery (see page 5-5). Note If your authorized dealer. 8 - 9 - ?! 6-2 Embroidery Edit Functions Index Key Display Pattern Type One point...
... machine's memory 5 - Character pattern Frame pattern Pattern from an embroidery card (sold separately) Pattern from a floppy disk 6 - 7 - Attach the embroidery unit, and prepare the machine for your machine, so that it can receive an upgrade service for embroidery (see page 5-5). Note If your authorized dealer. 8 - 9 - ?! 6-2 Embroidery Edit Functions Index Key Display Pattern Type One point...
Users Manual - English
Page 257
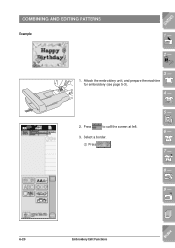
COMBINING AND EDITING PATTERNS Example CONTENTS 1 - 2 - 3 - 1. Select a border. 1 Press . 5 - 6 - 7 - 8 - 9 - ?! 6-20 Embroidery Edit Functions Index Attach the embroidery unit, and prepare the machine for embroidery (see page 5-3). 4 - 2. Press to call the screen at left. 3.
COMBINING AND EDITING PATTERNS Example CONTENTS 1 - 2 - 3 - 1. Select a border. 1 Press . 5 - 6 - 7 - 8 - 9 - ?! 6-20 Embroidery Edit Functions Index Attach the embroidery unit, and prepare the machine for embroidery (see page 5-3). 4 - 2. Press to call the screen at left. 3.
Users Manual - English
Page 278
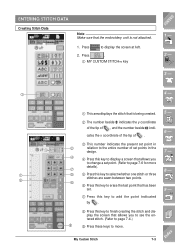
My Custom Stitch 7-3 Index ENTERING STITCH DATA Creating Stitch Data Note Make sure that the embroidery unit is being created. 5 - 2 The number beside indicates the y coordinate of the tip of , and the number beside indicates the x coordinate of the tip of . 6 - 3 This ...
My Custom Stitch 7-3 Index ENTERING STITCH DATA Creating Stitch Data Note Make sure that the embroidery unit is being created. 5 - 2 The number beside indicates the y coordinate of the tip of , and the number beside indicates the x coordinate of the tip of . 6 - 3 This ...
Users Manual - English
Page 288
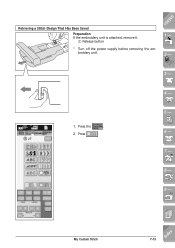
Retrieving a Stitch Design That Has Been Saved Preparation If the embroidery unit is attached, remove it. 1 Release button * Turn off the power supply before removing the embroidery unit. My Custom Stitch 7-13 Index Press the . 2. CONTENTS 1 - 2 - 3 - 4 - 1. Press . 5 - 6 - 7 - 8 - 9 - ?!
Retrieving a Stitch Design That Has Been Saved Preparation If the embroidery unit is attached, remove it. 1 Release button * Turn off the power supply before removing the embroidery unit. My Custom Stitch 7-13 Index Press the . 2. CONTENTS 1 - 2 - 3 - 4 - 1. Press . 5 - 6 - 7 - 8 - 9 - ?!


