
Users Manual - English
Page 4
...occurs during use • Maintaining the machine • Leaving the machine unattended. 3. Use only neutral soaps or detergents to keep your local authorized Brother dealer. If the problem persists, please consult your eye on the foot controller. 4. Plug the machine directly into the wall. For a longer ...direct sunlight and high humidity locations. For repair or adjustment In the event a malfunction occurs or adjustment is required, first follow the troubleshooting table in the back of the operation manual to turn off the power switch and unplug the cord when: • Operation is...
...occurs during use • Maintaining the machine • Leaving the machine unattended. 3. Use only neutral soaps or detergents to keep your local authorized Brother dealer. If the problem persists, please consult your eye on the foot controller. 4. Plug the machine directly into the wall. For a longer ...direct sunlight and high humidity locations. For repair or adjustment In the event a malfunction occurs or adjustment is required, first follow the troubleshooting table in the back of the operation manual to turn off the power switch and unplug the cord when: • Operation is...
Users Manual - English
Page 11
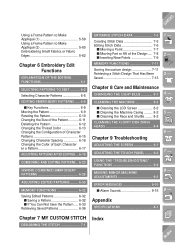
... 8-2 s Cleaning the Machine Casing ......... 8-2 s Cleaning the Race and Shuttle ........ 8-2 CLEANING THE FLOPPY DISK DRIVE HEADS 8-4 Chapter 9 Troubleshooting ADJUSTING THE SCREEN 9-1 ADJUSTING THE TOUCH PANEL ........ 9-2 5 - 6 - 7 - Chapter 8 Care and Maintenance CHANGING THE LIGHT BULB 8-1 4 - USING THE "TROUBLESHOOTING" FUNCTION 9-4 MAKING MINOR MACHINE ADJUSTMENTS 9-5 8 - CONTENTS Using a Frame Pattern to Make Appliqué (1 5-59 Using a Frame Pattern...
... 8-2 s Cleaning the Machine Casing ......... 8-2 s Cleaning the Race and Shuttle ........ 8-2 CLEANING THE FLOPPY DISK DRIVE HEADS 8-4 Chapter 9 Troubleshooting ADJUSTING THE SCREEN 9-1 ADJUSTING THE TOUCH PANEL ........ 9-2 5 - 6 - 7 - Chapter 8 Care and Maintenance CHANGING THE LIGHT BULB 8-1 4 - USING THE "TROUBLESHOOTING" FUNCTION 9-4 MAKING MINOR MACHINE ADJUSTMENTS 9-5 8 - CONTENTS Using a Frame Pattern to Make Appliqué (1 5-59 Using a Frame Pattern...
Users Manual - English
Page 296
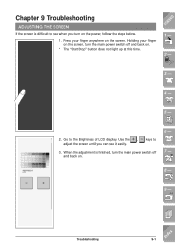
... Go to adjust the screen until you turn the main power switch off and back on the power, follow the steps below. 1. Chapter 9 Troubleshooting ADJUSTING THE SCREEN If the screen is finished, turn the main power switch off and back on the screen. Holding your finger anywhere on . * The "...
... Go to adjust the screen until you turn the main power switch off and back on the power, follow the steps below. 1. Chapter 9 Troubleshooting ADJUSTING THE SCREEN If the screen is finished, turn the main power switch off and back on the screen. Holding your finger anywhere on . * The "...
Users Manual - English
Page 297
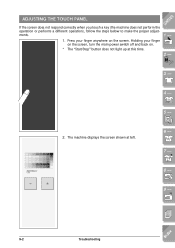
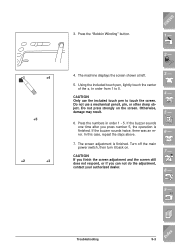
The machine displays the screen shown at this time. Holding your finger anywhere on . * The "Start/Stop" button does not light up at left. 6 - 7 - 8 - 9 - ?! 9-2 Troubleshooting Index CONTENTS 1 - 2 - 3 - 4 - 5 - 2. ADJUSTING THE TOUCH PANEL If the screen does not respond correctly when you touch a key (the machine does not perform the operation or performs a different operation), follow the steps below to make the proper adjustments. 1. Press your finger on the screen, turn the main power switch off and back on the screen.
The machine displays the screen shown at this time. Holding your finger anywhere on . * The "Start/Stop" button does not light up at left. 6 - 7 - 8 - 9 - ?! 9-2 Troubleshooting Index CONTENTS 1 - 2 - 3 - 4 - 5 - 2. ADJUSTING THE TOUCH PANEL If the screen does not respond correctly when you touch a key (the machine does not perform the operation or performs a different operation), follow the steps below to make the proper adjustments. 1. Press your finger on the screen, turn the main power switch off and back on the screen.
Users Manual - English
Page 298
..., pin, or other sharp object. Otherwise, damage may result. 3 - 4 - 5 - 6. If the buzzer sounds twice, there was an error. In this case, repeat the steps above. 7. Troubleshooting 9-3 Index +1 +4 +5 +2 +3 3. Press the "Bobbin Winding" button. Do not press strongly on . CAUTION If you finish the screen adjustment and the screen still does not respond...
..., pin, or other sharp object. Otherwise, damage may result. 3 - 4 - 5 - 6. If the buzzer sounds twice, there was an error. In this case, repeat the steps above. 7. Troubleshooting 9-3 Index +1 +4 +5 +2 +3 3. Press the "Bobbin Winding" button. Do not press strongly on . CAUTION If you finish the screen adjustment and the screen still does not respond...
Users Manual - English
Page 299
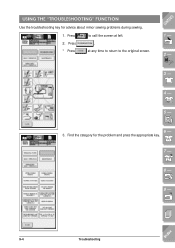
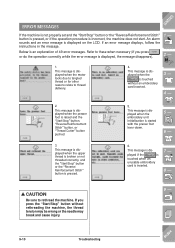
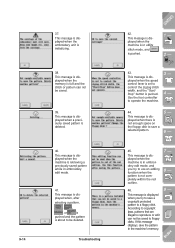
at any time to return to call the screen at left. . Press 2. Find the category for advice about minor sewing problems during sewing. 1. USING THE "TROUBLESHOOTING" FUNCTION Use the troubleshooting key for the problem and press the appropriate key. 7 - 8 - 9 - ?! 9-4 Troubleshooting Index Press * Press to the original screen. CONTENTS 1 - 2 - 3 - 4 - 5 - 6 - 3.
at any time to return to call the screen at left. . Press 2. Find the category for advice about minor sewing problems during sewing. 1. USING THE "TROUBLESHOOTING" FUNCTION Use the troubleshooting key for the problem and press the appropriate key. 7 - 8 - 9 - ?! 9-4 Troubleshooting Index Press * Press to the original screen. CONTENTS 1 - 2 - 3 - 4 - 5 - 6 - 3.
Users Manual - English
Page 300
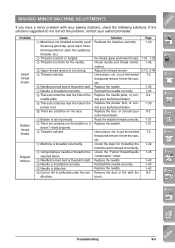
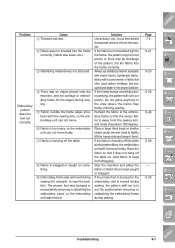
... foot, or con- 1-39 sult your authorized dealer. Reset the bobbin thread correctly. 1-31 Replace the bobbin. 1-31 Use scissors, etc. Reinstall the needle correctly. Troubleshooting 9-5 Index Problem Upper thread breaks Bobbin thread breaks Skipped stitches Cause 1 Machine is not threaded correctly (used the wrong spool cap, spool cap is loose...
... foot, or con- 1-39 sult your authorized dealer. Reset the bobbin thread correctly. 1-31 Replace the bobbin. 1-31 Use scissors, etc. Reinstall the needle correctly. Troubleshooting 9-5 Index Problem Upper thread breaks Bobbin thread breaks Skipped stitches Cause 1 Machine is not threaded correctly (used the wrong spool cap, spool cap is loose...
Users Manual - English
Page 301
... holder 1-42 correctly. Solution Check the steps for attaching the spool cap, then reattach the spool cap. Attach a stabilizer material. 4-8 Adjust the thread tension. 2-13 1 - 2 - 3 - 4 - 5 - 6 - 7 - 8 - 9 - ?! 9-6 Troubleshooting Index
... holder 1-42 correctly. Solution Check the steps for attaching the spool cap, then reattach the spool cap. Attach a stabilizer material. 4-8 Adjust the thread tension. 2-13 1 - 2 - 3 - 4 - 5 - 6 - 7 - 8 - 9 - ?! 9-6 Troubleshooting Index
Users Manual - English
Page 302
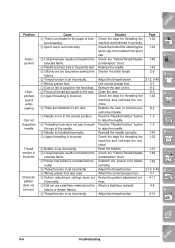
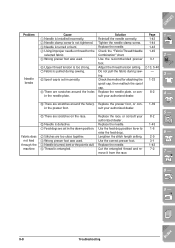
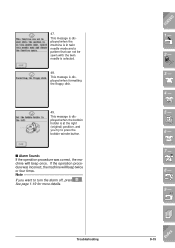
... the frame may be shrinkage of the pattern. Be careful when removing or reattaching the embroidery frame during sewing, the pattern will not turn out. Troubleshooting 9-7 Index See your authorized dealer for example, to keep it does not hang off the table during embroidery, the embroidery unit will not move freely...
... the frame may be shrinkage of the pattern. Be careful when removing or reattaching the embroidery frame during sewing, the pattern will not turn out. Troubleshooting 9-7 Index See your authorized dealer for example, to keep it does not hang off the table during embroidery, the embroidery unit will not move freely...
Users Manual - English
Page 303
... the fabric during sewing. 8 Spool cap is set in the presser foot. Cut the entangled thread and remove it from the race. 1-39 8-2 1-43 1-6 2-9 3-1 1-43 7-2 5 - 6 - 7 - 8 - 9 - ?! 9-8 Troubleshooting Index Use the recommended presser 3-1 foot. Replace the needle plate, or con- 8-2 sult your authorized dealer. 1 - 2 - 3 - 4 - 0 There are scratches on the race. CONTENTS Problem Needle...
... the fabric during sewing. 8 Spool cap is set in the presser foot. Cut the entangled thread and remove it from the race. 1-39 8-2 1-43 1-6 2-9 3-1 1-43 7-2 5 - 6 - 7 - 8 - 9 - ?! 9-8 Troubleshooting Index Use the recommended presser 3-1 foot. Replace the needle plate, or con- 8-2 sult your authorized dealer. 1 - 2 - 3 - 4 - 0 There are scratches on the race. CONTENTS Problem Needle...

Users Manual - English
Page 304
... foot controller, or use the "Start/Stop" button to operate the machine. Remove the foot controller and use the foot controller to operate the machine. Troubleshooting 9-9 Index Push the "Start/Stop" button. Reattach the embroidery unit correctly. Adjust the LCD contrast. If you restart the machine, follow the instructions for embroidery...
... foot controller, or use the "Start/Stop" button to operate the machine. Remove the foot controller and use the foot controller to operate the machine. Troubleshooting 9-9 Index Push the "Start/Stop" button. Reattach the embroidery unit correctly. Adjust the LCD contrast. If you restart the machine, follow the instructions for embroidery...
Users Manual - English
Page 305
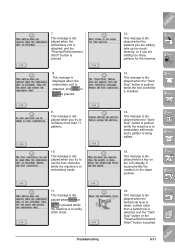
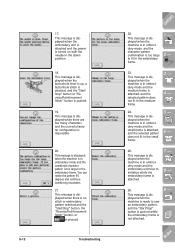
... is dis- This message is touched without rethreading the machine, the thread tension may be wrong or the needle may break and cause injury. 9 - ?! 9-10 Troubleshooting Index If an error message displays, follow the instructions in the message. 1 - ERROR MESSAGES CONTENTS If the machine is not properly set and the "Start...
... is dis- This message is touched without rethreading the machine, the thread tension may be wrong or the needle may break and cause injury. 9 - ?! 9-10 Troubleshooting Index If an error message displays, follow the instructions in the message. 1 - ERROR MESSAGES CONTENTS If the machine is not properly set and the "Start...
Users Manual - English
Page 306
... memory, or if you try to use the foot controller while the machine is displayed when you are editing too many patterns for the memory. Troubleshooting 12. This message is dis- This message is displayed when a key on the LCD display is touched while the needle is in the down , a stitch...
... memory, or if you try to use the foot controller while the machine is displayed when you are editing too many patterns for the memory. Troubleshooting 12. This message is dis- This message is displayed when a key on the LCD display is touched while the needle is in the down , a stitch...
Users Manual - English
Page 307
... degrees and continue combining characters. 21. This message is displayed when there are too many characters and the curved character configuration is not attached. 9 - ?! 9-12 Troubleshooting Index This message is displayed when there is no stitch or embroidery pattern selected and the "Start/Stop" button, the "Reverse/Reinforcement Stitch" button, or...
... degrees and continue combining characters. 21. This message is displayed when there are too many characters and the curved character configuration is not attached. 9 - ?! 9-12 Troubleshooting Index This message is displayed when there is no stitch or embroidery pattern selected and the "Start/Stop" button, the "Reverse/Reinforcement Stitch" button, or...
Users Manual - English
Page 308
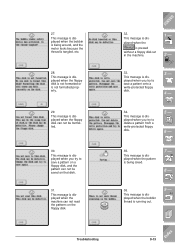
... is displayed when the pattern is displayed when you try to save a pattern onto a write-protected floppy disk. 3 - 4 - 34. This message is tangled, etc. 28. Troubleshooting 32. 27. This message is displayed when the bobbin is being saved. 7 - 8 - 36. This message is displayed when the floppy disk is not formatted or...
... is displayed when the pattern is displayed when you try to save a pattern onto a write-protected floppy disk. 3 - 4 - 34. This message is tangled, etc. 28. Troubleshooting 32. 27. This message is displayed when the bobbin is being saved. 7 - 8 - 36. This message is displayed when the floppy disk is not formatted or...
Users Manual - English
Page 309
.... 45. This message is displayed when the machine is retrieving a previously saved pattern while in utility stitch mode, and is in the machine's memory. 9-14 Troubleshooting Index This message is displayed when the machine is pushed. This message is deleted. 42. This message is displayed when there is pushed. This message...
.... 45. This message is displayed when the machine is retrieving a previously saved pattern while in utility stitch mode, and is in the machine's memory. 9-14 Troubleshooting Index This message is displayed when the machine is pushed. This message is deleted. 42. This message is displayed when there is pushed. This message...
Users Manual - English
Page 310
... be sewn with the twin needle is displayed when formatting the floppy disk. 49. This message is selected. 48. See page 1-19 for more details. Troubleshooting CONTENTS 1 - 2 - 3 - 4 - 5 - 6 - 7 - 8 - 9 - ?! 9-15 Index This message is displayed when the bobbin holder is at the right (original) position, and you want to press the bobbin winder...
... be sewn with the twin needle is displayed when formatting the floppy disk. 49. This message is selected. 48. See page 1-19 for more details. Troubleshooting CONTENTS 1 - 2 - 3 - 4 - 5 - 6 - 7 - 8 - 9 - ?! 9-15 Index This message is displayed when the bobbin holder is at the right (original) position, and you want to press the bobbin winder...

Users Manual - English
Page 311
9-16 Troubleshooting CONTENTS 1 - 2 - 3 - 4 - 5 - 6 - 7 - 8 - 9 - ?! Index
9-16 Troubleshooting CONTENTS 1 - 2 - 3 - 4 - 5 - 6 - 7 - 8 - 9 - ?! Index
Users Manual - English
Page 318
... 1-3 Thread palette key 6-8, 6-13 Thread tension embroidery 5-40 utility stitches 2-13 Thread tension key 1-15, 2-13, 4-14, 5-40, 5-44 Top cover 1-5 Trial key 5-27, 5-44 Troubleshooting 9-1, 9-4, 9-5 Twin needle 2-5 U Uppercase/lowercase 4-6 Upper threading 1-32 Utility decorative stitch patterns 4-5 Utility stitches mirror image 3-11 quick reference table 3-1 selecting 3-9, 3-13 stitch width/length settings...
... 1-3 Thread palette key 6-8, 6-13 Thread tension embroidery 5-40 utility stitches 2-13 Thread tension key 1-15, 2-13, 4-14, 5-40, 5-44 Top cover 1-5 Trial key 5-27, 5-44 Troubleshooting 9-1, 9-4, 9-5 Twin needle 2-5 U Uppercase/lowercase 4-6 Upper threading 1-32 Utility decorative stitch patterns 4-5 Utility stitches mirror image 3-11 quick reference table 3-1 selecting 3-9, 3-13 stitch width/length settings...


