
Startup : Reference Guide
Page 3
... of this product were created using technology from Softfoundry International Pte. Read the following product agreement, which has been provided for this software. Before installing this software, carefully read the following before installing this software Thank you (the end-user) and our company for this product. 2) Use of this product You may install and use this product on only one computer...
... of this product were created using technology from Softfoundry International Pte. Read the following product agreement, which has been provided for this software. Before installing this software, carefully read the following before installing this software Thank you (the end-user) and our company for this product. 2) Use of this product You may install and use this product on only one computer...

Startup : Reference Guide
Page 4
... Only) Responsible Party: Brother International Corporation 200 Crossing Boulevard P.O. could void the user's authority to Part 15 of the FCC Rules. This equipment generates, uses, and can be determined by turning the equipment off and on a circuit different from that the products Product Name: Model Numbers: Brother PE-DESIGN Software Key PE-DESIGN 11 complies with the instructions, may cause undesired operation. Box 6911 Bridgewater, NJ...
... Only) Responsible Party: Brother International Corporation 200 Crossing Boulevard P.O. could void the user's authority to Part 15 of the FCC Rules. This equipment generates, uses, and can be determined by turning the equipment off and on a circuit different from that the products Product Name: Model Numbers: Brother PE-DESIGN Software Key PE-DESIGN 11 complies with the instructions, may cause undesired operation. Box 6911 Bridgewater, NJ...
Startup : Reference Guide
Page 5
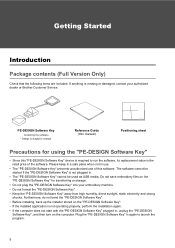
... law. Congratulations on Brother products, related documents and any files on the "PE-DESIGN Software Key". • Do not drop or hit the "PE-DESIGN Software Key". Trademarks Any trade names and product names of sewing attribute settings (thread density, sewing pitch, etc.). For a longer service life • When storing the "PE-DESIGN Software Key", avoid direct sunlight and high humidity locations. SAVE THESE INSTRUCTIONS This product is...
... law. Congratulations on Brother products, related documents and any files on the "PE-DESIGN Software Key". • Do not drop or hit the "PE-DESIGN Software Key". Trademarks Any trade names and product names of sewing attribute settings (thread density, sewing pitch, etc.). For a longer service life • When storing the "PE-DESIGN Software Key", avoid direct sunlight and high humidity locations. SAVE THESE INSTRUCTIONS This product is...
Startup : Reference Guide
Page 10
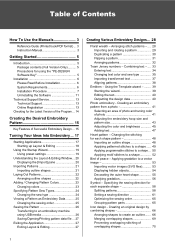
... Applying patterned stitches to a shape ..... 49 Applying programmable stitches to a shape ... 50 Applying motif stitches to an embroidery machine using the "PE-DESIGN Software Key 5 Installation 6 Please Read Before Installation 6 System Requirements 6 Installation Procedure 7 Uninstalling the Software 11 Technical Support/Service 13 Technical Support 13 Online Registration 13 Checking for the Latest Version of the Program... 14 Creating the Desired Embroidery Pattern 15 Key Features of photo 41 Adjusting the embroidery hoop size and pattern size 43 Adjusting...
... Applying patterned stitches to a shape ..... 49 Applying programmable stitches to a shape ... 50 Applying motif stitches to an embroidery machine using the "PE-DESIGN Software Key 5 Installation 6 Please Read Before Installation 6 System Requirements 6 Installation Procedure 7 Uninstalling the Software 11 Technical Support/Service 13 Technical Support 13 Online Registration 13 Checking for the Latest Version of the Program... 14 Creating the Desired Embroidery Pattern 15 Key Features of photo 41 Adjusting the embroidery hoop size and pattern size 43 Adjusting...
Startup : Reference Guide
Page 12
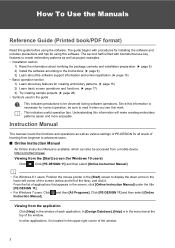
b : This indicates useful operation tips. http://s.brother/cmpaa/ Viewing from the [Start] screen (for correct operation, be sure to be accessed from the application Click [Help] in the upper-right corner of the tiles), and click it. Click [PE-DESIGN 11] and then select [Online Instruction Manual]. From the list of applications that use key features to create embroidery patterns as well as various settings of PE-DESIGN for creating embroidery patterns. (c page...
b : This indicates useful operation tips. http://s.brother/cmpaa/ Viewing from the [Start] screen (for correct operation, be sure to be accessed from the application Click [Help] in the upper-right corner of the tiles), and click it. Click [PE-DESIGN 11] and then select [Online Instruction Manual]. From the list of applications that use key features to create embroidery patterns as well as various settings of PE-DESIGN for creating embroidery patterns. (c page...

Startup : Reference Guide
Page 13
... [PE-DESIGN 11] and click [PDF] and then select [Instruction Manual] or [Reference Guide]. • Adobe® Reader® is not connected to display the down arrow in the lower-left corner of the screen (below and left of applications that appears in the screen, click [Instruction Manual] or [Reference Guide] under the title [PE-DESIGN 11]. - For Windows 10 users: Click [Reference Guide]. . From the list...
... [PE-DESIGN 11] and click [PDF] and then select [Instruction Manual] or [Reference Guide]. • Adobe® Reader® is not connected to display the down arrow in the lower-left corner of the screen (below and left of applications that appears in the screen, click [Instruction Manual] or [Reference Guide] under the title [PE-DESIGN 11]. - For Windows 10 users: Click [Reference Guide]. . From the list...
Startup : Reference Guide
Page 14
... Guide (this manual) Positioning sheet Precautions for transferring or storage. • Do not plug the "PE-DESIGN Software Key" into your authorized dealer or Brother Customer Service. Furthermore, do not bend the "PE-DESIGN Software Key". • Before installing, back up the installer stored on the "PE-DESIGN Software Key". • If the installed application is not operating properly, perform the installation again. • If the computer does not start...
... Guide (this manual) Positioning sheet Precautions for transferring or storage. • Do not plug the "PE-DESIGN Software Key" into your authorized dealer or Brother Customer Service. Furthermore, do not bend the "PE-DESIGN Software Key". • Before installing, back up the installer stored on the "PE-DESIGN Software Key". • If the installed application is not operating properly, perform the installation again. • If the computer does not start...
Startup : Reference Guide
Page 15
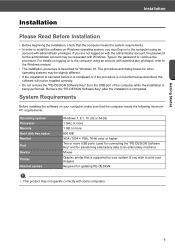
... not remove the "PE-DESIGN Software Key" from the USB port of the computer while the installation is supported by your system (if you wish to print your computer, make sure that the computer meets the system requirements. • In order to install the software on Windows operating system, you are not logged on with the administrator account, the password for updating PE-DESIGN a •...
... not remove the "PE-DESIGN Software Key" from the USB port of the computer while the installation is supported by your system (if you wish to print your computer, make sure that the computer meets the system requirements. • In order to install the software on Windows operating system, you are not logged on with the administrator account, the password for updating PE-DESIGN a •...
Startup : Reference Guide
Page 16
... list. * For Windows 8.1, move the pointer over the lower-left corner of the screen to show , and rightclick . The [Run] dialog box appears. 2) Type in the full path to the installer, and then click [OK] to start up the installer onto your computer. 1) Create a backup folder on the computer. 2) Copy the entire [PE-DESIGN 11] folder from the "PE-DESIGN Software...
... list. * For Windows 8.1, move the pointer over the lower-left corner of the screen to show , and rightclick . The [Run] dialog box appears. 2) Type in the full path to the installer, and then click [OK] to start up the installer onto your computer. 1) Create a backup folder on the computer. 2) Copy the entire [PE-DESIGN 11] folder from the "PE-DESIGN Software...
Startup : Reference Guide
Page 17
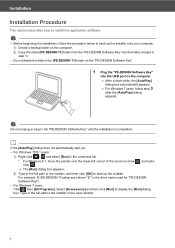
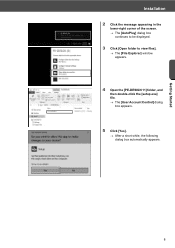
Getting Started Installation 2 Click the message appearing in the lower-right corner of the screen. The [AutoPlay] dialog box continues to be displayed. 3 Click [Open folder to view files]. The [File Explorer] window appears. 4 Open the [PE-DESIGN 11] folder, and then double-click the [setup.exe] file. The [User Account Control] dialog box appears. 5 Click [Yes]. After a short while, the following dialog box automatically appears. 8
Getting Started Installation 2 Click the message appearing in the lower-right corner of the screen. The [AutoPlay] dialog box continues to be displayed. 3 Click [Open folder to view files]. The [File Explorer] window appears. 4 Open the [PE-DESIGN 11] folder, and then double-click the [setup.exe] file. The [User Account Control] dialog box appears. 5 Click [Yes]. After a short while, the following dialog box automatically appears. 8
Startup : Reference Guide
Page 21
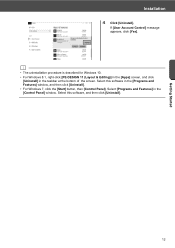
... 8.1, right-click [PE-DESIGN 11 (Layout & Editing)] in the [Apps] screen, and click [Uninstall] in the [Control Panel] window. Select this software in the [Programs and Features] window, and then click [Uninstall]. • For Windows 7, click the [Start] button, then [Control Panel]. Select this software, and then click [Uninstall]. 12 If [User Account Control] message appears, click [Yes]. Getting Started Installation 4 Click [Uninstall...
... 8.1, right-click [PE-DESIGN 11 (Layout & Editing)] in the [Apps] screen, and click [Uninstall] in the [Control Panel] window. Select this software in the [Programs and Features] window, and then click [Uninstall]. • For Windows 7, click the [Start] button, then [Control Panel]. Select this software, and then click [Uninstall]. 12 If [User Account Control] message appears, click [Yes]. Getting Started Installation 4 Click [Uninstall...
Startup : Reference Guide
Page 22
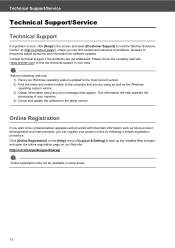
... for software updates. a Before contacting web site: 1) Have your Windows operating system updated to the most current version. 2) Find the make and model number of [Layout & Editing] to the latest version. Technical Support/Service Technical Support/Service Technical Support If a problem occurs, click [Help] in the screen and select [Customer Support] to visit the "Brother Solutions Center" at (http://s.brother/cppab/), where you can register your product online...
... for software updates. a Before contacting web site: 1) Have your Windows operating system updated to the most current version. 2) Find the make and model number of [Layout & Editing] to the latest version. Technical Support/Service Technical Support/Service Technical Support If a problem occurs, click [Help] in the screen and select [Customer Support] to visit the "Brother Solutions Center" at (http://s.brother/cppab/), where you can register your product online...
Startup : Reference Guide
Page 27
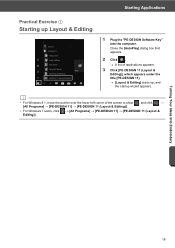
...] → [PE-DESIGN 11] → [PE-DESIGN 11 (Layout & Editing)]. • For Windows 7 users, click Editing)]. [All Programs] [PE-DESIGN 11] [PE-DESIGN 11 (Layout & Turning Your Ideas Into Embroidery 18 b • For Windows 8.1, move the pointer over the lower-left corner of applications appears. 3 Click [PE-DESIGN 11 (Layout & Editing)], which appears under the title [PE-DESIGN 11]. [Layout & Editing] starts up Layout & Editing 1 Plug the "PE-DESIGN Software Key...
...] → [PE-DESIGN 11] → [PE-DESIGN 11 (Layout & Editing)]. • For Windows 7 users, click Editing)]. [All Programs] [PE-DESIGN 11] [PE-DESIGN 11 (Layout & Turning Your Ideas Into Embroidery 18 b • For Windows 8.1, move the pointer over the lower-left corner of applications appears. 3 Click [PE-DESIGN 11 (Layout & Editing)], which appears under the title [PE-DESIGN 11]. [Layout & Editing] starts up Layout & Editing 1 Plug the "PE-DESIGN Software Key...
Startup : Reference Guide
Page 33
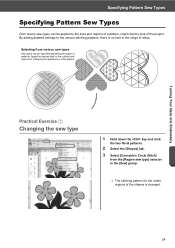
... the [Region sew type] selector in the [Sew] group. The stitching pattern for changing the appearance of the pattern. Turning Your Ideas Into Embroidery Practical Exercise g Changing the sew type 1 Hold down the key and click the two floral patterns. 2 Select the [Shapes] tab. 3 Select [Concentric Circle Stitch] from various sew types Sew types can be specified depending the types of patterns. Specifying Pattern Sew Types Specifying Pattern Sew Types Over twenty sew types can be...
... the [Region sew type] selector in the [Sew] group. The stitching pattern for changing the appearance of the pattern. Turning Your Ideas Into Embroidery Practical Exercise g Changing the sew type 1 Hold down the key and click the two floral patterns. 2 Select the [Shapes] tab. 3 Select [Concentric Circle Stitch] from various sew types Sew types can be specified depending the types of patterns. Specifying Pattern Sew Types Specifying Pattern Sew Types Over twenty sew types can be...
Startup : Reference Guide
Page 37
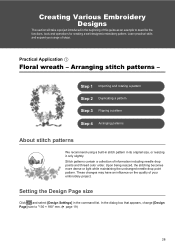
Stitch patterns contain a collection of information including needle drop points and thread color order. In the dialog box that appears, change [Design Page] size to describe the functions, tools and operations for creating a well-designed embroidery pattern. Step 1 Importing and rotating a pattern Step 2 Duplicating a pattern Step 3 Flipping a pattern Step 4 Arranging patterns About stitch patterns We recommend using a built-in stitch pattern in the command list. Arranging stitch patterns - Setting the Design Page size Click and select [Design Settings] in its...
Stitch patterns contain a collection of information including needle drop points and thread color order. In the dialog box that appears, change [Design Page] size to describe the functions, tools and operations for creating a well-designed embroidery pattern. Step 1 Importing and rotating a pattern Step 2 Duplicating a pattern Step 3 Flipping a pattern Step 4 Arranging patterns About stitch patterns We recommend using a built-in stitch pattern in the command list. Arranging stitch patterns - Setting the Design Page size Click and select [Design Settings] in its...

Startup : Reference Guide
Page 51
... embroidery pattern from the right, and then click [OK]. 42 Creating Various Embroidery Designs For this example, increase the saturation by dragging the saturation slider to the third setting from a photo - 2 Select [shh_gesture.jpg] that is located at Documents (My documents)\PE-DESIGN 11\Sample\ Layout & Editing\Photo Stitch, and then click [Open]. The selected photo appears in the [Design...
... embroidery pattern from the right, and then click [OK]. 42 Creating Various Embroidery Designs For this example, increase the saturation by dragging the saturation slider to the third setting from a photo - 2 Select [shh_gesture.jpg] that is located at Documents (My documents)\PE-DESIGN 11\Sample\ Layout & Editing\Photo Stitch, and then click [Open]. The selected photo appears in the [Design...
Startup : Reference Guide
Page 61
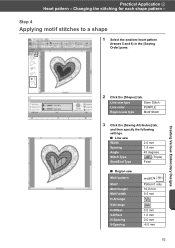
... Region sew type Motif Stitch 3 Click the [Sewing Attributes] tab, and then specify the following settings. ■ Line sew Width 2.0 mm Spacing 1.5 mm Angle 45 degrees Stitch Type (Triple) Start/End Type Feed ■ Region sew Motif pattern Motif Motif height Motif width H-Arrange V-Arrange H-Offset V-Offset H-Spacing V-Spacing motif074 Pattern1 only 10.0 mm 9.5 mm 0.0 mm 1.0 mm 0.0 mm -6.0 mm 52 Creating Various Embroidery Designs 2 Click...
... Region sew type Motif Stitch 3 Click the [Sewing Attributes] tab, and then specify the following settings. ■ Line sew Width 2.0 mm Spacing 1.5 mm Angle 45 degrees Stitch Type (Triple) Start/End Type Feed ■ Region sew Motif pattern Motif Motif height Motif width H-Arrange V-Arrange H-Offset V-Offset H-Spacing V-Spacing motif074 Pattern1 only 10.0 mm 9.5 mm 0.0 mm 1.0 mm 0.0 mm -6.0 mm 52 Creating Various Embroidery Designs 2 Click...
Startup : Reference Guide
Page 67
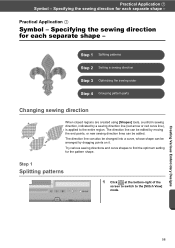
... sewing direction for each separate shape - Creating Various Embroidery Designs 58 Practical Application g Symbol - Step 1 Splitting patterns Step 2 Setting a sewing direction Step 3 Optimizing the sewing order Step 4 Grouping pattern parts Changing sewing direction When closed regions are created using [Shapes] tools, a uniform sewing direction, indicated by dragging points on it. Try various sewing directions and curve shapes to find the optimum setting for each separate shape - Specifying the sewing direction for the pattern...
... sewing direction for each separate shape - Creating Various Embroidery Designs 58 Practical Application g Symbol - Step 1 Splitting patterns Step 2 Setting a sewing direction Step 3 Optimizing the sewing order Step 4 Grouping pattern parts Changing sewing direction When closed regions are created using [Shapes] tools, a uniform sewing direction, indicated by dragging points on it. Try various sewing directions and curve shapes to find the optimum setting for each separate shape - Specifying the sewing direction for the pattern...
Installation Guide for the upgrade version package Model: SAVRPED11 / UGKPED11
Page 1
... of embroidery designs and supports a wider range of sewing attribute settings (thread density, sewing pitch, etc.). For safe operation • Do not save any other liquids on the final material. Do not store the "PE-DESIGN Software Key" close to a heater, iron or other hot objects. • Do not spill water or other materials are included. Notice Neither this Installation Guide nor the Instruction Manual...
... of embroidery designs and supports a wider range of sewing attribute settings (thread density, sewing pitch, etc.). For safe operation • Do not save any other liquids on the final material. Do not store the "PE-DESIGN Software Key" close to a heater, iron or other hot objects. • Do not spill water or other materials are included. Notice Neither this Installation Guide nor the Instruction Manual...

Installation Guide for the upgrade version package Model: SAVRPED11 / UGKPED11
Page 2
... remove the "PE-DESIGN Software Key" from the USB port of the screen, and click it. click [PE-DESIGN 11 (Layout & Editing)]. For details on logging on the UPGRADE CARD. If you are planning to continue using an account with administrator privileges. Click [PE-DESIGN 11] and then right- Select [Run as administrator] in the password to the Windows manual. • The installation procedure is checked, the Online Instruction Manual...
... remove the "PE-DESIGN Software Key" from the USB port of the screen, and click it. click [PE-DESIGN 11 (Layout & Editing)]. For details on logging on the UPGRADE CARD. If you are planning to continue using an account with administrator privileges. Click [PE-DESIGN 11] and then right- Select [Run as administrator] in the password to the Windows manual. • The installation procedure is checked, the Online Instruction Manual...


