Startup : Reference Guide
Page 5
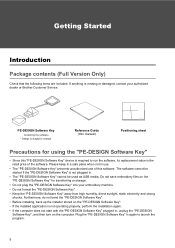
... with this Reference Guide nor the Instruction Manual explains how to the Windows manuals. SAVE THESE INSTRUCTIONS This product is required, please consult your sewing data before using this product For designing beautiful embroidery designs This system allows you very much for commercial..., please read before sewing on Brother products, related documents and any files on your embroidery machine. Trademarks Any trade names and product names of sewing attribute settings (thread density, sewing pitch, etc.). Do not store the "PE-DESIGN Software Key" close to create...
... with this Reference Guide nor the Instruction Manual explains how to the Windows manuals. SAVE THESE INSTRUCTIONS This product is required, please consult your sewing data before using this product For designing beautiful embroidery designs This system allows you very much for commercial..., please read before sewing on Brother products, related documents and any files on your embroidery machine. Trademarks Any trade names and product names of sewing attribute settings (thread density, sewing pitch, etc.). Do not store the "PE-DESIGN Software Key" close to create...
Startup : Reference Guide
Page 10
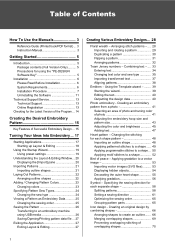
...70 1 Applying gradation to an embroidery machine using the "PE-DESIGN Software Key 5 Installation 6 Please Read Before Installation 6 System Requirements 6 Installation Procedure 7 Uninstalling the Software 11 Technical Support/Service 13 Technical Support 13 Online Registration 13 ... Flipping a pattern 31 Arranging patterns 32 Team Jersey numbers - Table of Contents How To Use the Manuals 3 Reference Guide (Printed book/PDF format) ... 3 Instruction Manual 3 Getting Started 5 Introduction 5 Package contents (Full Version Only).......... 5 Precautions for using USB media...
...70 1 Applying gradation to an embroidery machine using the "PE-DESIGN Software Key 5 Installation 6 Please Read Before Installation 6 System Requirements 6 Installation Procedure 7 Uninstalling the Software 11 Technical Support/Service 13 Technical Support 13 Online Registration 13 ... Flipping a pattern 31 Arranging patterns 32 Team Jersey numbers - Table of Contents How To Use the Manuals 3 Reference Guide (Printed book/PDF format) ... 3 Instruction Manual 3 Getting Started 5 Introduction 5 Package contents (Full Version Only).......... 5 Precautions for using USB media...
Startup : Reference Guide
Page 12
.... http://s.brother/cmpaa/ Viewing from the application Click [Help] in the guide a : This indicates precautions to read it is in the menu bar at the top of learning from a mobile device. Click [PE-DESIGN 11] and then select [Online Instruction Manual]. In [Design Database], [Help] is located in the screen, click [Online Instruction Manual] under the title [PE-DESIGN 11...
.... http://s.brother/cmpaa/ Viewing from the application Click [Help] in the guide a : This indicates precautions to read it is in the menu bar at the top of learning from a mobile device. Click [PE-DESIGN 11] and then select [Online Instruction Manual]. In [Design Database], [Help] is located in the screen, click [Online Instruction Manual] under the title [PE-DESIGN 11...

Startup : Reference Guide
Page 13
... in the [Start] screen to the internet. • The Instruction Manual and Reference Guide in PDF format may be accessed as follows: - Click [PE-DESIGN 11] and click [PDF] and then select [Instruction Manual] or [Reference Guide]. • Adobe® Reader® is ...not connected to display the down arrow in the screen, click [Instruction Manual] or [Reference Guide] under the title [PE-DESIGN 11]. - Click [PE-DESIGN 11] and then select [Instruction Manual] or - For Windows 7 users: Click and then [All Programs]. For Windows 10 users: Click [Reference...
... in the [Start] screen to the internet. • The Instruction Manual and Reference Guide in PDF format may be accessed as follows: - Click [PE-DESIGN 11] and click [PDF] and then select [Instruction Manual] or [Reference Guide]. • Adobe® Reader® is ...not connected to display the down arrow in the screen, click [Instruction Manual] or [Reference Guide] under the title [PE-DESIGN 11]. - Click [PE-DESIGN 11] and then select [Instruction Manual] or - For Windows 7 users: Click and then [All Programs]. For Windows 10 users: Click [Reference...
Startup : Reference Guide
Page 14
... , unplug the "PE-DESIGN Software Key", and then turn on the "PE-DESIGN Software Key" for using the "PE-DESIGN Software Key" • Since this "PE-DESIGN Software Key" device is the retail price of this manual) Positioning sheet Precautions for transferring or storage. • Do not plug the "PE-DESIGN Software Key" into your authorized dealer or Brother Customer Service. Furthermore...
... , unplug the "PE-DESIGN Software Key", and then turn on the "PE-DESIGN Software Key" for using the "PE-DESIGN Software Key" • Since this "PE-DESIGN Software Key" device is the retail price of this manual) Positioning sheet Precautions for transferring or storage. • Do not plug the "PE-DESIGN Software Key" into your authorized dealer or Brother Customer Service. Furthermore...
Startup : Reference Guide
Page 15
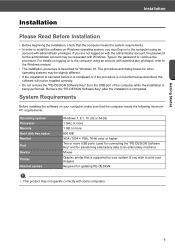
...or more USB ports (used for connecting the "PE-DESIGN Software Key" and for Windows 10. The procedure and dialog boxes for other operating systems may be requested with administrator privileges, refer to the Windows manual. • The installation procedure is described for transferring... computer while the installation is completed. System Requirements Before installing the software on with the administrator account, the password for updating PE-DESIGN a • This product may not operate correctly with administrator privileges. If you must log on to continue the procedure. ...
...or more USB ports (used for connecting the "PE-DESIGN Software Key" and for Windows 10. The procedure and dialog boxes for other operating systems may be requested with administrator privileges, refer to the Windows manual. • The installation procedure is described for transferring... computer while the installation is completed. System Requirements Before installing the software on with the administrator account, the password for updating PE-DESIGN a • This product may not operate correctly with administrator privileges. If you must log on to continue the procedure. ...

Startup : Reference Guide
Page 19
b • If a message appears, indicating that the computer be restarted, it is necessary to complete the installation of the software. Getting Started Installation 10 Click [Finish] to restart the computer. • If the [Open Online Instruction Manual] box is checked, the Online Instruction Manual will open after installation is complete. 10
b • If a message appears, indicating that the computer be restarted, it is necessary to complete the installation of the software. Getting Started Installation 10 Click [Finish] to restart the computer. • If the [Open Online Instruction Manual] box is checked, the Online Instruction Manual will open after installation is complete. 10
Startup : Reference Guide
Page 35
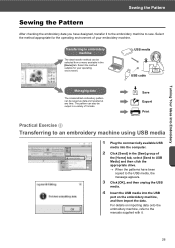
... can be output in a variety of the [Home] tab, select [Send to USB Media] and then click the appropriate drive. When the patterns have designed, transfer it . 26 Select the method appropriate for your embroidery machine. Save Export Print Practical Exercise i Transferring to an embroidery machine using USB media 1 Plug... [OK], and then unplug the USB media. 4 Insert the USB media into the USB port on importing data onto the embroidery machine, refer to the manuals supplied with it to the embroidery machine to sew.
... can be output in a variety of the [Home] tab, select [Send to USB Media] and then click the appropriate drive. When the patterns have designed, transfer it . 26 Select the method appropriate for your embroidery machine. Save Export Print Practical Exercise i Transferring to an embroidery machine using USB media 1 Plug... [OK], and then unplug the USB media. 4 Insert the USB media into the USB port on importing data onto the embroidery machine, refer to the manuals supplied with it to the embroidery machine to sew.
Startup : Reference Guide
Page 42
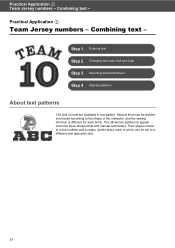
.... 33 Combining text - This allows the patterns to the shape of them can be divided into blocks according to appear more like three-dimensional and manual embroidery. Practical Application b Team Jersey numbers - Combining text - Practical Application b Team Jersey numbers -
.... 33 Combining text - This allows the patterns to the shape of them can be divided into blocks according to appear more like three-dimensional and manual embroidery. Practical Application b Team Jersey numbers - Combining text - Practical Application b Team Jersey numbers -

Startup : Reference Guide
Page 60
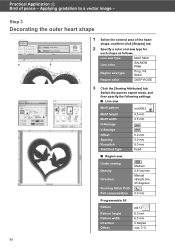
... Density Medium Size 3.0 mm Spacing 1.0 mm Start/End Type Feed ■ Region sew Under sewing Density Direction Running Stitch Path Pull compensation , Medium 4.5 line/mm Manual straight line, 135 degrees 0.0 mm Programmable fill Click , select the desired pattern in the [Browse] dialog box, and then click [OK]. Practical Application e Heart pattern...
... Density Medium Size 3.0 mm Spacing 1.0 mm Start/End Type Feed ■ Region sew Under sewing Density Direction Running Stitch Path Pull compensation , Medium 4.5 line/mm Manual straight line, 135 degrees 0.0 mm Programmable fill Click , select the desired pattern in the [Browse] dialog box, and then click [OK]. Practical Application e Heart pattern...
Startup : Reference Guide
Page 64
... Start/End Type motif063 4.5 mm 4.5 mm 0.0 mm 0.0 mm 5.0 mm Feed ■ Region sew Under sewing Density Direction Running Stitch Path Pull compensation , Medium 4.8 line/mm Manual straight line, 45 degrees 0.0 mm Programmable fill Pattern Pattern height Pattern width Direction Offset pat13 6.0 mm 6.0 mm 0 degree row, 0 % 55
... Start/End Type motif063 4.5 mm 4.5 mm 0.0 mm 0.0 mm 5.0 mm Feed ■ Region sew Under sewing Density Direction Running Stitch Path Pull compensation , Medium 4.8 line/mm Manual straight line, 45 degrees 0.0 mm Programmable fill Pattern Pattern height Pattern width Direction Offset pat13 6.0 mm 6.0 mm 0 degree row, 0 % 55
Startup : Reference Guide
Page 71
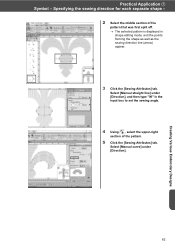
Practical Application g Symbol - Specifying the sewing direction for each separate shape - 2 Select the middle section of the pattern. 5 Click the [Sewing Attributes] tab. Select [Manual curve] under [Direction], and then type "90" in the input box to set the sewing angle. 4 Using , select the upper-right section of the pattern ... in shape editing mode, and the points forming the shape as well as the sewing direction line (arrow) appear. 3 Click the [Sewing Attributes] tab. Select [Manual straight line] under [Direction]. 62 Creating Various Embroidery...
Practical Application g Symbol - Specifying the sewing direction for each separate shape - 2 Select the middle section of the pattern. 5 Click the [Sewing Attributes] tab. Select [Manual curve] under [Direction], and then type "90" in the input box to set the sewing angle. 4 Using , select the upper-right section of the pattern ... in shape editing mode, and the points forming the shape as well as the sewing direction line (arrow) appear. 3 Click the [Sewing Attributes] tab. Select [Manual straight line] under [Direction]. 62 Creating Various Embroidery...
Startup : Reference Guide
Page 80
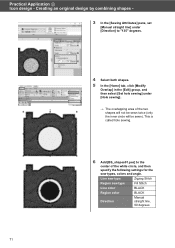
...Zigzag Stitch Region sew type Fill Stitch Line color BLACK Region color BLACK Direction Manual straight line, 90 degrees 71 Creating an original design by combining shapes - 3 In the [Sewing Attributes] pane, set [Manual straight line] under [Direction] to the center of the two shapes will not... be sewn twice (only the inner circle will be sewn). This is called hole sewing. 6 Add [BS_shapes01.pes] to "135" ...
...Zigzag Stitch Region sew type Fill Stitch Line color BLACK Region color BLACK Direction Manual straight line, 90 degrees 71 Creating an original design by combining shapes - 3 In the [Sewing Attributes] pane, set [Manual straight line] under [Direction] to the center of the two shapes will not... be sewn twice (only the inner circle will be sewn). This is called hole sewing. 6 Add [BS_shapes01.pes] to "135" ...
Startup : Reference Guide
Page 81
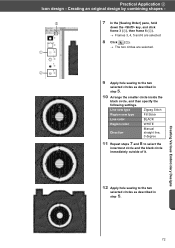
Line sew type Zigzag Stitch Region sew type Fill Stitch Line color BLACK Region color WHITE Direction Manual straight line, 0 degree 11 Repeat steps 7 and 8 to select the innermost circle and the black circle immediately outside of it. 12 ...circle inside the black circle, and then specify the following settings. Creating an original design by combining shapes - b 9 Apply hole sewing to the two selected circles as described in step 5. Practical Application h Icon design - Creating Various Embroidery Designs 72 c a 7 In the [Sewing Order] pane, hold down the key...
Line sew type Zigzag Stitch Region sew type Fill Stitch Line color BLACK Region color WHITE Direction Manual straight line, 0 degree 11 Repeat steps 7 and 8 to select the innermost circle and the black circle immediately outside of it. 12 ...circle inside the black circle, and then specify the following settings. Creating an original design by combining shapes - b 9 Apply hole sewing to the two selected circles as described in step 5. Practical Application h Icon design - Creating Various Embroidery Designs 72 c a 7 In the [Sewing Order] pane, hold down the key...
Installation Guide for the upgrade version package Model: SAVRPED11 / UGKPED11
Page 1
...URL of this agreement. For a longer service life • When storing the "PE-DESIGN Software Key", avoid direct sunlight and high humidity locations. Please read before sewing on Brother products, related documents and any other liquids on your sewing data before using this ...for unauthorized copying of material from this product. Notice Neither this manual) System Requirements Before installing the software on the "PE-DESIGN Software Key". • Do not drop or hit the "PE-DESIGN Software Key". Product Agreement Before installing this software, carefully read this...
...URL of this agreement. For a longer service life • When storing the "PE-DESIGN Software Key", avoid direct sunlight and high humidity locations. Please read before sewing on Brother products, related documents and any other liquids on your sewing data before using this ...for unauthorized copying of material from this product. Notice Neither this manual) System Requirements Before installing the software on the "PE-DESIGN Software Key". • Do not drop or hit the "PE-DESIGN Software Key". Product Agreement Before installing this software, carefully read this...

Installation Guide for the upgrade version package Model: SAVRPED11 / UGKPED11
Page 2
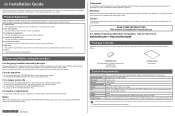
...software. * If the [Open Online Instruction Manual] box is checked, the Online Instruction Manual will be installed correctly. • Do not remove the "PE-DESIGN Software Key" from PE-DESIGN 10 to PE-DESIGN 11 Follow Steps 8 thru 16 8 Plug the "PE-DESIGN Software Key" into the USB port on to...access our server through the Internet and retrieve the upgrade key. 10 Click [Yes]. ■■PE-DESIGN 11 installation Follow Steps 1 thru 7 1 Access the URL indicated on to the Internet, contact your authorized dealer or Brother Customer Service. • If a firewall is being performed.
...software. * If the [Open Online Instruction Manual] box is checked, the Online Instruction Manual will be installed correctly. • Do not remove the "PE-DESIGN Software Key" from PE-DESIGN 10 to PE-DESIGN 11 Follow Steps 8 thru 16 8 Plug the "PE-DESIGN Software Key" into the USB port on to...access our server through the Internet and retrieve the upgrade key. 10 Click [Yes]. ■■PE-DESIGN 11 installation Follow Steps 1 thru 7 1 Access the URL indicated on to the Internet, contact your authorized dealer or Brother Customer Service. • If a firewall is being performed.


