Aspire 2420, 2920, 2920Z Service Guide
Page 8
... Message 111 Intermittent Problems 115 Undetermined Problems 116 Jumper and Connector Locations 117 Top View 117 Bottom View 118 Clearing Password Check and BIOS Recovery 119 Clearing Password Check 119 BIOS Recovery by Crisis Disk 120 FRU (Field Replaceable Unit) List 121 Aspire 2920/2920Z/2420 Exploded Diagram 122 Aspire 2920/2920Z/2420 Series 130 VIII
... Message 111 Intermittent Problems 115 Undetermined Problems 116 Jumper and Connector Locations 117 Top View 117 Bottom View 118 Clearing Password Check and BIOS Recovery 119 Clearing Password Check 119 BIOS Recovery by Crisis Disk 120 FRU (Field Replaceable Unit) List 121 Aspire 2920/2920Z/2420 Exploded Diagram 122 Aspire 2920/2920Z/2420 Series 130 VIII
Aspire 2420, 2920, 2920Z Service Guide
Page 33
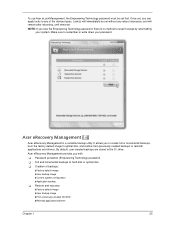
... Technology password) K Full and incremental backups to optical disc, and restore from previously created backups or reinstall applications and drivers. Acer eRecovery Management provides you to create full or incremental backups, burn the factory default image to hard disk or optical disc K...password must be set without any of backups: jFactory default image jUser backup image jCurrent system configuration jApplication backup K Restore and recovery: jFactory default image jUser backup image jFrom previously-created CD/DVD jReinstall applications/drivers Chapter 1 23 NOTE: If you can ...
... Technology password) K Full and incremental backups to optical disc, and restore from previously created backups or reinstall applications and drivers. Acer eRecovery Management provides you to create full or incremental backups, burn the factory default image to hard disk or optical disc K...password must be set without any of backups: jFactory default image jUser backup image jCurrent system configuration jApplication backup K Restore and recovery: jFactory default image jUser backup image jFrom previously-created CD/DVD jReinstall applications/drivers Chapter 1 23 NOTE: If you can ...
Aspire 2420, 2920, 2920Z Service Guide
Page 34
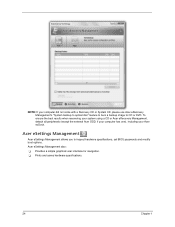
... 1 To ensure the best results when recovering your system using a CD or Acer eRecovery Management, detach all peripherals (except the external Acer ODD, if your computer has one), including your computer did not come with a Recovery CD or System CD, please use Acer eRecovery Management's "System backup to optical disc" feature to burn a backup...
... 1 To ensure the best results when recovering your system using a CD or Acer eRecovery Management, detach all peripherals (except the external Acer ODD, if your computer has one), including your computer did not come with a Recovery CD or System CD, please use Acer eRecovery Management's "System backup to optical disc" feature to burn a backup...

Aspire 2420, 2920, 2920Z Service Guide
Page 52
Quiet Boot: Network Boot: F12 Boot Menu: D2D Recovery: SATA Mode: [Enabled] [Enabled] [Disabled] [Enabled] [AHCI Mode] F1 Help Esc Exit Select Item -/+ Change Values F9 Setup Defaults Select Menu Enter Select Sub-Menu .... 42 Chapter 2 Main The Main screen allows the user to set the system time and date as well as enable and disable boot option and recovery. Information Phoenix TrustedCore(tm) Setup Utility Main Security Boot Exit System Time: System Date: System Memory: Extended Memory: Video Memory: [10:10:10] [10/26...
Quiet Boot: Network Boot: F12 Boot Menu: D2D Recovery: SATA Mode: [Enabled] [Enabled] [Disabled] [Enabled] [AHCI Mode] F1 Help Esc Exit Select Item -/+ Change Values F9 Setup Defaults Select Menu Enter Select Sub-Menu .... 42 Chapter 2 Main The Main screen allows the user to set the system time and date as well as enable and disable boot option and recovery. Information Phoenix TrustedCore(tm) Setup Utility Main Security Boot Exit System Time: System Date: System Memory: Extended Memory: Video Memory: [10:10:10] [10/26...

Aspire 2420, 2920, 2920Z Service Guide
Page 53
...LAN (remote server). Parameter System Time System Date System Memory Extended Memory VGA Memory Quiet Boot Network Boot F12 Boot Menu D2D Recovery SATA Mode Description Format/Option Sets the system time. VGA Memory size=128/256 MB Determines if Customer Logo will not be ...displayed or not; Option: Disabled or Enabled Enables, disables D2D Recovery function. shows Summary Screen is not allowed to disable or auto. The hours are the default and suggested parameter settings. Extended Memory size...
...LAN (remote server). Parameter System Time System Date System Memory Extended Memory VGA Memory Quiet Boot Network Boot F12 Boot Menu D2D Recovery SATA Mode Description Format/Option Sets the system time. VGA Memory size=128/256 MB Determines if Customer Logo will not be ...displayed or not; Option: Disabled or Enabled Enables, disables D2D Recovery function. shows Summary Screen is not allowed to disable or auto. The hours are the default and suggested parameter settings. Extended Memory size...

Aspire 2420, 2920, 2920Z Service Guide
Page 60
BIOS Flash Utility The BIOS flash memory update is not completely loaded. NOTE: If you do not have a crisis recovery diskette at hand, then you should create a Crisis Recovery Diskette before you use the Phlash utility. The flash utility has auto-execution function. 50 Chapter 2 If the battery pack does not contain enough...
BIOS Flash Utility The BIOS flash memory update is not completely loaded. NOTE: If you do not have a crisis recovery diskette at hand, then you should create a Crisis Recovery Diskette before you use the Phlash utility. The flash utility has auto-execution function. 50 Chapter 2 If the battery pack does not contain enough...
Aspire 2420, 2920, 2920Z Service Guide
Page 117
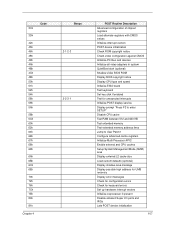
... Setup System Management Mode (SMM) area Display external L2 cache size Load custom defaults (optional) Display shadow-area message Display possible high address for UMB recovery Display error messages Check for configuration errors Check for keyboard errors Set up hardware interrupt vectors Initialize coprocessor if present Disable onboard Super I/O ports and...
... Setup System Management Mode (SMM) area Display external L2 cache size Load custom defaults (optional) Display shadow-area message Display possible high address for UMB recovery Display error messages Check for configuration errors Check for keyboard errors Set up hardware interrupt vectors Initialize coprocessor if present Disable onboard Super I/O ports and...

Aspire 2420, 2920, 2920Z Service Guide
Page 119
... Force check (optional) Extended checksum (optional) Unknown interrupt Initialize the chipset Initialize the bridge Initialize the CPU Initialize the system timer Initialize system I/O Check force recovery boot Checksum BIOS ROM Go to BIOS Set Huge Segment Initialize Multi Processor Initialize OEM special code Initialize PIC and DMA Initialize Memory type Initialize...
... Force check (optional) Extended checksum (optional) Unknown interrupt Initialize the chipset Initialize the bridge Initialize the CPU Initialize the system timer Initialize system I/O Check force recovery boot Checksum BIOS ROM Go to BIOS Set Huge Segment Initialize Multi Processor Initialize OEM special code Initialize PIC and DMA Initialize Memory type Initialize...
Aspire 2420, 2920, 2920Z Service Guide
Page 129
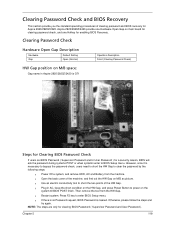
...BIOS POST finish. Clearing Password Check and BIOS Recovery This section provide you the standard operating procedures of clearing password and BIOS recovery for clearing BIOS Password ( Supervisor Password and User Password ). NOTE: The steps are only for Aspire 2920/2920Z/2420. Press F2 key to power ...on the HW Gap, and press Power Button to enter BIOS Setup menu. q Plug in Aspire 2920/2920Z/2420 is cleared...
...BIOS POST finish. Clearing Password Check and BIOS Recovery This section provide you the standard operating procedures of clearing password and BIOS recovery for clearing BIOS Password ( Supervisor Password and User Password ). NOTE: The steps are only for Aspire 2920/2920Z/2420. Press F2 key to power ...on the HW Gap, and press Power Button to enter BIOS Setup menu. q Plug in Aspire 2920/2920Z/2420 is cleared...

Aspire 2420, 2920, 2920Z Service Guide
Page 130
...to a successful one Crisis Disk should be powered on with minimum BIOS initialization. Users can update the latest version BIOS for enable BIOS Recovery process when system is strongly recommended to enter a special BIOS block, called Boot Block. The Crisis Disk could be prepared ready in another...Chapter 5 Insert the Crisis Disk to a USB floppy drive which is finished, the system should be made by Crisis Disk BIOS Recovery Boot Block: BIOS Recovery Boot Block is finished, the system will force the BIOS to have the AC adapter and Battery present. If this function, it ...
...to a successful one Crisis Disk should be powered on with minimum BIOS initialization. Users can update the latest version BIOS for enable BIOS Recovery process when system is strongly recommended to enter a special BIOS block, called Boot Block. The Crisis Disk could be prepared ready in another...Chapter 5 Insert the Crisis Disk to a USB floppy drive which is finished, the system should be made by Crisis Disk BIOS Recovery Boot Block: BIOS Recovery Boot Block is finished, the system will force the BIOS to have the AC adapter and Battery present. If this function, it ...
Aspire 2420, 2920, 2920Z User's Guide - EN
Page 15
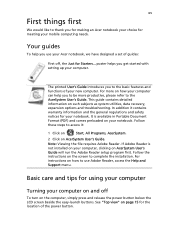
...on the screen to complete the installation. Note: Viewing the file requires Adobe Reader. For instructions on such subjects as system utilities, data recovery, expansion options and troubleshooting. See "Top view" on AcerSystem User's Guide will run the Adobe Reader setup program first. The printed User's...notebook. Follow the instructions on AcerSystem User's Guide. xv First things first We would like to thank you for making an Acer notebook your choice for meeting your computer. poster helps you get started with setting up your mobile computing needs. Follow these ...
...on the screen to complete the installation. Note: Viewing the file requires Adobe Reader. For instructions on such subjects as system utilities, data recovery, expansion options and troubleshooting. See "Top view" on AcerSystem User's Guide will run the Adobe Reader setup program first. The printed User's...notebook. Follow the instructions on AcerSystem User's Guide. xv First things first We would like to thank you for making an Acer notebook your choice for meeting your computer. poster helps you get started with setting up your mobile computing needs. Follow these ...

Aspire 2420, 2920, 2920Z User's Guide - EN
Page 21
... (for selected models) 56 56 Remote control (for selected models) 57 Remote functions 58 Starting Acer Arcade Deluxe 59 VideoMagician 59 DV Wizard 59 DVDivine 59 Taking your notebook PC with you 61 Disconnecting from the desktop 61 Moving around 61 ... Built-in network feature 68 Universal Serial Bus (USB) 68 ExpressCard 69 Installing memory 70 BIOS utility 71 Boot sequence 71 Enable disk-to-disk recovery 71 Password 71 Using software 72 Playing DVD movies 72
... (for selected models) 56 56 Remote control (for selected models) 57 Remote functions 58 Starting Acer Arcade Deluxe 59 VideoMagician 59 DV Wizard 59 DVDivine 59 Taking your notebook PC with you 61 Disconnecting from the desktop 61 Moving around 61 ... Built-in network feature 68 Universal Serial Bus (USB) 68 ExpressCard 69 Installing memory 70 BIOS utility 71 Boot sequence 71 Enable disk-to-disk recovery 71 Password 71 Using software 72 Playing DVD movies 72

Aspire 2420, 2920, 2920Z User's Guide - EN
Page 22
Power management 73 Acer eRecovery Management 74 Create backup 74 Burn backup disc 75 Restore and recovery 75 Troubleshooting 77 Troubleshooting tips 77 Error messages 77 Regulations and safety notices 79 FCC notice 79 Modem notices 80 Laser compliance statement 83 LCD pixel statement 83 Macrovision copyright protection notice 83 Radio device regulatory notice 84 General 84 European Union (EU) 84 The FCC RF safety requirement 86 Canada - Low-power license-exempt radio communication devices (RSS-210) 87 LCD panel ergonomic specifications 88 Index 89
Power management 73 Acer eRecovery Management 74 Create backup 74 Burn backup disc 75 Restore and recovery 75 Troubleshooting 77 Troubleshooting tips 77 Error messages 77 Regulations and safety notices 79 FCC notice 79 Modem notices 80 Laser compliance statement 83 LCD pixel statement 83 Macrovision copyright protection notice 83 Radio device regulatory notice 84 General 84 European Union (EU) 84 The FCC RF safety requirement 86 Canada - Low-power license-exempt radio communication devices (RSS-210) 87 LCD panel ergonomic specifications 88 Index 89
Aspire 2420, 2920, 2920Z User's Guide - EN
Page 33
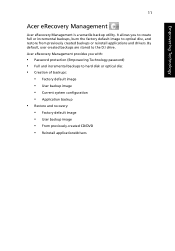
Empowering Technology 11 Acer eRecovery Management Acer eRecovery Management is a versatile backup utility. By default, user-created backups are stored to optical disc, and restore from previously created backups or ...image • User backup image • Current system configuration • Application backup • Restore and recovery: • Factory default image • User backup image • From previously-created CD/DVD • Reinstall applications/drivers Acer eRecovery Management provides you to create full or incremental backups, burn the factory default image to...
Empowering Technology 11 Acer eRecovery Management Acer eRecovery Management is a versatile backup utility. By default, user-created backups are stored to optical disc, and restore from previously created backups or ...image • User backup image • Current system configuration • Application backup • Restore and recovery: • Factory default image • User backup image • From previously-created CD/DVD • Reinstall applications/drivers Acer eRecovery Management provides you to create full or incremental backups, burn the factory default image to...

Aspire 2420, 2920, 2920Z User's Guide - EN
Page 34
To ensure the best results when recovering your system using a CD or Acer eRecovery Management, detach all peripherals (except the external Acer ODD, if your computer has one), including your computer did not come with a Recovery CD or System CD, please use Acer eRecovery Management's "System backup to optical disc" feature to burn a backup image to "Acer eRecovery Management" on page 74 in the AcerSystem User's Guide. Note: If your Acer ezDock. Empowering Technology 12 For more information, please refer to CD or DVD.
To ensure the best results when recovering your system using a CD or Acer eRecovery Management, detach all peripherals (except the external Acer ODD, if your computer has one), including your computer did not come with a Recovery CD or System CD, please use Acer eRecovery Management's "System backup to optical disc" feature to burn a backup image to "Acer eRecovery Management" on page 74 in the AcerSystem User's Guide. Note: If your Acer ezDock. Empowering Technology 12 For more information, please refer to CD or DVD.

Aspire 2420, 2920, 2920Z User's Guide - EN
Page 63
... with the original software content that is important to perform system recovery. Before performing a restore operation, please check the BIOS settings. 1 Check to see if Acer disk-to-disk recovery is enabled or not. 2 Make sure the D2D Recovery setting in a hidden partition on the system will be erased.)...on your C: drive. (Your C: drive will be reformatted and all data files before using this option. To start the recovery process: 1 Restart the system. 2 While the Acer logo is Enabled. 3 Exit the BIOS utility and save changes. English 41 I want to restore my computer to rebuild ...
... with the original software content that is important to perform system recovery. Before performing a restore operation, please check the BIOS settings. 1 Check to see if Acer disk-to-disk recovery is enabled or not. 2 Make sure the D2D Recovery setting in a hidden partition on the system will be erased.)...on your C: drive. (Your C: drive will be reformatted and all data files before using this option. To start the recovery process: 1 Restart the system. 2 While the Acer logo is Enabled. 3 Exit the BIOS utility and save changes. English 41 I want to restore my computer to rebuild ...

Aspire 2420, 2920, 2920Z User's Guide - EN
Page 93
... the top of the screen and use the and keys to run this feature. Enable disk-to-disk recovery To enable disk-to-disk recovery (hard disk recovery), activate the BIOS utility, then select Main from the categories listed at the bottom of the screen. However, if you encounter configuration problems, you do...
... the top of the screen and use the and keys to run this feature. Enable disk-to-disk recovery To enable disk-to-disk recovery (hard disk recovery), activate the BIOS utility, then select Main from the categories listed at the bottom of the screen. However, if you encounter configuration problems, you do...

Aspire 2420, 2920, 2920Z User's Guide - EN
Page 96
... images of your system configuration to hard disk from the Empowering Technology toolbar to start Acer eRecovery Management. 2 In the Acer eRecovery Management window, select the type of the following functions: 1 Create backup 2 Burn backup disc 3 Restore and recovery This chapter will guide you may be prompted to enter the Empowering Technology password...
... images of your system configuration to hard disk from the Empowering Technology toolbar to start Acer eRecovery Management. 2 In the Acer eRecovery Management window, select the type of the following functions: 1 Create backup 2 Burn backup disc 3 Restore and recovery This chapter will guide you may be prompted to enter the Empowering Technology password...
Aspire 2420, 2920, 2920Z User's Guide - EN
Page 97
...image, from a user created image, or from the Empowering Technology toolbar to start Acer eRecovery Management. 2 Switch to the restore and recovery page by selecting the Burn Disc button. 3 Select the type of Acer eRecovery Management, you can burn the factory default image, a user backup image,...configuration, or an application backup image to CD or DVD. 1 Press + or select Acer eRecovery Management from previously created CD and DVD backups. Restore and recovery The restore and recovery features allow you to browse the contents and install selected drivers and applications, create an ...
...image, from a user created image, or from the Empowering Technology toolbar to start Acer eRecovery Management. 2 Switch to the restore and recovery page by selecting the Burn Disc button. 3 Select the type of Acer eRecovery Management, you can burn the factory default image, a user backup image,...configuration, or an application backup image to CD or DVD. 1 Press + or select Acer eRecovery Management from previously created CD and DVD backups. Restore and recovery The restore and recovery features allow you to browse the contents and install selected drivers and applications, create an ...


