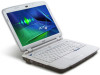
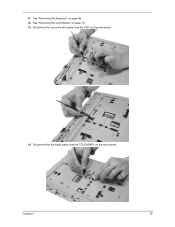
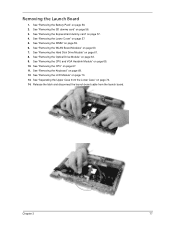
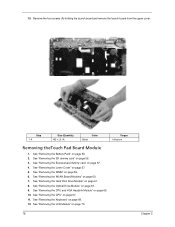
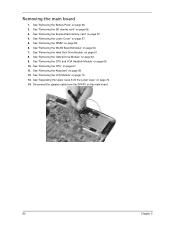
Aspire 2420, 2920, 2920Z Service Guide
Page 8
... Process 65 Main Unit Disassembly Flowchart 65 Removing the CPU and VGA Heatsink Module 65 Removing the CPU 67 Removing the Keyboard 69 Removing the LCD Module 70 Separating the Upper Case from the Lower Case 74 Removing the Launch Board 77 Removing theTouch Pad Board Module 78 Removing the main... View 118 Clearing Password Check and BIOS Recovery 119 Clearing Password Check 119 BIOS Recovery by Crisis Disk 120 FRU (Field Replaceable Unit) List 121 Aspire 2920/2920Z/2420 Exploded Diagram 122 Aspire 2920/2920Z/2420 Series 130 VIII
Aspire 2420, 2920, 2920Z Service Guide
Page 11
Chapter 1 System Specifications Features Below is a brief summary of the computer's many feature: Platform For Aspire 2920 K Intel® Centrino® Duo mobile processor technology, featuring: K Intel® Core™2 Duo mobile processor T7300/T7500/T7700...using two soDIMM modules (for selected models) Display and graphics K 12.1" WXGA High Brightness (200nits), Acer CrystalBrite™ TFT LCD, 1280 x 800 pixel resolution, supporting simultaneous multi-window viewing via Acer GridVista™ K Mobile Intel® GL960/GM965 Express Chipset with integrated 3D graphics, featuring Intel...
Aspire 2420, 2920, 2920Z Service Guide
Page 14
....00U, SLA5V X4 DMI 400MHz 6,7,8,9,10,11 GM965 : KI.96501.008 C-Link0 GL960 :KI.96501.010 ICH8M GIGA LAN BCM5787MKMLG 22 TVOUT 15 14" WXGA LCD 14 CRT 15 TXFM 23 RJ45 23 6 PCIe ports PCI/PCI BRIDGE ACPI 1.1 Mini Card abgn/bg 24 3 SATA 1 PATA 66/100 10 USB 2.0/1.1 ports...
Aspire 2420, 2920, 2920Z Service Guide
Page 15
...After knowing your computer features, let us show the status of the computer's functions and components. Empowering key Lanuch Acer Empowering Technology Status indicators Keyboard Palmrest Touchpad Click buttons (left and right buttons function like a computer mouse. Touch...-sensitive pointing device which functions like the left and right mouse buttons. 5 Display screen Also called Liquid-Crystal Display (LCD), displays computer output. The left and right) Light-Emitting Diodes (LEDs) that light up to show you use the computer. Front View 1...
Aspire 2420, 2920, 2920Z Service Guide
Page 16
...USB camera). Connect to a television or display device with S-video input. Adjust the volume of the computer's functions and components. 10 Acer Crystal Eye Web camera for video communication. (for selected models) 11 Easy-launch Buttons for launching frequently used program. Closed Front View... 4 12 3 Icon 1 2 3 4 Left View Item Microphone-in jack Description Connects to a display device (e.g., external monitor, LCD projector). Left and right speakers deliver stereo audio output. # 1 2 3 4 5 6 1 2 3 4 5 Icon Item DC-in jack Headphones/...
Aspire 2420, 2920, 2920Z Service Guide
Page 29
... delete the active power plan, switch to from the drop-down list. 2. You can also turn on current usage, refer to adjust system settings like LCD brightness and CPU speed. Select the power plan you to the panel in sleep and hibernate modes. Battery status For real-time battery life estimates...
Aspire 2420, 2920, 2920Z Service Guide
Page 45
...) 2.4 SONY (6cell) 2.4 Li-ion 2.0 AH SANYO (6cell) 2.0 2.0 AH SIMPLO (6cell) 2.0 2.4 AH Sanyo (6cell) 2.4 2.4 AH SIMPLO (6cell) 2.4 6 3 cells in series, 2 series in parallel 11.1V 19.0 v LCD 12.1" inch Item Vendor & model name Screen Diagonal (mm) Active Area (mm) Chapter 1 Specification AUO B121EW03 V7 (Glare) AUO B121EW03 V4 (Glare) 12.1 inches 12...
Aspire 2420, 2920, 2920Z Service Guide
Page 46
typical, 290 max. 275.82 x 178 x 5.5 max. 1 channel LVDS 262,144 45/45 15/35 0 to +50 -40 to +60 LCD Inverter Item Vendor & model name Brightness conditions Input voltage (V) Input current (mA) Output voltage (V, rms) Output current (mA, rms) Output voltage frequency...input full load 36 Chapter 1 Vertical Stripe Normally White 220 typical 187 minimum 1.25 max. 400 typical 12/4 +3.3V 4.5W max. 275 g. LCD 12.1" inch Item Display resolution (pixels) Pixel Pitch Pixel Arrangement Display Mode Typical White Luminance (cd/m2) also called Brightness Luminance Uniformity Contrast Ratio Response...
Aspire 2420, 2920, 2920Z Service Guide
Page 64
... sequence. Place the system on a flat, stable surface. 4. For example, if you do the following stages: • External module disassembly • Main unit disassembly • LCD module disassembly The flowcharts provided in that you want to any of the hardware components. General Information Pre-disassembly Instructions Before proceeding with the disassembly...
Aspire 2420, 2920, 2920Z Service Guide
Page 75
... 57. Main Unit Disassembly Process Main Unit Disassembly Flowchart MAIN UNIT DISASSEMBLY MAIN UNIT 5xCaptive Screws CPU/VGA THERMAL MODULE CPU KEYBOARD Ax7, Fx4 Hx2 LCD MODULE Dx9 UPPER CASE Ax4 Fx2 MAIN BOARD LAUNCH BOARD Fx2 TOUCH PAD BRACKET ASSEMBLY 2xSCREWS MODEM BOARD 2xSCREWS LEFT AND RIGHT SPEAKER MODULE TOUCH...
Aspire 2420, 2920, 2920Z Service Guide
Page 80
Disconnect the keyboard cable from the main board to remove the keyboard. See "Removing the LCD Module" on page 57. 3. See "Removing the Lower Cover" on page 70. 70 Chapter 3 See "Removing the Keyboard" on page 60. 4. 4. See "Removing the WLAN Board Modules" on page 69. 5. See "Removing the Battery Pack" on page 56. 2. Removing the LCD Module 1.
Aspire 2420, 2920, 2920Z Service Guide
Page 81
Remove the two screws (H) from the botton panel of the system and three screws (A) on the battery bay area. Chapter 3 71 Turn over the system and open the LCD panel and gently pry up and remove the middle cover. 6. Step 1~2 3~5 Size (Quantity) M2.5 x L8 (2) M2 x L3 (3) Black Black Color Torque 3.0 kgf-cm 1.6 kgf-cm 7.
Aspire 2420, 2920, 2920Z Service Guide
Page 82
Disconnect the LCD cable from the latches. 10. 8. Release the wireless antennas from the main board. 72 Chapter 3 Carefully pry up the middle cap cover and remove it. 9.
Aspire 2420, 2920, 2920Z Service Guide
Page 84
..." on page 63. 9. 13. See "Removing the Lower Cover" on page 60. 7. Separating the Upper Case from the left and right hinge of the LCD module. Carefully remove the LCD module from the base unit. See "Removing the WLAN Board Modules" on page 57. 5. Step 1~4 Size (Quantity) M2 x L4 (4) Color Black 14...
Aspire 2420, 2920, 2920Z Service Guide
Page 85
See "Removing the LCD Module" on the main board. 14. 11. Disconnect the Launch board cable from the TOUCHPAD1 on page 69. 12. Disconnect the touchpad cable from the CN1 on page 70. 13. See "Removing the Keyboard" on the main board. Chapter 3 75
Aspire 2420, 2920, 2920Z Service Guide
Page 87
See "Removing the Battery Pack" on page 70. 13. See "Removing the LCD Module" on page 56. 2. See "Removing the Lower Cover" on page 63. 9. See "Removing the Optical Drive Module" on page 57. 5. See "Removing the CPU" ...
Aspire 2420, 2920, 2920Z Service Guide
Page 88
... Optical Drive Module" on page 69. 12. See "Removing the Battery Pack" on page 59. 6. See "Removing the DIMM" on page 56. 2. See "Removing the LCD Module" on page 56. 3. See "Removing the SD dummy card" on page 70. 78 Chapter 3 See "Removing the Lower Cover" on page 67. 11. See...
Aspire 2420, 2920, 2920Z Service Guide
Page 90
... main board 1. Disconnect the speaker cable from the Lower Case" on page 59. 6. See "Removing the Battery Pack" on page 70. 13. See "Removing the LCD Module" on page 56. 2. See "Removing the Optical Drive Module" on page 67. 11. See "Removing the CPU" on page 63. 9.
Aspire 2420, 2920, 2920Z Service Guide
Page 92
See "Removing the LCD Module" on page 59. 6. See "Removing the DIMM" on page 70. 13. See "Removing the Keyboard" on page 57. 4. See "Removing the ExpressCard dummy card" ...
Aspire 2420, 2920, 2920Z Service Guide
Page 93
See "Removing the DIMM" on page 70. 13. See "Removing the LCD Module" on page 59. 6. See "Separating the Upper Case from the upper case. Chapter 3 83 See "Removing the SD dummy card" on page 74. 14. ...