
Aspire 2420, 2920, 2920Z Service Guide
Page 8
...Antennas 93 Removing the Internal Microphone and Web Camera 94 Troubleshooting 97 System Check Procedures 98 External Diskette Drive Check 98 External CD-ROM Drive Check 98 Keyboard or Auxiliary Input Device Check 98 Memory check 99 Power System Check 99 Touchpad Check 101 ... 116 Jumper and Connector Locations 117 Top View 117 Bottom View 118 Clearing Password Check and BIOS Recovery 119 Clearing Password Check 119 BIOS Recovery by Crisis Disk 120 FRU (Field Replaceable Unit) List 121 Aspire 2920/2920Z/2420 Exploded Diagram 122 Aspire 2920/2920Z/2420 Series 130 VIII
...Antennas 93 Removing the Internal Microphone and Web Camera 94 Troubleshooting 97 System Check Procedures 98 External Diskette Drive Check 98 External CD-ROM Drive Check 98 Keyboard or Auxiliary Input Device Check 98 Memory check 99 Power System Check 99 Touchpad Check 101 ... 116 Jumper and Connector Locations 117 Top View 117 Bottom View 118 Clearing Password Check and BIOS Recovery 119 Clearing Password Check 119 BIOS Recovery by Crisis Disk 120 FRU (Field Replaceable Unit) List 121 Aspire 2920/2920Z/2420 Exploded Diagram 122 Aspire 2920/2920Z/2420 Series 130 VIII
Aspire 2420, 2920, 2920Z Service Guide
Page 33
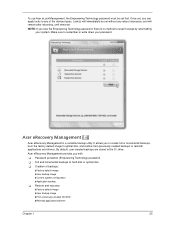
... K Full and incremental backups to optical disc, and restore from previously created backups or reinstall applications and drivers. To use Acer eLock Management, the Empowering Technology password must be set without any of backups: jFactory default image jUser backup image jCurrent system ...configuration jApplication backup K Restore and recovery: jFactory default image jUser backup image jFrom previously-created CD/DVD jReinstall applications/drivers Chapter 1 23 It allows you can apply locks to reset it ...
... K Full and incremental backups to optical disc, and restore from previously created backups or reinstall applications and drivers. To use Acer eLock Management, the Empowering Technology password must be set without any of backups: jFactory default image jUser backup image jCurrent system ...configuration jApplication backup K Restore and recovery: jFactory default image jUser backup image jFrom previously-created CD/DVD jReinstall applications/drivers Chapter 1 23 It allows you can apply locks to reset it ...
Aspire 2420, 2920, 2920Z Service Guide
Page 34
... DVD. To ensure the best results when recovering your system using a CD or Acer eRecovery Management, detach all peripherals (except the external Acer ODD, if your computer has one), including your computer did not come with a Recovery CD or System CD, please use Acer eRecovery Management's "System backup to optical disc" feature to burn a backup image to...
... DVD. To ensure the best results when recovering your system using a CD or Acer eRecovery Management, detach all peripherals (except the external Acer ODD, if your computer has one), including your computer did not come with a Recovery CD or System CD, please use Acer eRecovery Management's "System backup to optical disc" feature to burn a backup image to...
Aspire 2420, 2920, 2920Z User's Guide - EN
Page 33
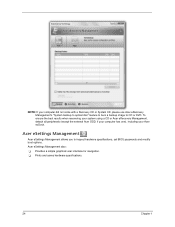
...User backup image • Current system configuration • Application backup • Restore and recovery: • Factory default image • User backup image • From previously-created CD/DVD • Reinstall applications/drivers By default, user-created backups are stored to optical ...disc, and restore from previously created backups or reinstall applications and drivers. Acer eRecovery Management provides you to create ...
...User backup image • Current system configuration • Application backup • Restore and recovery: • Factory default image • User backup image • From previously-created CD/DVD • Reinstall applications/drivers By default, user-created backups are stored to optical ...disc, and restore from previously created backups or reinstall applications and drivers. Acer eRecovery Management provides you to create ...

Aspire 2420, 2920, 2920Z User's Guide - EN
Page 34
To ensure the best results when recovering your system using a CD or Acer eRecovery Management, detach all peripherals (except the external Acer ODD, if your computer has one), including your computer did not come with a Recovery CD or System CD, please use Acer eRecovery Management's "System backup to optical disc" feature to burn a backup image to "Acer eRecovery Management" on page 74 in the AcerSystem User's Guide. Empowering Technology 12 For more information, please refer to CD or DVD. Note: If your Acer ezDock.
To ensure the best results when recovering your system using a CD or Acer eRecovery Management, detach all peripherals (except the external Acer ODD, if your computer has one), including your computer did not come with a Recovery CD or System CD, please use Acer eRecovery Management's "System backup to optical disc" feature to burn a backup image to "Acer eRecovery Management" on page 74 in the AcerSystem User's Guide. Empowering Technology 12 For more information, please refer to CD or DVD. Note: If your Acer ezDock.

Aspire 2420, 2920, 2920Z User's Guide - EN
Page 63
...save changes. Follow the steps below to perform system recovery. Before performing a restore operation, please check the BIOS settings. 1 Check to see if Acer disk-to-disk recovery is enabled or not. 2 Make sure the D2D Recovery setting in a hidden partition on the system will...to the onscreen instructions to rebuild your notebook. To start the recovery process: 1 Restart the system. 2 While the Acer logo is important to its original settings without recovery CDs. The system will be the only option for future recovery operations. Note: To activate the BIOS utility, press during ...
...save changes. Follow the steps below to perform system recovery. Before performing a restore operation, please check the BIOS settings. 1 Check to see if Acer disk-to-disk recovery is enabled or not. 2 Make sure the D2D Recovery setting in a hidden partition on the system will...to the onscreen instructions to rebuild your notebook. To start the recovery process: 1 Restart the system. 2 While the Acer logo is important to its original settings without recovery CDs. The system will be the only option for future recovery operations. Note: To activate the BIOS utility, press during ...

Aspire 2420, 2920, 2920Z User's Guide - EN
Page 96
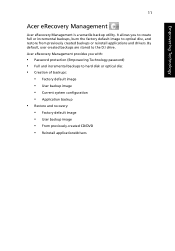
... Acer eRecovery Management from the main Acer eRecovery Management screen. English 74 Acer eRecovery Management Acer eRecovery Management is a tool to proceed. When using Acer ...and recovery This chapter will guide you want to create using the Empowering Technology toolbar or when first running Acer eLock Management or Acer eRecovery... before entering Acer eRecovery Management for optical disc-related tasks. You can...backup you through each process. Acer eRecovery Management consists of your ...Acer eRecovery Management. 2 In the Acer eRecovery Management window, select the type ...
... Acer eRecovery Management from the main Acer eRecovery Management screen. English 74 Acer eRecovery Management Acer eRecovery Management is a tool to proceed. When using Acer ...and recovery This chapter will guide you want to create using the Empowering Technology toolbar or when first running Acer eLock Management or Acer eRecovery... before entering Acer eRecovery Management for optical disc-related tasks. You can...backup you through each process. Acer eRecovery Management consists of your ...Acer eRecovery Management. 2 In the Acer eRecovery Management window, select the type ...
Aspire 2420, 2920, 2920Z User's Guide - EN
Page 97
... Management from the Empowering Technology toolbar to start Acer eRecovery Management. 2 Switch to the Burn Disc page by selecting the Restore button. 3 Select the backup point you would like to restore from previously created CD and DVD backups. Restore and recovery The restore and recovery features allow you to browse the contents and install...
... Management from the Empowering Technology toolbar to start Acer eRecovery Management. 2 Switch to the Burn Disc page by selecting the Restore button. 3 Select the backup point you would like to restore from previously created CD and DVD backups. Restore and recovery The restore and recovery features allow you to browse the contents and install...


