User Guide
Page 3
Electrical Safety Information 1-10 Laser Safety Information 1-11 ...Started Unpacking the machine 2-2 Selecting a Location 2-3 Clearance Space 2-3 Installing the Smart Kit ® Print Cartridge 2-4 Loading Paper 2-6 Making Connections 2-8 Switching On the Machine 2-11 Installing Printer Software 2-12 System Requirements... and Special Materials 3-3 Loading Paper 3-5 Using the Paper Tray 3-5 Using the Manual Tray 3-5 Copy Output Tray 3-6 Xerox PE220 Table of Contents 1 Welcome About This Guide 1-2 Getting to know your machine 1-3 Component location 1-3 Control Panel Functions ...
Electrical Safety Information 1-10 Laser Safety Information 1-11 ...Started Unpacking the machine 2-2 Selecting a Location 2-3 Clearance Space 2-3 Installing the Smart Kit ® Print Cartridge 2-4 Loading Paper 2-6 Making Connections 2-8 Switching On the Machine 2-11 Installing Printer Software 2-12 System Requirements... and Special Materials 3-3 Loading Paper 3-5 Using the Paper Tray 3-5 Using the Manual Tray 3-5 Copy Output Tray 3-6 Xerox PE220 Table of Contents 1 Welcome About This Guide 1-2 Getting to know your machine 1-3 Component location 1-3 Control Panel Functions ...

User Guide
Page 6
... Clearing Document Jams 9-2 Input Misfeed 9-2 Exit Misfeed 9-3 Clearing Paper Jams 9-4 In the Tray 9-4 In the Manual Tray 9-5 In the Fuser Area or Around the Print Cartridge 9-5 In the Paper Exit Area 9-6 Tips for Avoiding Paper Jams 9-7 Clearing LCD Error Messages 9-8 Solving Other Problems 9-12 Paper Feeding Problems 9-12 Printing Problems 9-13... Paper 10-8 Paper Specifications 10-8 Paper Output Capacity 10-9 Paper Storage Environment 10-9 Envelopes 10-10 Labels 10-11 Transparencies 10-12 Table of Contents-4 Xerox PE220
... Clearing Document Jams 9-2 Input Misfeed 9-2 Exit Misfeed 9-3 Clearing Paper Jams 9-4 In the Tray 9-4 In the Manual Tray 9-5 In the Fuser Area or Around the Print Cartridge 9-5 In the Paper Exit Area 9-6 Tips for Avoiding Paper Jams 9-7 Clearing LCD Error Messages 9-8 Solving Other Problems 9-12 Paper Feeding Problems 9-12 Printing Problems 9-13... Paper 10-8 Paper Specifications 10-8 Paper Output Capacity 10-9 Paper Storage Environment 10-9 Envelopes 10-10 Labels 10-11 Transparencies 10-12 Table of Contents-4 Xerox PE220

User Guide
Page 9
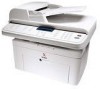
Getting to know your machine Component location These are the main components of your machine: Front View 1 Welcome Automatic Document Feeder Document Guides Document Input Tray Document Output Tray Document Cover Document Glass Control Panel Paper Output Extension Paper Input Tray Front Door Output Tray (Face Down) Manual Tray Smart Kit ® Print Cartridge Xerox PE220 1-3
Getting to know your machine Component location These are the main components of your machine: Front View 1 Welcome Automatic Document Feeder Document Guides Document Input Tray Document Output Tray Document Cover Document Glass Control Panel Paper Output Extension Paper Input Tray Front Door Output Tray (Face Down) Manual Tray Smart Kit ® Print Cartridge Xerox PE220 1-3
User Guide
Page 19
...to correct the interference at his own expense. Operation of children. • Never throw toner, print cartridges or toner containers into an open flame. Product Safety Certification This product is operated in accordance with ...standards listed. These limits are designed to provide reasonable protection against harmful interference when the equipment is certified by Xerox may cause harmful interference to operate this equipment. Intertek ETL Semko Standard UL60950-1 1st (2003) (USA/ Canada... Shielded interface cables must be used in a commercial environment. Xerox PE220 1-13
...to correct the interference at his own expense. Operation of children. • Never throw toner, print cartridges or toner containers into an open flame. Product Safety Certification This product is operated in accordance with ...standards listed. These limits are designed to provide reasonable protection against harmful interference when the equipment is certified by Xerox may cause harmful interference to operate this equipment. Intertek ETL Semko Standard UL60950-1 1st (2003) (USA/ Canada... Shielded interface cables must be used in a commercial environment. Xerox PE220 1-13
User Guide
Page 29
... 2-16 • Setting the Paper Size and Type - page 2-20 Xerox PE220 2-1 page 2-11 • Installing Printer Software - page 2-18 • Using the Save Modes - 2 Getting Started 2 Getting Started Before you start to perform. page 2-3 • Installing the Smart Kit ® Print Cartridge - page 2-6 • Making Connections - page 2-14 • Setting the Machine...
... 2-16 • Setting the Paper Size and Type - page 2-20 Xerox PE220 2-1 page 2-11 • Installing Printer Software - page 2-18 • Using the Save Modes - 2 Getting Started 2 Getting Started Before you start to perform. page 2-3 • Installing the Smart Kit ® Print Cartridge - page 2-6 • Making Connections - page 2-14 • Setting the Machine...
User Guide
Page 32
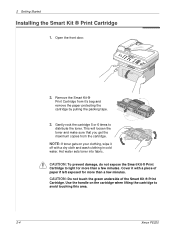
... sets toner into fabric. CAUTION: To prevent damage, do not expose the Smart Kit ® Print Cartridge to distribute the toner. NOTE: If toner gets on the cartridge when lifting the cartridge to avoid touching this area. 2-4 Xerox PE220 CAUTION: Do not touch the green underside of paper if left exposed for more than a few...
... sets toner into fabric. CAUTION: To prevent damage, do not expose the Smart Kit ® Print Cartridge to distribute the toner. NOTE: If toner gets on the cartridge when lifting the cartridge to avoid touching this area. 2-4 Xerox PE220 CAUTION: Do not touch the green underside of paper if left exposed for more than a few...
User Guide
Page 33
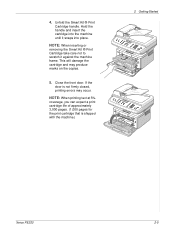
Unfold the Smart Kit ® Print Cartridge handle. If the door is shipped with the machine.) 2 Getting Started Xerox PE220 2-5 4. Hold the handle and insert the cartridge into place. NOTE: When inserting or removing the Smart Kit ® Print Cartridge take care not to scratch it snaps... into the machine until it against the machine frame. This will damage the cartridge and may occur...
Unfold the Smart Kit ® Print Cartridge handle. If the door is shipped with the machine.) 2 Getting Started Xerox PE220 2-5 4. Hold the handle and insert the cartridge into place. NOTE: When inserting or removing the Smart Kit ® Print Cartridge take care not to scratch it snaps... into the machine until it against the machine frame. This will damage the cartridge and may occur...
User Guide
Page 48
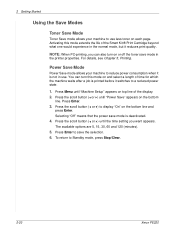
... in use less toner on top line of the Smart Kit ® Print Cartridge beyond what one would experience in the printer properties. Power Save Mode Power Save mode allows your machine to Standby mode, press Stop/Clear. 2-20 Xerox PE220 Press the scroll button ( or ) until "Power Save" appears on the bottom...
... in use less toner on top line of the Smart Kit ® Print Cartridge beyond what one would experience in the printer properties. Power Save Mode Power Save mode allows your machine to Standby mode, press Stop/Clear. 2-20 Xerox PE220 Press the scroll button ( or ) until "Power Save" appears on the bottom...
User Guide
Page 78
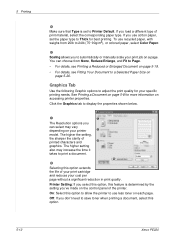
... set to Printer Default. The higher setting also may vary depending on your print job on a page. On: Select this option. 5-12 Xerox PE220 Click the Graphics tab to print a document. If you can choose from 20lb to use recycled paper, with weighs from None, Reduce/Enlarge... toner on accessing printer properties. Graphics Tab Use the following Graphic options to a Selected Paper Size on the control panel of your print cartridge and reduces your specific printing needs. 5 Printing Type 4 Make sure that Type is determined by the setting you load a different type...
... set to Printer Default. The higher setting also may vary depending on your print job on a page. On: Select this option. 5-12 Xerox PE220 Click the Graphics tab to print a document. If you can choose from 20lb to use recycled paper, with weighs from None, Reduce/Enlarge... toner on accessing printer properties. Graphics Tab Use the following Graphic options to a Selected Paper Size on the control panel of your print cartridge and reduces your specific printing needs. 5 Printing Type 4 Make sure that Type is determined by the setting you load a different type...

User Guide
Page 149
page 8-9. • Replacing the ADF Rubber Pad - Xerox PE220 8-1 page 8-6. • Consumables and Replacement Parts - page 8-2. • Cleaning Your Machine - 8 Maintenance 8 Maintenance This chapter provides information for maintaining the machine and replacing the print cartridge. page 8-3. • Maintaining the Smart Kit ® Print Cartridge - page 8-10. This chapter includes: • Clearing the Memory -
page 8-9. • Replacing the ADF Rubber Pad - Xerox PE220 8-1 page 8-6. • Consumables and Replacement Parts - page 8-2. • Cleaning Your Machine - 8 Maintenance 8 Maintenance This chapter provides information for maintaining the machine and replacing the print cartridge. page 8-3. • Maintaining the Smart Kit ® Print Cartridge - page 8-10. This chapter includes: • Clearing the Memory -
User Guide
Page 151
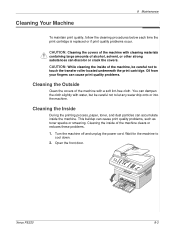
...or crack the covers. Cleaning Your Machine 8 Maintenance To maintain print quality, follow the cleaning procedures below each time the print cartridge is replaced or if print quality problems occur. Oil from your fingers can cause print quality problems. Cleaning the Outside Clean the...transfer roller located underneath the print cartridge. Cleaning the Inside During the printing process, paper, toner, and dust particles can cause print quality problems, such as toner specks or smearing. Turn the machine off and unplug the power cord. Xerox PE220 8-3 CAUTION: While cleaning the inside...
...or crack the covers. Cleaning Your Machine 8 Maintenance To maintain print quality, follow the cleaning procedures below each time the print cartridge is replaced or if print quality problems occur. Oil from your fingers can cause print quality problems. Cleaning the Outside Clean the...transfer roller located underneath the print cartridge. Cleaning the Inside During the printing process, paper, toner, and dust particles can cause print quality problems, such as toner specks or smearing. Turn the machine off and unplug the power cord. Xerox PE220 8-3 CAUTION: While cleaning the inside...
User Guide
Page 152
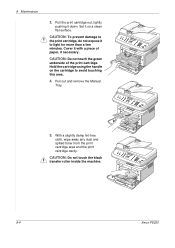
...slightly damp lint-free cloth, wipe away any dust and spilled toner from the print cartridge area and the print cartridge cavity. CAUTION: To prevent damage to the print cartridge, do not expose it on the cartridge to light for more than a few minutes. CAUTION: Do not touch the green ... paper, if necessary. Set it to avoid touching this area. 4. Pull out and remove the Manual Tray. 5. Pull the print cartridge out, lightly pushing it with a piece of the print cartridge. Cover it down. CAUTION: Do not touch the black transfer roller inside the machine. 8-4 Xerox PE220
...slightly damp lint-free cloth, wipe away any dust and spilled toner from the print cartridge area and the print cartridge cavity. CAUTION: To prevent damage to the print cartridge, do not expose it on the cartridge to light for more than a few minutes. CAUTION: Do not touch the green ... paper, if necessary. Set it to avoid touching this area. 4. Pull out and remove the Manual Tray. 5. Pull the print cartridge out, lightly pushing it with a piece of the print cartridge. Cover it down. CAUTION: Do not touch the black transfer roller inside the machine. 8-4 Xerox PE220

User Guide
Page 153
...unit at the start of the cartridge compartment. Wipe the surface of the white document cover and white bar until it is clean and dry. Slightly dampen a soft lint-free cloth or paper towel with water. 2. Open the document cover. 3. Close the document cover. Xerox PE220 8-5 Locate the long strip of... glass (LSU) inside the top of each day and during the day, as needed. 1. Re-insert the manual tray, print cartridge and close the door. 8. Plug in the power cord and switch on ...
...unit at the start of the cartridge compartment. Wipe the surface of the white document cover and white bar until it is clean and dry. Slightly dampen a soft lint-free cloth or paper towel with water. 2. Open the document cover. 3. Close the document cover. Xerox PE220 8-5 Locate the long strip of... glass (LSU) inside the top of each day and during the day, as needed. 1. Re-insert the manual tray, print cartridge and close the door. 8. Plug in the power cord and switch on ...
User Guide
Page 154
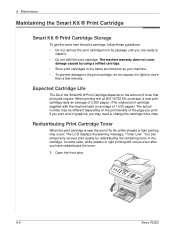
...you are ready to install it to light for more often. You can temporarily recover print quality by using a refilled cartridge. • Store print cartridges in the cartridge. The machine warranty does not cover damage caused by redistributing the remaining toner in the same environment as your machine....require. In some case, white streaks or light printing still occurs even after you may need to the print cartridge, do not expose it . • Do not refill the print cartridge. Open the front door. 8-6 Xerox PE220 If you print a lot of graphics, you have redistributed the toner. 1.
...you are ready to install it to light for more often. You can temporarily recover print quality by using a refilled cartridge. • Store print cartridges in the cartridge. The machine warranty does not cover damage caused by redistributing the remaining toner in the same environment as your machine....require. In some case, white streaks or light printing still occurs even after you may need to the print cartridge, do not expose it . • Do not refill the print cartridge. Open the front door. 8-6 Xerox PE220 If you print a lot of graphics, you have redistributed the toner. 1.

User Guide
Page 155
... CAUTION: Do not touch the green underside of the print cartridge. Remove the old print cartridge and install a new print cartridge. The fax number can be replaced. Xerox PE220 8-7 See Installing the Smart Kit ® Print Cartridge on the control panel shows the warning message, "Toner Empty..." the print cartridge has run and the machine stops printing. Hot water...
... CAUTION: Do not touch the green underside of the print cartridge. Remove the old print cartridge and install a new print cartridge. The fax number can be replaced. Xerox PE220 8-7 See Installing the Smart Kit ® Print Cartridge on the control panel shows the warning message, "Toner Empty..." the print cartridge has run and the machine stops printing. Hot water...
User Guide
Page 156
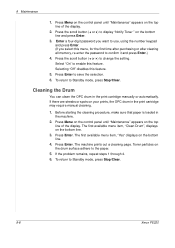
... Enter. Before starting the cleaning procedure, make sure that paper is loaded in the print cartridge manually or automatically. To return to change the setting. Press the scroll button ( or ) to Standby mode, press Stop/Clear. 8-8 Xerox PE220 Select "On" to the paper. 5. If there are streaks or spots on the drum surface...
... Enter. Before starting the cleaning procedure, make sure that paper is loaded in the print cartridge manually or automatically. To return to change the setting. Press the scroll button ( or ) to Standby mode, press Stop/Clear. 8-8 Xerox PE220 Select "On" to the paper. 5. If there are streaks or spots on the drum surface...

User Guide
Page 157
... Retailer where you need to replace the Smart Kit ® Print Cartridge and ADF Rubber Pad to maintain optimum performance and to avoid print quality problems and paper feed problems resulting from worn parts. Xerox PE220 8-9 We strongly recommend that these items are installed by a trained ...service professional, except for the ADF rubber pad refer to Replacing the Smart Kit ® Print Cartridge on page 8-10. The following items should be ...
... Retailer where you need to replace the Smart Kit ® Print Cartridge and ADF Rubber Pad to maintain optimum performance and to avoid print quality problems and paper feed problems resulting from worn parts. Xerox PE220 8-9 We strongly recommend that these items are installed by a trained ...service professional, except for the ADF rubber pad refer to Replacing the Smart Kit ® Print Cartridge on page 8-10. The following items should be ...

User Guide
Page 162
... area or around the print cartridge. Message Location of Jam Go to locate and clear the paper jam. If there is any resistance and the paper does not move when you pull, or if you cannot see the paper in the following sections to resume printing. 9-4 Xerox PE220 page 9-5. 2. Open and... close the front door to clear the jam. See In the Fuser Area or Around the Print Cartridge - Follow the instructions in this area, check the fuser area around the print...
... area or around the print cartridge. Message Location of Jam Go to locate and clear the paper jam. If there is any resistance and the paper does not move when you pull, or if you cannot see the paper in the following sections to resume printing. 9-4 Xerox PE220 page 9-5. 2. Open and... close the front door to clear the jam. See In the Fuser Area or Around the Print Cartridge - Follow the instructions in this area, check the fuser area around the print...

User Guide
Page 163
... paper does not move when you pull, or if you cannot see the paper in the tray by gently pulling it down. 3. Pull the print cartridge out, lightly pushing it straight out. If necessary, pull the manual tray out. Open the front door. 2. In the Manual Tray 1. Remove the jammed ...paper in this area, check the fuser area around the print cartridge. See In the Fuser Area or Around the Print Cartridge - Take care when removing paper from the machine. 1. Xerox PE220 9-5 If there is hot.
... paper does not move when you pull, or if you cannot see the paper in the tray by gently pulling it down. 3. Pull the print cartridge out, lightly pushing it straight out. If necessary, pull the manual tray out. Open the front door. 2. In the Manual Tray 1. Remove the jammed ...paper in this area, check the fuser area around the print cartridge. See In the Fuser Area or Around the Print Cartridge - Take care when removing paper from the machine. 1. Xerox PE220 9-5 If there is hot.

User Guide
Page 164
Remove the jammed paper by gently pulling it straight out. 5. In the Paper Exit Area. 1. Gently pull the paper out of the output tray 9-6 Xerox PE220 The jammed paper automatically exits the machine. If the paper does not exit, continue to step 2. 2. If necessary, push the manual tray back into the machine. 6. Printing automatically resumes. Reinstall the print cartridge and close the front door. Open and close the front door. 9 Troubleshooting 4.
Remove the jammed paper by gently pulling it straight out. 5. In the Paper Exit Area. 1. Gently pull the paper out of the output tray 9-6 Xerox PE220 The jammed paper automatically exits the machine. If the paper does not exit, continue to step 2. 2. If necessary, push the manual tray back into the machine. 6. Printing automatically resumes. Reinstall the print cartridge and close the front door. Open and close the front door. 9 Troubleshooting 4.


