
User Guide
Page 3
...Chapter 1: GETTING STARTED Unpacking 1.2 Understanding the Component Location 1.5 Front View 1.5 Rear View 1.6 Control Panel Functions 1.7 Installing the Toner Cartridge 1.9 Loading Paper 1.11 Making Connections 1.14 Turning the Machine On 1.16 Changing the Display Language and Country .......... 1.17 Setting... Language 1.17 Setting Country 1.17 Setting the Paper Type and Size 1.18 Using the Save Modes 1.19 Toner Save Mode 1.19 Power Save Mode 1.19 CCD Power Save Mode 1.20 Chapter 2: INSTALLING SOFTWARE Printer Driver Features 2.2 System Requirements 2.3 Installing...
...Chapter 1: GETTING STARTED Unpacking 1.2 Understanding the Component Location 1.5 Front View 1.5 Rear View 1.6 Control Panel Functions 1.7 Installing the Toner Cartridge 1.9 Loading Paper 1.11 Making Connections 1.14 Turning the Machine On 1.16 Changing the Display Language and Country .......... 1.17 Setting... Language 1.17 Setting Country 1.17 Setting the Paper Type and Size 1.18 Using the Save Modes 1.19 Toner Save Mode 1.19 Power Save Mode 1.19 CCD Power Save Mode 1.20 Chapter 2: INSTALLING SOFTWARE Printer Driver Features 2.2 System Requirements 2.3 Installing...
User Guide
Page 6
... 7.2 Cleaning Your Machine 7.3 Cleaning the Outside 7.3 Cleaning the Inside 7.3 Cleaning the Scan Unit 7.5 Maintaining the Toner Cartridge 7.6 Redistributing Toner 7.7 Replacing the Toner Cartridge 7.8 Setting the Notify Toner Option 7.10 Cleaning the Drum 7.10 Consumables and Replacement Parts 7.11 Chapter 8: TROUBLESHOOTING Clearing Document Jams 8.2 Input...Paper Jams 8.4 In the Paper Feed Area 8.4 In the Paper Exit Area 8.5 In the Fuser Area or Around the Toner Cartridge . 8.7 In the Bypass Tray 8.8 Tips for Avoiding Paper Jams When Printing on the A5-sized Paper 8.9 Tips for...
... 7.2 Cleaning Your Machine 7.3 Cleaning the Outside 7.3 Cleaning the Inside 7.3 Cleaning the Scan Unit 7.5 Maintaining the Toner Cartridge 7.6 Redistributing Toner 7.7 Replacing the Toner Cartridge 7.8 Setting the Notify Toner Option 7.10 Cleaning the Drum 7.10 Consumables and Replacement Parts 7.11 Chapter 8: TROUBLESHOOTING Clearing Document Jams 8.2 Input...Paper Jams 8.4 In the Paper Feed Area 8.4 In the Paper Exit Area 8.5 In the Fuser Area or Around the Toner Cartridge . 8.7 In the Bypass Tray 8.8 Tips for Avoiding Paper Jams When Printing on the A5-sized Paper 8.9 Tips for...
User Guide
Page 18
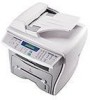
This chapter gives you for setting up your machine. This chapter includes: • Unpacking • Understanding the Component Location • Installing the Toner Cartridge • Loading Paper • Making Connections • Turning the Machine On • Changing the Display Language and Country • Setting the Paper Type and Size • Using the Save Modes Your machine provides printing, copying, scanning, and faxing functions! 1 GETTING STARTED Thank you step-by-step instructions for purchasing this Xerox multifunctional product.
This chapter gives you for setting up your machine. This chapter includes: • Unpacking • Understanding the Component Location • Installing the Toner Cartridge • Loading Paper • Making Connections • Turning the Machine On • Changing the Display Language and Country • Setting the Paper Type and Size • Using the Save Modes Your machine provides printing, copying, scanning, and faxing functions! 1 GETTING STARTED Thank you step-by-step instructions for purchasing this Xerox multifunctional product.
User Guide
Page 24
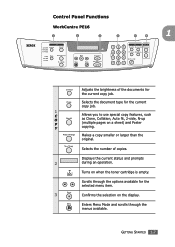
... current copy job. 1 C Allows you to use special copy features, such O as Clone, Collation, Auto fit, 2-side, N-up P (multiple pages on when the toner cartridge is empty. Turns on a sheet) and Poster Y copying. Selects the number of the documents for the selected menu item. 3 Confirms the selection on the display... an operation. Scrolls through the menus available. Enters Menu Mode and scrolls through the options available for the current copy job. Control Panel Functions WorkCentre PE16 1 2 3 4 5 6 1 Adjusts the brightness of copies. GETTING STARTED 1.7
... current copy job. 1 C Allows you to use special copy features, such O as Clone, Collation, Auto fit, 2-side, N-up P (multiple pages on when the toner cartridge is empty. Turns on a sheet) and Poster Y copying. Selects the number of the documents for the selected menu item. 3 Confirms the selection on the display... an operation. Scrolls through the menus available. Enters Menu Mode and scrolls through the options available for the current copy job. Control Panel Functions WorkCentre PE16 1 2 3 4 5 6 1 Adjusts the brightness of copies. GETTING STARTED 1.7

User Guide
Page 26
Gently roll the cartridge to distribute the toner. Thoroughly rolling the cartridge will assure the maximum copies per cartridge. 3 Slide the toner cartridge into the machine until it locks into place completely. Installing the Toner Cartridge 1 Open the front cover. 1 2 Remove the starter toner cartridge from its bag. GETTING STARTED 1.9
Gently roll the cartridge to distribute the toner. Thoroughly rolling the cartridge will assure the maximum copies per cartridge. 3 Slide the toner cartridge into the machine until it locks into place completely. Installing the Toner Cartridge 1 Open the front cover. 1 2 Remove the starter toner cartridge from its bag. GETTING STARTED 1.9

User Guide
Page 27
To replace the toner cartridge, see page 7.8. 1.10 GETTING STARTED 4 Close the front cover. NOTE: When the toner cartridge needs to be replaced, the indicator turns on and the "Toner Empty" message appears on the display.
To replace the toner cartridge, see page 7.8. 1.10 GETTING STARTED 4 Close the front cover. NOTE: When the toner cartridge needs to be replaced, the indicator turns on and the "Toner Empty" message appears on the display.

User Guide
Page 36
... the selection. 6 To return to display "On" on top line of the toner cartridge longer than the normal mode, but it is off the toner save mode allows your machine to a reduced power state. 1 Press Menu until the...bottom line and press Enter. See page 5.20. You can also turn the toner save mode on or off, press Toner Save. • If the button backlight is on, the mode is active and the machine uses... less toner when printing a document. • If the button backlight is not in the printer properties....
... the selection. 6 To return to display "On" on top line of the toner cartridge longer than the normal mode, but it is off the toner save mode allows your machine to a reduced power state. 1 Press Menu until the...bottom line and press Enter. See page 5.20. You can also turn the toner save mode on or off, press Toner Save. • If the button backlight is on, the mode is active and the machine uses... less toner when printing a document. • If the button backlight is not in the printer properties....

User Guide
Page 87
...below. 1 2 3 5.20 PRINTING Property Description 1 Resolution You can select the printing resolution by the setting you select this option, the Toner Save feature is determined by choosing from 600 dpi (Normal) or 300 dpi (Draft). Click the Graphics tab to adjust the print quality ... 've made on each page. • Off: When you do not need to save toner to print a document. 2 Toner Save Selecting this option. Higher settings may increase time it takes to print a document, select this option extends the life of your toner cartridge and reduces your specific printing needs.
...below. 1 2 3 5.20 PRINTING Property Description 1 Resolution You can select the printing resolution by the setting you select this option, the Toner Save feature is determined by choosing from 600 dpi (Normal) or 300 dpi (Draft). Click the Graphics tab to adjust the print quality ... 've made on each page. • Off: When you do not need to save toner to print a document. 2 Toner Save Selecting this option. Higher settings may increase time it takes to print a document, select this option extends the life of your toner cartridge and reduces your specific printing needs.

User Guide
Page 96
This chapter includes: • Clearing the Memory • Cleaning Your Machine • Maintaining the Toner Cartridge • Consumables and Replacement Parts 7 MAINTENANCE This chapter provides information for maintaining your machine and the toner cartridge.
This chapter includes: • Clearing the Memory • Cleaning Your Machine • Maintaining the Toner Cartridge • Consumables and Replacement Parts 7 MAINTENANCE This chapter provides information for maintaining your machine and the toner cartridge.

User Guide
Page 98
... water, but be careful not to be careful not to touch the transfer roller (located underneath the toner cartridge). Cleaning Your Machine To maintain the print quality, follow the cleaning procedures below each time the toner cartridge is replaced or if print quality problems occur. Cleaning the Outside Clean the cabinet of the printer...
... water, but be careful not to be careful not to touch the transfer roller (located underneath the toner cartridge). Cleaning Your Machine To maintain the print quality, follow the cleaning procedures below each time the toner cartridge is replaced or if print quality problems occur. Cleaning the Outside Clean the cabinet of the printer...

User Guide
Page 99
2 Open the front cover and pull the toner cartridge out, lightly pushing it with a piece of paper, if necessary. Cover it down. 3 With a dry and lint-free cloth, wipe away any dust and spilled toner from the toner cartridge area and the toner cartridge cavity. CAUTION: To prevent damage to the toner cartridge, do not expose it to light for more than a few minute. Do not touch the black transfer roller inside the machine. 4 Reinsert the toner cartridge and close the cover. 5 Plug in the power cord and turn the machine on. 7.4 MAINTENANCE
2 Open the front cover and pull the toner cartridge out, lightly pushing it with a piece of paper, if necessary. Cover it down. 3 With a dry and lint-free cloth, wipe away any dust and spilled toner from the toner cartridge area and the toner cartridge cavity. CAUTION: To prevent damage to the toner cartridge, do not expose it to light for more than a few minute. Do not touch the black transfer roller inside the machine. 4 Reinsert the toner cartridge and close the cover. 5 Plug in the power cord and turn the machine on. 7.4 MAINTENANCE

User Guide
Page 101
... it to light for use. • Do not refill the toner cartridge. The machine warranty does not cover damage caused by using a refilled cartridge. • Store toner cartridges in mind: • Do not remove the toner cartridge from its package until ready for more often. 7.6 MAINTENANCE The ...When printing text at IDC 5% coverage, a new toner cartridge lasts an average of 3,500 pages. (The original toner cartridge supplied with the printer lasts an average of toner that print jobs require. Saving toner To save toner, press the Toner Save button on the amount of 1,000 pages.) ...
... it to light for use. • Do not refill the toner cartridge. The machine warranty does not cover damage caused by using a refilled cartridge. • Store toner cartridges in mind: • Do not remove the toner cartridge from its package until ready for more often. 7.6 MAINTENANCE The ...When printing text at IDC 5% coverage, a new toner cartridge lasts an average of 3,500 pages. (The original toner cartridge supplied with the printer lasts an average of toner that print jobs require. Saving toner To save toner, press the Toner Save button on the amount of 1,000 pages.) ...

User Guide
Page 102
... on your clothing, wipe it off with a dry cloth and wash clothing in the cartridge. 1 Open the front cover. 2 Pull the toner cartridge out and gently roll the cartridge to distribute the toner evenly inside the cartridge. Redistributing Toner When the toner cartridge is near the end of its life, white streaks or light print occurs. You can temporarily...
... on your clothing, wipe it off with a dry cloth and wash clothing in the cartridge. 1 Open the front cover. 2 Pull the toner cartridge out and gently roll the cartridge to distribute the toner evenly inside the cartridge. Redistributing Toner When the toner cartridge is near the end of its life, white streaks or light print occurs. You can temporarily...

User Guide
Page 103
Replacing the Toner Cartridge When the toner eventually runs out, only blank pages print when a print job is sent or when a fax is received. At this stage, the toner cartridge needs to the recycling brochure packed with the toner cartridge for details. 7.8 MAINTENANCE Refer to be replaced. NOTE: Help the environment by recycling your used cartridge down, pull it out. The display shows the warning message, "Toner Empty," and the indicator on the control panel turns on. 1 Open the front cover. 2 Lightly pushing the used toner cartridge.
Replacing the Toner Cartridge When the toner eventually runs out, only blank pages print when a print job is sent or when a fax is received. At this stage, the toner cartridge needs to the recycling brochure packed with the toner cartridge for details. 7.8 MAINTENANCE Refer to be replaced. NOTE: Help the environment by recycling your used cartridge down, pull it out. The display shows the warning message, "Toner Empty," and the indicator on the control panel turns on. 1 Open the front cover. 2 Lightly pushing the used toner cartridge.

User Guide
Page 104
3 Unpack the new toner cartridge and gently shake it locks into place. 5 Close the front cover. 7 MAINTENANCE 7.9 Save the box and the cover for shipping. 4 Slide the new toner cartridge in until it horizontally four or five times to distribute the toner evenly inside the cartridge.
3 Unpack the new toner cartridge and gently shake it locks into place. 5 Close the front cover. 7 MAINTENANCE 7.9 Save the box and the cover for shipping. 4 Slide the new toner cartridge in until it horizontally four or five times to distribute the toner evenly inside the cartridge.

User Guide
Page 105
... require cleaning. 1 Before setting the cleaning procedure, make sure that your machine requires a new toner cartridge when the toner cartridge needs to the paper. 4 If the problem remains, repeat steps 1 through 3. 7.10 MAINTENANCE Setting the Notify Toner Option If you bought your machine. 1 Press Menu on the control panel until "Maintenance" appears on the top.... The display confirms your service company or the dealer to notify them that paper is preset by your dealer when you have set the Notify Toner menu option to "On", your machine automatically sends a fax to display "Notify...
... require cleaning. 1 Before setting the cleaning procedure, make sure that your machine requires a new toner cartridge when the toner cartridge needs to the paper. 4 If the problem remains, repeat steps 1 through 3. 7.10 MAINTENANCE Setting the Notify Toner Option If you bought your machine. 1 Press Menu on the control panel until "Maintenance" appears on the top.... The display confirms your service company or the dealer to notify them that paper is preset by your dealer when you have set the Notify Toner menu option to "On", your machine automatically sends a fax to display "Notify...
User Guide
Page 106
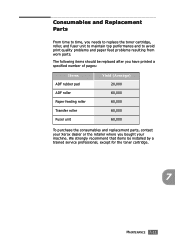
The following items should be installed by a trained service professional, except for the toner cartridge. 7 MAINTENANCE 7.11 We strongly recommend that items be replaced after you have printed a specified number of pages: Items ADF rubber pad ADF roller ...the consumables and replacement parts, contact your machine. Consumables and Replacement Parts From time to time, you bought your Xerox dealer or the retailer where you needs to replace the toner cartridge, roller, and fuser unit to maintain top performance and to avoid print quality problems and paper feed problems resulting from...
The following items should be installed by a trained service professional, except for the toner cartridge. 7 MAINTENANCE 7.11 We strongly recommend that items be replaced after you have printed a specified number of pages: Items ADF rubber pad ADF roller ...the consumables and replacement parts, contact your machine. Consumables and Replacement Parts From time to time, you bought your Xerox dealer or the retailer where you needs to replace the toner cartridge, roller, and fuser unit to maintain top performance and to avoid print quality problems and paper feed problems resulting from...
User Guide
Page 111
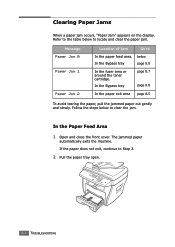
... the paper does not exit, continue to In the paper feed area. below In the Bypass tray page 8.8 In the fuser area or around the toner cartridge. In the Paper Feed Area 1 Open and close the front cover. Clearing Paper Jams When a paper jam occurs, "Paper Jam" appears on the display...
... the paper does not exit, continue to In the paper feed area. below In the Bypass tray page 8.8 In the fuser area or around the toner cartridge. In the Paper Feed Area 1 Open and close the front cover. Clearing Paper Jams When a paper jam occurs, "Paper Jam" appears on the display...

User Guide
Page 112
If there is any resistance and the paper does not move when you pull or if you cannot see the paper in this area, skip to resume printing. In the Paper Exit Area 1 Open and close the front cover to the fuser area around the toner cartridge. TROUBLESHOOTING 8.5 The jammed paper 8 automatically exits the machine. See page 8.7. 4 Insert the paper tray into place. 5 Open and close the front cover. If the paper does not exit, continue to Step 2. 3 Remove the jammed paper by gently pulling it snaps into the machine until it straight out.
If there is any resistance and the paper does not move when you pull or if you cannot see the paper in this area, skip to resume printing. In the Paper Exit Area 1 Open and close the front cover to the fuser area around the toner cartridge. TROUBLESHOOTING 8.5 The jammed paper 8 automatically exits the machine. See page 8.7. 4 Insert the paper tray into place. 5 Open and close the front cover. If the paper does not exit, continue to Step 2. 3 Remove the jammed paper by gently pulling it snaps into the machine until it straight out.
User Guide
Page 114
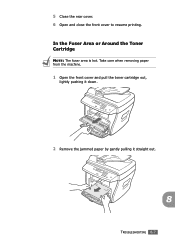
5 Close the rear cover. 6 Open and close the front cover to resume printing. Take care when removing paper from the machine. 1 Open the front cover and pull the toner cartridge out, lightly pushing it down. 2 Remove the jammed paper by gently pulling it straight out. 8 TROUBLESHOOTING 8.7 In the Fuser Area or Around the Toner Cartridge NOTE: The fuser area is hot.
5 Close the rear cover. 6 Open and close the front cover to resume printing. Take care when removing paper from the machine. 1 Open the front cover and pull the toner cartridge out, lightly pushing it down. 2 Remove the jammed paper by gently pulling it straight out. 8 TROUBLESHOOTING 8.7 In the Fuser Area or Around the Toner Cartridge NOTE: The fuser area is hot.

