User Guide
Page 6
... the Drum 7.10 Consumables and Replacement Parts 7.11 Chapter 8: TROUBLESHOOTING Clearing Document Jams 8.2 Input Misfeed 8.2 Exit Misfeed 8.3 Roller Misfeed 8.3 Clearing Paper Jams 8.4 In the Paper Feed Area 8.4 In the Paper Exit Area 8.5 In the Fuser Area or Around the Toner Cartridge . 8.7 In... the Bypass Tray 8.8 Tips for Avoiding Paper Jams When Printing on the A5-sized Paper 8.9 Tips for Avoiding Paper Jams 8.10 Clearing LCD Error Messages 8.11 Solving Problems 8.14 Paper Feeding Problems 8.14 Printing Problems 8.15 Printing Quality Problems 8.18...
... the Drum 7.10 Consumables and Replacement Parts 7.11 Chapter 8: TROUBLESHOOTING Clearing Document Jams 8.2 Input Misfeed 8.2 Exit Misfeed 8.3 Roller Misfeed 8.3 Clearing Paper Jams 8.4 In the Paper Feed Area 8.4 In the Paper Exit Area 8.5 In the Fuser Area or Around the Toner Cartridge . 8.7 In... the Bypass Tray 8.8 Tips for Avoiding Paper Jams When Printing on the A5-sized Paper 8.9 Tips for Avoiding Paper Jams 8.10 Clearing LCD Error Messages 8.11 Solving Problems 8.14 Paper Feeding Problems 8.14 Printing Problems 8.15 Printing Quality Problems 8.18...

User Guide
Page 29
4 Insert the paper stack into the paper tray. For details, see page 1.13. 5 Pay attention to set up your machine for PC-printing. 1.12 GETTING STARTED After you load paper, you need to adjust the paper guides. Paper overloading may cause paper jams. 6 Slide the paper tray back in. If you want to load a different sized paper, you loaded. See page 1.18 for copying and faxing, or page 5.7 for the paper type and size you need to the paper limit mark on the left inside wall of the tray.
4 Insert the paper stack into the paper tray. For details, see page 1.13. 5 Pay attention to set up your machine for PC-printing. 1.12 GETTING STARTED After you load paper, you need to adjust the paper guides. Paper overloading may cause paper jams. 6 Slide the paper tray back in. If you want to load a different sized paper, you loaded. See page 1.18 for copying and faxing, or page 5.7 for the paper type and size you need to the paper limit mark on the left inside wall of the tray.

User Guide
Page 31
NOTES: • Do not push the paper width guide far enough to cause the materials to warp. • If you do not adjust the paper width guide, it may cause paper jams. Making Connections 1 Plug the supplied telephone line cord into the LINE jack and the other end into the wall jack. 1.14 GETTING STARTED
NOTES: • Do not push the paper width guide far enough to cause the materials to warp. • If you do not adjust the paper width guide, it may cause paper jams. Making Connections 1 Plug the supplied telephone line cord into the LINE jack and the other end into the wall jack. 1.14 GETTING STARTED

User Guide
Page 45
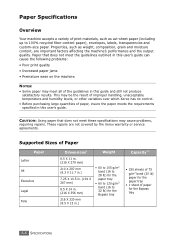
... recommended may be reduced depending on paper thickness. **. If you experience excessive jamming, load one sheet at a time through the Bypass tray. 3.2 PAPER HANDLING Maximum capacity may cause paper jams or print quality problems. Size, Input Sources and Capacities Size (mm/in.) Input Source/Capacity* Paper Tray Bypass Tray Plain paper Letter (215.9 x 279/8.5 x 11) A4 (210...
... recommended may be reduced depending on paper thickness. **. If you experience excessive jamming, load one sheet at a time through the Bypass tray. 3.2 PAPER HANDLING Maximum capacity may cause paper jams or print quality problems. Size, Input Sources and Capacities Size (mm/in.) Input Source/Capacity* Paper Tray Bypass Tray Plain paper Letter (215.9 x 279/8.5 x 11) A4 (210...

User Guide
Page 46
... may occur. • Store paper in laser printers. • To prevent special materials, such as transparencies and label sheets from sticking together, remove them from contaminating your labels' adhesive material can cause paper jams and the poor print quality. • Use only high quality copier grade paper. PAPER HANDLING 3.3 DO NOT use . Paper jams may accumulate on the...
... may occur. • Store paper in laser printers. • To prevent special materials, such as transparencies and label sheets from sticking together, remove them from contaminating your labels' adhesive material can cause paper jams and the poor print quality. • Use only high quality copier grade paper. PAPER HANDLING 3.3 DO NOT use . Paper jams may accumulate on the...

User Guide
Page 47
Exposed areas can cause labels to peel off during printing, which can cause paper jams. Exposed adhesive can also cause damage to the rear output slot. • To avoid paper jams, do not open the cover. the rear output slot (face up) and the front output tray (face down). ... machine more than once. Selecting an Output Location The machine has two output locations; To use Carbonless paper and Tracing paper. The adhesive backing is printing. 3.4 PAPER HANDLING NOTES: • If paper coming out of the front output tray has problems, such as excessive curl, try printing to machine ...
Exposed areas can cause labels to peel off during printing, which can cause paper jams. Exposed adhesive can also cause damage to the rear output slot. • To avoid paper jams, do not open the cover. the rear output slot (face up) and the front output tray (face down). ... machine more than once. Selecting an Output Location The machine has two output locations; To use Carbonless paper and Tracing paper. The adhesive backing is printing. 3.4 PAPER HANDLING NOTES: • If paper coming out of the front output tray has problems, such as excessive curl, try printing to machine ...

User Guide
Page 51
... an uncurled edge at the top side. NOTES: • Always load only the print materials specified in the Specifications on page A.6 to avoid paper jams and print quality problems. • Flatten any curl on 76mm X 127mm (3 X 5 in .), the largest size acceptable, and weighing between 16 lb and 32 ..., open the rear output tray. 1 Load a sheet of the print material with the print side face up to 150 sheets of the tray. 3.8 PAPER HANDLING Postcards, 3.5 by 14 in.) Acceptable print materials are not currently loaded in .) and the maximum size is not guaranteed. The printed side should ...
... an uncurled edge at the top side. NOTES: • Always load only the print materials specified in the Specifications on page A.6 to avoid paper jams and print quality problems. • Flatten any curl on 76mm X 127mm (3 X 5 in .), the largest size acceptable, and weighing between 16 lb and 32 ..., open the rear output tray. 1 Load a sheet of the print material with the print side face up to 150 sheets of the tray. 3.8 PAPER HANDLING Postcards, 3.5 by 14 in.) Acceptable print materials are not currently loaded in .) and the maximum size is not guaranteed. The printed side should ...

User Guide
Page 108
This chapter includes: • Clearing Document Jams • Clearing Paper Jams • Clearing LCD Error Messages • Solving Problems 8 TROUBLESHOOTING This chapter gives helpful information for what to do if you encounter an error.
This chapter includes: • Clearing Document Jams • Clearing Paper Jams • Clearing LCD Error Messages • Solving Problems 8 TROUBLESHOOTING This chapter gives helpful information for what to do if you encounter an error.
User Guide
Page 111
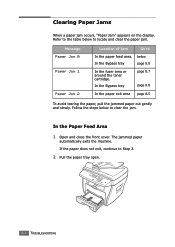
... toner cartridge. below to clear the jam. In the Paper Feed Area 1 Open and close the front cover. The jammed paper automatically exits the machine. Message Paper Jam 0 Paper Jam 1 Paper Jam 2 Location of Jam Go to Step 2. 2 Pull the paper tray open. 8.4 TROUBLESHOOTING Follow the steps below to locate and clear the paper jam. Clearing Paper Jams When a paper jam occurs, "Paper Jam" appears on the display. In the...
... toner cartridge. below to clear the jam. In the Paper Feed Area 1 Open and close the front cover. The jammed paper automatically exits the machine. Message Paper Jam 0 Paper Jam 1 Paper Jam 2 Location of Jam Go to Step 2. 2 Pull the paper tray open. 8.4 TROUBLESHOOTING Follow the steps below to locate and clear the paper jam. Clearing Paper Jams When a paper jam occurs, "Paper Jam" appears on the display. In the...

User Guide
Page 112
See page 8.7. 4 Insert the paper tray into the machine until it straight out. If the paper does not exit, continue to the fuser area around the toner cartridge. TROUBLESHOOTING 8.5 In the Paper Exit Area 1 Open and close the front cover to resume printing. The jammed paper 8 automatically exits the machine. If there is any resistance and the paper does not move when you pull or if you cannot see the paper in this area, skip to Step 2. 3 Remove the jammed paper by gently pulling it snaps into place. 5 Open and close the front cover.
See page 8.7. 4 Insert the paper tray into the machine until it straight out. If the paper does not exit, continue to the fuser area around the toner cartridge. TROUBLESHOOTING 8.5 In the Paper Exit Area 1 Open and close the front cover to resume printing. The jammed paper 8 automatically exits the machine. If there is any resistance and the paper does not move when you pull or if you cannot see the paper in this area, skip to Step 2. 3 Remove the jammed paper by gently pulling it snaps into place. 5 Open and close the front cover.

User Guide
Page 115
Printing automatically resumes. In that case, pull the paper out of the machine. 8.8 TROUBLESHOOTING In the Bypass Tray "Paper Jam 0" , "Paper Jam 1" appears on the display when you try to print using the Bypass tray and the machine does not detect paper, due to no paper or improper paper loading. "Paper Jam 0" , "Paper Jam 1" also may occur when the paper is not properly fed into the machine through the Bypass tray. 3 Replace the toner cartridge and close the front cover.
Printing automatically resumes. In that case, pull the paper out of the machine. 8.8 TROUBLESHOOTING In the Bypass Tray "Paper Jam 0" , "Paper Jam 1" appears on the display when you try to print using the Bypass tray and the machine does not detect paper, due to no paper or improper paper loading. "Paper Jam 0" , "Paper Jam 1" also may occur when the paper is not properly fed into the machine through the Bypass tray. 3 Replace the toner cartridge and close the front cover.
User Guide
Page 116
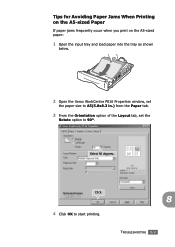
Select 90 degrees. Click. 4 Click OK to 90º. Tips for Avoiding Paper Jams When Printing on the A5-sized Paper If paper jams frequently occur when you print on the A5-sized paper: 1 Open the input tray and load paper into the tray as shown below. 2 Open the Xerox WorkCentre PE16 Properties window, set the paper size to A5(5.8x8.3 in.) from the Paper tab. 3 From the Orientation option of the Layout tab, set the Rotate option to start printing. 8 TROUBLESHOOTING 8.9
Select 90 degrees. Click. 4 Click OK to 90º. Tips for Avoiding Paper Jams When Printing on the A5-sized Paper If paper jams frequently occur when you print on the A5-sized paper: 1 Open the input tray and load paper into the tray as shown below. 2 Open the Xerox WorkCentre PE16 Properties window, set the paper size to A5(5.8x8.3 in.) from the Paper tab. 3 From the Orientation option of the Layout tab, set the Rotate option to start printing. 8 TROUBLESHOOTING 8.9

User Guide
Page 117
... correctly. • Do not overload the paper tray. Tips for Avoiding Paper Jams By selecting the correct paper types, most paper jams can be avoided. Ensure that the paper is facing down in the paper tray and facing up in the Bypass tray. 8.10 TROUBLESHOOTING When a paper jam occurs, follow the steps outlined in "Clearing Paper Jams" on page 8.4. • Follow the...
... correctly. • Do not overload the paper tray. Tips for Avoiding Paper Jams By selecting the correct paper types, most paper jams can be avoided. Ensure that the paper is facing down in the paper tray and facing up in the Bypass tray. 8.10 TROUBLESHOOTING When a paper jam occurs, follow the steps outlined in "Clearing Paper Jams" on page 8.4. • Follow the...

User Guide
Page 120
... this, you were trying to redial a previously busy station. Clear the jam. See page 8.5. Stop Pressed Toner Empty Toner Low Meaning Suggested solutions Paper has jammed in the fuser area. Or remove the jammed paper from the Bypass tray. See page 8.7. Try again. See page 8.4. Load paper in the Bypass tray. Display Paper Jam 0 Paper Jam 1 Paper Jam 2 Power Failure Retry Redial?
... this, you were trying to redial a previously busy station. Clear the jam. See page 8.5. Stop Pressed Toner Empty Toner Low Meaning Suggested solutions Paper has jammed in the fuser area. Or remove the jammed paper from the Bypass tray. See page 8.7. Try again. See page 8.4. Load paper in the Bypass tray. Display Paper Jam 0 Paper Jam 1 Paper Jam 2 Power Failure Retry Redial?

User Guide
Page 121
... page 8.4. • Ensure that the paper guides are using the correct type of paper. Paper does not feed into the machine. The paper keeps jamming. See "Paper Specifications" on page A.6. • There is not too much paper in the paper exit. Ensure that there is too much paper in the paper tray. If the problem persists, please call for a laser printer.
... page 8.4. • Ensure that the paper guides are using the correct type of paper. Paper does not feed into the machine. The paper keeps jamming. See "Paper Specifications" on page A.6. • There is not too much paper in the paper exit. Ensure that there is too much paper in the paper tray. If the problem persists, please call for a laser printer.
User Guide
Page 131
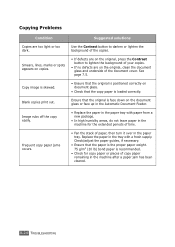
...of your copies. • If no defects are on the document glass or face up in the machine for copy paper or pieces of copy paper remaining in the machine after a paper jam has been cleared. 8.24 TROUBLESHOOTING Smears, lines, marks or spots appears on copies. • If defects are ...image is skewed. • Ensure that the copy paper is loaded correctly. Frequent copy paper jams occurs. • Fan the stack of paper, then turn it over in the tray with paper from a new package. • In high humidity areas, do not leave paper in the Automatic Document Feeder. Image rubs off the...
...of your copies. • If no defects are on the document glass or face up in the machine for copy paper or pieces of copy paper remaining in the machine after a paper jam has been cleared. 8.24 TROUBLESHOOTING Smears, lines, marks or spots appears on copies. • If defects are ...image is skewed. • Ensure that the copy paper is loaded correctly. Frequent copy paper jams occurs. • Fan the stack of paper, then turn it over in the tray with paper from a new package. • In high humidity areas, do not leave paper in the Automatic Document Feeder. Image rubs off the...
User Guide
Page 139
... are not covered by the Xerox warranty or service agreements. This may cause problems, requiring repairs. CAUTION: Using paper that does not meet the guidelines outlined in this user's guide can cause the following problems: • Poor print quality • Increased paper jams • Premature wear on ...the machine. Properties, such as cut-sheet paper (including up to 32 lb) for the Bypass tray Capacity** • 250 sheets of 75 g/m2...
... are not covered by the Xerox warranty or service agreements. This may cause problems, requiring repairs. CAUTION: Using paper that does not meet the guidelines outlined in this user's guide can cause the following problems: • Poor print quality • Increased paper jams • Premature wear on ...the machine. Properties, such as cut-sheet paper (including up to 32 lb) for the Bypass tray Capacity** • 250 sheets of 75 g/m2...

User Guide
Page 142
... wrapped with a relative humidity of paper have more paper than can cause the humidity to 55 %. Also, as paper loses and gains moisture it absorbs and loses moisture rapidly. Paper stored for long periods may experience heat and moisture extremes, which can cause paper jams. Care should not be too dry... or too humid. • The best way to store an opened and used during the day's operation to condense on the sheets. If the machine environment is to ensure optimum performance. The paper storage environment should be...
... wrapped with a relative humidity of paper have more paper than can cause the humidity to 55 %. Also, as paper loses and gains moisture it absorbs and loses moisture rapidly. Paper stored for long periods may experience heat and moisture extremes, which can cause paper jams. Care should not be too dry... or too humid. • The best way to store an opened and used during the day's operation to condense on the sheets. If the machine environment is to ensure optimum performance. The paper storage environment should be...
User Guide
Page 144
...3.4 overlay, use 5.16 P paper guidelines 3.3 paper jam, clear 8.4 paper level indicator 3.7 paper load in bypass tray 3.8 in paper tray 1.11 paper load capacity 3.2 paper properties, set 5.7 paper size, set bypass tray 3.10 paper tray 1.18 print 5.7 paper source, set 5.8 paper type 3.2 paper type, set bypass tray 3.10 paper tray 1.18 print 5.8 parallel...12 print 5.12 power save mode, use 1.19 print order, set 5.3 print resolution 5.20 printing fitting to a selected paper size 5.11 from Windows 5.2 multiple pages on one sheet 5.8 posters 5.12 reduced or enlarged document 5.10 using overlays 5.16...
...3.4 overlay, use 5.16 P paper guidelines 3.3 paper jam, clear 8.4 paper level indicator 3.7 paper load in bypass tray 3.8 in paper tray 1.11 paper load capacity 3.2 paper properties, set 5.7 paper size, set bypass tray 3.10 paper tray 1.18 print 5.7 paper source, set 5.8 paper type 3.2 paper type, set bypass tray 3.10 paper tray 1.18 print 5.8 parallel...12 print 5.12 power save mode, use 1.19 print order, set 5.3 print resolution 5.20 printing fitting to a selected paper size 5.11 from Windows 5.2 multiple pages on one sheet 5.8 posters 5.12 reduced or enlarged document 5.10 using overlays 5.16...

User Guide
Page 192
... Fax Number List This list shows up your machine to print on the top line of operation. Multi-Communication Report This report is no paper loaded or a paper jam has occurred. The first available menu item, "Phone Book" displays on the bottom line. 2 Press the scroll button (¦ or ‹) to display the...
... Fax Number List This list shows up your machine to print on the top line of operation. Multi-Communication Report This report is no paper loaded or a paper jam has occurred. The first available menu item, "Phone Book" displays on the bottom line. 2 Press the scroll button (¦ or ‹) to display the...


