User Guide
Page 8
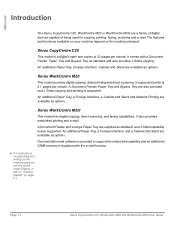
... Documentation and software is provided to "Getting Started" on page 2-1. Page 1-2 Xerox CopyCentre C20, WorkCentre M20 and WorkCentre M20i User Guide Xerox WorkCentre M20 This model provides digital copying, direct printing and direct scanning. An additional ...Feeder and a single Paper Tray are supplied as options. The features and functions available on your machine depend on the model purchased: Xerox CopyCentre C20 This model is also supported. It also provides networked printing and e-mail. Welcome Introduction The Xerox CopyCentre C20, WorkCentre M20 or WorkCentre M20i...
... Documentation and software is provided to "Getting Started" on page 2-1. Page 1-2 Xerox CopyCentre C20, WorkCentre M20 and WorkCentre M20i User Guide Xerox WorkCentre M20 This model provides digital copying, direct printing and direct scanning. An additional ...Feeder and a single Paper Tray are supplied as options. The features and functions available on your machine depend on the model purchased: Xerox CopyCentre C20 This model is also supported. It also provides networked printing and e-mail. Welcome Introduction The Xerox CopyCentre C20, WorkCentre M20 or WorkCentre M20i...
User Guide
Page 28
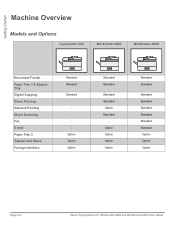
Option Option Option Standard Standard Standard Standard Option Standard Option Option Option Option Standard Standard Standard Standard Standard Standard Standard Standard Option Option Option Page 2-4 Xerox CopyCentre C20, WorkCentre M20 and WorkCentre M20i User Guide Getting Started Machine Overview Models and Options CopyCentre C20 WorkCentre M20 WorkCentre M20i Document Feeder Paper Tray 1 & Bypass Tray Digital Copying Direct Printing Network Printing Direct Scanning Fax E-mail Paper Tray 2 Cabinet and Stand Foreign Interface Standard Standard Standard -
Option Option Option Standard Standard Standard Standard Option Standard Option Option Option Option Standard Standard Standard Standard Standard Standard Standard Standard Option Option Option Page 2-4 Xerox CopyCentre C20, WorkCentre M20 and WorkCentre M20i User Guide Getting Started Machine Overview Models and Options CopyCentre C20 WorkCentre M20 WorkCentre M20i Document Feeder Paper Tray 1 & Bypass Tray Digital Copying Direct Printing Network Printing Direct Scanning Fax E-mail Paper Tray 2 Cabinet and Stand Foreign Interface Standard Standard Standard -
User Guide
Page 29
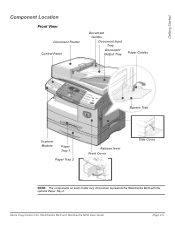
Xerox CopyCentre C20, WorkCentre M20 and WorkCentre M20i User Guide Page 2-5 Getting Started Component Location Front View: Document Feeder Control Panel Document Guides Document Input Tray Document Output Tray Paper Guides Bypass Tray Scanner Module Paper Tray 1 Paper Tray 2 Release lever Front Cover Side Cover NOTE: The components on each model vary, this picture represents the WorkCentre M20i with the optional Paper Tray 2.
Xerox CopyCentre C20, WorkCentre M20 and WorkCentre M20i User Guide Page 2-5 Getting Started Component Location Front View: Document Feeder Control Panel Document Guides Document Input Tray Document Output Tray Paper Guides Bypass Tray Scanner Module Paper Tray 1 Paper Tray 2 Release lever Front Cover Side Cover NOTE: The components on each model vary, this picture represents the WorkCentre M20i with the optional Paper Tray 2.
User Guide
Page 30
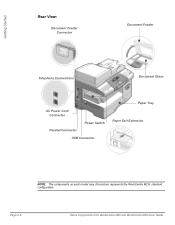
Page 2-6 Xerox CopyCentre C20, WorkCentre M20 and WorkCentre M20i User Guide Getting Started Rear View: Document Feeder Connector Document Feeder Telephone Connections Document Glass AC Power Cord Connector Parallel Connector Power Switch USB Connector Paper Tray Paper Exit Extension NOTE: The components on each model vary, this picture represents the WorkCentre M20i, standard configuration.
Page 2-6 Xerox CopyCentre C20, WorkCentre M20 and WorkCentre M20i User Guide Getting Started Rear View: Document Feeder Connector Document Feeder Telephone Connections Document Glass AC Power Cord Connector Parallel Connector Power Switch USB Connector Paper Tray Paper Exit Extension NOTE: The components on each model vary, this picture represents the WorkCentre M20i, standard configuration.
User Guide
Page 31
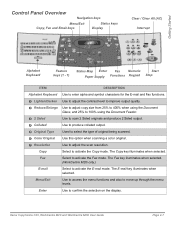
...Menu/Exit Use to access the menu functions and also to activate the Copy mode. Xerox CopyCentre C20, WorkCentre M20 and WorkCentre M20i User Guide Page 2-7 The Fax key illuminates when selected. (WorkCentre M20i only.) E-mail Select to adjust the scan resolution. Getting Started Control Panel Overview Navigation... Reduce/Enlarge Use to adjust copy size from 25% to 400% when using the Document Glass, and 25% to 100% using the Document Feeder. 3 2 Sided Use to scan 2 Sided originals and produce 2 Sided output. 4 Collated Use to produce collated output. 5 Original Type Used...
...Menu/Exit Use to access the menu functions and also to activate the Copy mode. Xerox CopyCentre C20, WorkCentre M20 and WorkCentre M20i User Guide Page 2-7 The Fax key illuminates when selected. (WorkCentre M20i only.) E-mail Select to adjust the scan resolution. Getting Started Control Panel Overview Navigation... Reduce/Enlarge Use to adjust copy size from 25% to 400% when using the Document Glass, and 25% to 100% using the Document Feeder. 3 2 Sided Use to scan 2 Sided originals and produce 2 Sided output. 4 Collated Use to produce collated output. 5 Original Type Used...
User Guide
Page 32
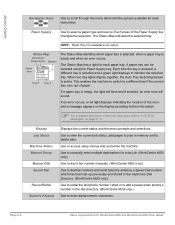
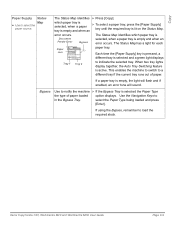
...for each paper tray. Each press of paper. Status Map Document Feeder Error Bypass Paper Jam Tray 1 Tray 2 The Status Map identifies which has been set up previously and stored in the machine's Dial Directory. (WorkCentre M20i only.) Use to redial the last phone number called or to...when storing a number in memory and to delete jobs. A paper tray can be selected using the Paper Supply key. Page 2-8 Xerox CopyCentre C20, WorkCentre M20 and WorkCentre M20i User Guide Paper Supply Use to access setup menus and customise the machine. Use to select a paper type and source. NOTE:...
...for each paper tray. Each press of paper. Status Map Document Feeder Error Bypass Paper Jam Tray 1 Tray 2 The Status Map identifies which has been set up previously and stored in the machine's Dial Directory. (WorkCentre M20i only.) Use to redial the last phone number called or to...when storing a number in memory and to delete jobs. A paper tray can be selected using the Paper Supply key. Page 2-8 Xerox CopyCentre C20, WorkCentre M20 and WorkCentre M20i User Guide Paper Supply Use to access setup menus and customise the machine. Use to select a paper type and source. NOTE:...
User Guide
Page 36
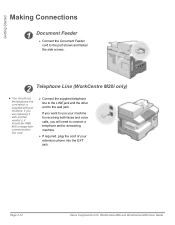
Getting Started Making Connections 1 Document Feeder ¾ Connect the Document Feeder cord to the wall jack. Page 2-12 Xerox CopyCentre C20, WorkCentre M20 and WorkCentre M20i User Guide If you will need to connect a telephone and/or answering machine. ¾ If required, plug the cord of your machine. If you ...¾ Connect the supplied telephone line to the LINE jack and the other end to the port shown and fasten the side screws. 2 Telephone Line (WorkCentre M20i only) z You should use the telephone line cord which is supplied with your extension phone into the EXT jack.
Getting Started Making Connections 1 Document Feeder ¾ Connect the Document Feeder cord to the wall jack. Page 2-12 Xerox CopyCentre C20, WorkCentre M20 and WorkCentre M20i User Guide If you will need to connect a telephone and/or answering machine. ¾ If required, plug the cord of your machine. If you ...¾ Connect the supplied telephone line to the LINE jack and the other end to the port shown and fasten the side screws. 2 Telephone Line (WorkCentre M20i only) z You should use the telephone line cord which is supplied with your extension phone into the EXT jack.
User Guide
Page 55
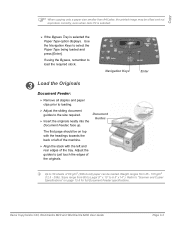
...50 sheets of 80 g/m2 (20lb bond) paper can be on page 12-5 for full Document Feeder specifications. Document Guides The first page should be loaded. Xerox CopyCentre C20, WorkCentre M20 and WorkCentre M20i User Guide Page 3-3 If using the Bypass, remember to just touch the edges of the tray.... Auto Fit is selected. ¾ If the Bypass Tray is selected the Paper Type option displays. Navigation Keys 3 Load the Originals Document Feeder: ¾ Remove all staples and paper clips prior to loading. ¾ Adjust the sliding document guides to "Scanner and Copier Specifications" ...
...50 sheets of 80 g/m2 (20lb bond) paper can be on page 12-5 for full Document Feeder specifications. Document Guides The first page should be loaded. Xerox CopyCentre C20, WorkCentre M20 and WorkCentre M20i User Guide Page 3-3 If using the Bypass, remember to just touch the edges of the tray.... Auto Fit is selected. ¾ If the Bypass Tray is selected the Paper Type option displays. Navigation Keys 3 Load the Originals Document Feeder: ¾ Remove all staples and paper clips prior to loading. ¾ Adjust the sliding document guides to "Scanner and Copier Specifications" ...
User Guide
Page 56
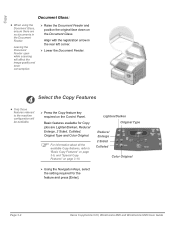
... are no documents in the rear left corner. ¾ Lower the Document Feeder. 4 Select the Copy Features z Only those features relevant to "Basic Copy Features" on page 3-6, and "Special Copy Features" on page 3-10. Page 3-4 Xerox CopyCentre C20, WorkCentre M20 and WorkCentre M20i User Guide Copy Document Glass: z When using the Document Glass, ensure there...
... are no documents in the rear left corner. ¾ Lower the Document Feeder. 4 Select the Copy Features z Only those features relevant to "Basic Copy Features" on page 3-6, and "Special Copy Features" on page 3-10. Page 3-4 Xerox CopyCentre C20, WorkCentre M20 and WorkCentre M20i User Guide Copy Document Glass: z When using the Document Glass, ensure there...
User Guide
Page 58
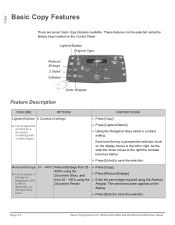
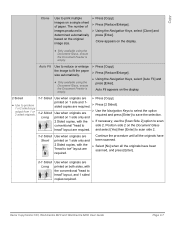
...Press [Enter] to save the selection. Copy Basic Copy Features There are seven basic Copy features available. Page 3-6 Xerox CopyCentre C20, WorkCentre M20 and WorkCentre M20i User Guide z Use to the left or right. As the selection block moves to the right the contrast becomes ...]. ¾ Using the Navigation Keys select a contrast setting. These features can be selected using the Numeric Document Feeder. Lighten/Darken Original Type Reduce/ Enlarge 2 Sided Collated Color Original Feature Description FEATURE OPTIONS INSTRUCTIONS Lighten/Darken 5 Contrast Settings ¾ ...
...Press [Enter] to save the selection. Copy Basic Copy Features There are seven basic Copy features available. Page 3-6 Xerox CopyCentre C20, WorkCentre M20 and WorkCentre M20i User Guide z Use to the left or right. As the selection block moves to the right the contrast becomes ...]. ¾ Using the Navigation Keys select a contrast setting. These features can be selected using the Numeric Document Feeder. Lighten/Darken Original Type Reduce/ Enlarge 2 Sided Collated Color Original Feature Description FEATURE OPTIONS INSTRUCTIONS Lighten/Darken 5 Contrast Settings ¾ ...
User Guide
Page 59
..., use the [Scan Side 2] option to scan conventional "head to head" layout, and 1 sided copies required. z Only available using the Document Glass, ensure the Document Feeder is empty. ¾ Press [Copy]. ¾ Press [Reduce/Enlarge]. ¾ Using the Navigation Keys, select [Auto Fit] and press [Enter]. z Only available using... Glass head" layout are ¾ Use the Navigation Keys to select the option required and press [Enter] to fit the paper size automatically. Xerox CopyCentre C20, WorkCentre M20 and WorkCentre M20i User Guide Page 3-7 Long printed on the display.
..., use the [Scan Side 2] option to scan conventional "head to head" layout, and 1 sided copies required. z Only available using the Document Glass, ensure the Document Feeder is empty. ¾ Press [Copy]. ¾ Press [Reduce/Enlarge]. ¾ Using the Navigation Keys, select [Auto Fit] and press [Enter]. z Only available using... Glass head" layout are ¾ Use the Navigation Keys to select the option required and press [Enter] to fit the paper size automatically. Xerox CopyCentre C20, WorkCentre M20 and WorkCentre M20i User Guide Page 3-7 Long printed on the display.
User Guide
Page 61
... is Document Feeder Error Bypass selected, when a paper tray is selected and a green light displays Tray 1 Tray 2 to in the Bypass Tray. If using the Bypass, remember to notify the machine ¾ If the Bypass Tray is selected the Paper Type the type of paper. Xerox CopyCentre C20, WorkCentre M20 and WorkCentre M20i User Guide...
... is Document Feeder Error Bypass selected, when a paper tray is selected and a green light displays Tray 1 Tray 2 to in the Bypass Tray. If using the Bypass, remember to notify the machine ¾ If the Bypass Tray is selected the Paper Type the type of paper. Xerox CopyCentre C20, WorkCentre M20 and WorkCentre M20i User Guide...
User Guide
Page 67
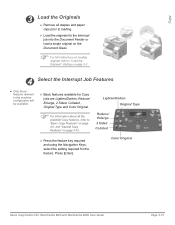
Color Original Xerox CopyCentre C20, WorkCentre M20 and WorkCentre M20i User Guide Page 3-15 Lighten/Darken Original Type Reduce/ Enlarge 2 Sided Collated ¾ Press the feature key required and using the Navigation Keys, select the ...]. Copy 3. Load the Originals ¾ Remove all staples and paper clips prior to loading. ¾ Load the originals for the Interrupt job into the Document Feeder or load a single original on the Document Glass. ) For full instructions on loading originals refer to "Load the Originals" starting on page 3-10.
Color Original Xerox CopyCentre C20, WorkCentre M20 and WorkCentre M20i User Guide Page 3-15 Lighten/Darken Original Type Reduce/ Enlarge 2 Sided Collated ¾ Press the feature key required and using the Navigation Keys, select the ...]. Copy 3. Load the Originals ¾ Remove all staples and paper clips prior to loading. ¾ Load the originals for the Interrupt job into the Document Feeder or load a single original on the Document Glass. ) For full instructions on loading originals refer to "Load the Originals" starting on page 3-10.

User Guide
Page 69
... Center & Edges Not Auto Center Transparencies Glass / Document X O X X Feeder O O O X Not Auto Center R/E % Glass / Document X O X X O X O O O Feeder Binder Holes & Border Surround Only AutoFit Glass X X X X O X O X O Small Orig Only Clone Glass X O X X O X O X O Small Orig Only Collate Glass / Document X X X X O O O O X Feeder Not Book Center & Edges Key: O= X= Compatible Incompatible Xerox CopyCentre C20, WorkCentre M20 and WorkCentre M20i User Guide Page 3-17 Copy Compatible Features The...
... Center & Edges Not Auto Center Transparencies Glass / Document X O X X Feeder O O O X Not Auto Center R/E % Glass / Document X O X X O X O O O Feeder Binder Holes & Border Surround Only AutoFit Glass X X X X O X O X O Small Orig Only Clone Glass X O X X O X O X O Small Orig Only Collate Glass / Document X X X X O O O O X Feeder Not Book Center & Edges Key: O= X= Compatible Incompatible Xerox CopyCentre C20, WorkCentre M20 and WorkCentre M20i User Guide Page 3-17 Copy Compatible Features The...
User Guide
Page 84
... headings towards the back or left and rear edges of your System Administrator. 1 Document Feeder: ¾ Remove all staples and paper clips prior to loading. ¾ Adjust the sliding document guides to 8.5" x 14" ). Page 5-2 Xerox CopyCentre C20, WorkCentre M20 and WorkCentre M20i User Guide L Up to "Scanner and Copier Specifications" on page 12-5 for the...
... headings towards the back or left and rear edges of your System Administrator. 1 Document Feeder: ¾ Remove all staples and paper clips prior to loading. ¾ Adjust the sliding document guides to 8.5" x 14" ). Page 5-2 Xerox CopyCentre C20, WorkCentre M20 and WorkCentre M20i User Guide L Up to "Scanner and Copier Specifications" on page 12-5 for the...
User Guide
Page 85
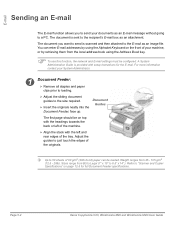
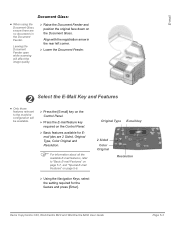
...190; Using the Navigation Keys, select the setting required for Email jobs are no documents in the rear left corner. ¾ Lower the Document Feeder. 2 Select the E-Mail Key and Features z Only those features relevant to "Basic E-mail Features" on page 5-7, and "Special E-mail ...on the Document Glass. Leaving the Document Feeder open while scanning will be available. ¾ Press the [E-mail] key on the Control Panel. ¾ Press the E-mail feature key required on page 5-9. Xerox CopyCentre C20, WorkCentre M20 and WorkCentre M20i User Guide Page 5-3 Align with the registration...
...190; Using the Navigation Keys, select the setting required for Email jobs are no documents in the rear left corner. ¾ Lower the Document Feeder. 2 Select the E-Mail Key and Features z Only those features relevant to "Basic E-mail Features" on page 5-7, and "Special E-mail ...on the Document Glass. Leaving the Document Feeder open while scanning will be available. ¾ Press the [E-mail] key on the Control Panel. ¾ Press the E-mail feature key required on page 5-9. Xerox CopyCentre C20, WorkCentre M20 and WorkCentre M20i User Guide Page 5-3 Align with the registration...
User Guide
Page 98
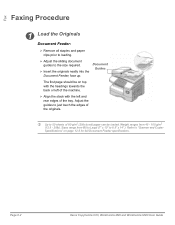
...10" to 50 sheets of 80 g/m2 (20lb bond) paper can be on page 12-5 for full Document Feeder specifications. Adjust the guides to just touch the edges of the tray. Document Guides The first page should be ...loaded. Fax Faxing Procedure 1 Load the Originals Document Feeder: ¾ Remove all staples and paper clips prior to loading. ¾ Adjust the sliding document guides to...Up to 8.5" x 14" ). Sizes range from 45 - 105 g/m2 (12.5 - 28lb). Page 6-2 Xerox CopyCentre C20, WorkCentre M20 and WorkCentre M20i User Guide
...10" to 50 sheets of 80 g/m2 (20lb bond) paper can be on page 12-5 for full Document Feeder specifications. Adjust the guides to just touch the edges of the tray. Document Guides The first page should be ...loaded. Fax Faxing Procedure 1 Load the Originals Document Feeder: ¾ Remove all staples and paper clips prior to loading. ¾ Adjust the sliding document guides to...Up to 8.5" x 14" ). Sizes range from 45 - 105 g/m2 (12.5 - 28lb). Page 6-2 Xerox CopyCentre C20, WorkCentre M20 and WorkCentre M20i User Guide

User Guide
Page 99
... affect the image quality and toner consumption. ¾ Raise the Document Feeder and position the original face down on the Document Glass. Fax Key Xerox CopyCentre C20, WorkCentre M20 and WorkCentre M20i User Guide Page 6-3 Align with the registration arrow in the Document Feeder when using the Document Glass. The Fax key remains illuminated when selected...
... affect the image quality and toner consumption. ¾ Raise the Document Feeder and position the original face down on the Document Glass. Fax Key Xerox CopyCentre C20, WorkCentre M20 and WorkCentre M20i User Guide Page 6-3 Align with the registration arrow in the Document Feeder when using the Document Glass. The Fax key remains illuminated when selected...
User Guide
Page 136
Scan TWAIN Scanner Program The Xerox WorkCentre M20 and M20i TWAIN Scanner program is a program for PC printing that you can be fed from the Document Feeder or placed on the Document Glass. The TWAIN driver is used to scan images, graphics, photographs, and printed text. Using an independent protocol and the ... converts the scanned image into a standard format that supports Windows 98, Windows NT4.0, Windows 2000, Windows ME and Windows XP environments. Documents can edit. Page 8-2 Xerox CopyCentre C20, WorkCentre M20 and WorkCentre M20i User Guide
Scan TWAIN Scanner Program The Xerox WorkCentre M20 and M20i TWAIN Scanner program is a program for PC printing that you can be fed from the Document Feeder or placed on the Document Glass. The TWAIN driver is used to scan images, graphics, photographs, and printed text. Using an independent protocol and the ... converts the scanned image into a standard format that supports Windows 98, Windows NT4.0, Windows 2000, Windows ME and Windows XP environments. Documents can edit. Page 8-2 Xerox CopyCentre C20, WorkCentre M20 and WorkCentre M20i User Guide

User Guide
Page 137
Adjust the guides to "Loading Paper" on page 42. Xerox CopyCentre C20, WorkCentre M20 and WorkCentre M20i User Guide Page 8-3 Scan Scanning Procedure 1 Open the Image Editing Application z For instructions on loading media, refer to just touch the edges of ...190; Open your image editing application and acquire the WorkCentre M20 TWAIN Scanner. For full media specifications refer to the size required. ¾ Insert the originals neatly into electronic images that you can use in other documents. 32 Load the Originals Document Feeder: ¾ Remove all staples and paper clips ...
Adjust the guides to "Loading Paper" on page 42. Xerox CopyCentre C20, WorkCentre M20 and WorkCentre M20i User Guide Page 8-3 Scan Scanning Procedure 1 Open the Image Editing Application z For instructions on loading media, refer to just touch the edges of ...190; Open your image editing application and acquire the WorkCentre M20 TWAIN Scanner. For full media specifications refer to the size required. ¾ Insert the originals neatly into electronic images that you can use in other documents. 32 Load the Originals Document Feeder: ¾ Remove all staples and paper clips ...


