Quick Use Guide
Page 16
... a test print from the print driver or submit a job to install multiple components such as printer drivers, user documentation and PPDs (PostScript® Printer Descriptions) at the same time. Install Scan Driver - Installs just the print drivers. Install Print Drivers This procedure describes how to the CD drive. The driver screen is successful, continue on page 33. Installs both the print drivers and the scan drivers. If the print operation failed, refer to the System Administration CD that was delivered with your machine. 12 quick use the installer, load the Drivers...
... a test print from the print driver or submit a job to install multiple components such as printer drivers, user documentation and PPDs (PostScript® Printer Descriptions) at the same time. Install Scan Driver - Installs just the print drivers. Install Print Drivers This procedure describes how to the CD drive. The driver screen is successful, continue on page 33. Installs both the print drivers and the scan drivers. If the print operation failed, refer to the System Administration CD that was delivered with your machine. 12 quick use the installer, load the Drivers...
Quick Use Guide
Page 18
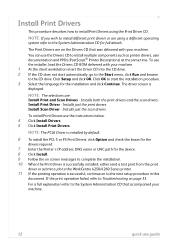
9 Enter the Login Name and Password. 10 Click Apply to confirm your selections click Apply. Click Edit in the General group to send e-mails from the device. NOTE: For more information on the E-mail Setup screen, click Edit for each options group. NOTE: A From: address is required to specify a default From: address. 13 When you have made your settings. 11 From the Properties menu, click Services > E-mail Settings > Defaults. 12 To amend the settings on all of the E-mail features including setting up address books, please refer to the System Administration CD. 14 quick use guide
9 Enter the Login Name and Password. 10 Click Apply to confirm your selections click Apply. Click Edit in the General group to send e-mails from the device. NOTE: For more information on the E-mail Setup screen, click Edit for each options group. NOTE: A From: address is required to specify a default From: address. 13 When you have made your settings. 11 From the Properties menu, click Services > E-mail Settings > Defaults. 12 To amend the settings on all of the E-mail features including setting up address books, please refer to the System Administration CD. 14 quick use guide
Quick Use Guide
Page 26
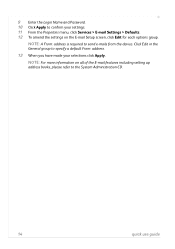
... of image Image Quality Layout Adjustment Lighten / Darken Lighten or darken the output Original Size Set size of the fax 22 quick use the numeric keypad to dial. • Speed Dial - select Speed Dial and select a pre-set speed dial number. • Add - Sending a Fax NOTE: This feature is available on all machines, but is attached to the device, select Manual Dial and dial the number on the handset, or use guide This button provides access to several recipients to the Send List to send a fax...
... of image Image Quality Layout Adjustment Lighten / Darken Lighten or darken the output Original Size Set size of the fax 22 quick use the numeric keypad to dial. • Speed Dial - select Speed Dial and select a pre-set speed dial number. • Add - Sending a Fax NOTE: This feature is available on all machines, but is attached to the device, select Manual Dial and dial the number on the handset, or use guide This button provides access to several recipients to the Send List to send a fax...

Quick Use Guide
Page 35
... default paper tray, customized reduction ratios and 2-sided copying to support both company (LDAP) and Local Address books. Address Numbers registered for each of the Services can be set to your machine is accessed from a .csv file in queue and Administrator setups. As a user, you walk up a list of frequent fax or mail recipients. Simply open your office's workflow. Use this feature. Customize your device The machine can be setup to reflect your web browser and enter...
... default paper tray, customized reduction ratios and 2-sided copying to support both company (LDAP) and Local Address books. Address Numbers registered for each of the Services can be set to your machine is accessed from a .csv file in queue and Administrator setups. As a user, you walk up a list of frequent fax or mail recipients. Simply open your office's workflow. Use this feature. Customize your device The machine can be setup to reflect your web browser and enter...
Quick Use Guide
Page 37
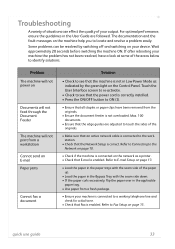
... switching off and switching on your device. Refer to E-mail Setup on page 15. Wait approximately 20 seconds before switching the machine ON. If after rebooting your machine is connected to touch the sides of your output. Touch the User Interface screen to re-activate. • Check to see that Fax is not in the User Guide are adjusted to a working telephone line and check for a dial tone. • Check that the machine is enabled. quick use guide...
... switching off and switching on your device. Refer to E-mail Setup on page 15. Wait approximately 20 seconds before switching the machine ON. If after rebooting your machine is connected to touch the sides of your output. Touch the User Interface screen to re-activate. • Check to see that Fax is not in the User Guide are adjusted to a working telephone line and check for a dial tone. • Check that the machine is enabled. quick use guide...
System Administration Guide
Page 3
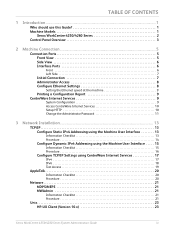
... 1 Machine Models 1 Xerox WorkCentre 4250/4260 Series 2 Control Panel Overview 3 2 Machine Connection ...5 Connection Ports 5 Front View 5 Side View 6 Interface Ports 6 Front 6 Left Side 7 Initial Connection 7 Administrator Access 8 Configure Ethernet Settings 8 Setting the Ethernet speed at the machine 9 Printing a Configuration Report 9 CentreWare Internet Services 9 System Configuration 9 Access CentreWare Internet Services 10 Setup HTTP 10 Change the Administrator Password 11 3 Network Installation ...13 TCP/IP 13 Configure Static IPv4 Addressing using the Machine User...
... 1 Machine Models 1 Xerox WorkCentre 4250/4260 Series 2 Control Panel Overview 3 2 Machine Connection ...5 Connection Ports 5 Front View 5 Side View 6 Interface Ports 6 Front 6 Left Side 7 Initial Connection 7 Administrator Access 8 Configure Ethernet Settings 8 Setting the Ethernet speed at the machine 9 Printing a Configuration Report 9 CentreWare Internet Services 9 System Configuration 9 Access CentreWare Internet Services 10 Setup HTTP 10 Change the Administrator Password 11 3 Network Installation ...13 TCP/IP 13 Configure Static IPv4 Addressing using the Machine User...

System Administration Guide
Page 47
.../IP Printing (Port 9100) on page 40 • AppleTalk Printing on page 42 • USB Printing (Windows XP/2000/2003) on page 45 • Configure your Print Driver on page 46 • Bi-Directional Communication on page 48 • Manual Print Driver Configuration on page 50 • TCP/IP Printing (OSX) on page 50 • Configure your Apple Mac Print Driver on page 52 • UNIX on page 53 • Print Driver Options: Enable/Disable the Banner Sheet on your CD drive. Xerox WorkCentre 4250/4260 Series System Administration Guide...
.../IP Printing (Port 9100) on page 40 • AppleTalk Printing on page 42 • USB Printing (Windows XP/2000/2003) on page 45 • Configure your Print Driver on page 46 • Bi-Directional Communication on page 48 • Manual Print Driver Configuration on page 50 • TCP/IP Printing (OSX) on page 50 • Configure your Apple Mac Print Driver on page 52 • UNIX on page 53 • Print Driver Options: Enable/Disable the Banner Sheet on your CD drive. Xerox WorkCentre 4250/4260 Series System Administration Guide...
System Administration Guide
Page 54
... to print a test page. 4 Print Drivers i) Click on the [Next] button. 20. Click on the [Next] button. 22. Click on the [Next] button. 25. If you to configure the machine to be your machine. 42 Xerox WorkCentre 4250/4260 Series System Administration Guide You will install. 28. Click on the [Next] button. 18. Click on the [Browse] button. 13. Windows XP/2003. Locate the Drivers folder on the CD and click on the machine. 2. b) Enter a Share...
... to print a test page. 4 Print Drivers i) Click on the [Next] button. 20. Click on the [Next] button. 22. Click on the [Next] button. 25. If you to configure the machine to be your machine. 42 Xerox WorkCentre 4250/4260 Series System Administration Guide You will install. 28. Click on the [Next] button. 18. Click on the [Browse] button. 13. Windows XP/2003. Locate the Drivers folder on the CD and click on the machine. 2. b) Enter a Share...

System Administration Guide
Page 62
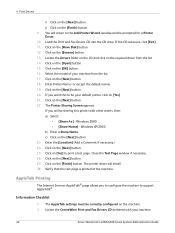
...] button. 6. Apple Mac TCP/IP Printing (OSX) Information Checklist 1. Locate the CentreWare Print and Fax Drivers CD delivered with your CD drive. 2. Install the Print Driver 1. Open the CD and select the required language, if necessary. 50 Xerox WorkCentre 4250/4260 Series System Administration Guide Change any default printer settings, as required. 11. Verify that are specific to close the [Test Page] window. 9. Select the options that the test page is printed at the machine. Click on the machine. 5. Click on the printer...
...] button. 6. Apple Mac TCP/IP Printing (OSX) Information Checklist 1. Locate the CentreWare Print and Fax Drivers CD delivered with your CD drive. 2. Install the Print Driver 1. Open the CD and select the required language, if necessary. 50 Xerox WorkCentre 4250/4260 Series System Administration Guide Change any default printer settings, as required. 11. Verify that are specific to close the [Test Page] window. 9. Select the options that the test page is printed at the machine. Click on the machine. 5. Click on the printer...
System Administration Guide
Page 65
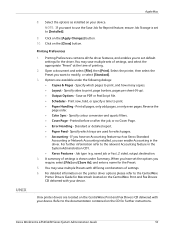
... device. Specify which trays are located on your device. Job type (e.g. For detailed information on the CentreWare Print and Fax Drivers CD delivered with your device. Xerox WorkCentre 4250/4260 Series System Administration Guide 53 UNIX Apple Mac 8. You may save multiple sets of settings, and select the appropriate "Preset" at the time of settings. 6. Unix printer drivers are used for Macintosh located on the printer driver options please refer to the CentreWare Printer Drivers Guide for which pages to [Installed]. 9. Reverse the page order. • Color...
... device. Specify which trays are located on your device. Job type (e.g. For detailed information on the CentreWare Print and Fax Drivers CD delivered with your device. Xerox WorkCentre 4250/4260 Series System Administration Guide 53 UNIX Apple Mac 8. You may save multiple sets of settings, and select the appropriate "Preset" at the time of settings. 6. Unix printer drivers are used for Macintosh located on the printer driver options please refer to the CentreWare Printer Drivers Guide for which pages to [Installed]. 9. Reverse the page order. • Color...

System Administration Guide
Page 85
... the machine are finished making changes, press the green button to scan your file(s) to print. Select the [Job Quantity] (number of the machine. 2. Insert a USB flash drive into the USB port at the front of copies) required if necessary. 9. Xerox WorkCentre 4250/4260 Series System Administration Guide 73 Print file from USB] button in the USB options screen. 3. Touch the [Print Files] button. 3. Touch [Add]. Touch [Add]. Refer to the file name. A pop-up menu will appear next to 'Store File' chapter 7 of the User Guide for instructions. 9.
... the machine are finished making changes, press the green button to scan your file(s) to print. Select the [Job Quantity] (number of the machine. 2. Insert a USB flash drive into the USB port at the front of copies) required if necessary. 9. Xerox WorkCentre 4250/4260 Series System Administration Guide 73 Print file from USB] button in the USB options screen. 3. Touch the [Print Files] button. 3. Touch [Add]. Touch [Add]. Refer to the file name. A pop-up menu will appear next to 'Store File' chapter 7 of the User Guide for instructions. 9.
System Administration Guide
Page 117
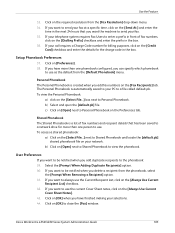
... to a file called default.pb. b) Select and open the [default.pb] file. Xerox WorkCentre 4250/4260 Series System Administration Guide 105 Click on the [Fax Recipients] tab. Click on [OK] to send your fax at a specific time, click on [Preferences]. 38. Select the [Prompt When Adding Duplicate Recipients] option. 40. Click on the [Send At:] and enter the time in the box. If you want to send your fax. 35. Use the Feature...
... to a file called default.pb. b) Select and open the [default.pb] file. Xerox WorkCentre 4250/4260 Series System Administration Guide 105 Click on the [Fax Recipients] tab. Click on [OK] to send your fax at a specific time, click on [Preferences]. 38. Select the [Prompt When Adding Duplicate Recipients] option. 40. Click on the [Send At:] and enter the time in the box. If you want to send your fax. 35. Use the Feature...
System Administration Guide
Page 119
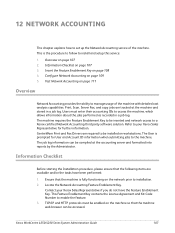
... the accounting server and formatted into reports by the Administrator. Xerox WorkCentre 4250/4260 Series System Administration Guide 107 12 Network Accounting This chapter explains how to set up the Network Accounting service of the machine with detailed cost analysis capabilities. Information Checklist on page 107 2. Print, Scan, Server Fax, and copy jobs are available and/or the tasks have the Feature Enablement Key. Locate the Network Accounting Feature Enablement Key. Contact your Xerox Sales Representative for User and...
... the accounting server and formatted into reports by the Administrator. Xerox WorkCentre 4250/4260 Series System Administration Guide 107 12 Network Accounting This chapter explains how to set up the Network Accounting service of the machine with detailed cost analysis capabilities. Information Checklist on page 107 2. Print, Scan, Server Fax, and copy jobs are available and/or the tasks have the Feature Enablement Key. Locate the Network Accounting Feature Enablement Key. Contact your Xerox Sales Representative for User and...

System Administration Guide
Page 177
Image Settings 4. the document will use at the machine. At your Workstation, open the web browser, enter the TCP/IP Address of images scanned with your selections, click the [Submit Job] button to send your print job being deleted. 9. Press [Enter]. 3. The default is sent to print. • Secure Print - When finished with the Network Scanning feature. 1. The settings also impact the job processing time of the machine in the Printing area. 6. Once validated, the remaining copies can be released...
Image Settings 4. the document will use at the machine. At your Workstation, open the web browser, enter the TCP/IP Address of images scanned with your selections, click the [Submit Job] button to send your print job being deleted. 9. Press [Enter]. 3. The default is sent to print. • Secure Print - When finished with the Network Scanning feature. 1. The settings also impact the job processing time of the machine in the Printing area. 6. Once validated, the remaining copies can be released...
User Guide
Page 86
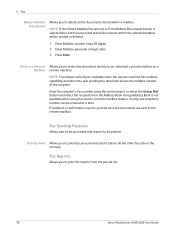
... will be printed or deleted. 1. If enabled, a confirmation report is not available when using the control panel, or select the Group Dial button and select the recipient from the pre-set list. 78 Xerox WorkCentre 4250/4260 User Guide Priority Send Allows you to delete all the other fax jobs in the memory. Press Start. Group Address Book is printed once the documents are sent to the remote mailbox. Enter Mailbox number (max 20 digits). 2. Enter the recipient's fax number using the send to...
... will be printed or deleted. 1. If enabled, a confirmation report is not available when using the control panel, or select the Group Dial button and select the recipient from the pre-set list. 78 Xerox WorkCentre 4250/4260 User Guide Priority Send Allows you to delete all the other fax jobs in the memory. Press Start. Group Address Book is printed once the documents are sent to the remote mailbox. Enter Mailbox number (max 20 digits). 2. Enter the recipient's fax number using the send to...
User Guide
Page 224
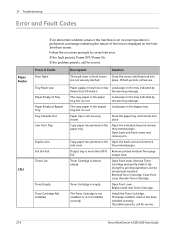
..., call for service. 216 Xerox WorkCentre 4250/4260 User Guide output area. Open back and front covers and remove jam. Output tray is more than 50 sheets). Reinstall Toner Cartridge. The Toner Cartridge is not installed, or is empty. Close front cover. Load paper in the tray indicated by (fewer than 90% Remove printed material from page full. tray has run out. Copy paper has jammed in the tray indicated by the warning message. If already installed, check it . Close the paper tray until they lock...
..., call for service. 216 Xerox WorkCentre 4250/4260 User Guide output area. Open back and front covers and remove jam. Output tray is more than 50 sheets). Reinstall Toner Cartridge. The Toner Cartridge is not installed, or is empty. Close front cover. Load paper in the tray indicated by (fewer than 90% Remove printed material from page full. tray has run out. Copy paper has jammed in the tray indicated by the warning message. If already installed, check it . Close the paper tray until they lock...

User Guide
Page 228
... Fax, Fax Receive Settings 172 L Layout / Watermark, Print 151 Lighten / Darken, Faxing 73, 83 Line Configuration, Fax Settings 174 M Machine Configurations Accessibility 204 Copier Speed 204 First Copy Out Time 204 Hardware 204 Machine Size 204 Models and Components 23 Warm Up Time 204 Machine Tests Image Quality 189 UI Test Application Checksum Verification 191 Audio Tone 190 Communications Self Test 190 220 Display Pixel 190 LED Indicator 190 Reset UI 190 Touch Area 189 UI Button 189 Video Memory...
... Fax, Fax Receive Settings 172 L Layout / Watermark, Print 151 Lighten / Darken, Faxing 73, 83 Line Configuration, Fax Settings 174 M Machine Configurations Accessibility 204 Copier Speed 204 First Copy Out Time 204 Hardware 204 Machine Size 204 Models and Components 23 Warm Up Time 204 Machine Tests Image Quality 189 UI Test Application Checksum Verification 191 Audio Tone 190 Communications Self Test 190 220 Display Pixel 190 LED Indicator 190 Reset UI 190 Touch Area 189 UI Button 189 Video Memory...

Evaluator Guide
Page 3
... same time: scan while printing or receiving an inbound fax, and interrupt a print job to us for the busy office that provide copy, print, scan, email and fax functions. Xerox WorkCentre® 4250/4260 Evaluator Guide 3 Section 1: Introducing the Xerox WorkCentre 4250/4260 Multifunction Device Product Overview Kick office productivity into high gear with letter-size documents? send your used toner cartridges to make a copy: A small size means it can be accessed at a small price! • Automatic two-sided printing saves paper. • Fax forward to email...
... same time: scan while printing or receiving an inbound fax, and interrupt a print job to us for the busy office that provide copy, print, scan, email and fax functions. Xerox WorkCentre® 4250/4260 Evaluator Guide 3 Section 1: Introducing the Xerox WorkCentre 4250/4260 Multifunction Device Product Overview Kick office productivity into high gear with letter-size documents? send your used toner cartridges to make a copy: A small size means it can be accessed at a small price! • Automatic two-sided printing saves paper. • Fax forward to email...
Evaluator Guide
Page 11
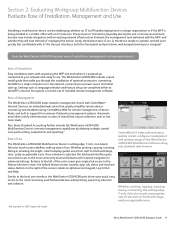
... network, connecting to a power source and initial start to advanced settings. Similar to the local user interface, the WorkCentre 4250/4260 print drivers give single-click access to the right of the WorkCentre 4250/4260 Multifunction Device using any standard web browser. Ease of device fleets; Buttons to the feature selection screen, the default feature screen (usually copy), job status and machine status. The process isn't limited to navigate? Are the user interfaces, both the front panel and print driver...
... network, connecting to a power source and initial start to advanced settings. Similar to the local user interface, the WorkCentre 4250/4260 print drivers give single-click access to the right of the WorkCentre 4250/4260 Multifunction Device using any standard web browser. Ease of device fleets; Buttons to the feature selection screen, the default feature screen (usually copy), job status and machine status. The process isn't limited to navigate? Are the user interfaces, both the front panel and print driver...
Evaluator Guide
Page 15
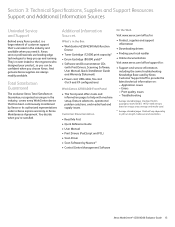
... the Box • WorkCentre 4250/4260 Multifunction Device • Toner Cartridge (12,000 print capacity)* • Drum Cartridge (80,000 yield)** • Software and Documentation CDs (with Print Drivers, Scanning Software, User Manual, Quick Installation Guide and Warranty Statement) • Power cord, USB cable, fax cord (for : • Product, supplies and support information • Downloading drivers • Finding your product, so you can be confident when you 're satisfied. Troubleshooting * Average standard pages. Xerox service professionals use leading-edge technologies to...
... the Box • WorkCentre 4250/4260 Multifunction Device • Toner Cartridge (12,000 print capacity)* • Drum Cartridge (80,000 yield)** • Software and Documentation CDs (with Print Drivers, Scanning Software, User Manual, Quick Installation Guide and Warranty Statement) • Power cord, USB cable, fax cord (for : • Product, supplies and support information • Downloading drivers • Finding your product, so you can be confident when you 're satisfied. Troubleshooting * Average standard pages. Xerox service professionals use leading-edge technologies to...


