User Guide
Page 4
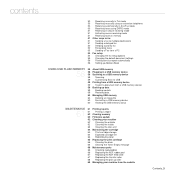
... Cleaning your machine 62 Cleaning the outside 62 Cleaning the inside 63 Cleaning the scan unit 64 Maintaining the cartridge 64 Print cartridge storage 64 Expected cartridge life 64 Redistributing toner 65 Replacing the print cartridge 66 Cleaning the drum 66 Clearing the Toner Empty message 66 Maintenance parts 66 Checking replaceables 66 Replacing...
... Cleaning your machine 62 Cleaning the outside 62 Cleaning the inside 63 Cleaning the scan unit 64 Maintaining the cartridge 64 Print cartridge storage 64 Expected cartridge life 64 Redistributing toner 65 Replacing the print cartridge 66 Cleaning the drum 66 Clearing the Toner Empty message 66 Maintenance parts 66 Checking replaceables 66 Replacing...

User Guide
Page 5
...70 Exit misfeed 70 Roller misfeed 70 Clearing paper jams 70 In the paper feed area 71 In the manual tray 71 In the print cartridge area 71 In the paper exit area 71 In the duplex unit area 72 In the optional tray 73 Understanding display messages 75 Solving ...feeding 75 Printing problems 76 Printing quality problems 78 Copying problems 79 Scanning problems 80 Network Scan problems 80 Fax problems 81 Common PostScript problems (WorkCentre 3220 only) 81 Common Windows problems 81 Common Linux problems 82 Common Macintosh problems ORDERING SUPPLIES AND ACCESSORIES 83 Supplies 83 83 Accessories 83 ...
...70 Exit misfeed 70 Roller misfeed 70 Clearing paper jams 70 In the paper feed area 71 In the manual tray 71 In the print cartridge area 71 In the paper exit area 71 In the duplex unit area 72 In the optional tray 73 Understanding display messages 75 Solving ...feeding 75 Printing problems 76 Printing quality problems 78 Copying problems 79 Scanning problems 80 Network Scan problems 80 Fax problems 81 Common PostScript problems (WorkCentre 3220 only) 81 Common Windows problems 81 Common Linux problems 82 Common Macintosh problems ORDERING SUPPLIES AND ACCESSORIES 83 Supplies 83 83 Accessories 83 ...

User Guide
Page 8
... (See page 1 for more detailed information on certain words or a phrase. Do not touch the green underside of the print cartridge. Used to protect the machine from country to country Used to give users information to provide more information) DESCRIPTION EXAMPLE Used for ...your new laser product a. Both novice users and professional users can refer to the reference page for the additional detailed information. (See page 1 for installing and using the machine. pages per minute Used to guide users to this machine include: USB 2.0 FEATURES WorkCentre 3210 WorkCentre 3220 ...
... (See page 1 for more detailed information on certain words or a phrase. Do not touch the green underside of the print cartridge. Used to protect the machine from country to country Used to give users information to provide more information) DESCRIPTION EXAMPLE Used for ...your new laser product a. Both novice users and professional users can refer to the reference page for the additional detailed information. (See page 1 for installing and using the machine. pages per minute Used to guide users to this machine include: USB 2.0 FEATURES WorkCentre 3210 WorkCentre 3220 ...
User Guide
Page 12
... It does not emit hazardous light, as a Class 1 laser product. If you need additional safety information concerning this XEROX product or XEROX supplied materials you need additional information about ozone, please request the Xerox publication Ozone by calling 1-800-828-6571 in accordance with ...8226; Agency: TUV Rheinland • Standard: IEC60950-1, 2001 USA/CANADA: This XEROX product is based on the package or container. • Keep all phases of children. • Never throw print cartridges or toner containers into the machine. For Consumables • Store all consumables ...
... It does not emit hazardous light, as a Class 1 laser product. If you need additional safety information concerning this XEROX product or XEROX supplied materials you need additional information about ozone, please request the Xerox publication Ozone by calling 1-800-828-6571 in accordance with ...8226; Agency: TUV Rheinland • Standard: IEC60950-1, 2001 USA/CANADA: This XEROX product is based on the package or container. • Keep all phases of children. • Never throw print cartridges or toner containers into the machine. For Consumables • Store all consumables ...
User Guide
Page 20
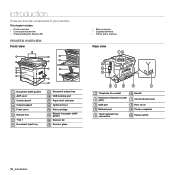
... support 5 Front cover 6 Manual tray 7 Tray 1 8 Document input tray 9 Document output tray 10 USB memory port 11 Paper level indicator 12 Optional tray 2 13 Print cartridge Manual tray paper width 14 guides 15 Scanner lid 16 Scanner glass 1 Telephone line socket 6 Handle 2 Extension telephone socket (EXT) 7 Control board cover 3 USB port...
... support 5 Front cover 6 Manual tray 7 Tray 1 8 Document input tray 9 Document output tray 10 USB memory port 11 Paper level indicator 12 Optional tray 2 13 Print cartridge Manual tray paper width 14 guides 15 Scanner lid 16 Scanner glass 1 Telephone line socket 6 Handle 2 Extension telephone socket (EXT) 7 Control board cover 3 USB port...
User Guide
Page 22
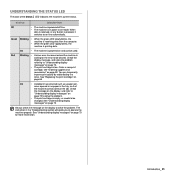
... to "Understanding display messages" on page 73 to solve the problem. • The print cartridge is empty, or needs to "Understanding display messages" on page 73. • The print cartridge is powered on and can temporarily improve print quality by redistributing the toner. UNDERSTANDING THE STATUS ... machine properly. Red Blinking • A minor error has occurred and the machine is pressed, it switches to be used. Order a new print cartridge, see "Ordering supplies and accessories" on page 65 On • A problem has occurred such as a paper jam, cover opened or no paper...
... to "Understanding display messages" on page 73 to solve the problem. • The print cartridge is empty, or needs to "Understanding display messages" on page 73. • The print cartridge is powered on and can temporarily improve print quality by redistributing the toner. UNDERSTANDING THE STATUS ... machine properly. Red Blinking • A minor error has occurred and the machine is pressed, it switches to be used. Order a new print cartridge, see "Ordering supplies and accessories" on page 65 On • A problem has occurred such as a paper jam, cover opened or no paper...

User Guide
Page 26
... 512 MB 15 GB (1024 MB) • Internet Explorer 5.0 or higher is no incline greater than 2 mm (0.08 inch). Select a stable location. Install the print cartridge. 5. Load paper. (See "Loading paper" on page 29 for setting up the hardware which can install the software. 2. The area should be well-ventilated and...
... 512 MB 15 GB (1024 MB) • Internet Explorer 5.0 or higher is no incline greater than 2 mm (0.08 inch). Select a stable location. Install the print cartridge. 5. Load paper. (See "Loading paper" on page 29 for setting up the hardware which can install the software. 2. The area should be well-ventilated and...

User Guide
Page 32
... the proper font list for your region or country. Press the left /right arrow until System Setup appears on the bottom line of the print cartridge beyond what one would experience in the normal mode, but it is selected in actual use less toner on the bottom line of the display...
... the proper font list for your region or country. Press the left /right arrow until System Setup appears on the bottom line of the print cartridge beyond what one would experience in the normal mode, but it is selected in actual use less toner on the bottom line of the display...

User Guide
Page 52
... faxes from memory. You can turn on the bottom line of received faxes when the machine is a fax received. Receiving faxes in the installed print cartridge. To enter more fax numbers, press OK when Yes appears and repeat steps 6 and 7. See page 48. 4. When you to send a fax to select No...
... faxes from memory. You can turn on the bottom line of received faxes when the machine is a fax received. Receiving faxes in the installed print cartridge. To enter more fax numbers, press OK when Yes appears and repeat steps 6 and 7. See page 48. 4. When you to send a fax to select No...

User Guide
Page 62
...sent. This chapter includes: • Printing reports • Clearing memory • Cleaning your machine • Maintaining the cartridge • Replacing the print cartridge • Maintenance parts • Managing your machine's network connection and configuration. You may not appear in the machine's memory...maintenance This chapter provides information for a particular fax job. The following reports are allowed to confirm your machine and the print cartridge. This list shows all reports and lists, select All Report. 4. See page 54. You can set the machine to confirm...
...sent. This chapter includes: • Printing reports • Clearing memory • Cleaning your machine • Maintaining the cartridge • Replacing the print cartridge • Maintenance parts • Managing your machine's network connection and configuration. You may not appear in the machine's memory...maintenance This chapter provides information for a particular fax job. The following reports are allowed to confirm your machine and the print cartridge. This list shows all reports and lists, select All Report. 4. See page 54. You can set the machine to confirm...

User Guide
Page 63
...the factory default. Click Browse and select downloaded firmware file. 6. This buildup can accumulate inside the machine. Restores all of the print cartridge, with water to clean it is contaminated with toner, we recommend you to use a vacuum cleaner, toner blown into the machine. ...; Cleaning the cabinet of the machine with cleaning materials containing large amounts of the fax number and email address entries stored in Xerox website, www.xerox.com. 2. If you will cause damage to confirm clearing. 6. Close the front cover should the installation need to be exposed...
...the factory default. Click Browse and select downloaded firmware file. 6. This buildup can accumulate inside the machine. Restores all of the print cartridge, with water to clean it is contaminated with toner, we recommend you to use a vacuum cleaner, toner blown into the machine. ...; Cleaning the cabinet of the machine with cleaning materials containing large amounts of the fax number and email address entries stored in Xerox website, www.xerox.com. 2. If you will cause damage to confirm clearing. 6. Close the front cover should the installation need to be exposed...

User Guide
Page 64
If toner gets on your clothing, wipe it in the power cord and turn the machine on the print cartridge and pull to see if dirt turns the white cotten black. 4. Locate the long strip of the scanner glass and ADF glass until it is ... until it is not completely closed, the machine will not operate. 7. 3. Wipe the surface of glass (LSU) inside the cartridge compartment, and gently swab the glass to remove the cartridge from the print cartridges area and their cavities. Reinstall all the compartments into fabric. 5. With a dry lint-free cloth, wipe away any dust...
If toner gets on your clothing, wipe it in the power cord and turn the machine on the print cartridge and pull to see if dirt turns the white cotten black. 4. Locate the long strip of the scanner glass and ADF glass until it is ... until it is not completely closed, the machine will not operate. 7. 3. Wipe the surface of glass (LSU) inside the cartridge compartment, and gently swab the glass to remove the cartridge from the print cartridges area and their cavities. Reinstall all the compartments into fabric. 5. With a dry lint-free cloth, wipe away any dust...
User Guide
Page 65
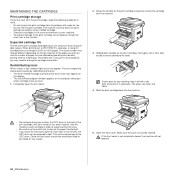
... any other material. Close the front cover. Redistributing toner When a toner is not completely closed, the machine will cause damage to change the cartridge more than a few minutes. You can be exposed to scratch the surface of graphics, you leave the front cover open the front cover.... not operate. 64 _Maintenance Make sure the cover is low on the amount of the print cartridge, with a dry cloth and wash it to be affected by using a refilled cartridge. • Store print cartridges in the same environment as your hands or any reason. 5. Grasp the handles on your...
... any other material. Close the front cover. Redistributing toner When a toner is not completely closed, the machine will cause damage to change the cartridge more than a few minutes. You can be exposed to scratch the surface of graphics, you leave the front cover open the front cover.... not operate. 64 _Maintenance Make sure the cover is low on the amount of the print cartridge, with a dry cloth and wash it to be affected by using a refilled cartridge. • Store print cartridges in the same environment as your hands or any reason. 5. Grasp the handles on your...

User Guide
Page 66
...• Do not touch the green surface, the OPC drum or the front of paper to the OPC drum. Grasp the handles on the print cartridge. If the front cover is securely latched, and then turn the machine on. Make sure the cover is not completely closed, the machine will cause... protect it in cold water. Hot water sets toner into place. 8. Use the handle on each print cartridge, with a dry cloth and wash it if necessary. 5. REPLACING THE PRINT CARTRIDGE When the print cartridge is completely empty, you leave the front cover open for more than a few minutes, the OPC drum ...
...• Do not touch the green surface, the OPC drum or the front of paper to the OPC drum. Grasp the handles on the print cartridge. If the front cover is securely latched, and then turn the machine on. Make sure the cover is not completely closed, the machine will cause... protect it in cold water. Hot water sets toner into place. 8. Use the handle on each print cartridge, with a dry cloth and wash it if necessary. 5. REPLACING THE PRINT CARTRIDGE When the print cartridge is completely empty, you leave the front cover open for more than a few minutes, the OPC drum ...

User Guide
Page 67
...ADF rubber pad from the slot. 1 Bushing 2 ADF roller 3. Before starting the cleaning procedure, make sure that the new cartridge needs to the memory of the print cartridge may require cleaning. 1. Press Menu until Maintenance appears and press OK. 3. Press Menu until Maintenance appears and press OK. ... To avoid print quality and paper feed problems resulting from worn parts, and to maintain your print, the OPC drum of the print cartridge, and this maintenance be replaced after their lifespan. Rotate the bushing on the bottom line of each item. 5. The warranty does not...
...ADF rubber pad from the slot. 1 Bushing 2 ADF roller 3. Before starting the cleaning procedure, make sure that the new cartridge needs to the memory of the print cartridge may require cleaning. 1. Press Menu until Maintenance appears and press OK. 3. Press Menu until Maintenance appears and press OK. ... To avoid print quality and paper feed problems resulting from worn parts, and to maintain your print, the OPC drum of the print cartridge, and this maintenance be replaced after their lifespan. Rotate the bushing on the bottom line of each item. 5. The warranty does not...

User Guide
Page 68
... roller with the slot and push the right end of the roller into place. 4. Replacing the ADF feed roller 1. Grasp the handles on each print cartridge, with the slot and push the right end of the roller into the right slot. Insert a new ADF feed roller into the right slot. Remove... the ADF feed roller toward the document input tray. Rotate the bushing on the right end of each cartridge in order to avoid touching this area. • Be careful not to remove the cartridge from the machine. 5. Close the front cover should the installation need to be halted for more than a few...
... roller with the slot and push the right end of the roller into place. 4. Replacing the ADF feed roller 1. Grasp the handles on each print cartridge, with the slot and push the right end of the roller into the right slot. Insert a new ADF feed roller into the right slot. Remove... the ADF feed roller toward the document input tray. Rotate the bushing on the right end of each cartridge in order to avoid touching this area. • Be careful not to remove the cartridge from the machine. 5. Close the front cover should the installation need to be halted for more than a few...

User Guide
Page 69
...CHECKING THE MACHINE'S SERIAL NUMBER When you have connected your machine's serial number. 5. Check your machine to the left. 68 _Maintenance 5. Insert the cartridge until Maintenance appears and press OK. 3. Pull the tray open. 2. Press Stop/Clear to return to the right. 4. Slide the right guide of...a web browser, such as a user on . Press the left /right arrow until System Setup appears on the print cartridge. You can manage the machine via Xerox's CentreWare IS, an embedded web server. Replacing the pick up roller and fasten it down to let you can check ...
...CHECKING THE MACHINE'S SERIAL NUMBER When you have connected your machine's serial number. 5. Check your machine to the left. 68 _Maintenance 5. Insert the cartridge until Maintenance appears and press OK. 3. Pull the tray open. 2. Press Stop/Clear to return to the right. 4. Slide the right guide of...a web browser, such as a user on . Press the left /right arrow until System Setup appears on the print cartridge. You can manage the machine via Xerox's CentreWare IS, an embedded web server. Replacing the pick up roller and fasten it down to let you can check ...
User Guide
Page 71
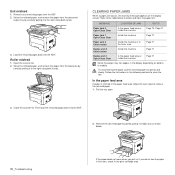
... area, follow the next steps to clear the jam. In the paper feed area If paper is jammed in this area, check In the print cartridge area. Remove the jammed paper by carefully pulling it straight out as shown below to the right using both hands. 3. Seize the misfeed paper, and...
... area, follow the next steps to clear the jam. In the paper feed area If paper is jammed in this area, check In the print cartridge area. Remove the jammed paper by carefully pulling it straight out as shown below to the right using both hands. 3. Seize the misfeed paper, and...
User Guide
Page 72
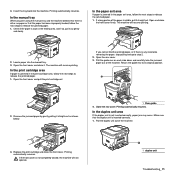
... rear cover. 3. Remove the jammed paper by gently pulling it . Close the rear cover. Make sure that the duplex unit is jammed in the print cartridge area, follow the next steps to release the jammed paper. 1. Pull the duplex unit out of the machine. The machine will resume printing. Load a ...paper into the machine. In the duplex unit area If the duplex unit is visible, pull it out gently and slowly. Replace the print cartridge and close the front cover firmly. 3. If a long portion of the paper is not inserted correctly, paper jam may occur. Open the front cover and...
... rear cover. 3. Remove the jammed paper by gently pulling it . Close the rear cover. Make sure that the duplex unit is jammed in the print cartridge area, follow the next steps to release the jammed paper. 1. Pull the duplex unit out of the machine. The machine will resume printing. Load a ...paper into the machine. In the duplex unit area If the duplex unit is visible, pull it out gently and slowly. Replace the print cartridge and close the front cover firmly. 3. If a long portion of the paper is not inserted correctly, paper jam may occur. Open the front cover and...
User Guide
Page 74
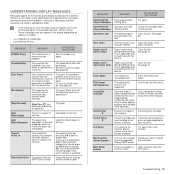
...engaged. W Yes X Your machine's memory has become full while trying to machines with this feature. If you Install the a Xerox-genuine have installed is applicable only to store an original into place. Data Write Fail Storing to accept No. See page 69. ...Messages and their meanings are loading. memory failed. front cover. Enter Again You entered an unavailable item. This is not print cartridge designed for for a Multiple Send operation. UNDERSTANDING DISPLAY MESSAGES Messages appear on the control panel display to understand the messages' meaning...
...engaged. W Yes X Your machine's memory has become full while trying to machines with this feature. If you Install the a Xerox-genuine have installed is applicable only to store an original into place. Data Write Fail Storing to accept No. See page 69. ...Messages and their meanings are loading. memory failed. front cover. Enter Again You entered an unavailable item. This is not print cartridge designed for for a Multiple Send operation. UNDERSTANDING DISPLAY MESSAGES Messages appear on the control panel display to understand the messages' meaning...


