
Uk Manual
Page 1
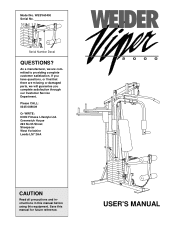
... instructions in this manual before using this manual for future reference. Save this equipment. Serial Number Decal QUESTIONS? As a manufacturer, we are missing or damaged parts, we will guarantee you have questions, or find that there are committed to providing complete customer satisfaction. USER'S MANUAL WESY60400 Serial No. If you complete...
... instructions in this manual before using this manual for future reference. Save this equipment. Serial Number Decal QUESTIONS? As a manufacturer, we are missing or damaged parts, we will guarantee you have questions, or find that there are committed to providing complete customer satisfaction. USER'S MANUAL WESY60400 Serial No. If you complete...
Uk Manual
Page 2
... 2 BEFORE YOU BEGIN 3 ASSEMBLY 4 ADJUSTMENT 15 TROUBLE-SHOOTING AND MAINTENANCE 18 CABLE DIAGRAM 19 ORDERING REPLACEMENT PARTS Back Cover Note: A PART IDENTIFICATION CHART and a PARTS LIST/EXPLODED DRAWING are attached at the centre of this or any exercise program, consult your physician. Use the... weight system only on the pulleys at all times. 5. Replace all parts each use . Always wear athletic shoes for protection. 3. The resistance cylinders become very hot during use . ICON assumes no responsibility...
... 2 BEFORE YOU BEGIN 3 ASSEMBLY 4 ADJUSTMENT 15 TROUBLE-SHOOTING AND MAINTENANCE 18 CABLE DIAGRAM 19 ORDERING REPLACEMENT PARTS Back Cover Note: A PART IDENTIFICATION CHART and a PARTS LIST/EXPLODED DRAWING are attached at the centre of this or any exercise program, consult your physician. Use the... weight system only on the pulleys at all times. 5. Replace all parts each use . Always wear athletic shoes for protection. 3. The resistance cylinders become very hot during use . ICON assumes no responsibility...
Uk Manual
Page 3
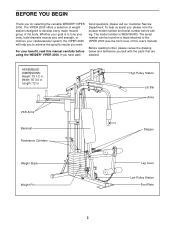
... number and serial number before using the WEIDER® VIPER 2000. The VIPER 2000 offers a selection of weight stations designed to the VIPER 2000 (see the front cover of the body. If you for selecting the versatile WEIDER® VIPER 2000. Before reading further, please review the drawing below and familiarise yourself with the parts that are labelled. Length: 72 in...
... number and serial number before using the WEIDER® VIPER 2000. The VIPER 2000 offers a selection of weight stations designed to the VIPER 2000 (see the front cover of the body. If you for selecting the versatile WEIDER® VIPER 2000. Before reading further, please review the drawing below and familiarise yourself with the parts that are labelled. Length: 72 in...
Uk Manual
Page 4
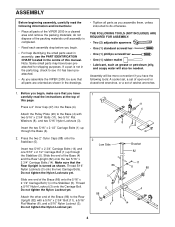
... make sure that the Rear Upright is not in the parts bag, check to see if it has been preattached. • As you have been preattached for shipping purposes. Make sure that you assemble the VIPER 2000, be sure that all parts are oriented as you begin . • For help... identifying the small parts used in assembly, use the PART IDENTIFICATION CHART located in a cleared area and remove the packing materials; Do not ...
... make sure that the Rear Upright is not in the parts bag, check to see if it has been preattached. • As you have been preattached for shipping purposes. Make sure that you assemble the VIPER 2000, be sure that all parts are oriented as you begin . • For help... identifying the small parts used in assembly, use the PART IDENTIFICATION CHART located in a cleared area and remove the packing materials; Do not ...
Uk Manual
Page 9
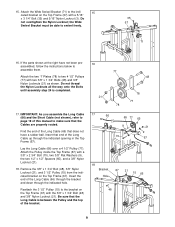
...) over a 4 1/2" Pulley (77). Insert the end of the Long Cable up through the indicated hole. Be sure that the Cables are properly routed. If the parts shown at the right have a rubber ball. Reattach the 3 1/2" Pulley (15) to swivel freely. 35 67 3 71 16. the Wide Swivel Bracket must be able...
...) over a 4 1/2" Pulley (77). Insert the end of the Long Cable up through the indicated hole. Be sure that the Cables are properly routed. If the parts shown at the right have a rubber ball. Reattach the 3 1/2" Pulley (15) to swivel freely. 35 67 3 71 16. the Wide Swivel Bracket must be able...
Uk Manual
Page 13
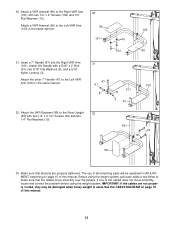
..." x 2" Bolt (61), two 5/16" Flat Washers (8), and a 5/16" Nylon Locknut (3). Attach the Handle with two 1/4" x 2" Screws (102) and 1/4" Flat Washers (10). The use of all parts are not properly routed, they may be explained in ADJUSTMENT, beginning on page 19 of this manual. 13 See the CABLE DIAGRAM on page 15... Arm (100) in the same manner. 30 99 101 10 102 100 99 31. Attach the other 7" Handle (47) to make sure that all remaining parts will be damaged when heavy weight is used. IMPORTANT: If the cables are properly tightened.
..." x 2" Bolt (61), two 5/16" Flat Washers (8), and a 5/16" Nylon Locknut (3). Attach the Handle with two 1/4" x 2" Screws (102) and 1/4" Flat Washers (10). The use of all parts are not properly routed, they may be explained in ADJUSTMENT, beginning on page 19 of this manual. 13 See the CABLE DIAGRAM on page 15... Arm (100) in the same manner. 30 99 101 10 102 100 99 31. Attach the other 7" Handle (47) to make sure that all remaining parts will be damaged when heavy weight is used. IMPORTANT: If the cables are properly tightened.
Uk Manual
Page 15
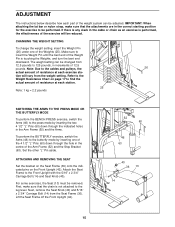
... SEAT Set the bracket on the Seat Frame (36) onto the indicated pins on page 17 to find the actual amount of resistance at each part of the Arm Frame (52) and the Stop Bracket (63). Next, remove the Seat Knob (40) and 5/16" x 2 3/4" Carriage Bolt (14) from 12.5 pounds to...
... SEAT Set the bracket on the Seat Frame (36) onto the indicated pins on page 17 to find the actual amount of resistance at each part of the Arm Frame (52) and the Stop Bracket (63). Next, remove the Seat Knob (40) and 5/16" x 2 3/4" Carriage Bolt (14) from 12.5 pounds to...
Uk Manual
Page 18
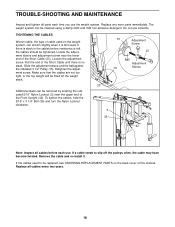
... slack. TIGHTENING THE CABLES Woven cable, the type of the Short Cable until there is felt, the cables should be replaced, see ORDERING REPLACEMENT PARTS on the weight system, can stretch slightly when it . Slide the adjustment sleeve and the ball against the indicated 3 1/2" Pulley (15). If... 3 1/4" Bolt (35) and turn the Nylon Locknut clockwise. 15 Adjustment Screw 23 Ball Adjustment 15 Sleeve 23 3 35 42 Note: Inspect all parts each use solvents. The weight system can be cleaned using a damp cloth and mild non-abrasive detergent. If there is slack in the cables before...
... slack. TIGHTENING THE CABLES Woven cable, the type of the Short Cable until there is felt, the cables should be replaced, see ORDERING REPLACEMENT PARTS on the weight system, can stretch slightly when it . Slide the adjustment sleeve and the ball against the indicated 3 1/2" Pulley (15). If... 3 1/4" Bolt (35) and turn the Nylon Locknut clockwise. 15 Adjustment Screw 23 Ball Adjustment 15 Sleeve 23 3 35 42 Note: Inspect all parts each use solvents. The weight system can be cleaned using a damp cloth and mild non-abrasive detergent. If there is slack in the cables before...
Uk Manual
Page 20
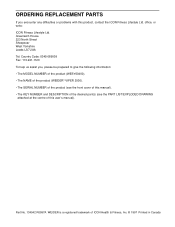
.... office, or write: ICON Fitness Lifestyle Ltd. ORDERING REPLACEMENT PARTS If you , please be prepared to give the following information: • The MODEL NUMBER of the product (WESY60400). • The NAME of the product (WEIDER® VIPER 2000). • The SERIAL NUMBER of the product (see the... front cover of this manual). • The KEY NUMBER and DESCRIPTION of the desired part(s) (see the PART LIST/EXPLODED DRAWING attached at the centre of ICON Health ...
.... office, or write: ICON Fitness Lifestyle Ltd. ORDERING REPLACEMENT PARTS If you , please be prepared to give the following information: • The MODEL NUMBER of the product (WESY60400). • The NAME of the product (WEIDER® VIPER 2000). • The SERIAL NUMBER of the product (see the... front cover of this manual). • The KEY NUMBER and DESCRIPTION of the desired part(s) (see the PART LIST/EXPLODED DRAWING attached at the centre of ICON Health ...
Uk Manual
Page 21
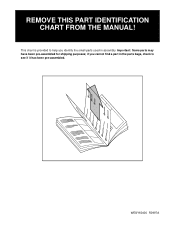
if you identify the small parts used in the parts bags, check to see if it has been pre-assembled. REMOVE THIS PART IDENTIFICATION CHART FROM THE MANUAL! This chart is provided to help you cannot find a part in assembly. WESY60400 R0997A Important: Some parts may have been pre-assembled for shipping purposes;
if you identify the small parts used in the parts bags, check to see if it has been pre-assembled. REMOVE THIS PART IDENTIFICATION CHART FROM THE MANUAL! This chart is provided to help you cannot find a part in assembly. WESY60400 R0997A Important: Some parts may have been pre-assembled for shipping purposes;

Uk Manual
Page 25
REMOVE THIS PART LIST/EXPLODED DRAWING FROM THE MANUAL! 81
REMOVE THIS PART LIST/EXPLODED DRAWING FROM THE MANUAL! 81
Uk Manual
Page 26
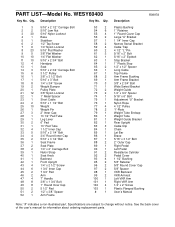
... 5/8" Retainer 5/8" Round Cover Cap 5/8" Spacer VKR Backrest VKR Armrest Left VKR Arm Right VKR Arm 1/4" x 2" Screw Plastic Flanged Bushing User's Manual Note: "#" indicates a non-illustrated part. PART LIST-Model No. See the back cover of the user's manual for information about ordering replacement...
... 5/8" Retainer 5/8" Round Cover Cap 5/8" Spacer VKR Backrest VKR Armrest Left VKR Arm Right VKR Arm 1/4" x 2" Screw Plastic Flanged Bushing User's Manual Note: "#" indicates a non-illustrated part. PART LIST-Model No. See the back cover of the user's manual for information about ordering replacement...


