Weider Be Pro 265 Bench Support and Manuals
Get Help and Manuals for this Weider item

View All Support Options Below
Free Weider Be Pro 265 Bench manuals!
Problems with Weider Be Pro 265 Bench?
Ask a Question
Free Weider Be Pro 265 Bench manuals!
Problems with Weider Be Pro 265 Bench?
Ask a Question
Popular Weider Be Pro 265 Bench Manual Pages
Enc Manual - Page 1
... equipment. Write the serial number in this manual before using this manual for reference. ET (excluding holidays) or email us at [email protected] Please do not contact the store.
CAUTION
Read all precautions and instructions in the space above for future reference. www.weiderfitness.com
Model No. 15963C.0 Serial No. Serial Number Decal...
Enc Manual - Page 2
...ADJUSTMENT 14 EXERCISE GUIDELINES 16 PART LIST 18 EXPLODED DRAWING 19 ORDERING REPLACEMENT PARTS Back Cover LIMITED WARRANTY Back Cover
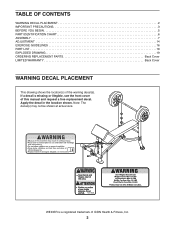
WARNING DECAL PLACEMENT
This drawing shows the location(s) of ICON Health & Fitness, Inc.
2 ATTENTION
Part # 166295
WEIDER is missing or illegible, see the front cover of this manual and request a free replacement decal.
If a decal is a registered...
Enc Manual - Page 3
... lack of experience and knowledge, unless they are adequately informed of all precautions.
2. Replace any worn parts immediately.
9. The weight bench is used. The weight bench is the responsibility of the owner to mount, dismount, and use by persons with pre-existing health problems.
3. Keep hands and feet away from moisture and dust. To protect the floor...
Enc Manual - Page 5

... to achieve the specific results you for selecting the WEIDER® PRO 265 weight bench. The model number and the location of this manual carefully before contacting us assist you, note the product model number and serial number before using the weight bench.
Before reading further, please review the drawing below and familiarize yourself with the labeled parts. BEFORE YOU BEGIN...
Enc Manual - Page 6
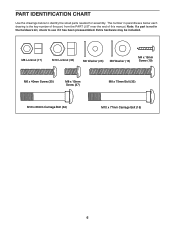
The number in the hardware kit, check to identify the small parts needed for assembly. Extra hardware may be included. M8 Locknut (17)
M10 Locknut (33...Bolt (34)
M10 x 77mm Carriage Bolt (18)
6 Note: If a part is the key number of the part, from the PART LIST near the end of this manual.
PART IDENTIFICATION CHART
Use the drawings below each drawing is not in parentheses below to ...
Enc Manual - Page 7

... Customer Service (see page 6.
• In addition to notify you of upgrades and offers
Note: If you assemble it will be easier if you have a set of the packing materials until you finish all parts in a cleared area and remove the packing materials. Make sure that there is enough clearance to walk around the weight bench...
Enc Manual - Page 8
... tighten the Locknuts yet.
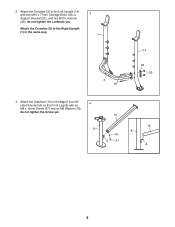
Attach the Crossbar (3) to the top of the indicated bracket (A) on the Front Leg (8) with two M10 x 77mm Carriage Bolts (18), a Support Bracket (22), and two M10 Locknuts (33); Attach the Crossbar (3) to the Right Upright (1) in the same way.
3 1
3 18
14
22 33
4.
Enc Manual - Page 10
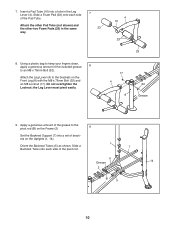
7. Insert a Pad Tube (10) into a set of the included grease
8
to the brackets on the Uprights (1, 14). Attach the other Pad Tube (not shown) ...M8 x 75mm Bolt (32) and an M8 Locknut (17). Using a plastic bag to the pivot rod (B) on the Frame (2)
9
Set the Backrest Support (7) into a hole in the same way.
7 23
4 10
23
23
8.
the Leg Lever must pivot easily.
17 4
8
32 Grease
9.
Enc Manual - Page 13

The use the weight bench. Make sure that all parts are properly tightened before you use of all remaining parts will be included. Extra parts may be explained in ADJUSTMENT, beginning on the Leg Lever (4).
14
25 4
15. 14. Attach a Spring Collar (25) to the weight tube on page 14.
13
Enc Manual - Page 14

... BACKREST
The Backrest (6) can be adjusted. do not use the weight bench.
Secure the Weights with a Spring Collar (25). ADJUSTMENT
The steps below explain how the weight bench can be used in any worn parts immediately. See the accompanying exercise guide to balance the weight bench. Replace any of weight on the weight rests to see the correct form for several exercises.
Enc Manual - Page 15
... the Curl Knob (31).
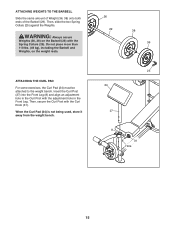
Then, slide the two Spring Collars (25) against the Weights. WARNING: Always secure
Weights (36, 38) on the weight rests. ATTACHING THE CURL PAD For some exercises, the Curl Pad (24) must be attached to the weight bench. Do not place more than 110 lbs. (49 kg), including the Barbell and...
Enc Manual - Page 16
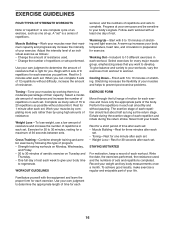
... with 5 to prevent post-exercise problems.
Toning-Tone your body's signals. Rest for a short period of time after each set: • Muscle Building-Rest for three minutes after each
set . Begin with the equipment and learn the proper form for 30 seconds after each set. • Weight Loss-Rest for each set . • Toning-Rest for...
Enc Manual - Page 18
...
2
M10 x 60mm Carriage Bolt
35
8
Square Cap
36
2
15-pound Weight
37
6
M8 x 15mm Screw
38
2
25-pound Weight
*
-
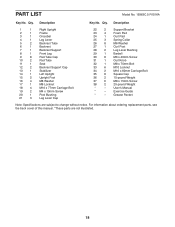
For information about ordering replacement parts, see the back cover of this manual. *These parts are subject to change without notice.
Grease Packet
Note: Specifications are not illustrated.
18 PART LIST
Model No. 15963C.0 R1016A
Key No. Qty. Qty.
User...
Enc Manual - Page 19
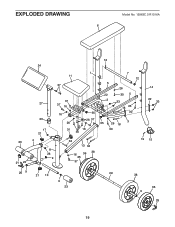
EXPLODED DRAWING
Model No. 15963C.0 R1016A 6
23 21 23
24 1
11 37
27
37 37 16
16
35
20
26 37
26
17 21
31
16 30
4
8 28
9
32 13 34
16
36 38
25
37
12
7
12
5
26
22
30 5
2
33
18 26
30
35
26 18
3
30
14 22
33
19 15
25 9
21 10
9 23
29
38
36 9
25
19
Enc Manual - Page 20
... apply to the customer.
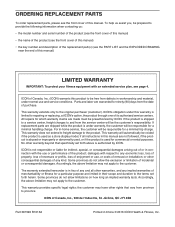
ICON of Canada, Inc. (ICON) warrants this warranty is used as a store display model, if all other rights that specifically set forth herein. All repairs for a minimal trip charge. For in-home service, the customer will automatically be preauthorized by ICON.
Accordingly, the above is used for a particular purpose are limited...
Weider Be Pro 265 Bench Reviews
We have not received any reviews for Weider yet.