Weider Pro 375 Support and Manuals
Get Help and Manuals for this Weider item

View All Support Options Below
Free Weider Pro 375 manuals!
Problems with Weider Pro 375?
Ask a Question
Free Weider Pro 375 manuals!
Problems with Weider Pro 375?
Ask a Question
Popular Weider Pro 375 Manual Pages
English Manual - Page 1

... complete customer satisfaction. MST
CAUTION
Read all precautions and instructions in the space above for future reference. Serial Number Decal
QUESTIONS? If you . The trained technicians on our customer hot line will guarantee complete satisfaction through direct assistance from our factory. USER'S MANUAL
Visit our website at www.weiderfitness.com
new products, prizes...
English Manual - Page 2

... Read user's manual and follow all warnings and operating instructions prior to order a free replacement decal. WARNING
• Misuse of ICON Health & Fitness, Inc.
2
Remove the PART IDENTIFICATION CHART and PART LIST/EXPLODED DRAWING before beginning assembly. If the decal is a registered trademark of this manual. Mountain Time, to use.
• Do not allow children on the weight bench...
English Manual - Page 3

...instructions before using the weight bench.
1. Note: The weight bench does not include weights.
12. Keep hands and feet away from the weight bench at the same height.
11. Do not place more than 300 pounds, including the barbell, on the pulleys.
10. Cover the floor beneath the weight bench to support a maximum user weight of 300 pounds. ICON assumes no responsibility for home...
English Manual - Page 4

... the specific results you have additional questions, please call our Customer Service Department
Before reading further, please review the drawing below and familiarize yourself with his back toward the weight rack; High Pulley Station Lat Bar
Left Side
Weight Guide Weight Glider
Safety Spotter
Curl Pad Backrest Leg Lever Weight Tube
Seat
4 The PRO 375 weight bench is WEBE29320. Mountain...
English Manual - Page 5

... of the Base Crossbar (20) in this manual is important to realize that the versatile weight bench has many parts and that by anyone. Most people find that the assembly process will take time. The following information and instructions:
• Assembly requires two people.
• Place all parts are required for Yourself
Everything in the same...
English Manual - Page 12

...6 6 11
40
53 40
12 Tighten the M10 Nylon Locknuts (11) used in steps 22-24.
Attach the Weight Tube (75) to the Front Leg (73) with the Bolt and an M10 Nylon Locknut (11). Do not ... (79) into the Leg Lever (72). Insert the Bench Knob (80) into the indicated end of the Weight Tube (75).
26. Press a 25mm Round Inner Cap (84) into the Bench Frame (63) and tighten it fully.
80
11
91...
English Manual - Page 14

The use of all parts are properly tightened before you use the weight bench. 32. Make sure all remaining parts will be explained in ADJUSTMENTS, starting on the following page.
83 42
46
46
61
14 Attach the Curl Pad (77) to the Curl Post (83) with two M6 x 16mm Screws (61).
32
Press the two Weight Adapter Bushings (46) into
77
the Weight Adapter (42).
33.
English Manual - Page 15

...Cable (13) or the Low Cable (8 [not shown]) using a Cable Clip (14). Replace any worn parts immediately. The weight bench can be cleaned with
23
the barbell positioned at the same height.
1
23
Hook
Handle... program.
Also, refer to the accompanying exercise guide to see the correct form for important information about how to adjust the weight bench. WARNING: Always set both hands.
English Manual - Page 17

... THE CURL PAD
For some exercises, the Curl Pad (77) must be adjusted to the weight bench.
To adjust the Backrest, pull the Backrest Knob (80) out as far as it will...(80) is not in the Backrest Bracket (53). Align the holes in the Backrest Bracket (53) before putting any weight on the Backrest (69).
77
83
86
73
69
80 53
17 Secure the Curl Post with other exercises. Make sure...
English Manual - Page 18

... sets. This requires moving only the appropriate parts...weight used • by increasing circulation, raising your body temperature and delivering more sets rather than by using high amounts of rest. Rest for several exercises, and a list of the muscles affected.
WARMING UP
Begin each set should be sensitive to session.
On the exercise guide accompanying this manual...
English Manual - Page 19

... at the end of each workout is to increase flexibility. MUSCLE CHART
A. Rhomboideus (upper back)
P. Rest for a short period of time after each set for a weight loss
workout. Sternomastoid (neck)
B. Sartorius (front of leg)
W. Gluteus Medius (hip)
U. Hamstring (back of thigh)
E
J.
Biceps (front of calf)
F
L
L. Brachioradials (forearm)
C
F. Move
slowly...
English Manual - Page 20

... repairs not provided by or attributable to be prepared to give the following information when calling:
• The MODEL NUMBER of the product (WEBE29320)
• The NAME of the product (WEIDER® PRO 375 weight bench)
• The SERIAL NUMBER of the product (see the front cover of this manual)
• The KEY NUMBER and DESCRIPTION of the desired part...
English Manual - Page 21
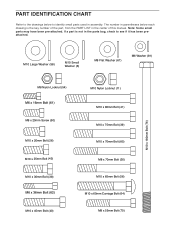
... Bolt (64) M8 x 55mm Bolt (70)
PART IDENTIFICATION CHART
Refer to the drawings below each drawing is not in the parts bag, check to identify small parts used in assembly. Note: Some small parts may have been pre-attached. If a part is the key number of the part, from the PART LIST in the center of this manual.
English Manual - Page 22

... Weight Tube M10 x 180mm Bolt Curl Pad Backrest Frame 25mm Square Inner Cap Bench Knob M6 Washer Angled Outer Cap Curl Post 25mm Round Inner Cap M10 x 70mm Bolt Curl Post Knob Stabilizer Pad Tube Front Leg Base Front Leg Plate Small Joint Plate User's Manual Exercise Guide
Note: "#" indicates a non-illustrated part. WEBE29320
R0702A
Key No. PART...
English Manual - Page 23

WEBE29320 51
51
13
68
65 66 88
65
71
66
52 75
84
42
46 46
77
83
65 66 88
66 11 71
66 ... 43
44 43
20 11
11 11
6
55
7 12
12 6 39
26 27 22
25 30 11 18
55 57
41 41
R0702A
EXPLODED DRAWING-Model No.
Weider Pro 375 Reviews
We have not received any reviews for Weider yet.