
English Manual
Page 1
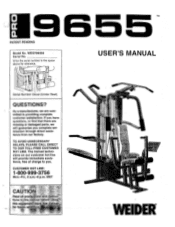
... will guarantee you have questions, or find that there are com- tance from our factory. If you complete sat- 0 a 9655 PATENT PENDING Model No. As a manufacturer, we are missing or damaged parts, we ■ will provide immediate assistance, free of charge to providing complete customer satisfaction. TO AVOID UNNECESSARY DELAYS, PLEASE CALL...'S MANUAL QUESTIONS? CUSTOMER HOT LINE: 1-800-999-3756 Mon.-Fri., 6 a.m.-6 p.m. WESY96550 Serial No. Write the serial number in the space above for future ref( rt WEIDER
... will guarantee you have questions, or find that there are com- tance from our factory. If you complete sat- 0 a 9655 PATENT PENDING Model No. As a manufacturer, we are missing or damaged parts, we ■ will provide immediate assistance, free of charge to providing complete customer satisfaction. TO AVOID UNNECESSARY DELAYS, PLEASE CALL...'S MANUAL QUESTIONS? CUSTOMER HOT LINE: 1-800-999-3756 Mon.-Fri., 6 a.m.-6 p.m. WESY96550 Serial No. Write the serial number in the space above for future ref( rt WEIDER

English Manual
Page 2
...long an implied warranty lasts. ICON HEALTH & FITNESS, INC., 1500 S. 1000 W., LOGAN, UT 84321-9813 2 Remove the PART IDENTIFICATION CHART and the PART LIST/EXPLODED DRAWING before beginning assembly. No other warranty beyond that specifically set forth herein. Accordingly, the above limitation may not apply...by ICON. Accordingly, the above limitation may also have other rights which warranty claim is made must be pre-authorized by ICON. WEIDER is limited in connection with the use and service conditions, for indirect, special or consequential damages arising out of or in its...
...long an implied warranty lasts. ICON HEALTH & FITNESS, INC., 1500 S. 1000 W., LOGAN, UT 84321-9813 2 Remove the PART IDENTIFICATION CHART and the PART LIST/EXPLODED DRAWING before beginning assembly. No other warranty beyond that specifically set forth herein. Accordingly, the above limitation may not apply...by ICON. Accordingly, the above limitation may also have other rights which warranty claim is made must be pre-authorized by ICON. WEIDER is limited in connection with the use and service conditions, for indirect, special or consequential damages arising out of or in its...
English Manual
Page 3
... arms before using the home gym system. 4 :Use the home gym system only on it. 6 Keep small children and pets away from moving parts. If you are adequately informed of all precautions. 2. tary press arm. Always wear athletic shoes for persons over the age of 35 or persons ... and make sure,that the cables are raised. Do not use the lat bar. 15. WARNING: Before beginning this manual and in any worn parts,immediately. 11. IMPORTANT PRECAUTIONS WARNING: To reduce the risk of serious Injury, read the following important precautions before using. Never release the press arm...
... arms before using the home gym system. 4 :Use the home gym system only on it. 6 Keep small children and pets away from moving parts. If you are adequately informed of all precautions. 2. tary press arm. Always wear athletic shoes for persons over the age of 35 or persons ... and make sure,that the cables are raised. Do not use the lat bar. 15. WARNING: Before beginning this manual and in any worn parts,immediately. 11. IMPORTANT PRECAUTIONS WARNING: To reduce the risk of serious Injury, read the following important precautions before using. Never release the press arm...
English Manual
Page 4
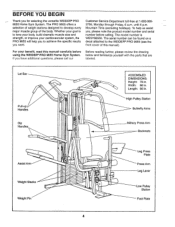
.... To help you to the WEIDER® PRO 9655 (see the front cover of the body. BEFORE YOU BEGIN Thank you have additional questions, please call our Before reading further, please review the drawing below and familiarize yourself with the parts that are labeled. For your cardiovascular system, the PRO 9655 will help us assist you...
.... To help you to the WEIDER® PRO 9655 (see the front cover of the body. BEFORE YOU BEGIN Thank you have additional questions, please call our Before reading further, please review the drawing below and familiarize yourself with the parts that are labeled. For your cardiovascular system, the PRO 9655 will help us assist you...
English Manual
Page 5
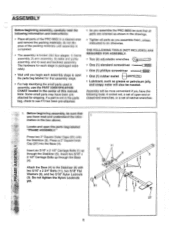
... and 4) seat and backrest assembly. Note: Some small parts may have read the following tools: A socket set, a set of open-end or closed-end wrenches, or a set of the PRO 9655 in a cleared area and remove the packing materials; If a part is not in the parts bag, check to see if it has been pre...-attached. • As you assemble the PRO 9655 be needed. Locate and open the parts bag labeled for each assembly stage to do...
... and 4) seat and backrest assembly. Note: Some small parts may have read the following tools: A socket set, a set of open-end or closed-end wrenches, or a set of the PRO 9655 in a cleared area and remove the packing materials; If a part is not in the parts bag, check to see if it has been pre...-attached. • As you assemble the PRO 9655 be needed. Locate and open the parts bag labeled for each assembly stage to do...
English Manual
Page 10
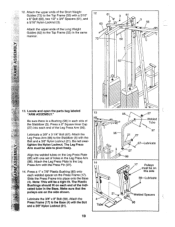
Locate and open the parts bag labeled "ARM ASSEMBLY." 13 Be sure there is a Bushing (98) in the Leg Press Arm (96). Press a 2" Square Inner Cap (27) into place onto ...
Locate and open the parts bag labeled "ARM ASSEMBLY." 13 Be sure there is a Bushing (98) in the Leg Press Arm (96). Press a 2" Square Inner Cap (27) into place onto ...
English Manual
Page 13
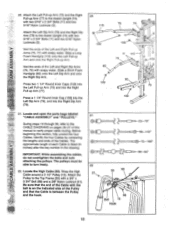
... around a 3 1/2" Pulley (15). Attach the Left Pull-up Arm (75) and the Right Pull-up Arms (75, 77) with soapy water. Locate and open the parts bags labeled "CABLE ASSEMBLY" and "PULLEYS." Identify the four Cables by comparing the lengths and ends of the Pulley and that the end of the...
... around a 3 1/2" Pulley (15). Attach the Left Pull-up Arm (75) and the Right Pull-up Arms (75, 77) with soapy water. Locate and open the parts bags labeled "CABLE ASSEMBLY" and "PULLEYS." Identify the four Cables by comparing the lengths and ends of the Pulley and that the end of the...

English Manual
Page 15
...Route the High Cable (58) through the Long "U"-Bracket (57) and the 3 1/2" Pulley (15) shown in the groove of the 3 1/2" Low Pulley (102) for part identification. Remove the 3/8" Nylon Locknut (21), the Spacer, and the Pulley from the 3/8" x 3 3/4" Bolt (88). 27. Attach a 3 1/2" Pulley (15) and... a Cable Trap (66) to the upper hole in the groove of several pre- 29 attached parts. Wrap the High Cable (58) around a 3 1/2" Pulley (15). The Bolt has been shown removed for shipping purposes. The 5/8" x 9/16" Spacer (7) has ...
...Route the High Cable (58) through the Long "U"-Bracket (57) and the 3 1/2" Pulley (15) shown in the groove of the 3 1/2" Low Pulley (102) for part identification. Remove the 3/8" Nylon Locknut (21), the Spacer, and the Pulley from the 3/8" x 3 3/4" Bolt (88). 27. Attach a 3 1/2" Pulley (15) and... a Cable Trap (66) to the upper hole in the groove of several pre- 29 attached parts. Wrap the High Cable (58) around a 3 1/2" Pulley (15). The Bolt has been shown removed for shipping purposes. The 5/8" x 9/16" Spacer (7) has ...

English Manual
Page 21
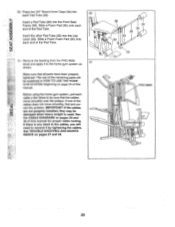
... Arm (105) with two 1/4" x 1/2" Screws (18). Insert the 1/4" x 2 1/2" Carriage Bolt (92) through the center hole in the Leg Press Upright (56). Locate and open the parts bag labeled "SEAT ASSEMBLY." 43 0 Insert a 1/4" x 2 1/2" Carriage Bolt (92) through the indicated hole in a Seat Plate (37). Attach the top of a Seat (13) to the...
... Arm (105) with two 1/4" x 1/2" Screws (18). Insert the 1/4" x 2 1/2" Carriage Bolt (92) through the center hole in the Leg Press Upright (56). Locate and open the parts bag labeled "SEAT ASSEMBLY." 43 0 Insert a 1/4" x 2 1/2" Carriage Bolt (92) through the indicated hole in a Seat Plate (37). Attach the top of a Seat (13) to the...
English Manual
Page 23
... installed, they may be sure that all parts have been properly tightened. See TROUBLE-SHOOTING AND MAINTE- ASSEMBLY 50. Insert the other Pad Tube (28) into 50 each cable a few times to the home gym system as 51 shown. Remove the backing from the PRO 9655 decal and apply it by tightening the... end of the remaining parts will be explained in the cables, you will need to remove it to be damaged when heavy weight is any slack in HOW TO USE THE HOME GYM SYSTEM, beginning on pages 27 and 28. 36 30 34 28 34 30 0 29 0 PRO 9655 0 0 23 Before using the...
... installed, they may be sure that all parts have been properly tightened. See TROUBLE-SHOOTING AND MAINTE- ASSEMBLY 50. Insert the other Pad Tube (28) into 50 each cable a few times to the home gym system as 51 shown. Remove the backing from the PRO 9655 decal and apply it by tightening the... end of the remaining parts will be explained in the cables, you will need to remove it to be damaged when heavy weight is any slack in HOW TO USE THE HOME GYM SYSTEM, beginning on pages 27 and 28. 36 30 34 28 34 30 0 29 0 PRO 9655 0 0 23 Before using the...
English Manual
Page 24
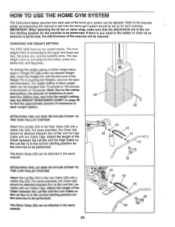
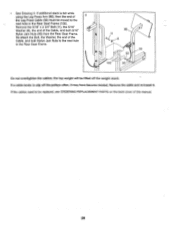
... 10 pounds. Adjust the length of the Chain between the Lat Bar and the High Cable with a Cable Clip (53). CHANGING THE WEIGHT SETTING The PRO 9655 features two weight stacks. To change the weight setting of either weight stack can be reduced. Note: Due to the cables and pulleys, the amount... (23) with two Cable Clips. The Nylon Strap (39) can be performed. HOW TO USE THE HOME GYM SYSTEM The instructions below describe how each part of the home gym system can be performed. Insert the Weight Pin until the bent end of the Weight Pin is connected to be adjusted...
... 10 pounds. Adjust the length of the Chain between the Lat Bar and the High Cable with a Cable Clip (53). CHANGING THE WEIGHT SETTING The PRO 9655 features two weight stacks. To change the weight setting of either weight stack can be reduced. Note: Due to the cables and pulleys, the amount... (23) with two Cable Clips. The Nylon Strap (39) can be performed. HOW TO USE THE HOME GYM SYSTEM The instructions below describe how each part of the home gym system can be performed. Insert the Weight Pin until the bent end of the Weight Pin is connected to be adjusted...

English Manual
Page 27
...-attach the Pulley and Cable Trap. Hand-tighten the 3/8" Nut against the Weight Cover. Repeat until the 3/8" Nut touches the Weight Cover. If any worn parts immediately. The home gym system can be tightened. Thread the Eyebolt into the middle of the Long "U"-Brackets (57). TROUBLE-SHOOTING AND MAINTENANCE Inspect and...
...-attach the Pulley and Cable Trap. Hand-tighten the 3/8" Nut against the Weight Cover. Repeat until the 3/8" Nut touches the Weight Cover. If any worn parts immediately. The home gym system can be tightened. Thread the Eyebolt into the middle of the Long "U"-Brackets (57). TROUBLE-SHOOTING AND MAINTENANCE Inspect and...
English Manual
Page 28
... (8), the end of 3 the Leg Press Cable (99) must be lifted off the pulleys often, it . If a cable tends to be replaced, see ORDERING REPLACEMENT PARTS on the back cover of the Cable, and both 5/16" Nylon Jam Nuts (93) from the Rear Seat Frame. If additional slack is felt while...
... (8), the end of 3 the Leg Press Cable (99) must be lifted off the pulleys often, it . If a cable tends to be replaced, see ORDERING REPLACEMENT PARTS on the back cover of the Cable, and both 5/16" Nylon Jam Nuts (93) from the Rear Seat Frame. If additional slack is felt while...

English Manual
Page 32
... through Friday, 6 a.m. The MODEL NUMBER of the product (WEIDER' PRO 9655 Home Gym System). 3. The KEY NUMBER and DESCRIPTION of the part(s) (see the front cover of this manual). • Part No. 133900 R0996A Printed in Canada 1996 ICON Health & Fitness, Inc. ORDERING REPLACEMENT PARTS To order replacement parts, simply call our Customer Service Department toll-free...
... through Friday, 6 a.m. The MODEL NUMBER of the product (WEIDER' PRO 9655 Home Gym System). 3. The KEY NUMBER and DESCRIPTION of the part(s) (see the front cover of this manual). • Part No. 133900 R0996A Printed in Canada 1996 ICON Health & Fitness, Inc. ORDERING REPLACEMENT PARTS To order replacement parts, simply call our Customer Service Department toll-free...
English Manual
Page 33
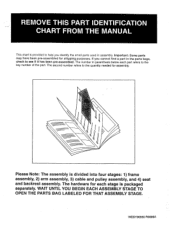
... the quantity needed for shipping purposes. Please Note: The assembly is packaged separately. REMOVE THIS PART IDENTIFICATION CHART FROM THE MANUAL This chart is provided to help'you cannot find a part in the parts bags, check to see if it has been pre-assembled. The number in parenthesis below each..., 2) arm assembly, 3) cable and pulley assembly, and 4) seat and backrest assembly. WESY96550 R0996A WAIT UNTIL YOU BEGIN EACH ASSEMBLY STAGE TO OPEN THE PARTS BAG LABELED FOR THAT ASSEMBLY STAGE. Important: Some parts may have been pre-assembled for assembly. The hardware for each...
... the quantity needed for shipping purposes. Please Note: The assembly is packaged separately. REMOVE THIS PART IDENTIFICATION CHART FROM THE MANUAL This chart is provided to help'you cannot find a part in the parts bags, check to see if it has been pre-assembled. The number in parenthesis below each..., 2) arm assembly, 3) cable and pulley assembly, and 4) seat and backrest assembly. WESY96550 R0996A WAIT UNTIL YOU BEGIN EACH ASSEMBLY STAGE TO OPEN THE PARTS BAG LABELED FOR THAT ASSEMBLY STAGE. Important: Some parts may have been pre-assembled for assembly. The hardware for each...
English Manual
Page 37
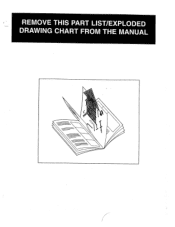
REMOVE THIS PART LIST/EXPLODED DRAWING CHART FROM THE MANUAL o
REMOVE THIS PART LIST/EXPLODED DRAWING CHART FROM THE MANUAL o
English Manual
Page 40
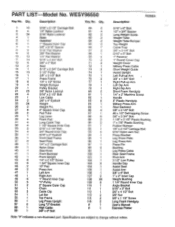
... 1" x 2" Inner Cap Weight Bushing 1 1/4" Round Inner Cap Angle Bracket 5/16" x 3" Bolt 3/8" x 4 1/2" Bolt 3/8" Nut 3/8" x 1 1/2" Screw Long Foam Handgrip User's Manual Exercise Poster Note: "#" indicates a non-illustrated part. PART LIST Model No.
... 1" x 2" Inner Cap Weight Bushing 1 1/4" Round Inner Cap Angle Bracket 5/16" x 3" Bolt 3/8" x 4 1/2" Bolt 3/8" Nut 3/8" x 1 1/2" Screw Long Foam Handgrip User's Manual Exercise Poster Note: "#" indicates a non-illustrated part. PART LIST Model No.


