
English Manual
Page 2
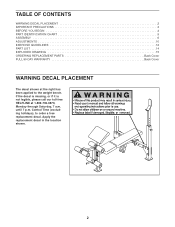
... OF CONTENTS WARNING DECAL PLACEMENT 2 IMPORTANT PRECAUTIONS 3 BEFORE YOU BEGIN 4 PART IDENTIFICATION CHART 5 ASSEMBLY 6 ADJUSTMENTS 10 EXERCISE GUIDELINES 12 PART LIST 14 EXPLODED DRAWING 15 ORDERING REPLACEMENT PARTS Back Cover FULL 90 DAY WARRANTY Back Cover WARNING DECAL PLACEMENT The decal shown at 1-800-736-6879, Monday through Saturday, 7 a.m. If the decal is missing...
... OF CONTENTS WARNING DECAL PLACEMENT 2 IMPORTANT PRECAUTIONS 3 BEFORE YOU BEGIN 4 PART IDENTIFICATION CHART 5 ASSEMBLY 6 ADJUSTMENTS 10 EXERCISE GUIDELINES 12 PART LIST 14 EXPLODED DRAWING 15 ORDERING REPLACEMENT PARTS Back Cover FULL 90 DAY WARRANTY Back Cover WARNING DECAL PLACEMENT The decal shown at 1-800-736-6879, Monday through Saturday, 7 a.m. If the decal is missing...
English Manual
Page 3
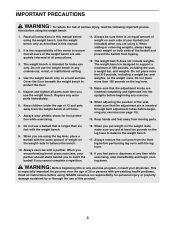
...always keep some weight on the leg lever to balance the bench. 10. Always remove the curl post from the weight bench at any worn parts immediately. 6. Keep hands and feet away from tipping. 12. It is longer than 150 pounds on a level surface. Always exercise with ...the leg lever. 18. Keep children under the age of the barbell and prevent the barbell from moving parts. 8. tions before performing leg curls with a partner. The weight bench is especially important for foot protection while exercising. 11. This is designed...
...always keep some weight on the leg lever to balance the bench. 10. Always remove the curl post from the weight bench at any worn parts immediately. 6. Keep hands and feet away from tipping. 12. It is longer than 150 pounds on a level surface. Always exercise with ...the leg lever. 18. Keep children under the age of the barbell and prevent the barbell from moving parts. 8. tions before performing leg curls with a partner. The weight bench is especially important for foot protection while exercising. 11. This is designed...
English Manual
Page 4
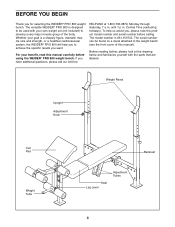
...Monday through Saturday, 7 a.m. Whether your benefit, read this manual). For your goal is 831.150742. If you for selecting the WEIDER® PRO 800 weight bench. until 7 p.m. Weight Rests Upright Adjustment Knob Curl Pad Weight Tube Backrest Seat Leg Lever Adjustment Tubes 4 BEFORE YOU BEGIN... you want. To help you , please note the product model number and serial number before using the WEIDER® PRO 800 weight bench. The serial number can be used with the parts that are labeled. The model number is a shapely figure, dramatic muscle size and strength, or a healthier...
...Monday through Saturday, 7 a.m. Whether your benefit, read this manual). For your goal is 831.150742. If you for selecting the WEIDER® PRO 800 weight bench. until 7 p.m. Weight Rests Upright Adjustment Knob Curl Pad Weight Tube Backrest Seat Leg Lever Adjustment Tubes 4 BEFORE YOU BEGIN... you want. To help you , please note the product model number and serial number before using the WEIDER® PRO 800 weight bench. The serial number can be used with the parts that are labeled. The model number is a shapely figure, dramatic muscle size and strength, or a healthier...
English Manual
Page 5
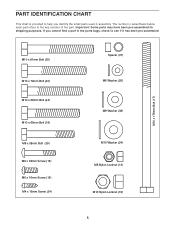
... to see if it has been pre-assembled. Important: Some parts may have been pre-assembled for shipping purposes. M10 x 178mm Bolt (17) M10 x 81mm Bolt (35) M10 x 72mm Bolt (40) M10 x 68mm Bolt (44) M10 x ... Screw (15) M4 x 16mm Screw (34) Spacer (37) M6 Washer (25) M8 Washer (38) M10 Washer (24) M8 Nylon Locknut (13) M10 Nylon Locknut (19) 5 PART IDENTIFICATION CHART This chart is provided to help you cannot find a part in the parts bags, check to the key number of the...
... to see if it has been pre-assembled. Important: Some parts may have been pre-assembled for shipping purposes. M10 x 178mm Bolt (17) M10 x 81mm Bolt (35) M10 x 72mm Bolt (40) M10 x 68mm Bolt (44) M10 x ... Screw (15) M4 x 16mm Screw (34) Spacer (37) M6 Washer (25) M8 Washer (38) M10 Washer (24) M8 Nylon Locknut (13) M10 Nylon Locknut (19) 5 PART IDENTIFICATION CHART This chart is provided to help you cannot find a part in the parts bags, check to the key number of the...
English Manual
Page 6
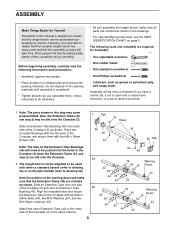
...2a) or an Olympic barbell (refer to drawing 2b). Slide an Extension Tube onto one side of the warning decal and make sure all parts in a cleared area and remove the packing materials. ASSEMBLY Make Things Easier for assembly: • Two adjustable wrenches • One rubber mallet...beginning assembly, carefully read the following tools (not included) are oriented as shown in the drawings. • For help identifying small parts, use the PART IDENTIFICATION CHART on the Extension Tube Bushings (45) will take time. The weight bench can be more convenient if you assemble the ...
...2a) or an Olympic barbell (refer to drawing 2b). Slide an Extension Tube onto one side of the warning decal and make sure all parts in a cleared area and remove the packing materials. ASSEMBLY Make Things Easier for assembly: • Two adjustable wrenches • One rubber mallet...beginning assembly, carefully read the following tools (not included) are oriented as shown in the drawings. • For help identifying small parts, use the PART IDENTIFICATION CHART on the Extension Tube Bushings (45) will take time. The weight bench can be more convenient if you assemble the ...
English Manual
Page 9
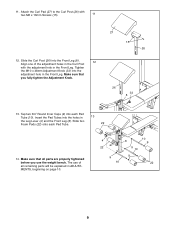
Make sure that all remaining parts will be explained in ADJUSTMENTS, beginning on page 10. 4 10 8 9 22 9 10 9 9 10 22 9 Insert the Pad Tubes into the adjustment hole in the Curl .... Slide the Curl Post (26) into each Pad Tube. 22 14. Tap two 3/4" Round Inner Caps (9) into the Front Leg (8). 12 Align one of all parts are properly tightened before you fully tighten the Adjustment Knob. 27 15 26 26 33 8 13. The use of the adjustment holes in the Front...
Make sure that all remaining parts will be explained in ADJUSTMENTS, beginning on page 10. 4 10 8 9 22 9 10 9 9 10 22 9 Insert the Pad Tubes into the adjustment hole in the Curl .... Slide the Curl Post (26) into each Pad Tube. 22 14. Tap two 3/4" Round Inner Caps (9) into the Front Leg (8). 12 Align one of all parts are properly tightened before you fully tighten the Adjustment Knob. 27 15 26 26 33 8 13. The use of the adjustment holes in the Front...
English Manual
Page 10
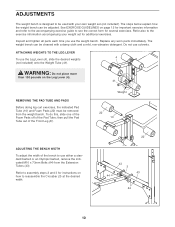
... form for additional exercises. The steps below explain how the weight bench can be cleaned with your weight set (not included). Inspect and tighten all parts each time you use the Leg Lever (4), slide the desired weights (not included) onto the Weight Tube (41). ATTACHING WEIGHTS TO THE LEG LEVER 4 To... Before doing leg curl exercises, the indicated Pad Tube (10) and Foam Pads (22) must be removed from the Extension Tubes (43). Replace any worn parts immediately. ADJUSTMENTS The weight bench is designed to be used with a damp cloth and a mild, non-abrasive detergent.
... form for additional exercises. The steps below explain how the weight bench can be cleaned with your weight set (not included). Inspect and tighten all parts each time you use the Leg Lever (4), slide the desired weights (not included) onto the Weight Tube (41). ATTACHING WEIGHTS TO THE LEG LEVER 4 To... Before doing leg curl exercises, the indicated Pad Tube (10) and Foam Pads (22) must be removed from the Extension Tubes (43). Replace any worn parts immediately. ADJUSTMENTS The weight bench is designed to be used with a damp cloth and a mild, non-abrasive detergent.
English Manual
Page 12
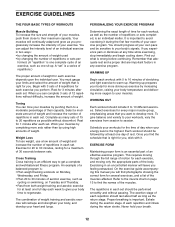
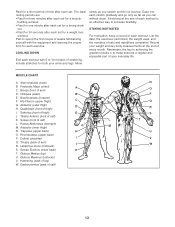
...is one complete cycle of an exercise, such as the number of repetitions or sets completed, is the highest. Remember that is an essential part of an effective exercise program. Each workout should be followed by using high amounts of weight. Exercising in each exercise you , stick with...and moving through the full range of motion for a maximum of the body. Once you feeling exhausted. This requires moving only the appropriate parts of 30 seconds between sets. On the exercise guide accompanying this manual you want to session. Refer to the muscle chart on Tuesday and...
...is one complete cycle of an exercise, such as the number of repetitions or sets completed, is the highest. Remember that is an essential part of an effective exercise program. Each workout should be followed by using high amounts of weight. Exercising in each exercise you , stick with...and moving through the full range of motion for a maximum of the body. Once you feeling exhausted. This requires moving only the appropriate parts of 30 seconds between sets. On the exercise guide accompanying this manual you want to session. Refer to the muscle chart on Tuesday and...
English Manual
Page 13
... first couple of sets and repetitions completed. Remember, the key to achieving the greatest results is an effective way to make exercise a regular and enjoyable part of your weight and key body measurements at the end of calf) NN OO PP QQ RR SS T T U U V V WW 13 Obliques (waist) BB E. Hip Flexors...
... first couple of sets and repetitions completed. Remember, the key to achieving the greatest results is an effective way to make exercise a regular and enjoyable part of your weight and key body measurements at the end of calf) NN OO PP QQ RR SS T T U U V V WW 13 Obliques (waist) BB E. Hip Flexors...
English Manual
Page 14
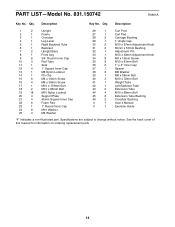
... 42 1 Left Backrest Tube 43 2 Extension Tube 44 4 M10 x 68mm Bolt 45 2 Extension Tube Bushing 46 2 Crossbar Bushing # 1 User's Manual # 1 Exercise Guide "#" Indicates a non-illustrated part. Specifications are subject to change without notice. See the back cover of this manual for information on ordering replacement...
... 42 1 Left Backrest Tube 43 2 Extension Tube 44 4 M10 x 68mm Bolt 45 2 Extension Tube Bushing 46 2 Crossbar Bushing # 1 User's Manual # 1 Exercise Guide "#" Indicates a non-illustrated part. Specifications are subject to change without notice. See the back cover of this manual for information on ordering replacement...
English Manual
Page 16
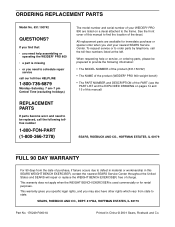
... EXERCISER, free of charge. All replacement parts are listed on pages 14 and 15 of the PART (see the PART LIST and the EXPLODED DRAWING on a decal attached to state. When requesting help assembling or operating the WEIDER® PRO 800 • a part is used commercially or for immediate purchase... the following information: • The MODEL NUMBER of the product (831.150742) • The NAME of the product (WEIDER® PRO 800 weight bench) • The PART NUMBER and DESCRIPTION of this manual) SEARS, ROEBUCK AND CO., HOFFMAN ESTATES, IL 60179 FULL 90 DAY WARRANTY For 90 ...
... EXERCISER, free of charge. All replacement parts are listed on pages 14 and 15 of the PART (see the PART LIST and the EXPLODED DRAWING on a decal attached to state. When requesting help assembling or operating the WEIDER® PRO 800 • a part is used commercially or for immediate purchase... the following information: • The MODEL NUMBER of the product (831.150742) • The NAME of the product (WEIDER® PRO 800 weight bench) • The PART NUMBER and DESCRIPTION of this manual) SEARS, ROEBUCK AND CO., HOFFMAN ESTATES, IL 60179 FULL 90 DAY WARRANTY For 90 ...


