
English Manual
Page 2
TABLE OF CONTENTS IMPORTANT PRECAUTIONS 3 BEFORE YOU BEGIN 4 ASSEMBLY 5 ADJUSTMENTS 20 WEIGHT RESISTANCE CHART 23 CABLE DIAGRAM 24 EXERCISE GUIDELINES 26 ORDERING REPLACEMENT PARTS Back Cover FULL 90 DAY WARRANTY Back Cover Note: A PART IDENTIFICATION CHART and a PART LIST/EXPLODED DRAWING are attached in the center of ICON Health & Fitness, Inc. 2 WEIDER is a registered trademark of this manual. Remove the PART IDENTIFICATION CHART and the PART LIST/EXPLODED DRAWING before beginning assembly.
TABLE OF CONTENTS IMPORTANT PRECAUTIONS 3 BEFORE YOU BEGIN 4 ASSEMBLY 5 ADJUSTMENTS 20 WEIGHT RESISTANCE CHART 23 CABLE DIAGRAM 24 EXERCISE GUIDELINES 26 ORDERING REPLACEMENT PARTS Back Cover FULL 90 DAY WARRANTY Back Cover Note: A PART IDENTIFICATION CHART and a PART LIST/EXPLODED DRAWING are attached in the center of ICON Health & Fitness, Inc. 2 WEIDER is a registered trademark of this manual. Remove the PART IDENTIFICATION CHART and the PART LIST/EXPLODED DRAWING before beginning assembly.

English Manual
Page 3
... the pulleys. 2. ICON assumes no responsibility for persons over the age of all times. 7. If the cables bind while you feel pain or dizziness while exercising, stop immediately and make sure that the cables are raised; Never release the press arm, butterfly arms, leg lever, leg press base, lat bar, ab... tightened each time the weight system is intended for foot protection when using the weight system. 1. Always stand on the foot plate when performing an exercise that the cables remain on a level surface. Always disconnect the lat bar from the weight system when performing an...
... the pulleys. 2. ICON assumes no responsibility for persons over the age of all times. 7. If the cables bind while you feel pain or dizziness while exercising, stop immediately and make sure that the cables are raised; Never release the press arm, butterfly arms, leg lever, leg press base, lat bar, ab... tightened each time the weight system is intended for foot protection when using the weight system. 1. Always stand on the foot plate when performing an exercise that the cables remain on a level surface. Always disconnect the lat bar from the weight system when performing an...
English Manual
Page 20
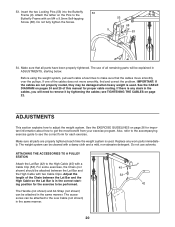
...(not shown) in ADJUSTMENTS, starting position for proper cable routing. ADJUSTMENTS This section explains how to get the most benefit from your exercise program. Make sure all parts are not properly routed, they may be damaged when heavy weight is any worn parts immediately. The ...use solvents. IMPORTANT: If the cables are properly tightened each exercise. See the EXERCISE GUIDELINES on pages 24 and 25 of the cables does not move smoothly over the pulleys. The weight system can be attached...
...(not shown) in ADJUSTMENTS, starting position for proper cable routing. ADJUSTMENTS This section explains how to get the most benefit from your exercise program. Make sure all parts are not properly routed, they may be damaged when heavy weight is any worn parts immediately. The ...use solvents. IMPORTANT: If the cables are properly tightened each exercise. See the EXERCISE GUIDELINES on pages 24 and 25 of the cables does not move smoothly over the pulleys. The weight system can be attached...
English Manual
Page 21
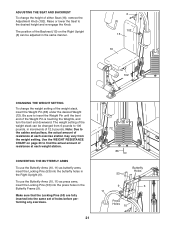
... (102). The weight setting of the weight stack can be changed from 6 pounds to the cables and pulleys, the actual amount of resistance at each exercise station may vary from the weight setting. The position of the Backrest (15) on page 23 to find the actual amount of resistance at each... Knob. To use the Butterfly Arms (10, 11) as press arms, insert the Locking Pins (53) into the same set of holes before performing any exercises. 21 72 86 Butterfly Holes 53 9 6 11 Press Holes 10 Make sure that the Locking Pins (53) are fully inserted into the press holes in...
... (102). The weight setting of the weight stack can be changed from 6 pounds to the cables and pulleys, the actual amount of resistance at each exercise station may vary from the weight setting. The position of the Backrest (15) on page 23 to find the actual amount of resistance at each... Knob. To use the Butterfly Arms (10, 11) as press arms, insert the Locking Pins (53) into the same set of holes before performing any exercises. 21 72 86 Butterfly Holes 53 9 6 11 Press Holes 10 Make sure that the Locking Pins (53) are fully inserted into the press holes in...

English Manual
Page 23
... individual weight plates as well as friction between the cables, pulleys, and weight guides. Weight resistance shown for the butterfly arm station is for each exercise station. Note: The actual resistance at each butterfly arm. Engage the Knob into the Left Seat Frame (29) and the Adjustable Seat Frame (100). "Top...
... individual weight plates as well as friction between the cables, pulleys, and weight guides. Weight resistance shown for the butterfly arm station is for each exercise station. Note: The actual resistance at each butterfly arm. Engage the Knob into the Left Seat Frame (29) and the Adjustable Seat Frame (100). "Top...
English Manual
Page 26
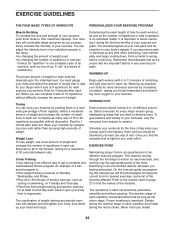
... Loss To lose weight, use a low amount of weight and increase the number of repetitions in each set should progress at any exercise program. Exercise for 20 to 30 minutes, resting for each workout, as well as cycling or swimming, on page 27 to find the schedule that...for more oxygen to develop most. Warming up . Rest for every major muscle group, emphasizing areas that is one complete cycle of an exercise, such as possible without difficulty, increase the amount of rest. Work your muscles by completing more sets rather than by increasing circulation, raising ...
... Loss To lose weight, use a low amount of weight and increase the number of repetitions in each set should progress at any exercise program. Exercise for 20 to 30 minutes, resting for each workout, as well as cycling or swimming, on page 27 to find the schedule that...for more oxygen to develop most. Warming up . Rest for every major muscle group, emphasizing areas that is one complete cycle of an exercise, such as possible without difficulty, increase the amount of rest. Work your muscles by completing more sets rather than by increasing circulation, raising ...

English Manual
Page 27
Move slowly as you stretch and do not bounce. Stretching at the end of every month. list the date, the exercises performed, the weight used, and the numbers of calf) N O P Q R S T U V W 27 MUSCLE CHART A. Brachioradials (forearm) C F. ...without strain. Hip Flexors (upper thigh) G. Soleus (front of thigh) E J. Spinae Erectors (lower back) K T. Plan to make exercise a regular and enjoyable part of stretching. COOLING DOWN End each exercise. Pectoralis Major (chest) A C. Sartorius (front of calf) F L L. Triceps (back of calf) K. Obliques (waist) E. ...
Move slowly as you stretch and do not bounce. Stretching at the end of every month. list the date, the exercises performed, the weight used, and the numbers of calf) N O P Q R S T U V W 27 MUSCLE CHART A. Brachioradials (forearm) C F. ...without strain. Hip Flexors (upper thigh) G. Soleus (front of thigh) E J. Spinae Erectors (lower back) K T. Plan to make exercise a regular and enjoyable part of stretching. COOLING DOWN End each exercise. Pectoralis Major (chest) A C. Sartorius (front of calf) F L L. Triceps (back of calf) K. Obliques (waist) E. ...

English Manual
Page 30
... M10 x 95mm Bolt M10 x 25mm Shoulder Bolt Seat Frame Backrest Frame Adjustment Knob Double "U"-Bracket 20mm x 40mm Inner Cap 25mm x 40mm Inner Cap User's Manual Exercise Guide Allen Wrench Grease Packet Note: "#" indicates a non-illustrated part. Specifications are subject to change without notice. PART LIST-Model No. WESY29521 R1002B Key No...
... M10 x 95mm Bolt M10 x 25mm Shoulder Bolt Seat Frame Backrest Frame Adjustment Knob Double "U"-Bracket 20mm x 40mm Inner Cap 25mm x 40mm Inner Cap User's Manual Exercise Guide Allen Wrench Grease Packet Note: "#" indicates a non-illustrated part. Specifications are subject to change without notice. PART LIST-Model No. WESY29521 R1002B Key No...


