

User Manual
Page 3
...inserted fully into the uprights and that there is the responsibility of the owner to protect the floor or carpet. Before using the weight bench. 12. Do not place more than five ft. (1.5 m) with a mat beneath it is especially important for personal injury or... property damage sustained by or through the use the weight bench. 6. Keep the weight bench indoors, away from the weight bench at all parts regularly. ICON assumes no responsibility for persons over age 35 or persons with pre-existing health problems...
...inserted fully into the uprights and that there is the responsibility of the owner to protect the floor or carpet. Before using the weight bench. 12. Do not place more than five ft. (1.5 m) with a mat beneath it is especially important for personal injury or... property damage sustained by or through the use the weight bench. 6. Keep the weight bench indoors, away from the weight bench at all parts regularly. ICON assumes no responsibility for persons over age 35 or persons with pre-existing health problems...
User Manual
Page 4
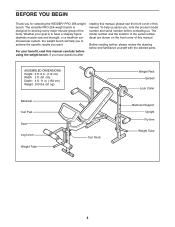
...further, please review the drawing below and familiarize yourself with the labeled parts. The versatile PRO 256 weight bench is to achieve the specific results you , note the product model number and serial number before using the weight bench. Whether your benefit, read this manual. For your goal is designed to develop every ...and the location of the serial number decal are shown on the front cover of the body. To help you for selecting the WEIDER® PRO 256 weight bench. ASSEMBLED DIMENSIONS: Height: 3 ft. 8 in. (112 cm) Width: 2 ft. (61 cm) Depth: 4 ft. 11 in. (150 cm...
...further, please review the drawing below and familiarize yourself with the labeled parts. The versatile PRO 256 weight bench is to achieve the specific results you , note the product model number and serial number before using the weight bench. Whether your benefit, read this manual. For your goal is designed to develop every ...and the location of the serial number decal are shown on the front cover of the body. To help you for selecting the WEIDER® PRO 256 weight bench. ASSEMBLED DIMENSIONS: Height: 3 ft. 8 in. (112 cm) Width: 2 ft. (61 cm) Depth: 4 ft. 11 in. (150 cm...
User Manual
Page 6
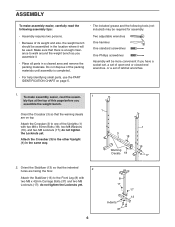
... indented holes are on page 5. • The included grease and the following assembly tips: • Assembly requires two persons. • Because of its weight and size, the weight bench should be assembled in the location where it . • Place all parts in a cleared area and remove the packing materials. ASSEMBLY To make assembly... before you assemble it will be used. Make sure that the warning decals are facing the floor. 2 Attach the Stabilizer (13) to walk around the weight bench as you assemble the weight bench. do not tighten the Locknuts yet.
... indented holes are on page 5. • The included grease and the following assembly tips: • Assembly requires two persons. • Because of its weight and size, the weight bench should be assembled in the location where it . • Place all parts in a cleared area and remove the packing materials. ASSEMBLY To make assembly... before you assemble it will be used. Make sure that the warning decals are facing the floor. 2 Attach the Stabilizer (13) to walk around the weight bench as you assemble the weight bench. do not tighten the Locknuts yet.

User Manual
Page 8
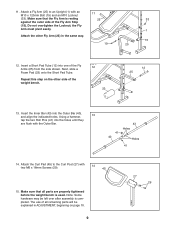
... (5) to the locked position, with four M6 x 38mm Screws (30) and four M6 6 Washers (26); Do not overtighten the Locknut; Slide a Weight Stop (28) onto the weight tube on the Frame (2) with four M6 9 x 16mm Screws (29). 11 34 33 2 29 1 7 Locking Pin 10. Rotate the Backrest Support... x 38mm Screws (30). 8 1 Grease 34 36 5 2 Welded Tube 9. Attach the Backrest Tubes (5) to the welded tube on a Fly Arm (25). 10 Slide a Weight Stop (not shown) onto the other Fly Arm (not shown) in the Uprights (1). 7. Insert the Backrest Support (7) into a set of holes in the same way...
... (5) to the locked position, with four M6 x 38mm Screws (30) and four M6 6 Washers (26); Do not overtighten the Locknut; Slide a Weight Stop (28) onto the weight tube on the Frame (2) with four M6 9 x 16mm Screws (29). 11 34 33 2 29 1 7 Locking Pin 10. Rotate the Backrest Support... x 38mm Screws (30). 8 1 Grease 34 36 5 2 Welded Tube 9. Attach the Backrest Tubes (5) to the welded tube on a Fly Arm (25). 10 Slide a Weight Stop (not shown) onto the other Fly Arm (not shown) in the Uprights (1). 7. Insert the Backrest Support (7) into a set of holes in the same way...
User Manual
Page 9
.... The use of all parts are flush with two M6 x 16mm Screws (29). 14 45 15. Insert a Short Pad Tube (12) into one of the weight bench. 12 23 12 25 13. Attach the Curl Pad (45) to an Upright (1) with an M10 x 120mm Bolt (19) and an M10 Locknut (33). the... is completed. Repeat this step on page 10. 9 27 29 Insert the Inner Bar (43) into the holes until they are properly tightened before the weight bench is resting against the outer side of the Fly Arm Stop (15). 11. Attach the other side of the Fly Arms (25) from the side...
.... The use of all parts are flush with two M6 x 16mm Screws (29). 14 45 15. Insert a Short Pad Tube (12) into one of the weight bench. 12 23 12 25 13. Attach the Curl Pad (45) to an Upright (1) with an M10 x 120mm Bolt (19) and an M10 Locknut (33). the... is completed. Repeat this step on page 10. 9 27 29 Insert the Inner Bar (43) into the holes until they are properly tightened before the weight bench is resting against the outer side of the Fly Arm Stop (15). 11. Attach the other side of the Fly Arms (25) from the side...
User Manual
Page 10
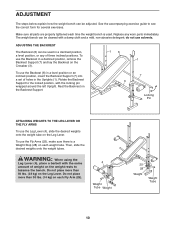
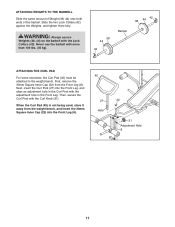
...BACKREST The Backrest (6) can be used . WARNING: When using the Leg Lever (4), place a barbell with the same amount of three inclined positions. The weight bench can be adjusted. Do not place more than 50 lbs. (23 kg) on the Crossbar (3). To use the Backrest in a declined position, remove ...To use the Fly Arms (25), make sure there is a Weight Stop (28) on each time the weight bench is used in the Uprights (1). Make sure all parts are properly tightened each weight tube. ADJUSTMENT The steps below explain how the weight bench can be cleaned with a damp cloth and a mild, non...
...BACKREST The Backrest (6) can be used . WARNING: When using the Leg Lever (4), place a barbell with the same amount of three inclined positions. The weight bench can be adjusted. Do not place more than 50 lbs. (23 kg) on the Crossbar (3). To use the Backrest in a declined position, remove ...To use the Fly Arms (25), make sure there is a Weight Stop (28) on each time the weight bench is used in the Uprights (1). Make sure all parts are properly tightened each weight tube. ADJUSTMENT The steps below explain how the weight bench can be cleaned with a damp cloth and a mild, non...
User Manual
Page 11
... the Curl Pad (45) is not being used, store it away from the Front Leg (8). First, remove the 30mm Square Inner Cap (22) from the weight bench, and insert the 30mm Square Inner Cap (22) into the Front Leg, and align an adjustment hole in the Curl Post with more than 100.... (45 kg). 38 44 42 Barbell 38 44 42 ATTACHING THE CURL PAD For some exercises, the Curl Pad (45) must be attached to the weight bench. Next, insert the Curl Post (27) into the Front Leg (8). 45 27 Hole 22 31 Adjustment Hole 8 11 Slide the two Lock Collars (42) against...
... the Curl Pad (45) is not being used, store it away from the Front Leg (8). First, remove the 30mm Square Inner Cap (22) from the weight bench, and insert the 30mm Square Inner Cap (22) into the Front Leg, and align an adjustment hole in the Curl Post with more than 100.... (45 kg). 38 44 42 Barbell 38 44 42 ATTACHING THE CURL PAD For some exercises, the Curl Pad (45) must be attached to the weight bench. Next, insert the Curl Post (27) into the Front Leg (8). 45 27 Hole 22 31 Adjustment Hole 8 11 Slide the two Lock Collars (42) against...
User Manual
Page 12
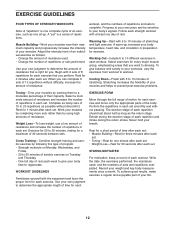
... Follow each strength workout with the equipment and learn the proper form for each repetition and inhale during the return stroke. Work your weight and key body measurements once a month. Rest for a short period of resistance that you can complete 3 sets of 12 repetitions without...of your muscles and helps to prevent post-exercise problems. Toning-Tone your own judgment to a moderate percentage of each set . Weight Loss-To lose weight, use a low amount of resistance and increase the number of repetitions. STAYING MOTIVATED For motivation, keep a record of their ...
... Follow each strength workout with the equipment and learn the proper form for each repetition and inhale during the return stroke. Work your weight and key body measurements once a month. Rest for a short period of resistance that you can complete 3 sets of 12 repetitions without...of your muscles and helps to prevent post-exercise problems. Toning-Tone your own judgment to a moderate percentage of each set . Weight Loss-To lose weight, use a low amount of resistance and increase the number of repetitions. STAYING MOTIVATED For motivation, keep a record of their ...
User Manual
Page 14
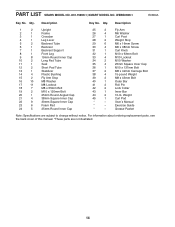
... Cap 23 6 Foam Pad 24 5 25mm Round Inner Cap 25 2 Fly Arm 26 4 M6 Washer 27 1 Curl Post 28 2 Weight Stop 29 6 M6 x 16mm Screw 30 4 M6 x 38mm Screw 31 1 Curl Knob 32 1 M10 x 63mm Bolt 33 4... 36 1 M10 x 137mm Bolt 37 2 M8 x 42mm Carriage Bolt 38 4 15-pound Weight 39 2 M8 x 43mm Bolt 40 1 Outer Bar 41 2 Roll Pin 42 2 Lock Collar 43 1 Inner Bar 44 2 10-...lb. Weight 45 1 Curl Pad * - For information about ordering replacement parts, see the back cover of this manual...
... Cap 23 6 Foam Pad 24 5 25mm Round Inner Cap 25 2 Fly Arm 26 4 M6 Washer 27 1 Curl Post 28 2 Weight Stop 29 6 M6 x 16mm Screw 30 4 M6 x 38mm Screw 31 1 Curl Knob 32 1 M10 x 63mm Bolt 33 4... 36 1 M10 x 137mm Bolt 37 2 M8 x 42mm Carriage Bolt 38 4 15-pound Weight 39 2 M8 x 43mm Bolt 40 1 Outer Bar 41 2 Roll Pin 42 2 Lock Collar 43 1 Inner Bar 44 2 10-...lb. Weight 45 1 Curl Pad * - For information about ordering replacement parts, see the back cover of this manual...


