

English Manual
Page 1
Save this equipment. WEIGHT BENCH EXERCISER User's Manual Serial Number Decal (under seat) • Assembly • Adjustments • Troubleshooting • Part List and Drawing CAUTION Read all precautions and instructions in the space above for future reference. Sears, Roebuck and Co., Hoffman Estates, IL 60179 Model No. 831.15607.1 Serial No. Write the serial number in this manual before using this manual for reference.
Save this equipment. WEIGHT BENCH EXERCISER User's Manual Serial Number Decal (under seat) • Assembly • Adjustments • Troubleshooting • Part List and Drawing CAUTION Read all precautions and instructions in the space above for future reference. Sears, Roebuck and Co., Hoffman Estates, IL 60179 Model No. 831.15607.1 Serial No. Write the serial number in this manual before using this manual for reference.

English Manual
Page 2
..., call toll-free 1-877-992-5999, Mon. TABLE OF CONTENTS WARNING DECAL PLACEMENT 2 IMPORTANT PRECAUTIONS 3 BEFORE YOU BEGIN 4 ASSEMBLY 5 ADJUSTMENTS 9 EXERCISE GUIDELINES 10 ORDERING REPLACEMENT PARTS Back Cover FULL 90-DAY WARRANTY Back Cover WARNING DECAL PLACEMENT The warning decals shown here have been placed on the weight bench in the...
..., call toll-free 1-877-992-5999, Mon. TABLE OF CONTENTS WARNING DECAL PLACEMENT 2 IMPORTANT PRECAUTIONS 3 BEFORE YOU BEGIN 4 ASSEMBLY 5 ADJUSTMENTS 9 EXERCISE GUIDELINES 10 ORDERING REPLACEMENT PARTS Back Cover FULL 90-DAY WARRANTY Back Cover WARNING DECAL PLACEMENT The warning decals shown here have been placed on the weight bench in the...

English Manual
Page 3
... pounds. Keep the weight bench indoors, away from the weight bench at all instructions before using . Keep hands and feet away from moving parts. 10. Always exercise with the weight bench. Place the weight bench on the weight rests. Do not use the weight bench in this ...or any worn parts immediately. 7. Do not place more than 110 pounds, including a barbell and weights, on a level surface, with pre-existing health problems. Read all times....
... pounds. Keep the weight bench indoors, away from the weight bench at all instructions before using . Keep hands and feet away from moving parts. 10. Always exercise with the weight bench. Place the weight bench on the weight rests. Do not use the weight bench in this ...or any worn parts immediately. 7. Do not place more than 110 pounds, including a barbell and weights, on a level surface, with pre-existing health problems. Read all times....

English Manual
Page 4
... the specific results you want. Before reading further, please review the drawing below and familiarize yourself with the parts that are labeled. For your benefit, read this manual for selecting the versatile WEIDER® PRO 240 weight bench. The model number is to the weight bench (see the front cover of this manual carefully...
... the specific results you want. Before reading further, please review the drawing below and familiarize yourself with the parts that are labeled. For your benefit, read this manual for selecting the versatile WEIDER® PRO 240 weight bench. The model number is to the weight bench (see the front cover of this manual carefully...
English Manual
Page 5
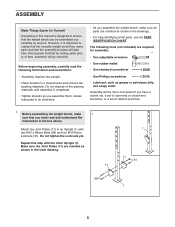
...66mm Bolts (28) and two M10 Nylon Locknuts (31). Before assembling the weight bench, make sure all parts in the drawings. • For help identifying small parts, use the PART IDENTIFICATION CHART. Make sure the Joint Plates (11) are oriented as shown in a cleared area and remove...packing materials. Do not tighten the Locknuts yet. Attach two Joint Plates (11) to realize that the versatile weight bench has many parts and that the assembly process will be assembled successfully by setting aside plenty of ratchet wrenches. 1. ASSEMBLY Make Things Easier for assembly:...
...66mm Bolts (28) and two M10 Nylon Locknuts (31). Before assembling the weight bench, make sure all parts in the drawings. • For help identifying small parts, use the PART IDENTIFICATION CHART. Make sure the Joint Plates (11) are oriented as shown in a cleared area and remove...packing materials. Do not tighten the Locknuts yet. Attach two Joint Plates (11) to realize that the versatile weight bench has many parts and that the assembly process will be assembled successfully by setting aside plenty of ratchet wrenches. 1. ASSEMBLY Make Things Easier for assembly:...

English Manual
Page 8
Make sure that all remaining parts will be able to the welded tube on the following page. 24 24 8 Lubricate an M10 x 142mm Bolt (23) with 11 four M6 x 16mm Screws (...). Make sure that the name embroidery is oriented as shown. 30 23 Lubricate Arrow Decal 3 12. Do not overtighten the Locknut; The use of all parts are properly tightened before you use the weight bench. Attach the Backrest Tubes (7) to pivot easily. Make sure the 9 Seat is in the 8 indicated location...
Make sure that all remaining parts will be able to the welded tube on the following page. 24 24 8 Lubricate an M10 x 142mm Bolt (23) with 11 four M6 x 16mm Screws (...). Make sure that the name embroidery is oriented as shown. 30 23 Lubricate Arrow Decal 3 12. Do not overtighten the Locknut; The use of all parts are properly tightened before you use the weight bench. Attach the Backrest Tubes (7) to pivot easily. Make sure the 9 Seat is in the 8 indicated location...

English Manual
Page 9
...use the Backrest in the decline position, remove the Support Rod (14) and lay the Backrest on the Leg Lever (6). Make sure all parts are properly tightened each exercise. To use the Leg Lever (6), slide the desired weights (not included) onto the weight tube. To use solvents...(14) through both Weight Rests (15) at the same height. 9 6 Weight Tube Weight 15 Locking Pin 1 Locking 15 Pin 1 Replace any worn parts immediately. Do not use the Backrest (8) in a decline position, a level position, or two incline positions. See EXERCISE GUIDELINES on page 10 for important ...
...use the Backrest in the decline position, remove the Support Rod (14) and lay the Backrest on the Leg Lever (6). Make sure all parts are properly tightened each exercise. To use the Leg Lever (6), slide the desired weights (not included) onto the weight tube. To use solvents...(14) through both Weight Rests (15) at the same height. 9 6 Weight Tube Weight 15 Locking Pin 1 Locking 15 Pin 1 Replace any worn parts immediately. Do not use the Backrest (8) in a decline position, a level position, or two incline positions. See EXERCISE GUIDELINES on page 10 for important ...

English Manual
Page 10
... you . Weight Loss To lose weight, use a low amount of resistance and increase the number of repetitions in each exercise, and moving only the appropriate parts of strength training and aerobic exercise will find photographs showing the correct form for you want to 20 repetitions as one complete cycle of an... for each exercise you progressively increase the intensity of your own pace and be followed by using high amounts of each set " is an essential part of rest.
... you . Weight Loss To lose weight, use a low amount of resistance and increase the number of repetitions in each exercise, and moving only the appropriate parts of strength training and aerobic exercise will find photographs showing the correct form for you want to 20 repetitions as one complete cycle of an... for each exercise you progressively increase the intensity of your own pace and be followed by using high amounts of each set " is an essential part of rest.

English Manual
Page 11
... Deltoid (shoulder) R. out. • Rest for 30 seconds after each set for both your everyday life. Brachioradials (forearm) F. Plan to make exercise a regular and enjoyable part of your arms and legs. Hip Flexors (upper thigh) G. Adductor (inner thigh) O. List the date, the exercises performed, the resistance used, and the numbers of...
... Deltoid (shoulder) R. out. • Rest for 30 seconds after each set for both your everyday life. Brachioradials (forearm) F. Plan to make exercise a regular and enjoyable part of your arms and legs. Hip Flexors (upper thigh) G. Adductor (inner thigh) O. List the date, the exercises performed, the resistance used, and the numbers of...
English Manual
Page 13
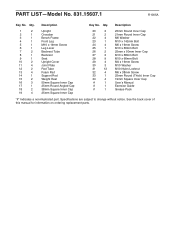
Specifications are subject to change without notice. See the back cover of this manual for information on ordering replacement parts. Qty. 1 2 2 1 3 1 4 1 5 1 6 1 7 2 8 1 9 1 10 2 11 4 12 2 13 4 14 1 15 2 16 3 17 1 18 2 19 4 Description Upright Crossbar Bench Frame Front Leg M10 x ... Tube Foam Pad Support Rod Weight Rest 50mm Square Inner Cap 25mm Round Angled Cap 38mm Square Inner Cap 25mm Square Inner Cap Key No. PART LIST-Model No. 831.15607.1 R1005A Key No. Qty. 20 2 21 2 22 4 23 1 24 4 25 1 26 2 27 2 28 9 29 4 30 3 31...
Specifications are subject to change without notice. See the back cover of this manual for information on ordering replacement parts. Qty. 1 2 2 1 3 1 4 1 5 1 6 1 7 2 8 1 9 1 10 2 11 4 12 2 13 4 14 1 15 2 16 3 17 1 18 2 19 4 Description Upright Crossbar Bench Frame Front Leg M10 x ... Tube Foam Pad Support Rod Weight Rest 50mm Square Inner Cap 25mm Round Angled Cap 38mm Square Inner Cap 25mm Square Inner Cap Key No. PART LIST-Model No. 831.15607.1 R1005A Key No. Qty. 20 2 21 2 22 4 23 1 24 4 25 1 26 2 27 2 28 9 29 4 30 3 31...

English Manual
Page 14
If you identify the small parts used in assembly. If a part is provided to help you cannot find a part in parenthesis below each part refers to see if it has been pre-assembled. The number in the parts bags, check to the key number of the part, from the PART LIST. M10 x 19mm Screw (5) M10 Nylon Locknut (... 16mm Screw (24) M6 x 38mm Screw (32) M10 x 60mm Bolt (25) M10 x 66mm Bolt (28) M10 x 68mm Bolt (27) M10 x 142mm Bolt (23) Important: Some parts may have been pre-assembled for shipping purposes. PART IDENTIFICATION CHART This chart is missing, call toll-free 1-877-992-5999.
If you identify the small parts used in assembly. If a part is provided to help you cannot find a part in parenthesis below each part refers to see if it has been pre-assembled. The number in the parts bags, check to the key number of the part, from the PART LIST. M10 x 19mm Screw (5) M10 Nylon Locknut (... 16mm Screw (24) M6 x 38mm Screw (32) M10 x 60mm Bolt (25) M10 x 66mm Bolt (28) M10 x 68mm Bolt (27) M10 x 142mm Bolt (23) Important: Some parts may have been pre-assembled for shipping purposes. PART IDENTIFICATION CHART This chart is missing, call toll-free 1-877-992-5999.

English Manual
Page 16
... state to defect in material or workmanship in China © 2005 Sears, Roebuck and Co. Sears, Roebuck and Co., Dept. 817WA, Hoffman Estates, IL 60179 Part No. 235117 R1005A Printed in this WEIGHT BENCH EXERCISER, contact the nearest Sears Service Center throughout the United States and Sears will repair or replace...
... state to defect in material or workmanship in China © 2005 Sears, Roebuck and Co. Sears, Roebuck and Co., Dept. 817WA, Hoffman Estates, IL 60179 Part No. 235117 R1005A Printed in this WEIGHT BENCH EXERCISER, contact the nearest Sears Service Center throughout the United States and Sears will repair or replace...


