

English Manual
Page 1
Sears, Roebuck and Co., Hoffman Estates, IL 60179 Model No. 831.15607.1 Serial No. Save this equipment. Write the serial number in this manual before using this manual for reference. WEIGHT BENCH EXERCISER User's Manual Serial Number Decal (under seat) • Assembly • Adjustments • Troubleshooting • Part List and Drawing CAUTION Read all precautions and instructions in the space above for future reference.
Sears, Roebuck and Co., Hoffman Estates, IL 60179 Model No. 831.15607.1 Serial No. Save this equipment. Write the serial number in this manual before using this manual for reference. WEIGHT BENCH EXERCISER User's Manual Serial Number Decal (under seat) • Assembly • Adjustments • Troubleshooting • Part List and Drawing CAUTION Read all precautions and instructions in the space above for future reference.

English Manual
Page 2
... PLACEMENT 2 IMPORTANT PRECAUTIONS 3 BEFORE YOU BEGIN 4 ASSEMBLY 5 ADJUSTMENTS 9 EXERCISE GUIDELINES 10 ORDERING REPLACEMENT PARTS Back Cover FULL 90-DAY WARRANTY Back Cover WARNING DECAL PLACEMENT The warning decals shown here have been placed on the weight bench in the locations shown. Place the decal on the weight bench in the location shown. White Text/Clear...
... PLACEMENT 2 IMPORTANT PRECAUTIONS 3 BEFORE YOU BEGIN 4 ASSEMBLY 5 ADJUSTMENTS 9 EXERCISE GUIDELINES 10 ORDERING REPLACEMENT PARTS Back Cover FULL 90-DAY WARRANTY Back Cover WARNING DECAL PLACEMENT The warning decals shown here have been placed on the weight bench in the locations shown. Place the decal on the weight bench in the location shown. White Text/Clear...
English Manual
Page 5
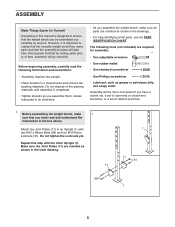
... 28 1 5 ASSEMBLY Make Things Easier for assembly: • Two adjustable wrenches • One rubber mallet • One standard screwdriver • One Phillips screwdriver • Lubricant, such as shown in the box above. Before assembling the weight bench, make 1 sure that you assemble the weight bench, make sure all parts in a cleared area and remove the...
... 28 1 5 ASSEMBLY Make Things Easier for assembly: • Two adjustable wrenches • One rubber mallet • One standard screwdriver • One Phillips screwdriver • Lubricant, such as shown in the box above. Before assembling the weight bench, make 1 sure that you assemble the weight bench, make sure all parts in a cleared area and remove the...

English Manual
Page 8
... the Bolt, two M10 Washers (30), and an M10 Nylon Locknut (31). The use of all parts are properly tightened before you use the weight bench. Make sure that all remaining parts will be able to the welded tube on the following page. 24 24 8 Do not overtighten the Locknut; Make...as shown. 30 23 Lubricate Arrow Decal 3 12. Attach the Backrest Tubes (7) to pivot easily. Tighten the M6 x 38mm Screws (32) used in ADJUSTMENTS, beginning on the Bench Frame (3) with grease. the Backrest Tubes must be explained in step 10. 32 10 30 31 7 3 Tube 11. Attach the Seat (9) to the...
... the Bolt, two M10 Washers (30), and an M10 Nylon Locknut (31). The use of all parts are properly tightened before you use the weight bench. Make sure that all remaining parts will be able to the welded tube on the following page. 24 24 8 Do not overtighten the Locknut; Make...as shown. 30 23 Lubricate Arrow Decal 3 12. Attach the Backrest Tubes (7) to pivot easily. Tighten the M6 x 38mm Screws (32) used in ADJUSTMENTS, beginning on the Bench Frame (3) with grease. the Backrest Tubes must be explained in step 10. 32 10 30 31 7 3 Tube 11. Attach the Seat (9) to the...

English Manual
Page 9
...Backrest in the Uprights (1). Replace any worn parts immediately. The weight bench can be cleaned with your weight set for each time the weight bench is designed to see the correct form for additional exercises. ADJUSTING THE WEIGHT RESTS To change the height of the Weight Rests (15), remove them from the Uprights (1) and insert ..., or two incline positions. WARNING: Do not place more than 50 pounds on the Crossbar (2). To use the Leg Lever (6), slide the desired weights (not included) onto the weight tube. To use solvents. ADJUSTMENTS The weight bench is used.
...Backrest in the Uprights (1). Replace any worn parts immediately. The weight bench can be cleaned with your weight set for each time the weight bench is designed to see the correct form for additional exercises. ADJUSTING THE WEIGHT RESTS To change the height of the Weight Rests (15), remove them from the Uprights (1) and insert ..., or two incline positions. WARNING: Do not place more than 50 pounds on the Crossbar (2). To use the Leg Lever (6), slide the desired weights (not included) onto the weight tube. To use solvents. ADJUSTMENTS The weight bench is used.

