
English Manual
Page 2
...is in lieu of any and all defects in the center of this limited warranty. Limited Warranty WHAT IS COVEREDÑThe entire CLUB WEIDER 16.8ST Training System (ÒProductÓ) is warranted to get a part replaced, or if necessary, arrange for service where your Product...Table of Contents Limited Warranty 2 Important Precautions 3 Before You Begin 4 Assembly 5 Cable Diagram 21 Adjustment 22 Trouble-shooting and Maintenance 24 Weight Resistance Chart 25 Ordering Replacement Parts Back Cover Note: A PART LIST/EXPLODED DRAWING and a PART IDENTIFICATION CHART are performed by an ICON...
...is in lieu of any and all defects in the center of this limited warranty. Limited Warranty WHAT IS COVEREDÑThe entire CLUB WEIDER 16.8ST Training System (ÒProductÓ) is warranted to get a part replaced, or if necessary, arrange for service where your Product...Table of Contents Limited Warranty 2 Important Precautions 3 Before You Begin 4 Assembly 5 Cable Diagram 21 Adjustment 22 Trouble-shooting and Maintenance 24 Weight Resistance Chart 25 Ordering Replacement Parts Back Cover Note: A PART LIST/EXPLODED DRAWING and a PART IDENTIFICATION CHART are performed by an ICON...

English Manual
Page 3
... only on the foot plate when perform- 14. Never release the press arm, leg lever, lat bar, leg press, ab strap, or ankle strap while weights are on the pulleys at a time. 8. Warning Decal No. 1 Warning Decal No. 3 ¥ Keep clear of the pulleys. 11. Inspect and tighten all... of this product. The weights will fall with pre-existing health problems. Read all times. ICON assumes no responsibility for persons over the age of the owner to tip. Make...
... only on the foot plate when perform- 14. Never release the press arm, leg lever, lat bar, leg press, ab strap, or ankle strap while weights are on the pulleys at a time. 8. Warning Decal No. 1 Warning Decal No. 3 ¥ Keep clear of the pulleys. 11. Inspect and tighten all... of this product. The weights will fall with pre-existing health problems. Read all times. ICON assumes no responsibility for persons over the age of the owner to tip. Make...

English Manual
Page 4
...tone your body, build dramatic muscle size and strength, or improve your cardiovascular system, the CLUB WEIDER 16.8ST will help us assist you want. Shroud Backrest Adjustment Tube Backrest Weight Stack Seat Warning Decal No. 2 Leg Press Lat Bar High Pulley Station Warning Decal ...with the major parts of the training system. Mountain Time (excluding holidays). Whether your benefit, read this manual). The CLUB WEIDER 16.8ST offers a selection of weight stations designed to the training system (see the front cover of the body. ASSEMBLED DIMENSIONS: Height: 81 in . Length...
...tone your body, build dramatic muscle size and strength, or improve your cardiovascular system, the CLUB WEIDER 16.8ST will help us assist you want. Shroud Backrest Adjustment Tube Backrest Weight Stack Seat Warning Decal No. 2 Leg Press Lat Bar High Pulley Station Warning Decal ...with the major parts of the training system. Mountain Time (excluding holidays). Whether your benefit, read this manual). The CLUB WEIDER 16.8ST offers a selection of weight stations designed to the training system (see the front cover of the body. ASSEMBLED DIMENSIONS: Height: 81 in . Length...

English Manual
Page 5
this brief introduction will save you much more convenient if you have a socket set, a set of open the parts bag for each stage to the weights. Make sure you have the following tools: ¥ Two adjustable wrenches ¥ One standard screwdriver ¥ One phillips screwdriver ¥ One rubber ... Assembly will begin each stage are oriented exactly as shown in assembly, we have included a PART IDENTIFICATION CHART in the center of its weight and size, the training system should be used in the drawings. Set Aside Enough Time Due to Orient Parts As you assemble the training...
this brief introduction will save you much more convenient if you have a socket set, a set of open the parts bag for each stage to the weights. Make sure you have the following tools: ¥ Two adjustable wrenches ¥ One standard screwdriver ¥ One phillips screwdriver ¥ One rubber ... Assembly will begin each stage are oriented exactly as shown in assembly, we have included a PART IDENTIFICATION CHART in the center of its weight and size, the training system should be used in the drawings. Set Aside Enough Time Due to Orient Parts As you assemble the training...
English Manual
Page 7
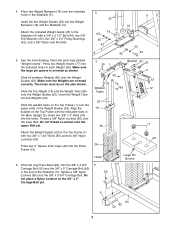
... (50) onto the lower Bolt. Slide all nineteen Weights (26) onto the Weight Guides (23). Make sure the Weights are oriented correctly. Slide the Top Weight (16) and the Weight Tube (36) onto the Weight Guides (23). Insert two 3/8Ó x 3Ó Bolts (45) into the Weights (26). Press two 2Ó Square Inner Caps (...inset drawing. Do not thread a Locknut onto the upper Bolt yet. 5 50 1 50 Bracket 45 33 3 Welded 60 12 Tubes 23 16 36 77 Attach the Weight Guides (23) to the Stabilizer (5) with two 3/8Ó x 1 3/4Ó Bolts (60) and two 3/8Ó Nylon Locknuts (50). 4. Place...
... (50) onto the lower Bolt. Slide all nineteen Weights (26) onto the Weight Guides (23). Make sure the Weights are oriented correctly. Slide the Top Weight (16) and the Weight Tube (36) onto the Weight Guides (23). Insert two 3/8Ó x 3Ó Bolts (45) into the Weights (26). Press two 2Ó Square Inner Caps (...inset drawing. Do not thread a Locknut onto the upper Bolt yet. 5 50 1 50 Bracket 45 33 3 Welded 60 12 Tubes 23 16 36 77 Attach the Weight Guides (23) to the Stabilizer (5) with two 3/8Ó x 1 3/4Ó Bolts (60) and two 3/8Ó Nylon Locknuts (50). 4. Place...
English Manual
Page 15
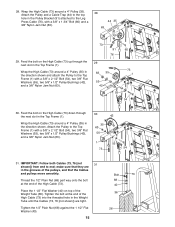
...; x 1 3/4Ó Bolt (60) and a 3/8Ó Nylon Jam Nut (63). 28 44 35 63 29. Wrap the High Cable (73) around a 4Ó Pulley (35) in the Weight Tube until the Cables (73, 76 [not shown]) are in the Top Frame (1). Place the 1 1/2Ó Flat Washer (40) on the High Cable (73) up.... make sure that the Cables and pulleys move smoothly. Thread the 1/2Ó Plain Nut (68) part way onto the bolt at the end of the Weight Tube (36). 28.
...; x 1 3/4Ó Bolt (60) and a 3/8Ó Nylon Jam Nut (63). 28 44 35 63 29. Wrap the High Cable (73) around a 4Ó Pulley (35) in the Weight Tube until the Cables (73, 76 [not shown]) are in the Top Frame (1). Place the 1 1/2Ó Flat Washer (40) on the High Cable (73) up.... make sure that the Cables and pulleys move smoothly. Thread the 1/2Ó Plain Nut (68) part way onto the bolt at the end of the Weight Tube (36). 28.
English Manual
Page 17
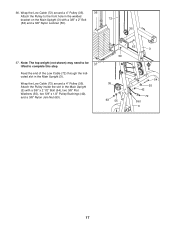
... a 3/8Ó x 2Ó Bolt 72 (62) and a 3/8Ó Nylon Locknut (50). 35 37. Wrap the Low Cable (72) around a 4Ó Pulley (35). 36. Note: The top weight (not shown) may need to be 37 lifted to the front hole in the Main Upright (3).
... a 3/8Ó x 2Ó Bolt 72 (62) and a 3/8Ó Nylon Locknut (50). 35 37. Wrap the Low Cable (72) around a 4Ó Pulley (35). 36. Note: The top weight (not shown) may need to be 37 lifted to the front hole in the Main Upright (3).

English Manual
Page 19
Slide one of the Pad Tube. 8 30 44. Insert the Weight Pin (39) under one Pad Tube (28) into the hole in the Leg 34 Lever (29). Attach the Leg Press Backrest (70) to the Sliding .... Slide the four Tinnerman Clips (38) down over the slots in the bracket on the Base (8). Slide a Foam Pad (30) onto each end of the Weights (26). 34 30 44 26 34 30 28 34 29 38 5 38 19 39 Bracket 41.
Slide one of the Pad Tube. 8 30 44. Insert the Weight Pin (39) under one Pad Tube (28) into the hole in the Leg 34 Lever (29). Attach the Leg Press Backrest (70) to the Sliding .... Slide the four Tinnerman Clips (38) down over the slots in the bracket on the Base (8). Slide a Foam Pad (30) onto each end of the Weights (26). 34 30 44 26 34 30 28 34 29 38 5 38 19 39 Bracket 41.

English Manual
Page 20
... the cables move smoothly, find and correct the problem. 21 83 IMPORTANT: If the cables are not properly installed, they may be damaged when heavy weight is any slack in the cables, you will be inserted through the square holes in step 45. 38 38 5 Bracket 47. If there is used...
... the cables move smoothly, find and correct the problem. 21 83 IMPORTANT: If the cables are not properly installed, they may be damaged when heavy weight is any slack in the cables, you will be inserted through the square holes in step 45. 38 38 5 Bracket 47. If there is used...
English Manual
Page 22
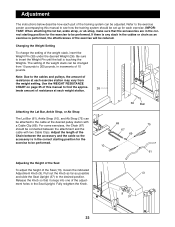
...in the cables or chain as possible and slide the Seat Upright (37) to be changed from the weight setting. IMPORTANT: When attaching the lat bar, ankle strap, or ab strap, make sure that it snaps... into one of 10 pounds. The setting of the weight stack can be performed. For some exercises, the Chain (67) should be adjusted. Pull out the Knob ... of the Seat To adjust the height of the exercise will be reduced. Changing the Weight Setting To change the setting of the training system can be connected between the accessory and the ...
...in the cables or chain as possible and slide the Seat Upright (37) to be changed from the weight setting. IMPORTANT: When attaching the lat bar, ankle strap, or ab strap, make sure that it snaps... into one of 10 pounds. The setting of the weight stack can be performed. For some exercises, the Chain (67) should be adjusted. Pull out the Knob ... of the Seat To adjust the height of the exercise will be reduced. Changing the Weight Setting To change the setting of the training system can be connected between the accessory and the ...

English Manual
Page 24
Tighten the bolt two turns into the Weight Tube (36) until the cables feel tighter. Move the Pulley to the lower hole in the groove of the Pulley and that the Low Cable (.... Move the Pulley to prevent the bolt from the top. Replace any worn parts immediately. Bolt To tighten the cables, insert the Weight Pin (39) under 36 the third Weight (26) from turning. Note: For clarity, the drawing shows the shroud removed; If there is 73 slack in the groove of the...
Tighten the bolt two turns into the Weight Tube (36) until the cables feel tighter. Move the Pulley to the lower hole in the groove of the Pulley and that the Low Cable (.... Move the Pulley to prevent the bolt from the top. Replace any worn parts immediately. Bolt To tighten the cables, insert the Weight Pin (39) under 36 the third Weight (26) from turning. Note: For clarity, the drawing shows the shroud removed; If there is 73 slack in the groove of the...

English Manual
Page 25
The other numbers refer to the 10 lb. Weight Plates Top 1 2 3 4 5 6 7 8 9 10 11 12 13 14 15 16 17 18 19 Arm Press (lbs.) 24 35 46 57 68 79 90 102 113 124 135 146 157 168 179 190 201 213 224 ... 397 420 443 466 25 Note: The actual resistance at each station may vary due to differences in individual weight plates as well as friction between the cables, pulleys, and weight guides. Weight Resistance Chart This chart shows the approximate weight resistance at each weight station. ÒTopÓ refers to the 10 lb. top...
The other numbers refer to the 10 lb. Weight Plates Top 1 2 3 4 5 6 7 8 9 10 11 12 13 14 15 16 17 18 19 Arm Press (lbs.) 24 35 46 57 68 79 90 102 113 124 135 146 157 168 179 190 201 213 224 ... 397 420 443 466 25 Note: The actual resistance at each station may vary due to differences in individual weight plates as well as friction between the cables, pulleys, and weight guides. Weight Resistance Chart This chart shows the approximate weight resistance at each weight station. ÒTopÓ refers to the 10 lb. top...
English Manual
Page 26
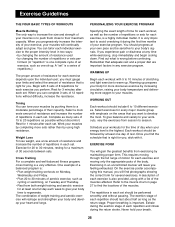
...for the time of the muscles affected. Complete as possible without discomfort. The combination of 15 to 20 repetitions as many sets of weight training and aerobic exercise will gain the greatest benefits from session to your heart and lungs. Warming up prepares your exercise program. ...complete 3 sets of their maximum capacity. Exercise for 20 to 10 different exercises. One example of a balanced program is: ¥ Plan weight training workouts on the areas that is the highest. It is a very effective. You should be followed by pushing them close to avoid overdoing...
...for the time of the muscles affected. Complete as possible without discomfort. The combination of 15 to 20 repetitions as many sets of weight training and aerobic exercise will gain the greatest benefits from session to your heart and lungs. Warming up prepares your exercise program. ...complete 3 sets of their maximum capacity. Exercise for 20 to 10 different exercises. One example of a balanced program is: ¥ Plan weight training workouts on the areas that is the highest. It is a very effective. You should be followed by pushing them close to avoid overdoing...
English Manual
Page 27
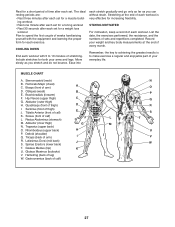
... DOWN End each workout with the equipment and learning the proper form for each exercise. Include stretches for both your weight and key body measurements at the end of each set for a weight loss workout Plan to spend the first couple of weeks familiarizing yourself with 5 to 10 minutes of stretching. Soleus...
... DOWN End each workout with the equipment and learning the proper form for each exercise. Include stretches for both your weight and key body measurements at the end of each set for a weight loss workout Plan to spend the first couple of weeks familiarizing yourself with 5 to 10 minutes of stretching. Soleus...
English Manual
Page 31
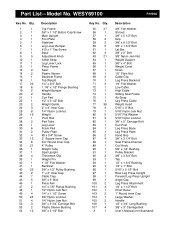
...; Bolt Grip 3/8Ó x 8 1/2Ó Bolt 3/8Ó x 1 3/4Ó Bolt Lat Bar 3/8Ó x 2Ó Bolt 3/8Ó Nylon Jam Nut Weight Support 3/8Ó x 4Ó Bolt Weight Cover Chain 1/2Ó Plain Nut Cable Clip Leg Press Backrest 1/4Ó Flat Washer Low Cable High Cable Sliding Seat Frame Ab Strap Leg... Press Cable Weight Insert 5/16Ó x 3Ó Bolt 5/16Ó Nylon Jam Nut 5/16Ó Flat Washer 5/16Ó Nylon Locknut 3/8Ó x 5Ó Carriage Bolt Curl Post Leg Press Base Leg Press Plate...
...; Bolt Grip 3/8Ó x 8 1/2Ó Bolt 3/8Ó x 1 3/4Ó Bolt Lat Bar 3/8Ó x 2Ó Bolt 3/8Ó Nylon Jam Nut Weight Support 3/8Ó x 4Ó Bolt Weight Cover Chain 1/2Ó Plain Nut Cable Clip Leg Press Backrest 1/4Ó Flat Washer Low Cable High Cable Sliding Seat Frame Ab Strap Leg... Press Cable Weight Insert 5/16Ó x 3Ó Bolt 5/16Ó Nylon Jam Nut 5/16Ó Flat Washer 5/16Ó Nylon Locknut 3/8Ó x 5Ó Carriage Bolt Curl Post Leg Press Base Leg Press Plate...


